はじめに
初めてnode-redを使用したので,忘れないように記録する.
目次
1. ラズパイにnode-redとmqttをインストール
2. ボードとライブラリのインストール
3. データの送信
4. node-red上で値を取得
5. node-red上で文字列で来たセンサの値を数値に変換
1. ラズパイにnode-redとmqttをインストール
node-redのインストール
Node-red日本ユーザー会サイトを参考にしてインストール.
mqttのインストール
下記のコマンドでインストールして実行する.
sudo apt install mosquitto
サーバの起動コマンド
sudo systemctl start mosquitto
2. ボードとライブラリのインストール
・ボードのインストール
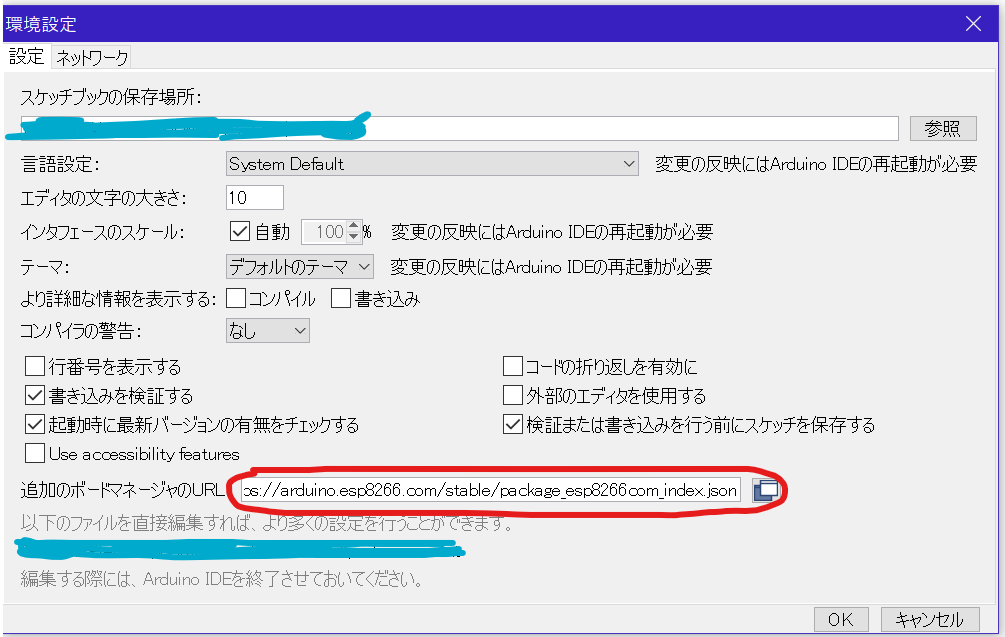
まず,Arduinoの ファイル → 環境設定 で以下の画面に移動する.
赤枠にesp8266のgithubからjsonファイルを探してコピペ.(以下)
https://arduino.esp8266.com/stable/package_esp8266com_index.json
上記はコマンドが参照時より変わっている可能性もあるのでgithubを要参照.
ここまで来たら ツール → ボード → ボードマネジャー で 「esp8266」 と調べて
**「esp8266」**をインストール.
ツール → ボード で**「Generic ESP8266 Module」**を選択.
これでesp8266を使用できる.
・ライブラリのインストール
今回はUltrasonic(距離センサ)を使用する.まずはこのセンサを使用するためのライブラリをインストールする.Ultrasonicのgithubよりjsonファイル(Zip)をダウンロードし,
上記からライブラリをインストールする.
データを送るためにmqttを用いるので,使用するためのライブラリ**「PubSubClient」**をインストールする.
これは,スケッチ → ライブラリをインクルード → ライブラリを管理... → ライブラリマネジャ から検索でインクルードできる.
3. データの送信
ここからはセンサのデータを送信するためのプログラムについて記載する.簡単に作るためにライブラリのスケッチ例を使用する.下記から使用.
ただの文字列(Hello!とか)の送信であればこのまま使用できるが,今回はセンサで取得した値を
送信したいので,ライブラリ宣言部分のUltrasonic,センサを使用するポートの宣言を追加し(今回は4番を使用),void loop内を変更した.
また.TOPICも各々の目的に合わせて変更する.TOPICはnode-red上で値を取得するときに指定するので,今回は距離を測定することよりDistanceにした.
/*
 Basic ESP8266 MQTT example
 This sketch demonstrates the capabilities of the pubsub library in combination
 with the ESP8266 board/library.
 It connects to an MQTT server then:
  - publishes "hello world" to the topic "outTopic" every two seconds
  - subscribes to the topic "inTopic", printing out any messages
    it receives. NB - it assumes the received payloads are strings not binary
  - If the first character of the topic "inTopic" is an 1, switch ON the ESP Led,
    else switch it off
 It will reconnect to the server if the connection is lost using a blocking
 reconnect function. See the 'mqtt_reconnect_nonblocking' example for how to
 achieve the same result without blocking the main loop.
 To install the ESP8266 board, (using Arduino 1.6.4+):
  - Add the following 3rd party board manager under "File -> Preferences -> Additional Boards Manager URLs":
       http://arduino.esp8266.com/stable/package_esp8266com_index.json
  - Open the "Tools -> Board -> Board Manager" and click install for the ESP8266"
  - Select your ESP8266 in "Tools -> Board"
*/

# include <ESP8266WiFi.h>
# include <PubSubClient.h>
# include <Ultrasonic.h>      //追加

// Update these with values suitable for your network.

const char* ssid = "ssid_hogehoge";
const char* password = "pass_hogehoge";
const char* mqtt_server = "IP_hogehoge";     //要変更

Ultrasonic ultrasonic(4); //追加 使用するポートの宣言 4 for D5

WiFiClient espClient;
PubSubClient client(espClient);
unsigned long lastMsg = 0;
# define MSG_BUFFER_SIZE	(50)
char msg[MSG_BUFFER_SIZE];
int value = 0;

void setup_wifi() {

  delay(10);
  // We start by connecting to a WiFi network
  Serial.println();
  Serial.print("Connecting to ");
  Serial.println(ssid);

  WiFi.mode(WIFI_STA);
  WiFi.begin(ssid, password);

  while (WiFi.status() != WL_CONNECTED) {
    delay(500);
    Serial.print(".");
  }

  randomSeed(micros());

  Serial.println("");
  Serial.println("WiFi connected");
  Serial.println("IP address: ");
  Serial.println(WiFi.localIP());
}

void callback(char* topic, byte* payload, unsigned int length) {
  Serial.print("Message arrived [");
  Serial.print(topic);
  Serial.print("] ");
  for (int i = 0; i < length; i++) {
    Serial.print((char)payload[i]);
  }
  Serial.println();

  // Switch on the LED if an 1 was received as first character
  if ((char)payload[0] == '1') {
    digitalWrite(BUILTIN_LED, LOW);   // Turn the LED on (Note that LOW is the voltage level
    // but actually the LED is on; this is because
    // it is active low on the ESP-01)
  } else {
    digitalWrite(BUILTIN_LED, HIGH);  // Turn the LED off by making the voltage HIGH
  }

}

void reconnect() {
  // Loop until we're reconnected
  while (!client.connected()) {
    Serial.print("Attempting MQTT connection...");
    // Create a random client ID
    String clientId = "ESP8266Client-";
    clientId += String(random(0xffff), HEX);
    // Attempt to connect
    if (client.connect(clientId.c_str())) {
      Serial.println("connected");
      // Once connected, publish an announcement...
      client.publish("Distance", "接続したよ!");
      // ... and resubscribe
      client.subscribe("Distance");
    } else {
      Serial.print("failed, rc=");
      Serial.print(client.state());
      Serial.println(" try again in 5 seconds");
      // Wait 5 seconds before retrying
      delay(5000);
    }
  }
}

void setup() {
  pinMode(BUILTIN_LED, OUTPUT);     // Initialize the BUILTIN_LED pin as an output
  Serial.begin(115200);
  setup_wifi();
  client.setServer(mqtt_server, 1883);
  client.setCallback(callback);
}

void loop() {

  if (!client.connected()) {
    reconnect();
  }
  client.loop();

  //以下コメント行はもとのプログラムにかかれていたやつ
  /*unsigned long now = millis();
  if (now - lastMsg > 2000) {
    lastMsg = now;
    ++value;
    snprintf (msg, MSG_BUFFER_SIZE, "hello world #%ld", value);
    Serial.print("Publish message: ");
    Serial.println(msg);
    client.publish("Distance", msg);
  */

   //追加 距離を測ってシリアルモニタに表示
  long RangeInCentimeters;
  RangeInCentimeters = ultrasonic.MeasureInCentimeters();
  Serial.print(RangeInCentimeters); //0~400cm
  Serial.println(" cm");
  dtostrf(RangeInCentimeters, 4, 2, msg);
  client.publish("Distance", msg);
  delay(5000);
}
loop内のセンサの値の取得のあたりはUltrasonicのスケッチ例を参考にした.
ここまでできたらプログラムをesp8266に送り,実行.
すると距離が測れている.
4. node-red上で値を取得
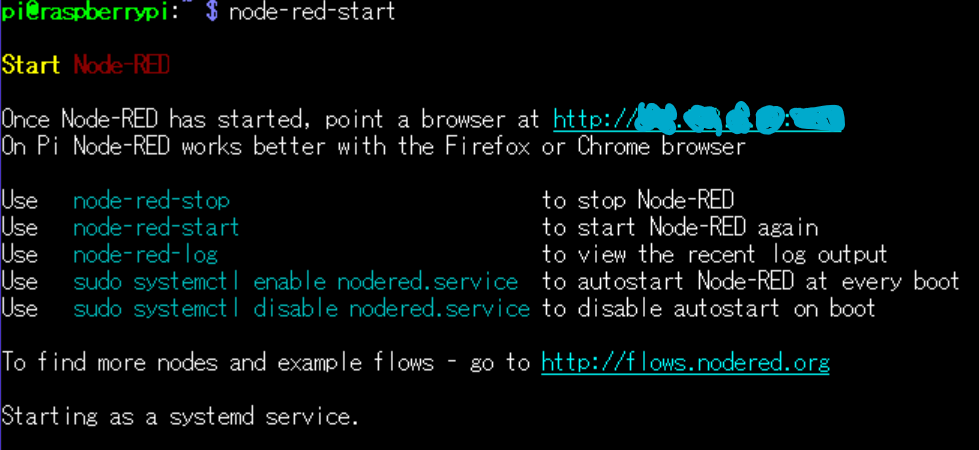
node-red上で値を取得する.まず,ラズパイで node-red を起動する.
node-red-start
水色で隠されているところにnode-redを実行しているアドレスが表示されるので,そこに移動する.

この画面ではすでにフローが構成されているが,このような画面が表示される.
早速値を取得する.下記のようにmqtt inノードを設置し,デバッグノードを接続.
mqtt inノードの設定で下記のように設定
ここまで来たらデプロイしてデバッグを有効にする.
これでDistanceの文字列を取得できる.(おそらく文字列でないと送れない(?)プログラム上でも文字列にしてある.)
デバッグの様子がこちら.センサからの距離を変化させて遊んでいる.

5. node-red上で文字列で来たセンサの値を数値に変換
しかし,このまま文字列で使用するとセンサの値を生かしきれないので,数値の型に変換する.
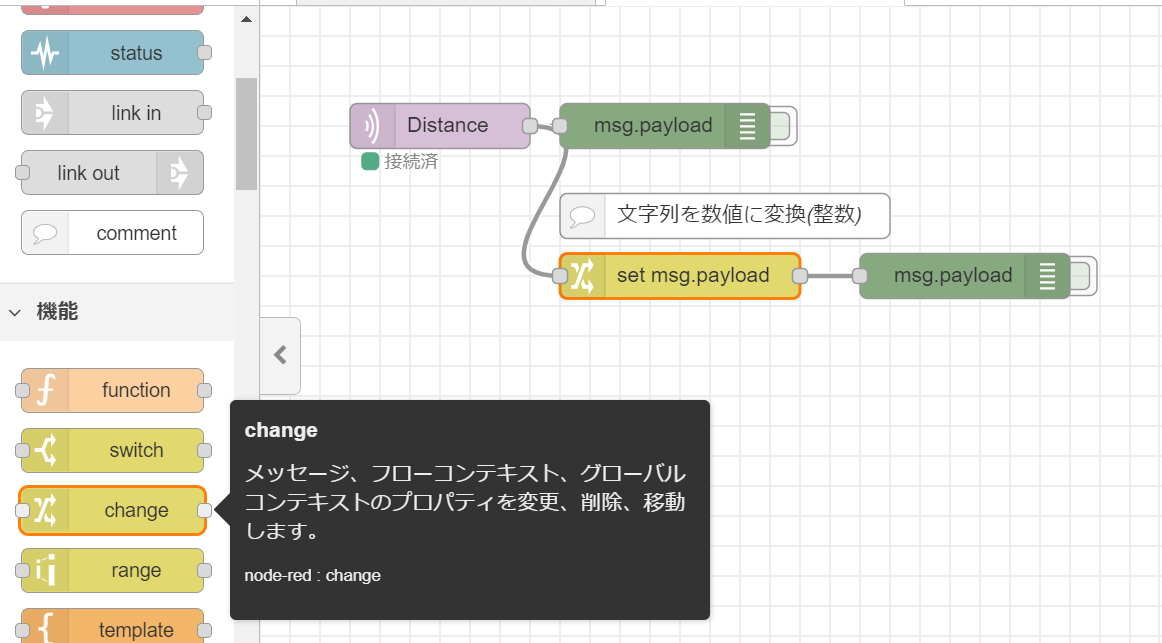
使用するのはchangeノード.下記のように接続.

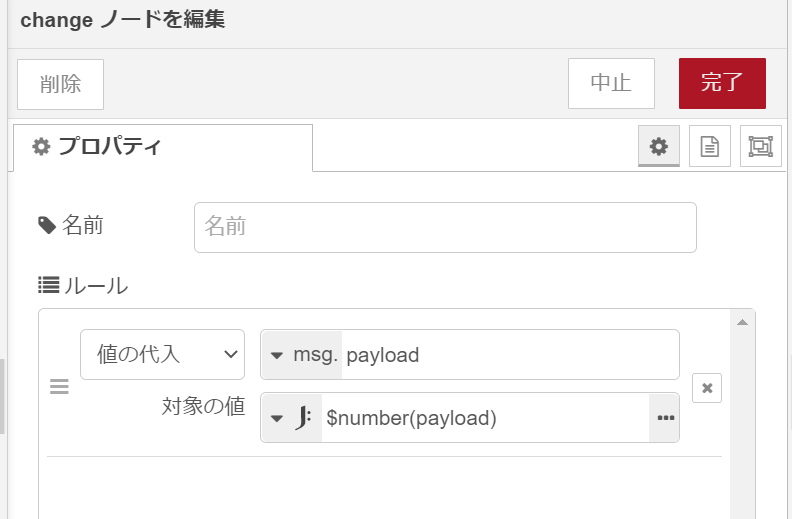
そして,changeノードの中身を下記のように設定する.

これでセンサの値を数値型に変換できる.早速デプロイしてデバッグする.

下の青文字が数値型である.これで閾値などを使いたいときに応用できる![]()
おわりに
今回はここまでです.長くなりました.
続けて距離が近いか遠いかを測ってものがあるかないかを判断する機能を作成する.また,それがweb上で見れるようにしようと思う.
ある程度進んだらまた記録します.閲覧ありがとうございました.


