これまでPythonの仮想環境をAnaconda3で管理していたのですが、 なにやらパッケージ管理ツールの「uv」が非常に軽快で、管理手順もわかりやすいとの話を聞きましたので導入してみました。 なお昨今のプロジェクトの多くはgitで管理されていることから、リポジトリにプロジェクトをpushしたものを別のメンバーがgit cloneした後にどれだけ簡単にパッケージを復元できるかも試してみました(結論:uv syncのみで完全に復元できました)。
Anacondaによるパッケージ管理を無効にする
まず、これまで利用してきたAnacondaによるパッケージ管理を無効にします。uvと同居することも可能ですが、ここでは説明を簡単にするため除外しました。まず、(base)となっている状態からdeactivateを実行し、ターミナルを開きなおしてもAnacondaが自動起動しないよう--set auto_activate_base falseを指定します。設定後、念のため再起動し(base)がプロンプトに出てこないことを確認します。
# パッケージ管理ツールcondaの環境から抜ける
(base) $ conda deactivate
# パッケージ管理ツールcondaが自動起動しないように設定
$ conda config --set auto_activate_base false
# 再起動
$ sudo reboot
uvをインストールする
それでは早速 uv をインストールしてみましょう。とはいうものの、インストール自体はひとつのコマンドのみで完了です。インストール後.bashrcを再度読み込み、uvへのパスを通します。
# uvをインストールする
# -->> https://docs.astral.sh/uv/getting-started/installation/
$ curl -LsSf https://astral.sh/uv/install.sh | sh

# .bashrcを読み込み直しパスを通す
$ source ~/.bashrc

####
## アンインストールする場合は
## $ rm -rf ~/.local
## ~/.bashrcの下記の行を削除
## . "$HOME/.local/bin/env"
プロジェクトをgitで管理する
本記事は、gitによりバージョン管理されたプロジェクトの中でuvを使うことを想定したものとなっています。gitの使い方の整理を兼ねて、GitHubでリポジトリを管理する手順をまとめておきます。
ローカルのワークスペースをgitにより管理する
まず作業ディレクトリを作成し、git initでバージョン管理を開始します。
# プロジェクトのディレクトリを作成する
$ cd ~
$ mkdir opencv-web-sandbox
$ cd opencv-web-sandbox
$ pwd
/home/shino/opencv-web-sandbox

# gitによるバージョン管理を有効にする
$ git init
$ ls -a
.  ..  .git
バージョン管理を開始した後、GitHubのデフォルトのブランチであるmainブランチにgit branchで切り替えます。そしてREADME.mdを作成し、コミットします。初回のコミット時はユーザー名とメールアドレスの登録を促されますので、これらを設定した後に再度コミットします。
# ブランチを切り替える
$ git branch -m main

# READMEを追加してコミット
$ touch README.md
$ git add -A
$ git commit -m "Add README.md"
# *** Please tell me who you are.
# Run
#   git config --global user.email "you@example.com"
#   git config --global user.name "Your Name"
# -->> 投稿者のメールアドレスと名前を登録しましょう

$ git config --global user.email "shino@xtrize.com"
$ git config --global user.name "Shinobu HUYUGIRI"

# 再度コミット
$ git commit -m "Add README.md"
# [master (root-commit) a2ef8de] Add README.md
#  1 file changed, 0 insertions(+), 0 deletions(-)
#  create mode 100644 README.md
GitHub上にリモートリポジトリを作成する
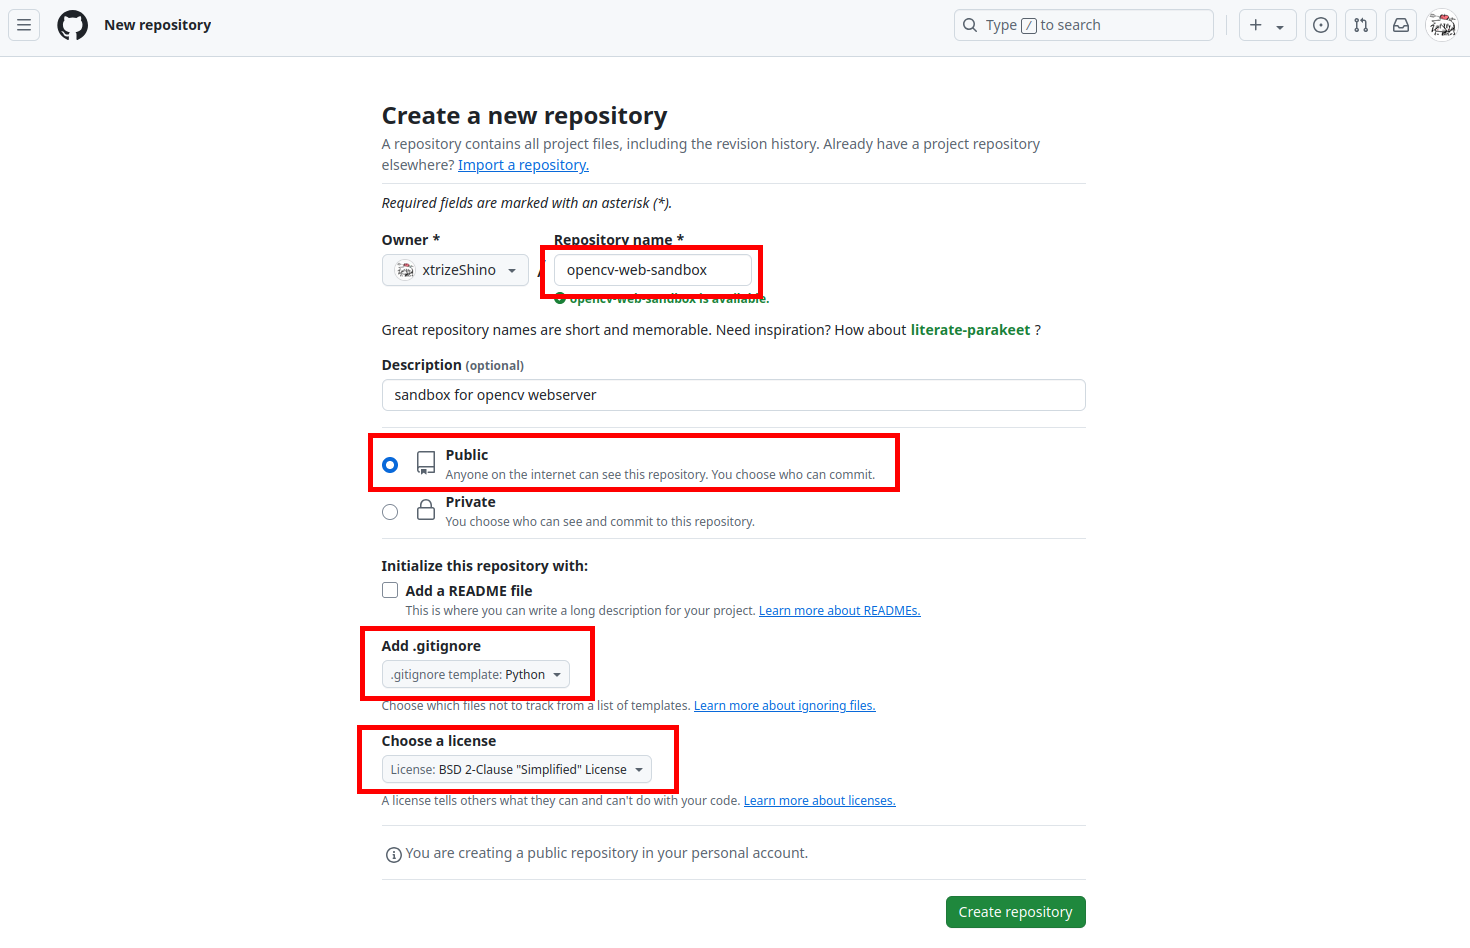
GitHubにアカウントを作成し、はじめてのリモートリポジトリを作成します。Repositoriesを開きNewを選択し、リポジトリの作成画面へ移行します。
リポジトリの名前と説明文を入力し、公開リポジトリであれば「Public」を選択します。開発する言語に合わせて「.gitignore」ファイルを設定(今回はPythonを選択)し、ソースコードのライセンスを指定してください。ここでは「2条項 BSD License」を指定しました。
GitHub上のファイルとローカルのコミットをマージする
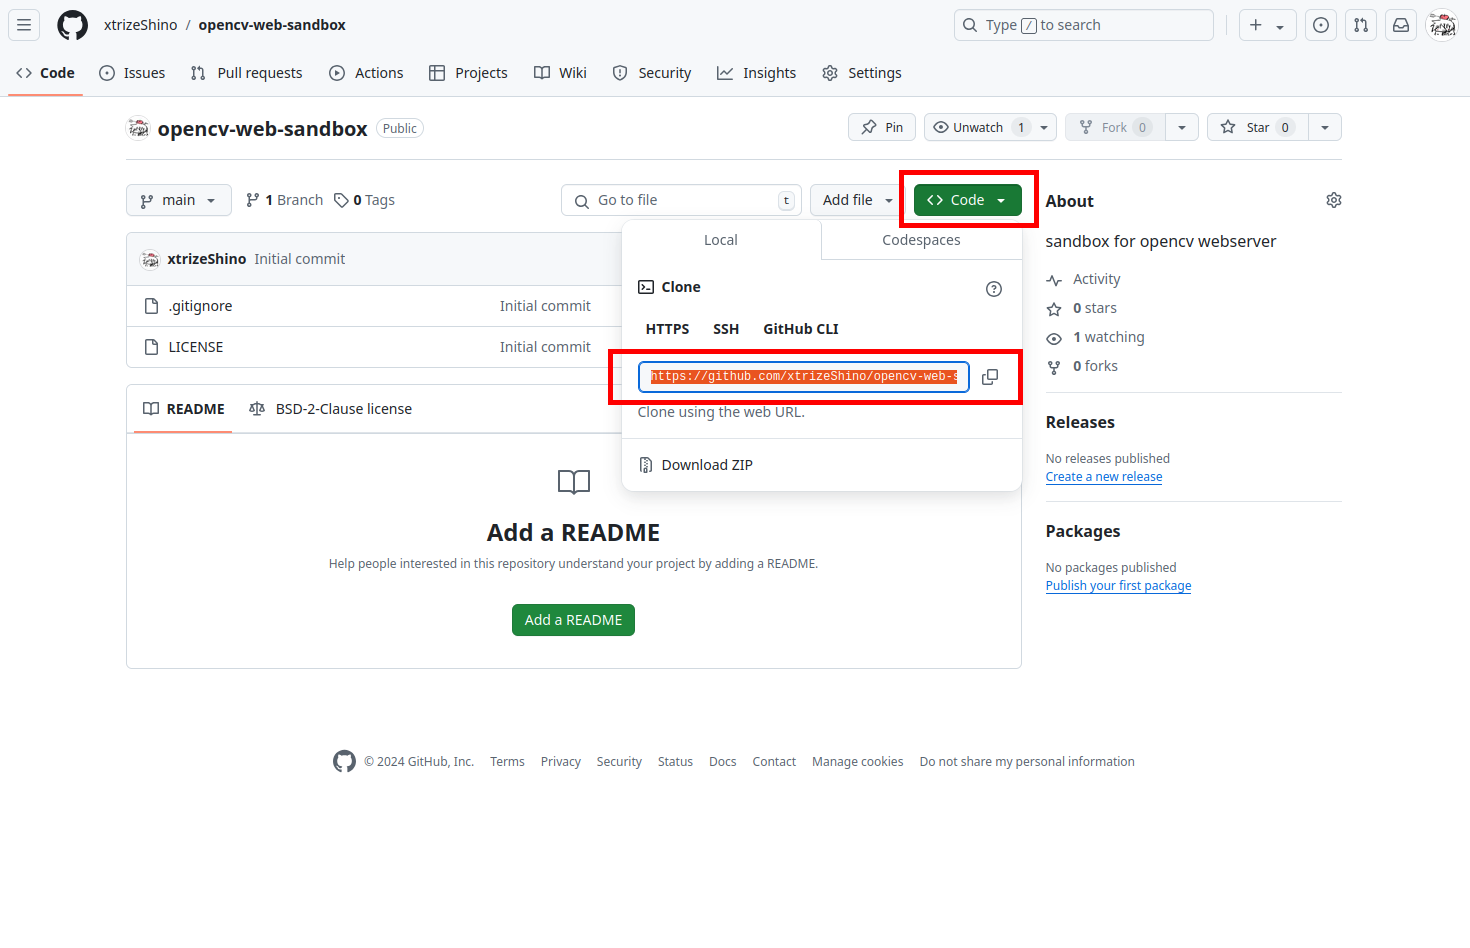
続いて、ローカルとリモートのリポジトリを結合します。GitHub上に作成されたリポジトリを開き、右上の「Code」をクリックしリモートリポジトリのURLを控えておいてください。
GitHubのリモートリポジトリとローカルリポジトリはgit remote addにより紐づけします。ブランチはデフォルトのoriginを選択しました。ここで、リモートに格納されているファイル.gitignoreとLICENSEを取得しようとgit pullすると、ブランチと結合するデフォルトの方法を聞かれます。今回はgit config pull.rebase falseを指定しました。そして、リモートリポジトリとローカルリポジトリをgit merge --allow-unrelated-histories origin/mainによりマージします。
# GitHub上に作成したgitと結合する
$ git remote add origin https://github.com/xtrizeShino/opencv-web-sandbox.git

# リモートのファイルをpullしようとすると...
$ git pull origin main
# hint: You have divergent branches and need to specify how to reconcile them.
# hint: You can do so by running one of the following commands sometime before
# hint: your next pull:
# hint:
# hint:   git config pull.rebase false  # merge
# hint:   git config pull.rebase true   # rebase
# hint:   git config pull.ff only       # fast-forward only
# hint:
# hint: You can replace "git config" with "git config --global" to set a default
# hint: preference for all repositories. You can also pass --rebase, --no-rebase,
# hint: or --ff-only on the command line to override the configured default per
# hint: invocation.
# fatal: Need to specify how to reconcile divergent branches.

# リモートとローカルのコミットをマージする
$ git config pull.rebase false
$ git merge --allow-unrelated-histories origin/main
マージ作業は特に必要ないため、下記の画面が出たら【Ctrl+x】で抜けます。
$ git merge --allow-unrelated-histories origin/main
# Merge made by the 'ort' strategy.
#  .gitignore | 162 +++++++++++++++++++++++++++++++++++++++++++++++++++++++++++++
#  LICENSE    |  24 +++++++++
#  2 files changed, 186 insertions(+)
#  create mode 100644 .gitignore
#  create mode 100644 LICENSE

# リモートで作成したLICENSEと.gitignoreが含まれていることを確認
$ ls -al
# drwxrwxr-x  3 shino shino 4096 12月  1 19:12 .
# drwxr-x--- 27 shino shino 4096 12月  1 19:10 ..
# drwxrwxr-x  8 shino shino 4096 12月  1 19:12 .git
# -rw-rw-r--  1 shino shino 3139 12月  1 19:12 .gitignore
# -rw-rw-r--  1 shino shino 1305 12月  1 19:12 LICENSE
# -rw-rw-r--  1 shino shino    0 12月  1 19:09 README.md
以上でマージ作業は完了です。
GitHubに変更をpushする
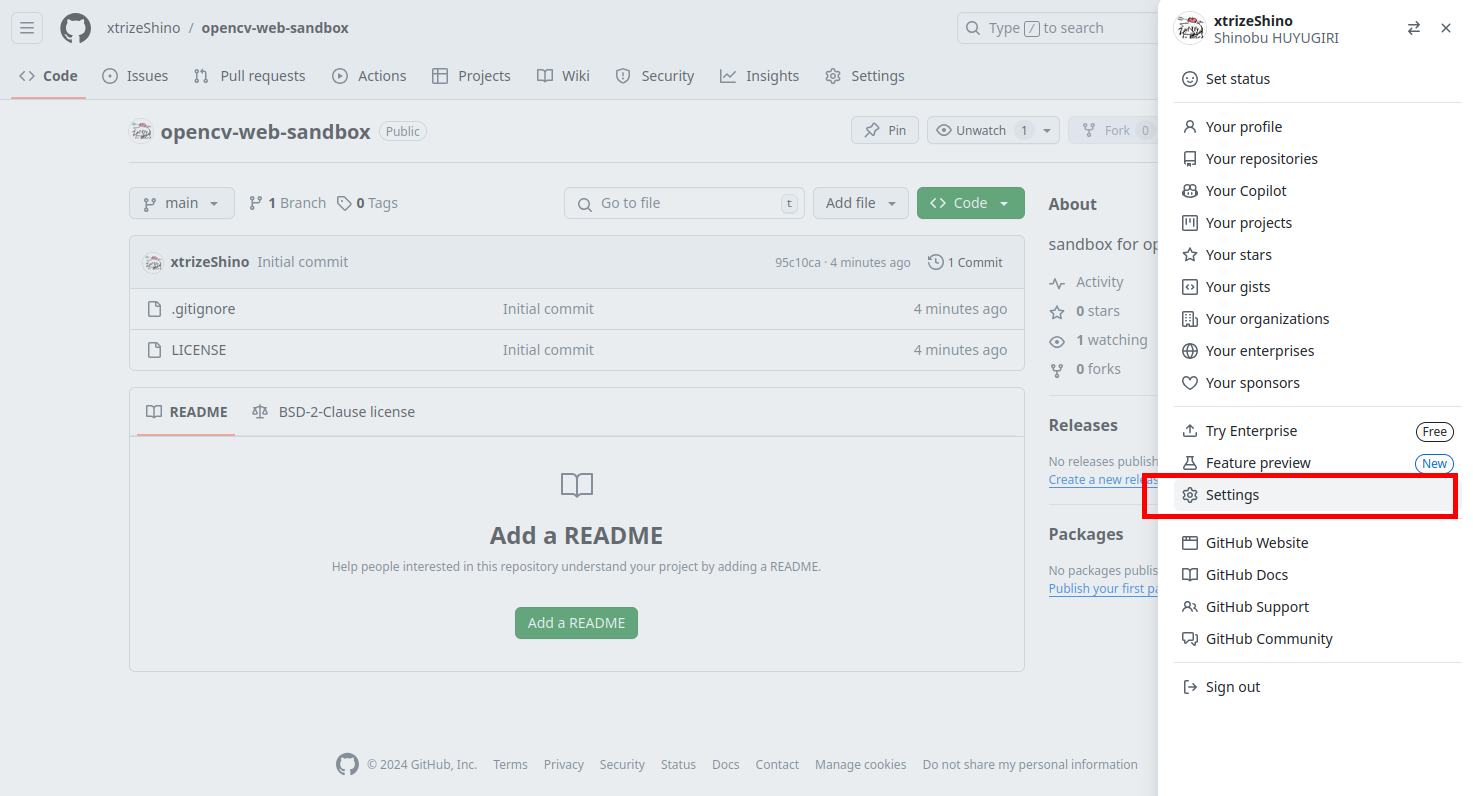
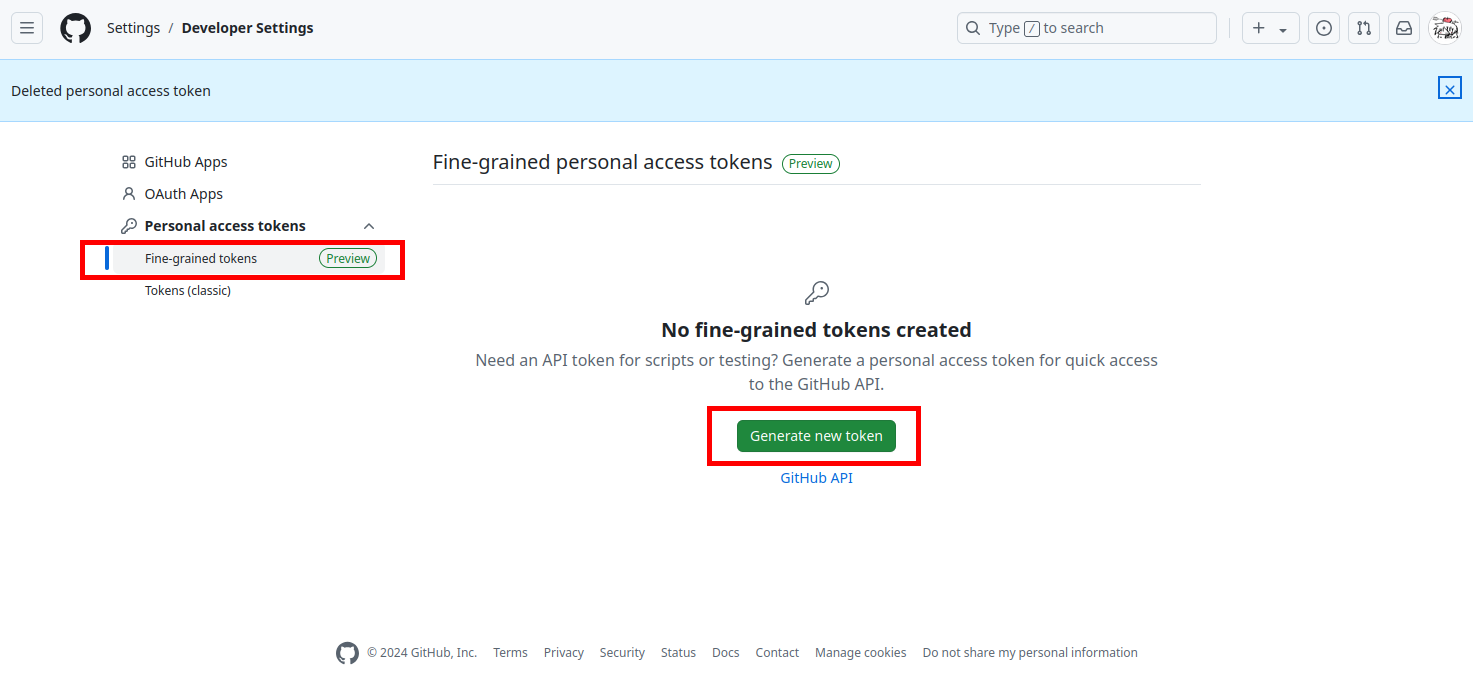
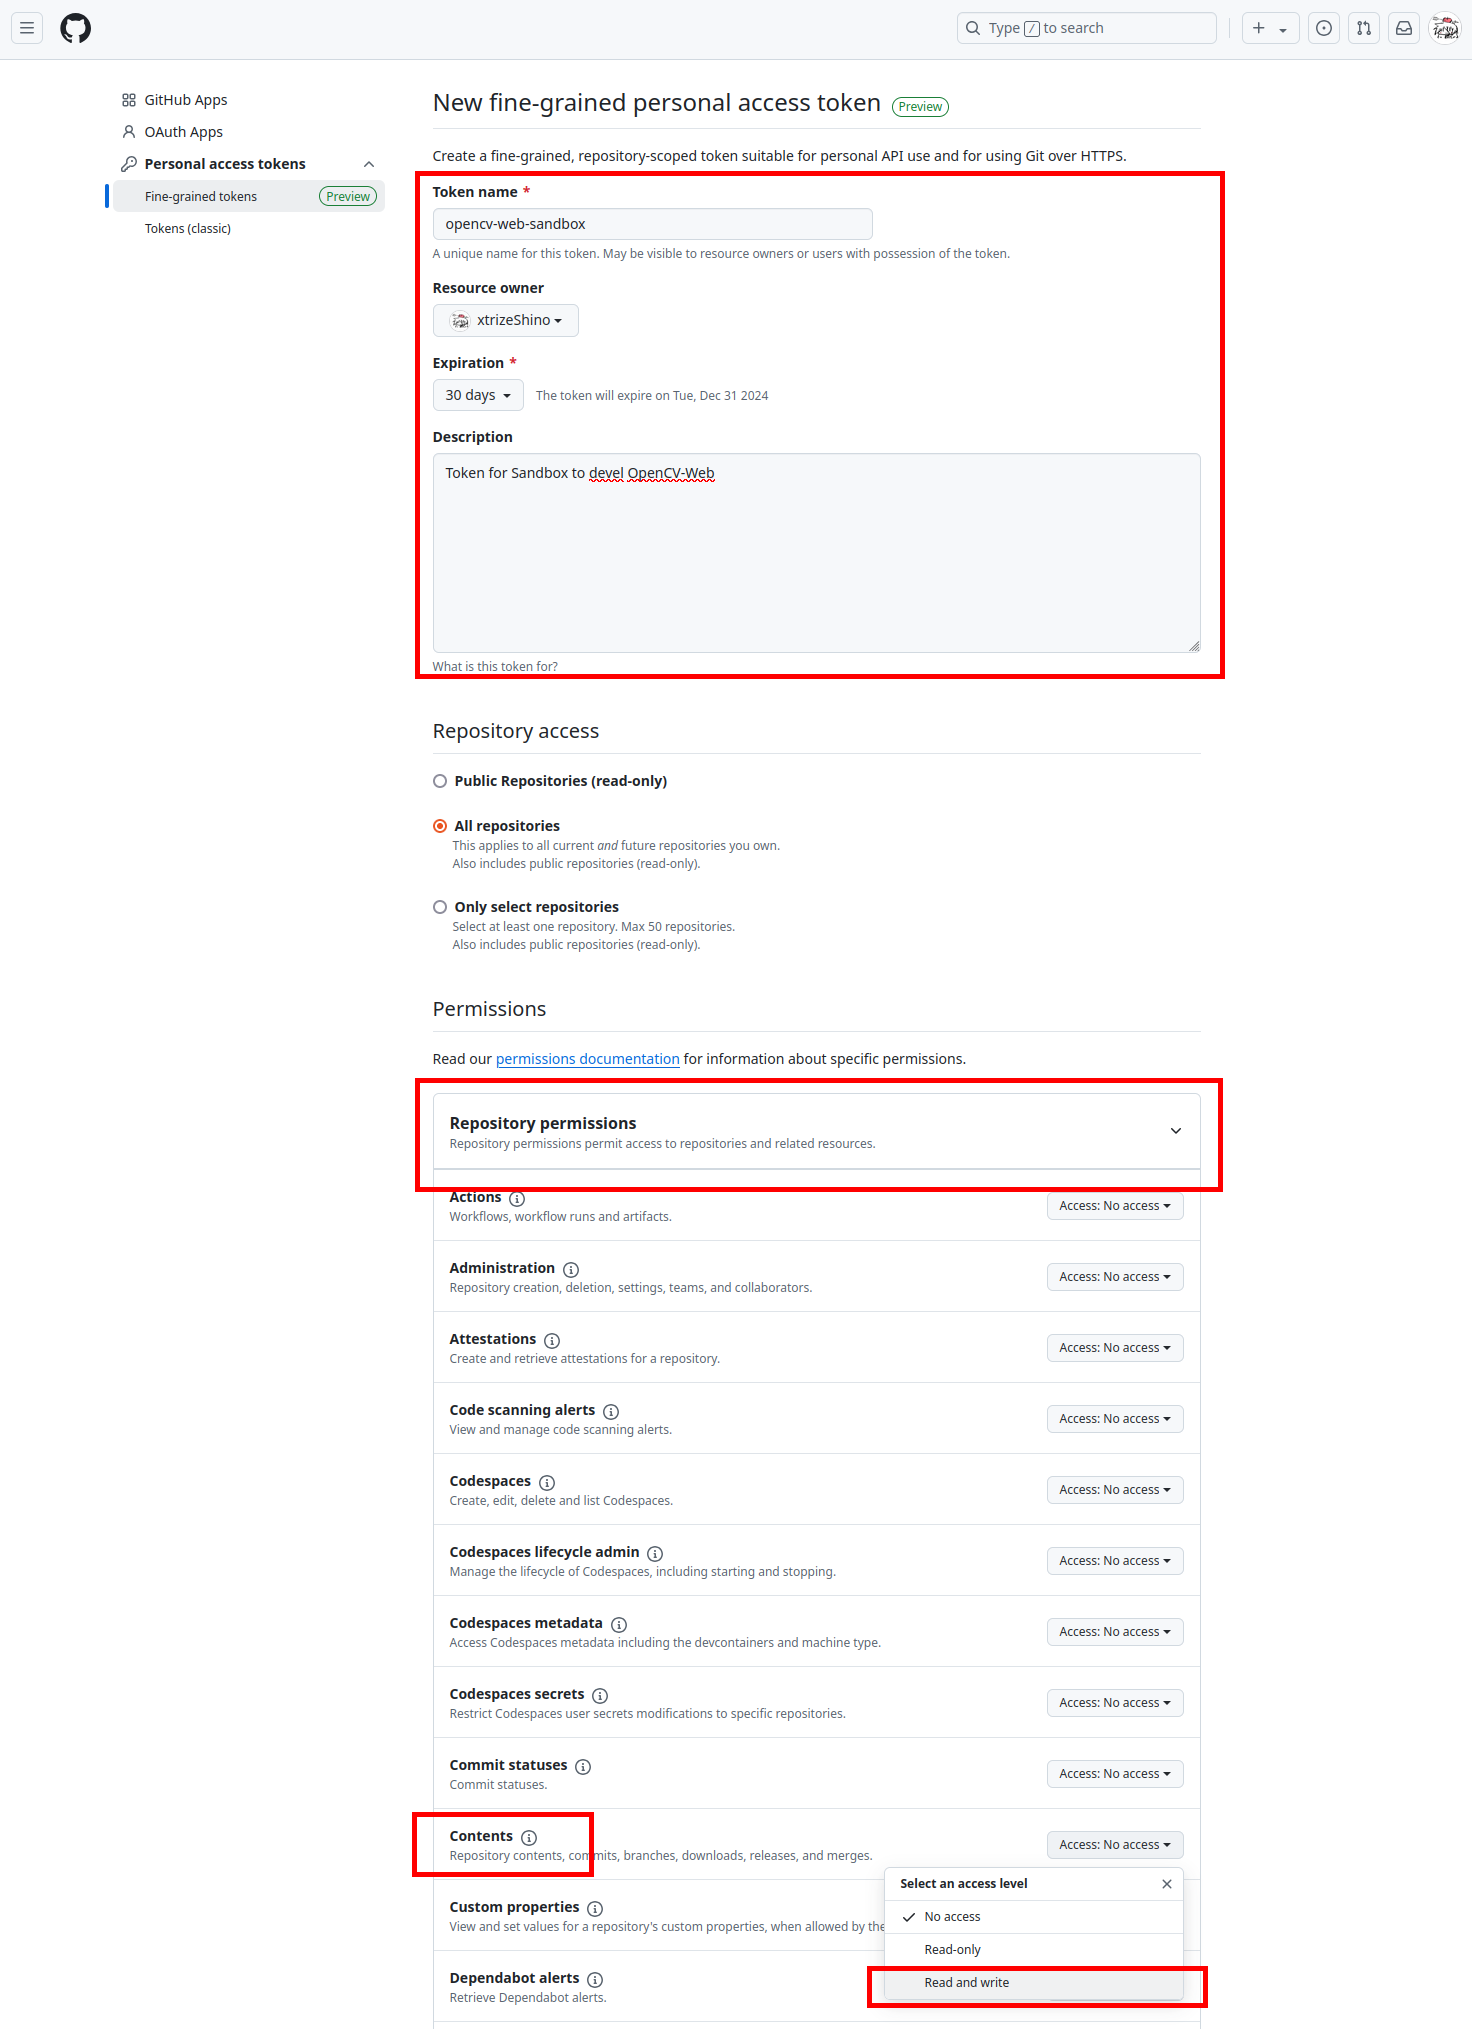
最後に変更をpushしましょう。GitHubへのpushには、トークンと呼ばれるパスワードを生成する必要があります( GitHubのログインパスワードではありません )。GitHub右上のユーザーアイコンから「 Settings 」を選択し、左下の「 Developer settings 」から「 Fine-grained tokens 」を開き、「 Generate new token 」をクリックします。
トークンの名前と説明を入力した後、「 All repositories 」を選択し「 Reposiroty permissions 」の「 Contents -->> Read and write 」を設定してください。本設定が抜けているとリモートリポジトリへの書き込み権限が不足となるため、pushに失敗します。最後に 「 Generate token 」をクリックするとトークンが生成されます。
生成できたトークンをコピーしてgit pushのパスワードに指定します。
GitHubのユーザー名と、上記の手順により生成したトークンをパスワードに指定することで、下記のようにpushできます。
# ローカルの変更をpushする
$ git push origin main
# Username for 'https://github.com': xtrizeShino
# Password for 'https://xtrizeShino@github.com':
# Enumerating objects: 6, done.
# Counting objects: 100% (6/6), done.
# Delta compression using up to 20 threads
# Compressing objects: 100% (3/3), done.
# Writing objects: 100% (5/5), 551 bytes | 551.00 KiB/s, done.
# Total 5 (delta 0), reused 0 (delta 0), pack-reused 0
# To https://github.com/xtrizeShino/opencv-web-sandbox.git
#    95c10ca..40e2799  main -> main
git pushでのパスワード入力を省略する
上記の手順の場合、pushする度に毎回パスワード(トークン)を入力しなければなりません。これは非効率的なため、sshの公開鍵を使ってパスワードを聞かれないようにします。まず、ssh接続するためにgit remote set-urlでリモートリポジトリのURLを https://github.com/... から git@github.com:... に変更します。
# リモートの設定を確認
$ git remote -v
# origin	https://github.com/xtrizeShino/opencv-web-sandbox.git (fetch)
# origin	https://github.com/xtrizeShino/opencv-web-sandbox.git (push)

# SSH接続に切り替える
$ git remote set-url origin git@github.com:xtrizeShino/opencv-web-sandbox.git

# リモートの設定を確認
$ git remote -v
# origin	git@github.com:xtrizeShino/opencv-web-sandbox.git (fetch)
# origin	git@github.com:xtrizeShino/opencv-web-sandbox.git (push)
続いてsshの公開鍵を作成します。 ssh-keygen を実行し鍵のペアを作成します。passphraseも指定できますが今回はemptyにしました。鍵が作成されると ~/.ssh に格納されますので、公開鍵 *.pub のファイルをcatして内容をコピーします。
# SSH鍵を作成する
$ ssh-keygen
# Generating public/private ed25519 key pair.
# Enter file in which to save the key (/home/shino/.ssh/id_ed25519):
# Enter passphrase (empty for no passphrase):
# Enter same passphrase again:
# Your identification has been saved in /home/shino/.ssh/id_ed25519
# Your public key has been saved in /home/shino/.ssh/id_ed25519.pub
# The key fingerprint is:
# SHA256:xhmdjnTMna7aFlGzF2Ond6th24TZ4sXIFN5hEM+OE3Y shino@shino-MS-7D98
# The key's randomart image is:
# +--[ED25519 256]--+
# |             oo  |
# |         + ooo*o.|
# |        o *.+*+E.|
# |       o *..ooB.o|
# |        S ..++*oo|
# |       .  .. O.* |
# |          ..o O  |
# |         o.  + . |
# |        ...      |
# +----[SHA256]-----+

# 作成した鍵を参照する
$ ls ~/.ssh
# authorized_keys  id_ed25519  id_ed25519.pub
$ cat ~/.ssh/id_ed25519.pub
# ssh-ed25519 AAAAC3NzaC1lZDI1NTE5AAAAIBh6LNzSwsxJSHS/ijKhTTdjJmSNgDvgaIWWhgB04i+/ shino@shino-MS-7D98

# この鍵(*.pub)をGitHubに登録する
GitHubに公開鍵を登録するには、GitHub右上のユーザーアイコンから「 Settings 」を選択し、左のメニューから「 SSH and GPG keys 」を選択「 New SSH key 」をクリックします。そして先の手順にてコピーした公開鍵の内容をペーストすれば、sshの設定は完了です。
以上の設定をすることにより、パスワード無しでgit pushできます。
# 登録後にpushしてみる
$ git push
# fatal: The current branch main has no upstream branch.
# To push the current branch and set the remote as upstream, use
#     git push --set-upstream origin main

$ git push --set-upstream origin main
# The authenticity of host 'github.com (20.27.177.113)' can't be established.
# ED25519 key fingerprint is SHA256:+DiY3wvvV6TuJJhbpZisF/zLDA0zPMSvHdkr4UvCOqU.
# This key is not known by any other names.
# Are you sure you want to continue connecting (yes/no/[fingerprint])? yes
# Everything up-to-date
uvでプロジェクトを作成する
それではいよいよuvによりパッケージを管理してみましょう。まずワークスペースとなるディレクトリへ移動した後に uv init <プロジェクト名> を実行しましょう。すると、指定したプロジェクト名のディレクトリが作成され、パッケージ管理に必要となるREADME.md、pyproject.tomlが生成され、仮想環境を操作する.venvが作成されます。. .venv/bin/activateで仮想環境に入ることができます。
# 仮想環境+プロジェクトを作成する
$ uv init opencv-web-sandbox
# Adding `opencv-web-sandbox` as member of workspace `/home/shino/opencv-web-sandbox`
# Initialized project `opencv-web-sandbox` at `/home/shino/opencv-web-sandbox/opencv-web-sandbox`

# 仮想環境に入る
$ . .venv/bin/activate

# 生成されたプロジェクトファイルを確認する
(opencv-web-sandbox) $ ls opencv-web-sandbox/
README.md  hello.py  pyproject.toml
uv syncを実行すると仮想環境の内容とpyproject.tomlの内容が同期されますので、uv syncしてからgit commitしてgit pushすれば仮想環境の情報をGitHub上に保持することができます。
# 最初の同期
(opencv-web-sandbox) $ cd opencv-web-sandbox/
(opencv-web-sandbox) $ uv sync
# Using CPython 3.12.3 interpreter at: /usr/bin/python3
# Creating virtual environment at: /home/shino/opencv-web-sandbox/.venv
# Resolved 1 package in 1ms
# Audited in 0.00ms
### -->> びっくりするほど早い

# このあたりでgit addしておく
(opencv-web-sandbox) $ cd ..
(opencv-web-sandbox) $ pwd
/home/shino/opencv-web-sandbox
(opencv-web-sandbox) $ git commit -m "uv init opencv-web-sandbox"
# [main b9dbb9e] uv init opencv-web-sandbox
#  6 files changed, 40 insertions(+)
#  create mode 100644 opencv-web-sandbox/.python-version
#  create mode 100644 opencv-web-sandbox/README.md
#  create mode 100644 opencv-web-sandbox/hello.py
#  create mode 100644 opencv-web-sandbox/pyproject.toml
#  create mode 100644 pyproject.toml
#  create mode 100644 uv.lock

# リポジトリへpushする
$ git push
仮想環境の設定ファイルを確認する
仮想環境の設定ファイルであるpyproject.tomlを開くと、必要とされるPythonのバージョン等をみることができます。
# プロジェクトを触っていきましょう
(opencv-web-sandbox) $ cd opencv-web-sandbox
(opencv-web-sandbox) $ pwd
# /home/shino/opencv-web-sandbox/opencv-web-sandbox

# プロジェクトの設定は以下のようになっている
(opencv-web-sandbox) $ cat pyproject.toml
[project]
name = "opencv-web-sandbox"
version = "0.1.0"
description = "Add your description here"
readme = "README.md"
requires-python = ">=3.12"
dependencies = []
パッケージを追加する
パッケージの追加は uv add を利用します。pip installと同じ感覚で利用できますが、uvを介することにより本プロジェクトにそのパッケージが必要となることが明記されます。以下はnumpyパッケージを追加した例です。uv add numpy後にuv syncすることによりpyproject.tomlが更新されます。
# numpyをいれてみる
$ uv add numpy

# syncしてプロジェクトファイルを確認する
$ uv sync
$ cat pyproject.toml
[project]
name = "opencv-web-sandbox"
version = "0.1.0"
description = "Add your description here"
readme = "README.md"
requires-python = ">=3.12"
dependencies = [
    "numpy>=2.1.3",
]
## -->> プロジェクトにnumpyが必要な旨が追記されている
Pythonのバージョンを切り替える
pyproject.tomlに定義されている requires-python の設定を変えることで、異なるPythonのバージョンを導入することができます。以下の例では requires-python を3.12以降から3.10以降に変更した後に、Python3.10を導入しています。Pythonのバージョンは uv python pin により変更可能で、変更した後は必ず source .venv/bin/activate で仮想環境をリロードしてください。
# Pythonのバージョンを切り替える
$ python --version
Python 3.12.3

# プロジェクトファイルの依存部を書き直す
$ vi pyproject.toml
# requires-python = ">=3.12" を
# requires-python = ">=3.10" に変更

# Python3.10をインストールする
$ uv venv -p 3.10
# Using CPython 3.10.15
# Creating virtual environment at: .venv
# Activate with: source .venv/bin/activate

# Python3.10に切り替える
$ uv python pin 3.10
# Updated `.python-version` from `3.12` -> `3.10`

# .venvを読み込み直せばPython3.10に切り替わっている
$ source .venv/bin/activate
$ python --version
Python 3.10.15

# ここまでの変更をgitへpush
$ git add -A
$ git commit -m "change python 3.12->3.10"
$ git push
uv管理下にPyTorchをインストールする
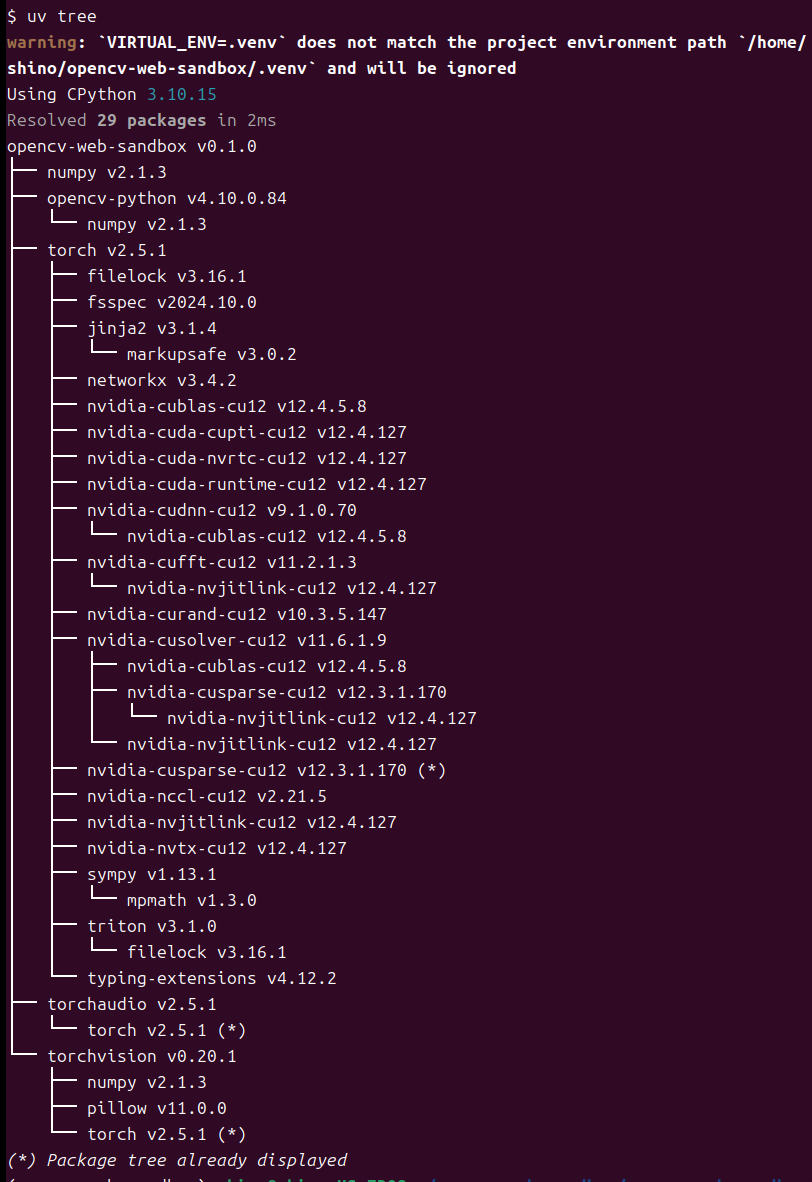
続いて、よく利用されるPyTorchとOpenCVを導入してみましょう。まず、PyTorchのWebサイトから実行すべきコマンドを確認します。pip3 install torch torchvision torchaudioとのことなので uv add torch torchvision torchaudio によりインストールします。OpenCVも同様に uv add opencv-python でインストールします。インストールしたパッケージの依存関係は uv tree により確認することができます。
# PyTorchの公式では以下とのことなので
# -->> pip3 install torch torchvision torchaudio
# uv pipで以下のようにインストールする
$ uv add torch torchvision torchaudio

# OpenCVもインストールする
$ uv add opencv-python

# プロジェクトファイルと同期する
$ uv sync
# warning: `VIRTUAL_ENV=.venv` does not match the project environment path `/# home/shino/opencv-web-sandbox/.venv` and will be ignored
# Resolved 29 packages in 1ms
# Audited 28 packages in 0.02ms

# インストールしたパッケージの依存関係を見る
$ uv tree

# ここまでの変更をコミットする
$ git add -A
$ git commit -m "add PyTorch and OpenCV"
$ git push
PyTorchを実行してみる
PyTorchがちゃんと動くことを確認しておきましょう。
# python
>>> import torch
>>> torch.cuda.is_available()
True
作成済みのプロジェクトを利用する
多人数開発をイメージして、以上の変更をすべてコミットしてリモートリポジトリへgit pushした後に、別のPCでgit cloneしてパッケージを復元できるか試してみました。 結論だけ言いますと pyproject.toml のあるディレクトリで uv sync するだけで仮想環境を復元することができました。個別にパッケージをインストールしなおすような非効率的な作業は不要です。
# 作業ディレクトリを作成する
$ cd ~
$ mkdir tmp
$ cd tmp
$ git clone https://github.com/xtrizeShino/opencv-web-sandbox.git
$ cd opencv-web-sandbox/

# 作業ディレクトリの内容は以下の通り
$ ls
# LICENSE  README.md  opencv-web-sandbox  uv.lock
$ cd opencv-web-sandbox/
$ pwd
# /home/shino/tmp/opencv-web-sandbox/opencv-web-sandbox
$ ls
# README.md  hello.py  pyproject.toml
$ uv sync
# Using CPython 3.10.15
# Creating virtual environment at: .venv
# Resolved 29 packages in 1.03s
# Installed 27 packages in 82ms
# ...

# 仮想環境にログインする
$ . .venv/bin/activate

# PyTorchが使えることを確認
(opencv-web-sandbox) $ python
>>> import torch
>>> torch.cuda.is_available()
True

$ deactivate
便利ですね!是非開発にお役立てください!

