Raspberry Pi 5からPCIeのデバイスを接続できるようになり、AI Kitというハードウェアアクセラレータが利用可能となりました。今回はRaspberry Pi 5の初期設定から、AI Kitのサンプルプログラムを利用した推論までの手順をまとめました。

今回購入した機材
今回、Raspberry Pi 5を触るにあたって、下記の機材を購入しました。
Raspberry Pi 5 本体、ヒートシンク、ACアダプタ、HDMIケーブル
Raspberry Pi 5 に対応したAI Kit
IMX219を搭載した広角(160°)カメラ
Raspberry Pi 5 をセットアップする
OSを起動用microSDカードにインストールする
Raspberry Pi 5へのOSインストール方法は下記を参考に進めていきます。
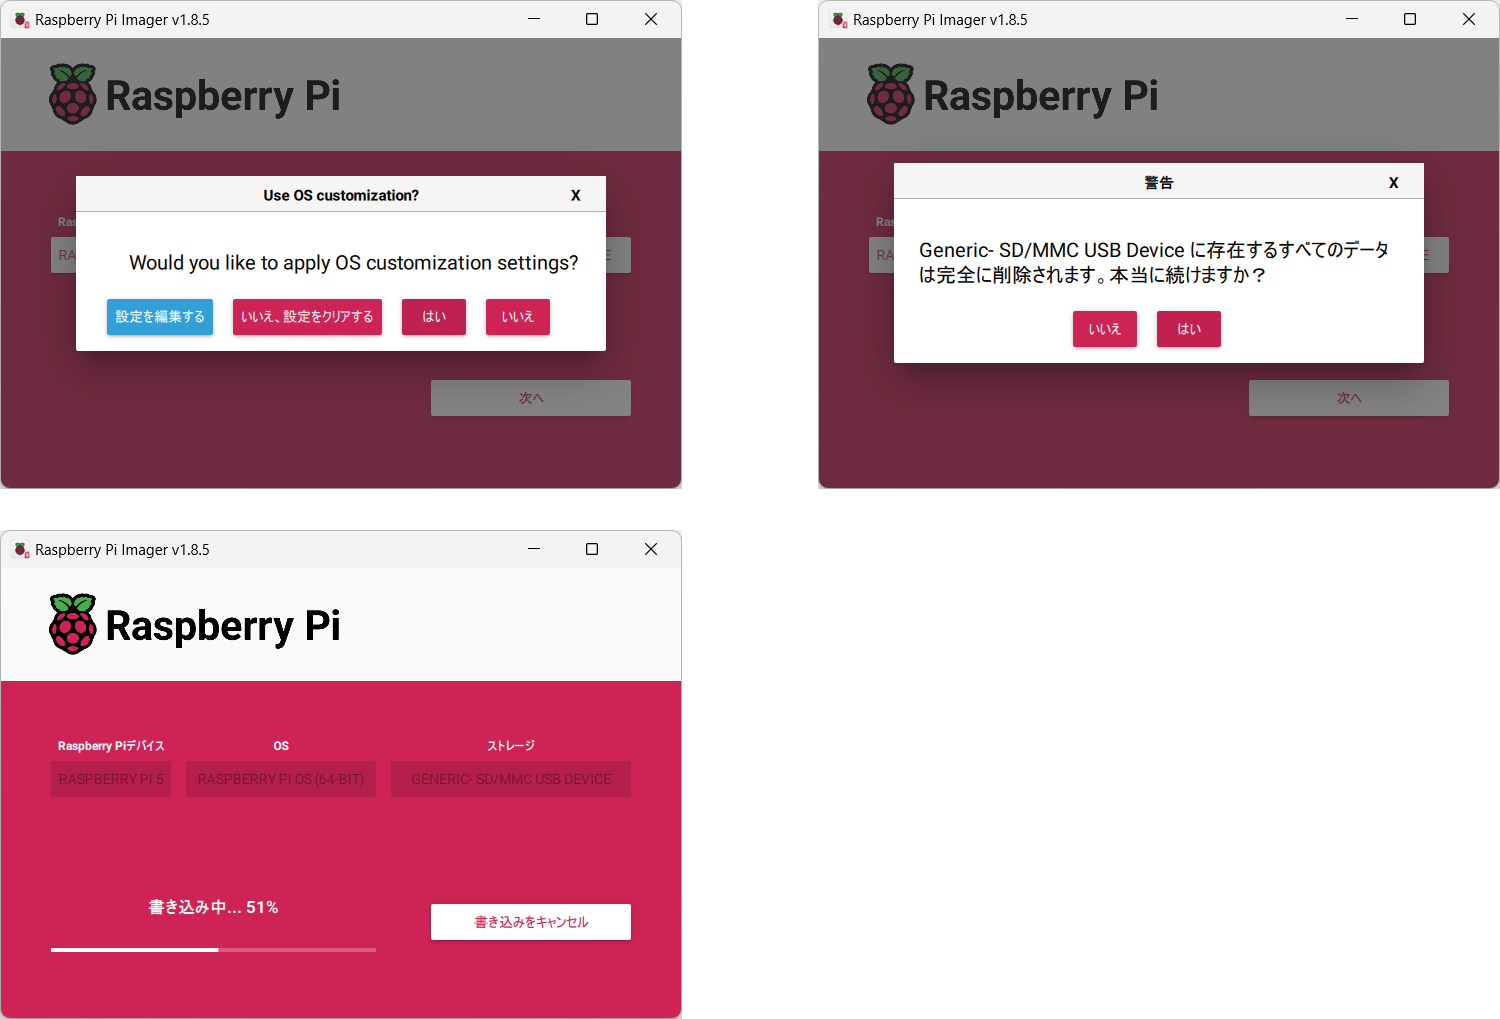
デバイスとOSを選択する
今回のターゲットはRaspberry Pi 5なので、デバイス選択で「Raspberry Pi 5」を指定して、OSには「Raspberry Pi OS」を、インストール先となるmicroSDカードを選択します。ここで指定したmicroSDカード(ストレージ)はすべて消去されますので、誤った選択をしないよう、注意しましょう。

インストールするOSの設定を行う
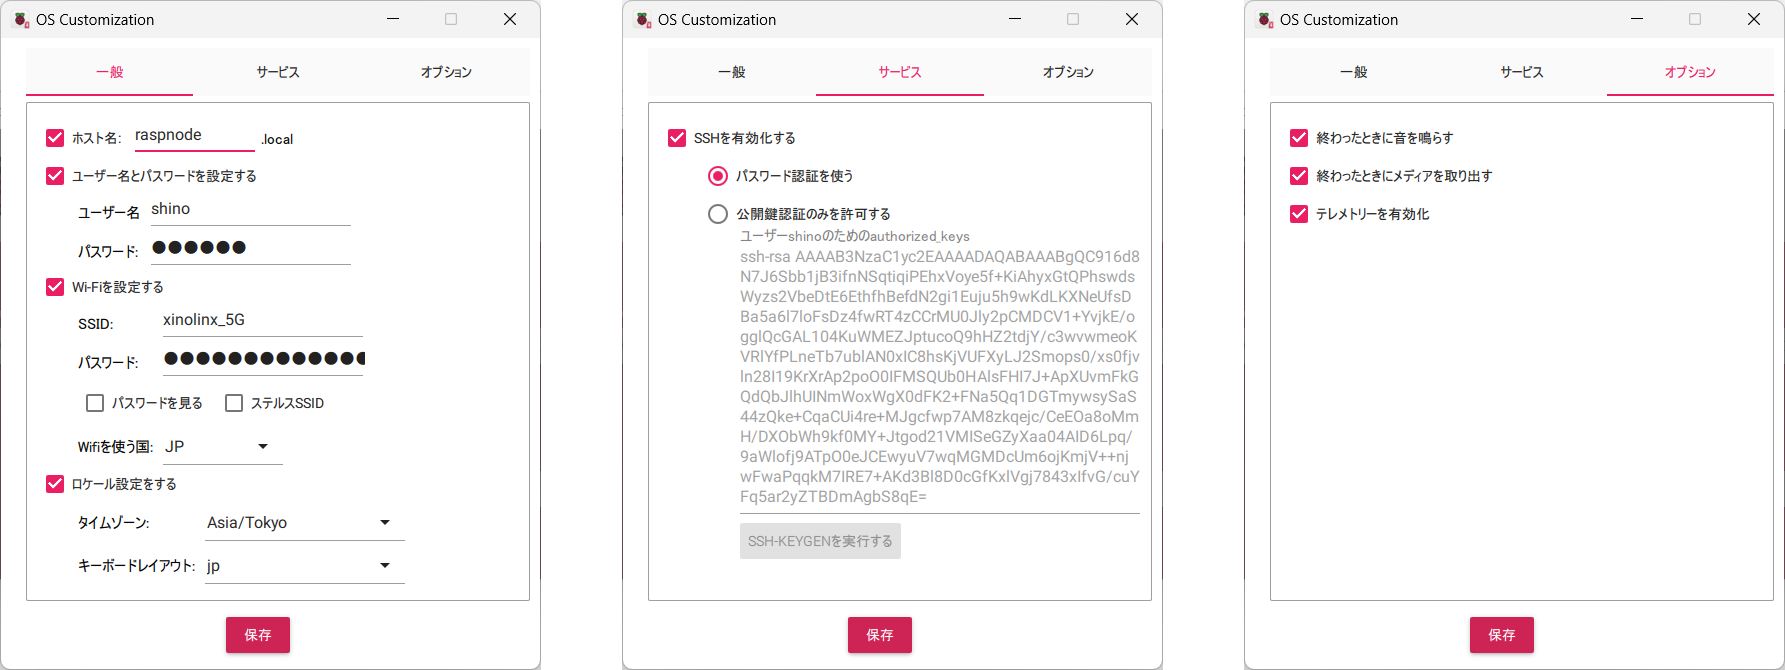
新しいRaspberry Pi Imagerでは、インストールするOSの設定をOS起動前に設定しておくことができます。設定できる内容は以下の通りです。
- ホスト名
- ユーザー名とパスワード
- Wi-Fiのアクセスポイント名とWi-Fiの地域
- タイムゾーンと言語の選択
- リモートログイン(ssh)の設定
microSDカードにOSを書き込む
設定したRaspberry Pi OSをmicroSDカードへインストールします。
Raspberry Piを起動する
microSDカードを挿入し、電源ボタンを押すとRaspberry Pi 5上でRaspberry Pi OS(Debian系)が起動します。インストールするOSの設定をした際にsshの設定もされていますので、IPアドレスを調べれば、以降の作業はリモートでも進めることができます。

Rapsberry Piの初期設定をする
インストール時にWi-Fiなどの設定は終わっていますので、初期設定はパッケージの更新からはじめます。Raspberry Pi 5の初期設定は下記を参考に進めていきます。
パッケージを更新する
リポジトリにアクセスして、すべてのパッケージを更新します。また、ファームウェアが古い場合はここでアップデートしておきましょう(6 December 2023以降にする)。加えて、AI Kitを接続するPCIeポートの通信設定をPCIe 3.0に切り替えます。すべて設定した後に、再起動してください。
# パッケージをすべて更新する
$ sudo apt update
$ sudo apt full-upgrade

# 再起動する
$ sudo reboot

# EEPROMのバージョンを確認する
# 6 December 2023以降であればアップデートはありません
$ sudo rpi-eeprom-update
# BOOTLOADER: up to date
#    CURRENT: Mon 23 Sep 13:02:56 UTC 2024 (1727096576)
#    LATEST: Mon 23 Sep 13:02:56 UTC 2024 (1727096576)
#    RELEASE: default (/lib/firmware/raspberrypi/bootloader-2712/default)
#             Use raspi-config to change the release.

### バージョンアップが必要な場合は下記を実行
# $ sudo raspi-config
# Advanced Options > Bootloader Version > Latest
# $ sudo rpi-eeprom-update -a
# $ sudo reboot

# PCIe Gen3を有効化する
# -->> Raspberry Pi 5はGen2らしいですが...
$ sudo vi /boot/firmware/config.txt
# 最後の行に以下を追加します
dtparam=pciex1_gen=3

# 再起動する
$ sudo reboot
日本語入力に必要なパッケージをインストールする
Raspberry Pi OSのGUIからターミナルを起動し、以下のコマンドを実行します。
####
# Raspberry Pi OSを日本語に対応させる
####
# raspi-configを起動する
$ sudo raspi-config
#
# -->> 5.Localisation Options
# -->> L1 Locale
# -->> ja_JP.UTF-8 UTF-8
# -->> ja_JP,UTF-8
#
# -->> 5.Localisation Options
# -->> L3 Keyboard
# -->> Generic 105-key PC
# -->> Japanese
# -->> The default for the keyboard layout
# -->> No compose key
# -->> (Use Ctrl+Alt+Backspace to terminate the X server?)
# [Yes]
#
# 設定を反映させるため再起動する
$ sudo reboot
####
# VNCの設定をする
####
# ディスプレイをX11に切り替える
$ sudo raspi-config
#
# -->> 6.Advanced Options
# -->> A6 Wayland
# -->> W1 X11
#
$ sudo reboot
# リモートデスクトップを有効にする
$ sudo raspi-config
#
# -->> 3.Interface Options
# -->> I3 VNC
# -->> Would you like the VNC Server to be enabled?
# -->> [Yes}
#
$ sudo reboot
####
# 日本語設定の続き
####
# パッケージ一覧を取得する
$ sudo apt update
# 日本語入力のパッケージFlatpak版Fcitx5-Mozcをインストールする
$ sudo apt install fcitx5-mozc
# 入力メソッドをfcitx5に設定する
$ im-config -n fcitx5
# 日本語フォントをインストールする
$ sudo apt install fonts-noto-cjk
# 再起動する
$ sudo reboot
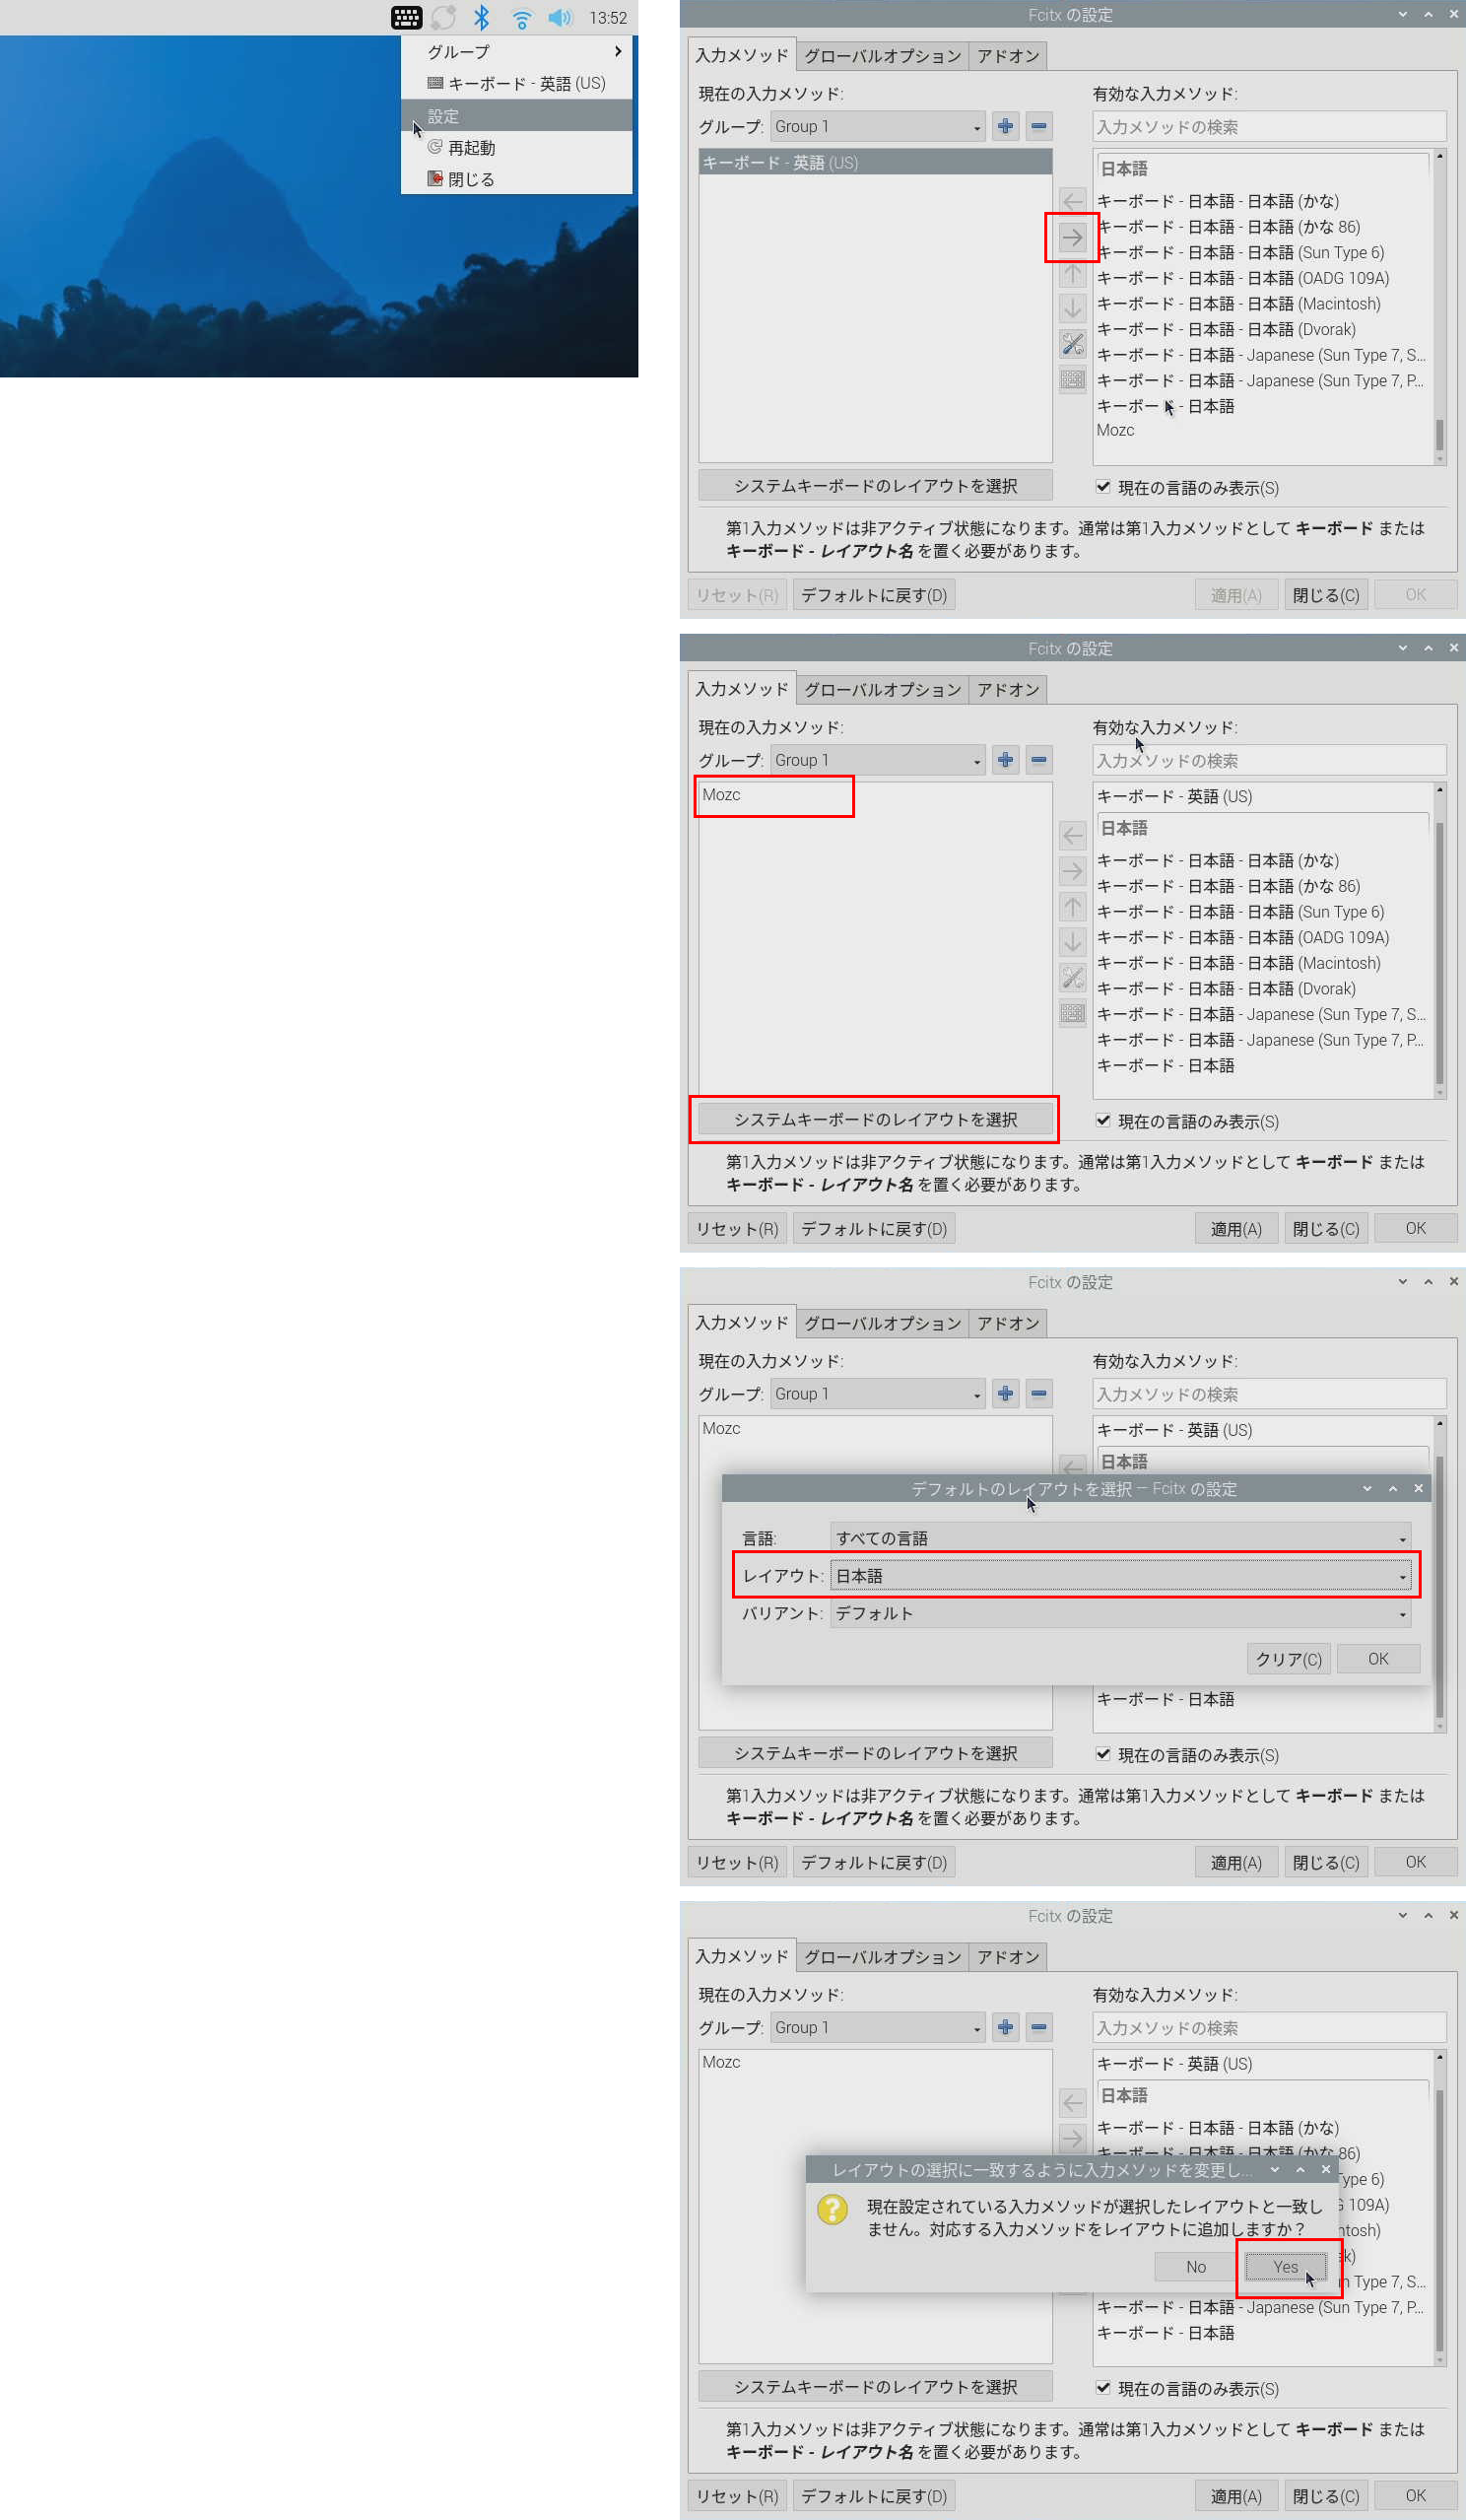
### GUIで日本語設定を行う
再起動後にGUIで日本語入力の設定をします。RealVNC等での設定も可能です。スクリーン右上のキーボードマークを右クリックし、設定を開き、入力メソッドに「Mozc」を選択し、システムキーボードのレイアウトを選択で「日本語」を選択してください。
Windowsからパスワード無しでSSHできるうようにする
内容は、下記記事とほぼ同じです。
# SSHログインに必要なディレクトリ、ファイルを作成
$ cd ~
$ mkdir ./.ssh
$ touch ./.ssh/authorized_keys
$ sudo chmod 700 ~/.ssh
$ sudo chmod 640 ~/.ssh/authorized_keys

# Windows上で作成した公開鍵(id_rsa.pub)を書き込む
$ vi ~/.ssh/authorized_keys
ssh-rsa AAAAB3NzaC1yc2EAA...
Windowsのホームディレクトリ(私の場合はC:\Users\ixiv2\.ssh)のconfigファイルに以下の行を追加します。本例は、秘密鍵ファイルがid_rsa、Raspberry Pi 5のIPアドレスが192.168.10.140の場合です。
Host rasp5
	HostName 192.168.10.140
	User shino
	IdentityFile ~/.ssh/id_rsa
設定後、Visual Studio CodeのRemote Developentプラグインを使うことで、画面左下の「><」マークから、下記のようにリモートログインすることができます。

Python仮想環境を操作するcondaコマンドを準備する
AI/機械学習まわりの開発にはPythonを使うことが多いため、Pythonの仮想環境を操作できるcondaコマンドを追加します。本来はAnaconda3を使うところですが、Raspberry Pi 5のmicroSDカードは容量が限られていることから、今回はMiniforgeをインストールしました。
# インストーラーをダウンロードします(2024年11月最新版)
$ wget https://github.com/conda-forge/miniforge/releases/download/24.9.2-0/Miniforge-pypy3-24.9.2-0-Linux-aarch64.sh

# スクリプトを実行し、インストールしましょう
$ chmod +x ./Miniforge-pypy3-24.9.2-0-Linux-aarch64.sh
$ ./Miniforge-pypy3-24.9.2-0-Linux-aarch64.sh
# Do you accept the license terms? [yes|no]
# >>> yes
# ...
# You can undo this by running `conda init --reverse $SHELL`? [yes|no]
# [no] >>> yes

# .bashrcを読み直してcondaへのパスを有効化します
$ source ~/.bashrc

# 仮想環境の作成
(base) $ conda create --name env python=3.10
# Proceed ([y]/n)? y

# 仮想環境へのログイン
(base) $ conda activate env
(env) $

# 仮想環境からのログアウト
(env) $ conda deactivate
(base) $
AI Kitを使うための初期設定をする
続いてAI Kitを使うための初期設定を行います。下記サイトの「Hardware setup」を参考に進めていきましょう。
# PCIeにHailoアクセラレータがあることを確認します
$ lspci
# 0000:00:00.0 PCI bridge: Broadcom Inc. and subsidiaries BCM2712 PCIe Bridge (rev 21)
# 0000:01:00.0 Co-processor: Hailo Technologies Ltd. Hailo-8 AI Processor (rev 01)
# 0001:00:00.0 PCI bridge: Broadcom Inc. and subsidiaries BCM2712 PCIe Bridge (rev 21)
# 0001:01:00.0 Ethernet controller: Raspberry Pi Ltd RP1 PCIe 2.0 South Bridge

# Hailoに関するパッケージをすべてインストールします
$ sudo apt install hailo-all
# 必ず再起動してください
$ sudo reboot

# Hailoデバイスが認識できることを確認します
$ hailortcli fw-control identify
# Executing on device: 0000:01:00.0
# Identifying board
# Control Protocol Version: 2
# Firmware Version: 4.18.0 (release,app,extended context switch buffer)
# Logger Version: 0
# Board Name: Hailo-8
# Device Architecture: HAILO8L
# Serial Number: HLDDLBB243301301
# Part Number: HM21LB1C2LAE
# Product Name: HAILO-8L AI ACC M.2 B+M KEY MODULE EXT TMP

# 起動ログにHailoの認識が含まれていることを確認する
$ dmesg | grep -i hailo
# [    3.876599] hailo: Init module. driver version 4.18.0
# [    3.878946] hailo 0000:01:00.0: Probing on: 1e60:2864...
# [    3.878955] hailo 0000:01:00.0: Probing: Allocate memory for device extension, 11632
# [    3.878972] hailo 0000:01:00.0: enabling device (0000 -> 0002)
# [    3.878978] hailo 0000:01:00.0: Probing: Device enabled
# [    3.879000] hailo 0000:01:00.0: Probing: mapped bar 0 - 000000007c93cdbf 16384
# [    3.879007] hailo 0000:01:00.0: Probing: mapped bar 2 - 000000000072f5fa 4096
# [    3.879010] hailo 0000:01:00.0: Probing: mapped bar 4 - 00000000651cbbc6 16384
# [    3.879014] hailo 0000:01:00.0: Probing: Force setting max_desc_page_size to 4096 (recommended value is 16384)
# [    3.879024] hailo 0000:01:00.0: Probing: Enabled 64 bit dma
# [    3.879028] hailo 0000:01:00.0: Probing: Using userspace allocated vdma buffers
# [    3.879032] hailo 0000:01:00.0: Disabling ASPM L0s
# [    3.879036] hailo 0000:01:00.0: Successfully disabled ASPM L0s
# [    4.068975] hailo 0000:01:00.0: Firmware was loaded successfully
# [    4.083753] hailo 0000:01:00.0: Probing: Added board 1e60-2864, /dev/hailo0
AI Kitで推論する
AI Kitを試すことのできるサンプルプログラムは、いくつか配布されています。
Hailoが配布しているサンプルプログラム
GitHubから、Hailoが配布しているサンプルプログラムを入手できます。GUI出力がありますので、Raspberry Pi 5のデスクトップで実行しましょう。
# 作業ディレクトリを作成する
$ cd ~
$ mkdir hailo_sample
$ cd hailo_sample
$ pwd
/home/shino/hailo_sample

# GitHubからサンプルプログラムを入手する
$ git clone https://github.com/hailo-ai/hailo-rpi5-examples.git
$ cd hailo-rpi5-examples/
$ ls
LICENSE          compile_postprocess.sh  install.sh        run_tests.sh
README.md        cpp                     meson.build       setup_env.sh
basic_pipelines  doc                     requirements.txt  tests
ci.yaml          download_resources.sh   resources


# 環境変数を設定する
$ source setup_env.sh

# サンプルを実行するために必要なパッケージを入手する
(venv_hailo_rpi5_examples) $ pip install -r requirements.txt

# サンプルプログラムが扱う動画像データを入手する
(venv_hailo_rpi5_examples) $ ./download_resources.sh

# Hailoのプラットフォームに基づくソリューションを
# 簡単に開発できるようにするTAPPASをインストールする
(venv_hailo_rpi5_examples) $ ./compile_postprocess.sh

# Hailoを使った推論を実行する
(venv_hailo_rpi5_examples) $ python basic_pipelines/detection.py
### resourcesに含まれている動画に対して物体検出を実行します
高精度でかなり高速に物体検出できるようですね!すごい!
Raspberry Piカメラに対応したサンプルプログラム
Raspberry Pi 5にカメラを接続し、設定する
まずはじめに、Raspberry Pi 5本体にRaspberry Pi対応のカメラモジュールを接続してください。なお、今回購入したカメラはIMX219というチップが搭載されているカメラで、ハードウェア的にRaspberry Pi 5に接続した後に /boot/firmware/config.txt の設定ファイルを編集する必要がありました(購入されたカメラにあわせて設定してください)。

# カメラを認識するようにコンフィグファイルを編集する
$ sudo vi /boot/firmware/config.txt
### 以下の行を camera_auto_detect=1 から camera_auto_detect=0 に変更
# Automatically load overlays for detected cameras
camera_auto_detect=0
### 最後の[all]指定部に dtoverlay=imx219,cam0 を追加
[all]
dtparam=pciex1_gen=3
dtoverlay=imx219,cam0

# 再起動する
$ reboot
設定後は libcamera-helloあるいはrpicam-helloを実行してカメラで撮影ができることを確認しましょう。
# GUIのある環境でカメラが撮影できていることを確認しましょう
## 確認方法 (1
$ libcamera-hello
## 確認方法 (2
$ rpicam-hello --list-cameras 0
Raspberry Pi 5 カメラの撮影後の後処理として推論する
Raspberry Piカメラと連携したHailoの推論は下記Webサイトの「Demos」を参照してください。rpicam-helloコマンドを使い、撮影の後処理としてHailoを使った推論を実施するサンプルプログラムを実行できます。
# GitHubからサンプルプログラムをダウンロードする
$ git clone --depth 1 https://github.com/raspberrypi/rpicam-apps.git ~/rpicam-apps

# 作業ディレクトリへ移動する
$ cd ~/rpicam-apps/
$ ls
README.md  core     license.txt        output                  utils
apps       encoder  meson.build        post_processing_stages
assets     image    meson_options.txt  preview

# 物体検出のデモを実行してみましょう
$ rpicam-hello -t 0 --post-process-file ~/rpicam-apps/assets/hailo_yolox_inference.json --lores-width 640 --lores-height 640 --framerate 20
様々なサンプルプログラムが提供されています、是非お試しください。