AWSのElastic Container Service (ECS)の概要
AWSのElastic Container Service (ECS)は、コンテナ化されたアプリケーションを簡単に実行、停止、管理できるフルマネージドコンテナオーケストレーションサービスです。ECSは以下の主な特徴を持っています:
- AWSのインフラストラクチャを活用した高可用性と拡張性
- Dockerコンテナのサポート
- 他のAWSサービスとの統合
- 柔軟なスケジューリングオプション
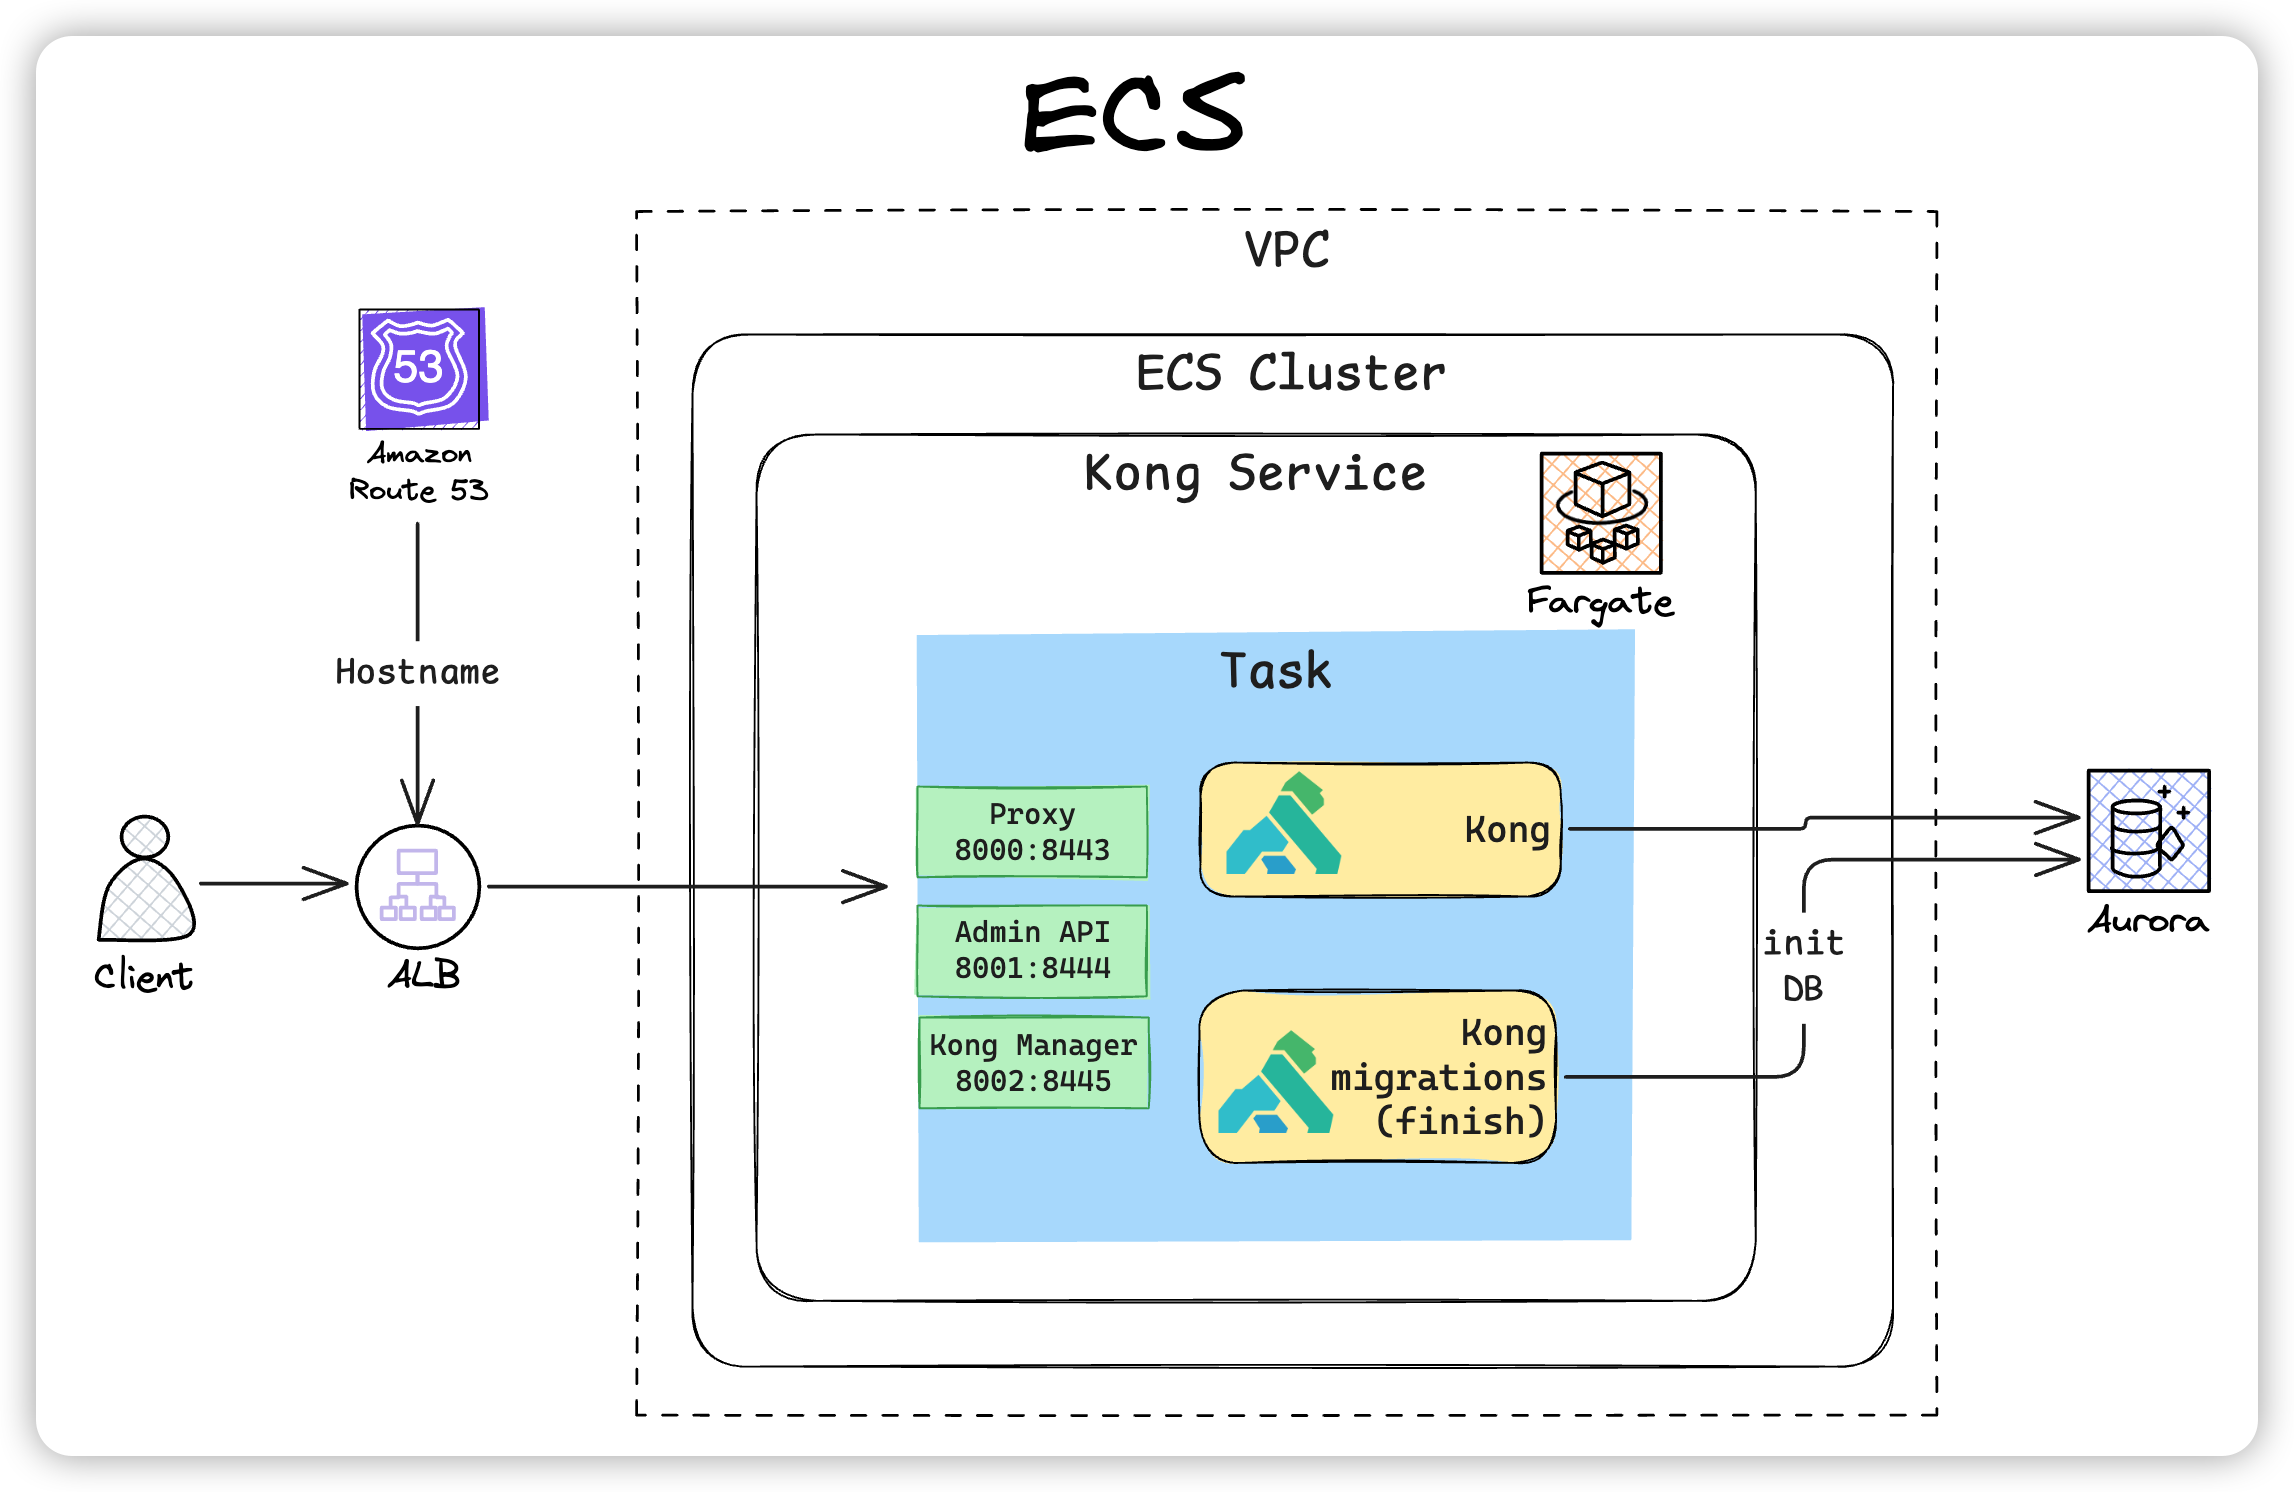
Kong Gatewayは、高性能なオープンソースAPIゲートウェイで、マイクロサービスの管理、セキュリティ、監視などの様々な機能を提供します。この記事では、Kong GatewayをECS環境にインストールする方法を説明します。インストールする全体像を以下に示します。
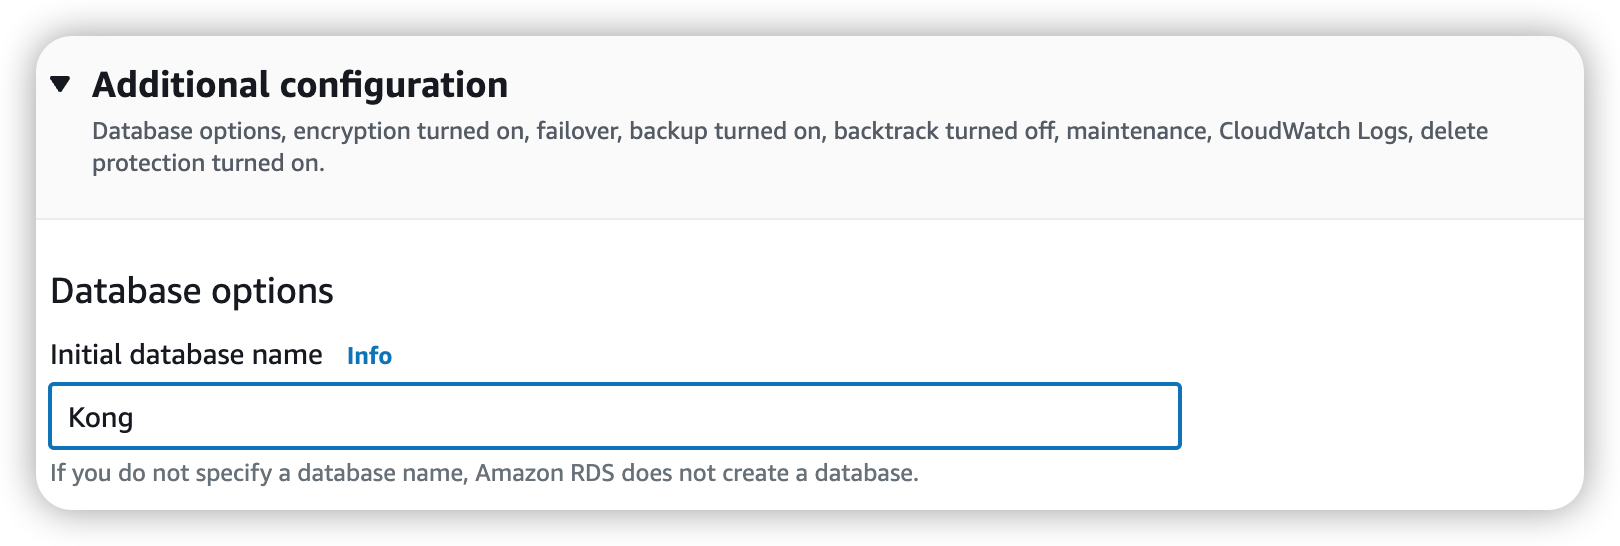
DBの準備
今回のデプロイでは、Postgre互換のAurora DBを利用しています。Aurora DBを作る時にデータベース名を指定することができるから、最初からKongに指定した方が楽です。
ecs-cliコマンドの準備
次にコマンドの準備です。アクセスの権限とクラスタの情報を事前に定義することができます。今回はFARGATEのタイプを作るため、default-launch-typeをFARGATEにしています。
> ecs-cli configure profile \
     --profile-name kong-profile \
     --access-key xxxxxxxx \
     --secret-key xxxxxxxx
INFO[0000] Saved ECS CLI profile configuration kong-profile.

> ecs-cli configure \
    --cluster kong-ecs \
    --region ap-northeast-1 \
    --config-name kong-config \
    --default-launch-type FARGATE
INFO[0000] Saved ECS CLI cluster configuration kong-config.
この設定内容は.ecsの下のファイルで確認できます。
> cat .ecs/config
version: v1
default: kong-config
clusters:
  kong-config:
    cluster: kong-ecs-demo
    region: ap-northeast-1
    default_launch_type: FARGATE

> cat .ecs/credentials
version: v1
default: kong-profile
ecs_profiles:
  kong-profile:
    aws_access_key_id: xxxxxxxxxxxx
    aws_secret_access_key: xxxxxxxxxxx
ECSクラスタの作成
次に、上記の設定内容をベースに、ecs-cliを使用してECSクラスタを作成します。VPCやサブネットなどの必要なリソースは自動的に生成されます。
> ecs-cli up --capability-iam --cluster-config kong-config
INFO[0000] Created cluster                               cluster=kong-ecs-demo region=ap-northeast-1
INFO[0000] Waiting for your cluster resources to be created...
INFO[0001] Cloudformation stack status                   stackStatus=CREATE_IN_PROGRESS
VPC created: vpc-0c8bd4ff24a588273
Subnet created: subnet-08a35c8103b05b6a6
Subnet created: subnet-0211846377e4c3d29
Cluster creation succeeded.
既存のVPCやサブネットを利用したい場合は、--vpcと--subnetsオプションで指定できます。
> ecs-cli up --vpc vpc-xxxxxxxxxxx \
             --subnets subnet-xxxxxxxxxxx,subnet-xxxxxxxxxxx,subnet-xxxxxxxxxxx\
             --cluster-config kong-config \
             --ecs-profile kong-profile
VPCが決まったら、次にセキュリティグループのIDを確認しましょう。
aws ec2 describe-security-groups \
        --filters Name=vpc-id,Values=vpc-xxxxxxxxxx | grep -i GroupId
                            "GroupId": "sg-yyyyyyyyyy",
            "GroupId": "sg-yyyyyyyyyy",
ECSクラスタの作成が完了したら、以下のリソースのIDを記録しておきましょう:
- 利用するVPC
- サブネット
- セキュリティグループ
タスクとサービスを定義するファイルを準備
ECSのタスクやサービスの設定は以下のファイルで行います。このファイルには注意すべき点がいくつかあります。
- ecs_network_modeはawsvpcにしか設定できない
- task_execution_roleは適切に変更
version: 1
task_definition:
  ecs_network_mode: awsvpc
  task_size:
    cpu_limit: 256
    mem_limit: 1024
  task_execution_role: arn:aws:iam::xxxxxxxxxxxx:role/ecsTaskExecutionRole
  services:
    kong-migrations:
      essential: false
      logConfiguration :
        logDriver: awslogs
        options:
          awslogs-group: kong
          awslogs-region: ap-northeast-1
          awslogs-stream-prefix: log-kong
    kong:
      hostname: kong
      essential: true
      depends_on:
      - container_name: kong-migrations
        condition: COMPLETE
      logConfiguration :
        logDriver: awslogs
        options:
          awslogs-group: kong
          awslogs-region: ap-northeast-1
          awslogs-stream-prefix: log-kong
run_params:
   network_configuration:
     awsvpc_configuration:
       subnets:
         - "subnet-08a35c8103b05b6a6"
         - "subnet-0211846377e4c3d29"
       security_groups:
         - "sg-025b2859c18d70c2c"
       assign_public_ip: ENABLED
サービスの中身のコンテナーを定義するファイルを準備
Kong Gatewayコンテナの起動条件を定義します。各パラメータの詳細な説明は省略しますが、KONG_ADMIN_GUI_URLとKONG_ADMIN_GUI_API_URLは環境に合わせて適切に設定する必要があります。
version: "3"
services:
  kong-migrations:
    image: kong/kong-gateway:3.4.3.12
    command: kong migrations bootstrap
    environment:
      - KONG_DATABASE=postgres
      - KONG_PG_HOST=wenhan.cluster-cad2bwtkwmrs.ap-northeast-1.rds.amazonaws.com
      - KONG_PG_USER=wenhan
      - KONG_PG_PASSWORD=kongkong
      - KONG_PASSWORD=kong
    logging:
      driver: awslogs
      options:
        awslogs-group: kong
        awslogs-region: ap-northeast-1
        awslogs-stream-prefix: log-kong-init
  kong:
    image: kong/kong-gateway:3.4.3.12
    ports:
      - 8000:8000
      - 8001:8001
      - 8002:8002
      - 8443:8443
      - 8444:8444
      - 8445:8445
    command: "kong start"
    environment:
      - KONG_ADMIN_GUI_URL=http://wenhan-manager.service-connectivity.com:8002
      - KONG_ADMIN_GUI_API_URL=http://wenhan-admin.service-connectivity.com:8001
      - KONG_DATABASE=postgres
      - KONG_PG_HOST=wenhan.cluster-cad2bwtkwmrs.ap-northeast-1.rds.amazonaws.com
      - KONG_PG_USER=wenhan
      - KONG_PG_PASSWORD=kongkong
      - KONG_PROXY_ACCESS_LOG=/dev/stdout
      - KONG_ADMIN_ACCESS_LOG=/dev/stdout
      - KONG_PROXY_ERROR_LOG=/dev/stderr
      - KONG_ADMIN_ERROR_LOG=/dev/stderr
      - KONG_PROXY_LISTEN=0.0.0.0:8000, 0.0.0.0:8443 ssl
      - KONG_ADMIN_LISTEN=0.0.0.0:8001, 0.0.0.0:8444 ssl
      - KONG_ADMIN_GUI_LISTEN=0.0.0.0:8002, 0.0.0.0:8445 ssl
      - KONG_LOG_LEVEL=info
    logging:
      driver: awslogs
      options:
        awslogs-group: kong
        awslogs-region: ap-northeast-1
        awslogs-stream-prefix: log-kong
タスクとサービスの起動
compose upコマンドでタスクとサービスを起動します。利用するパラメータに上記必要なファイルを入力します。
ecs-cli compose \
 --file docker-compose.yml \
 --ecs-params ./ecs-params.yml \
 --debug service up \
 --create-log-groups
これで二つのコンテナが起動されます。migrationsの方がDBを初期化するものなので、処理が終わったらStopped状態になります。もう一つの方が起動しているKong Gatewayのサービスです。

タスクのNetworkingから外部向けのIPアドレスがアサインされ、このアドレスからKongのサービスにアクセスすることができます。
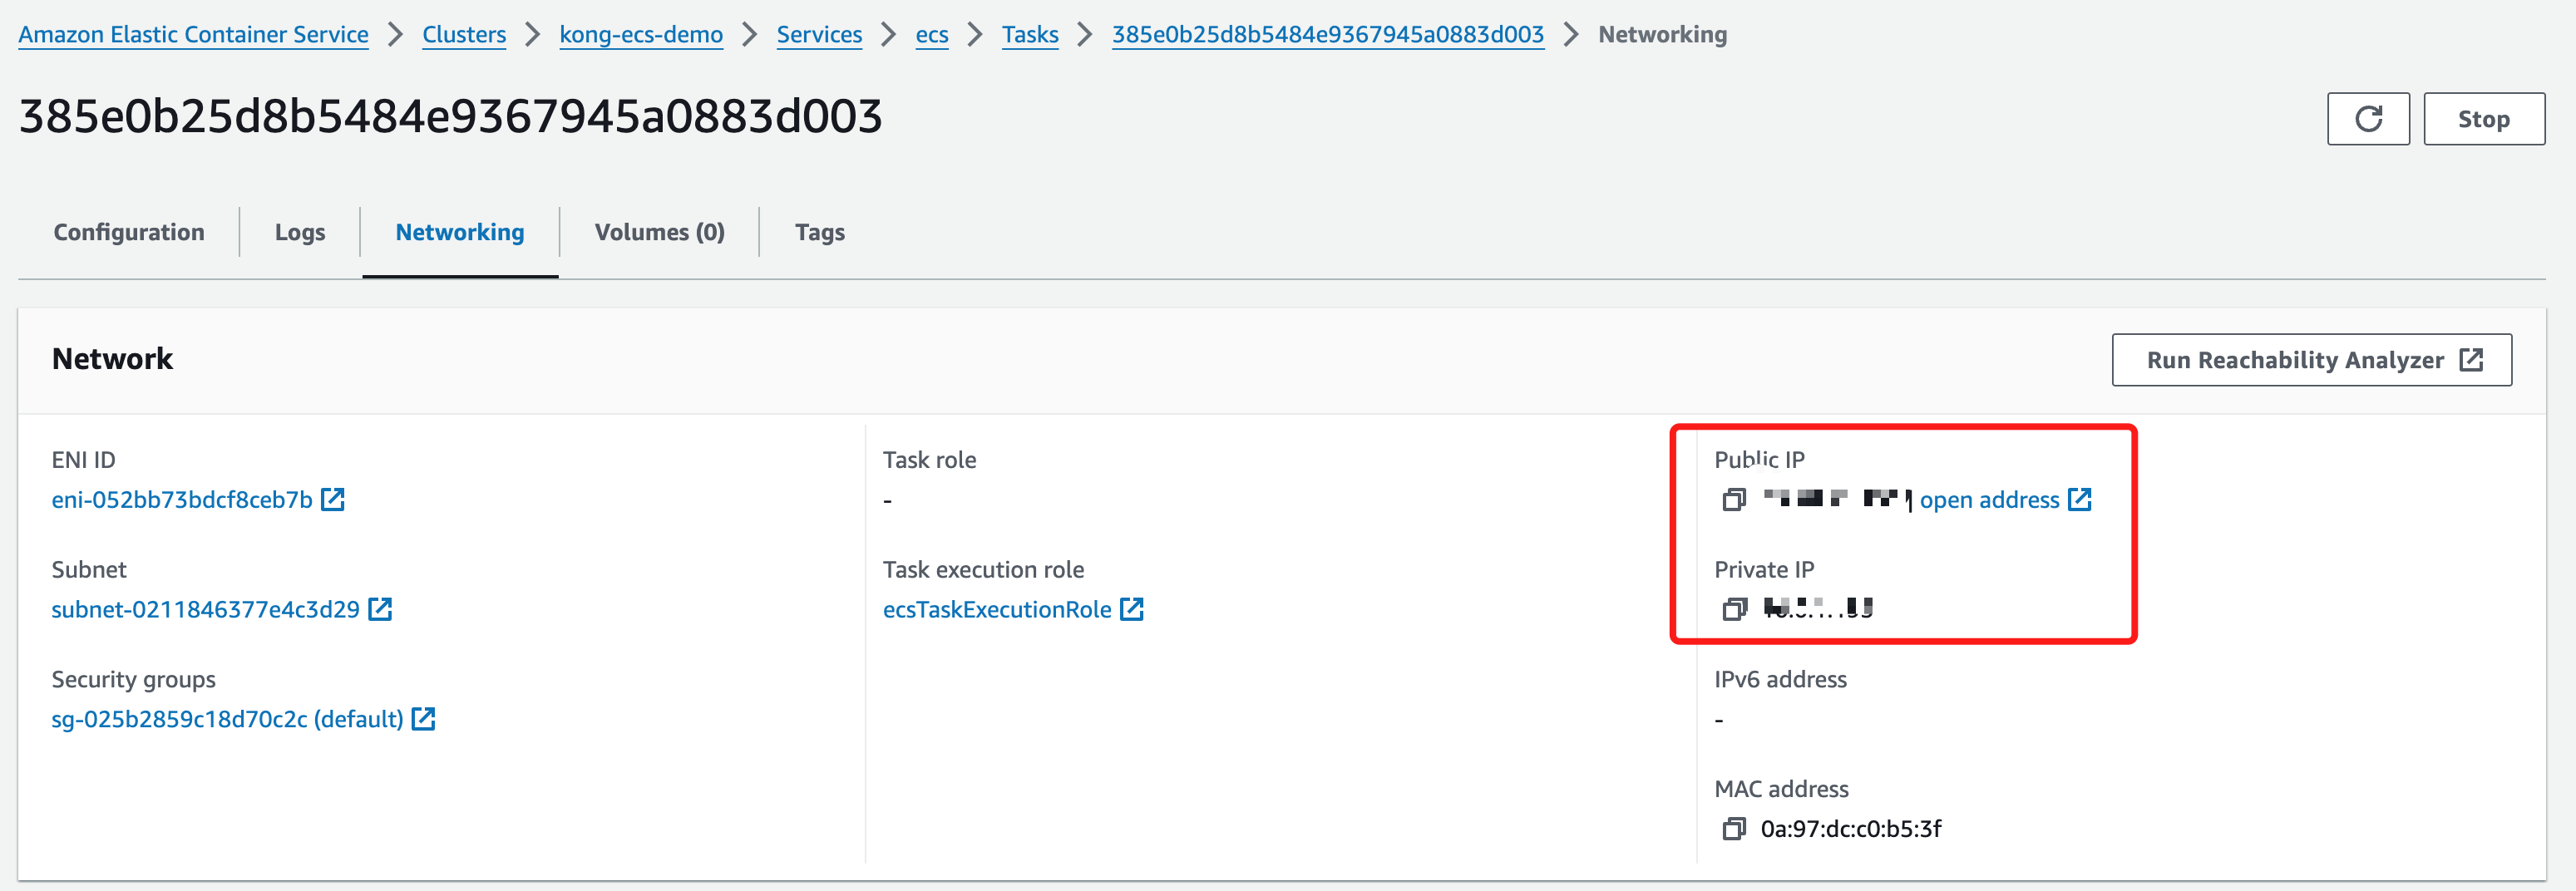
たとえば http://<IP address>:8001からAdmin APIにアクセスすることができます。
タスクとサービスの終了
ecs-cli compose \
 --file docker-compose.yml \
 --ecs-params ./ecs-params.yml \
 --debug service down
後書き
残りの作業として、
- このIPアドレスに指すようにTarget Groupを作って、ALBを作成
- Route 53からDNS Entryを作成
実は上記の作業をterraformやcloudformを使って、もっと自動化にすることはできますが、TBDにします。