初めに
手順
Twilio側
電話番号の購入
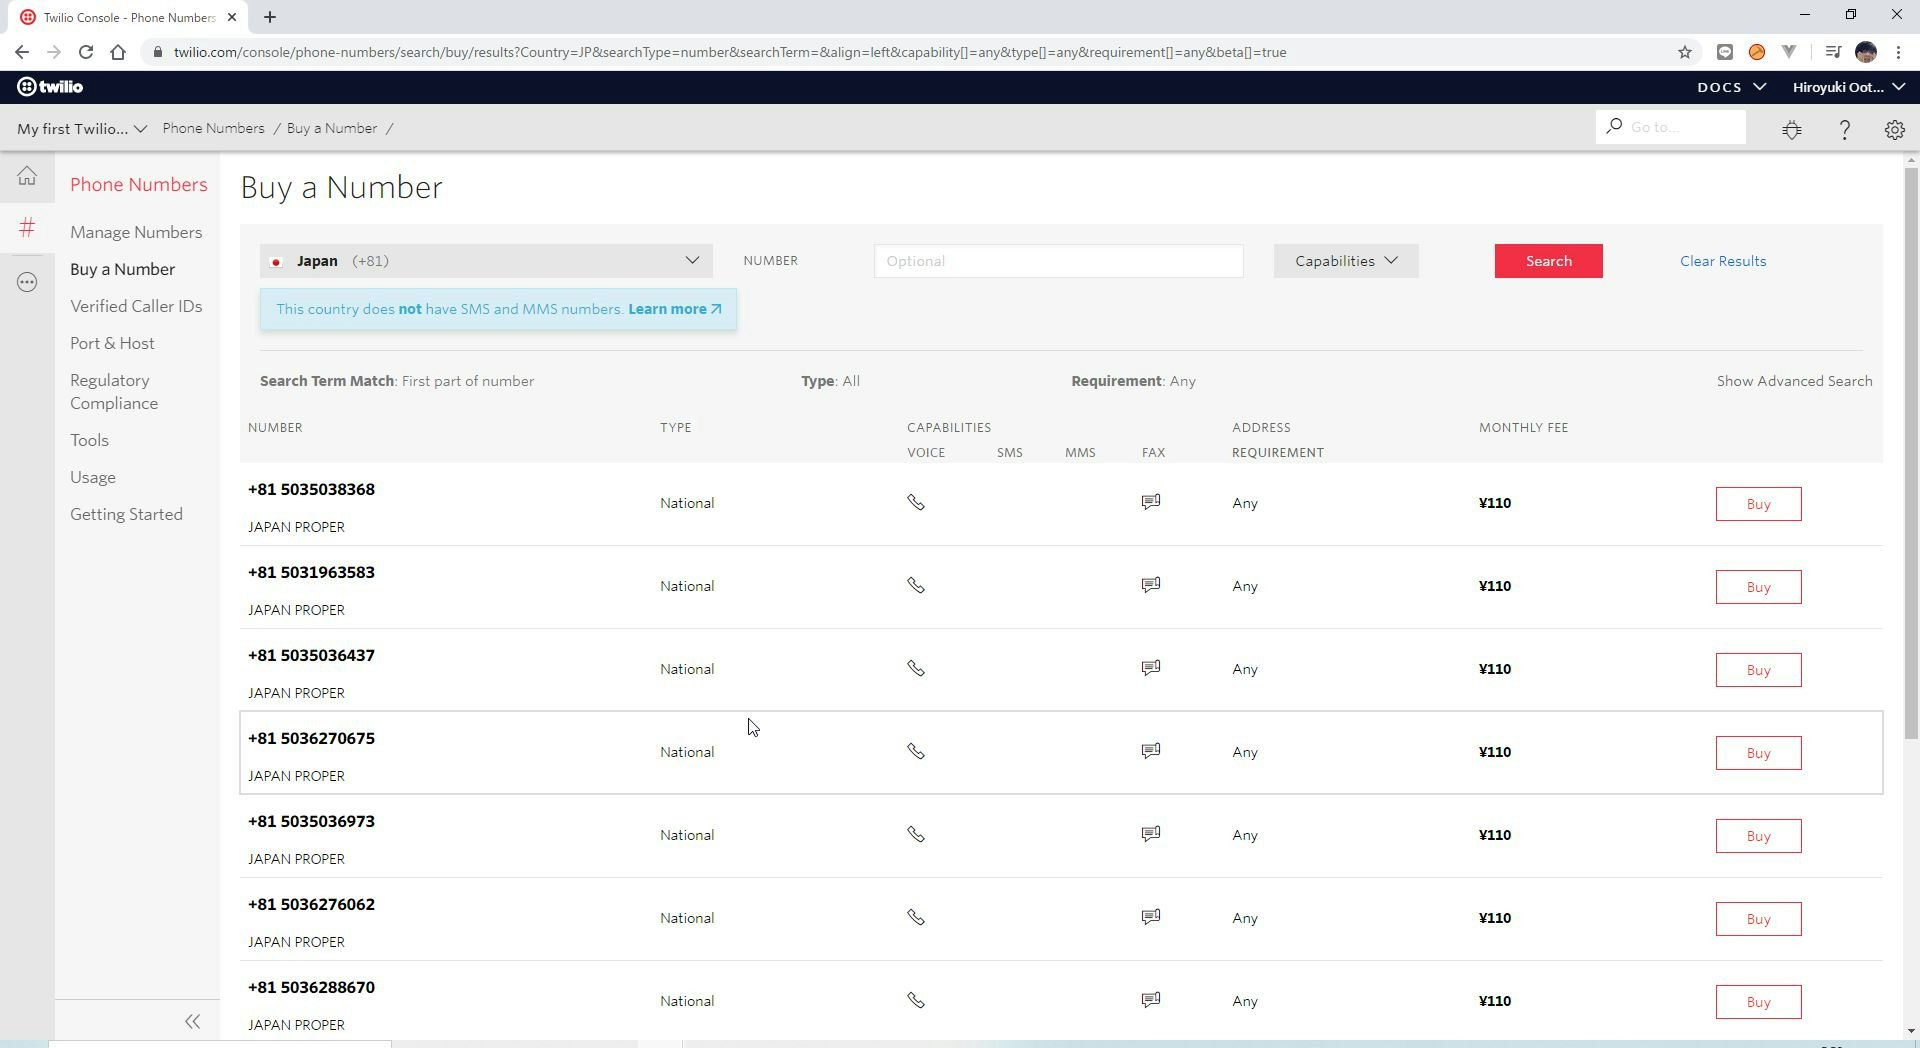
Twilio上の電話番号検索画面から+81(日本の電話番号)がつく電話番号を探し、手ごろなものを探します。
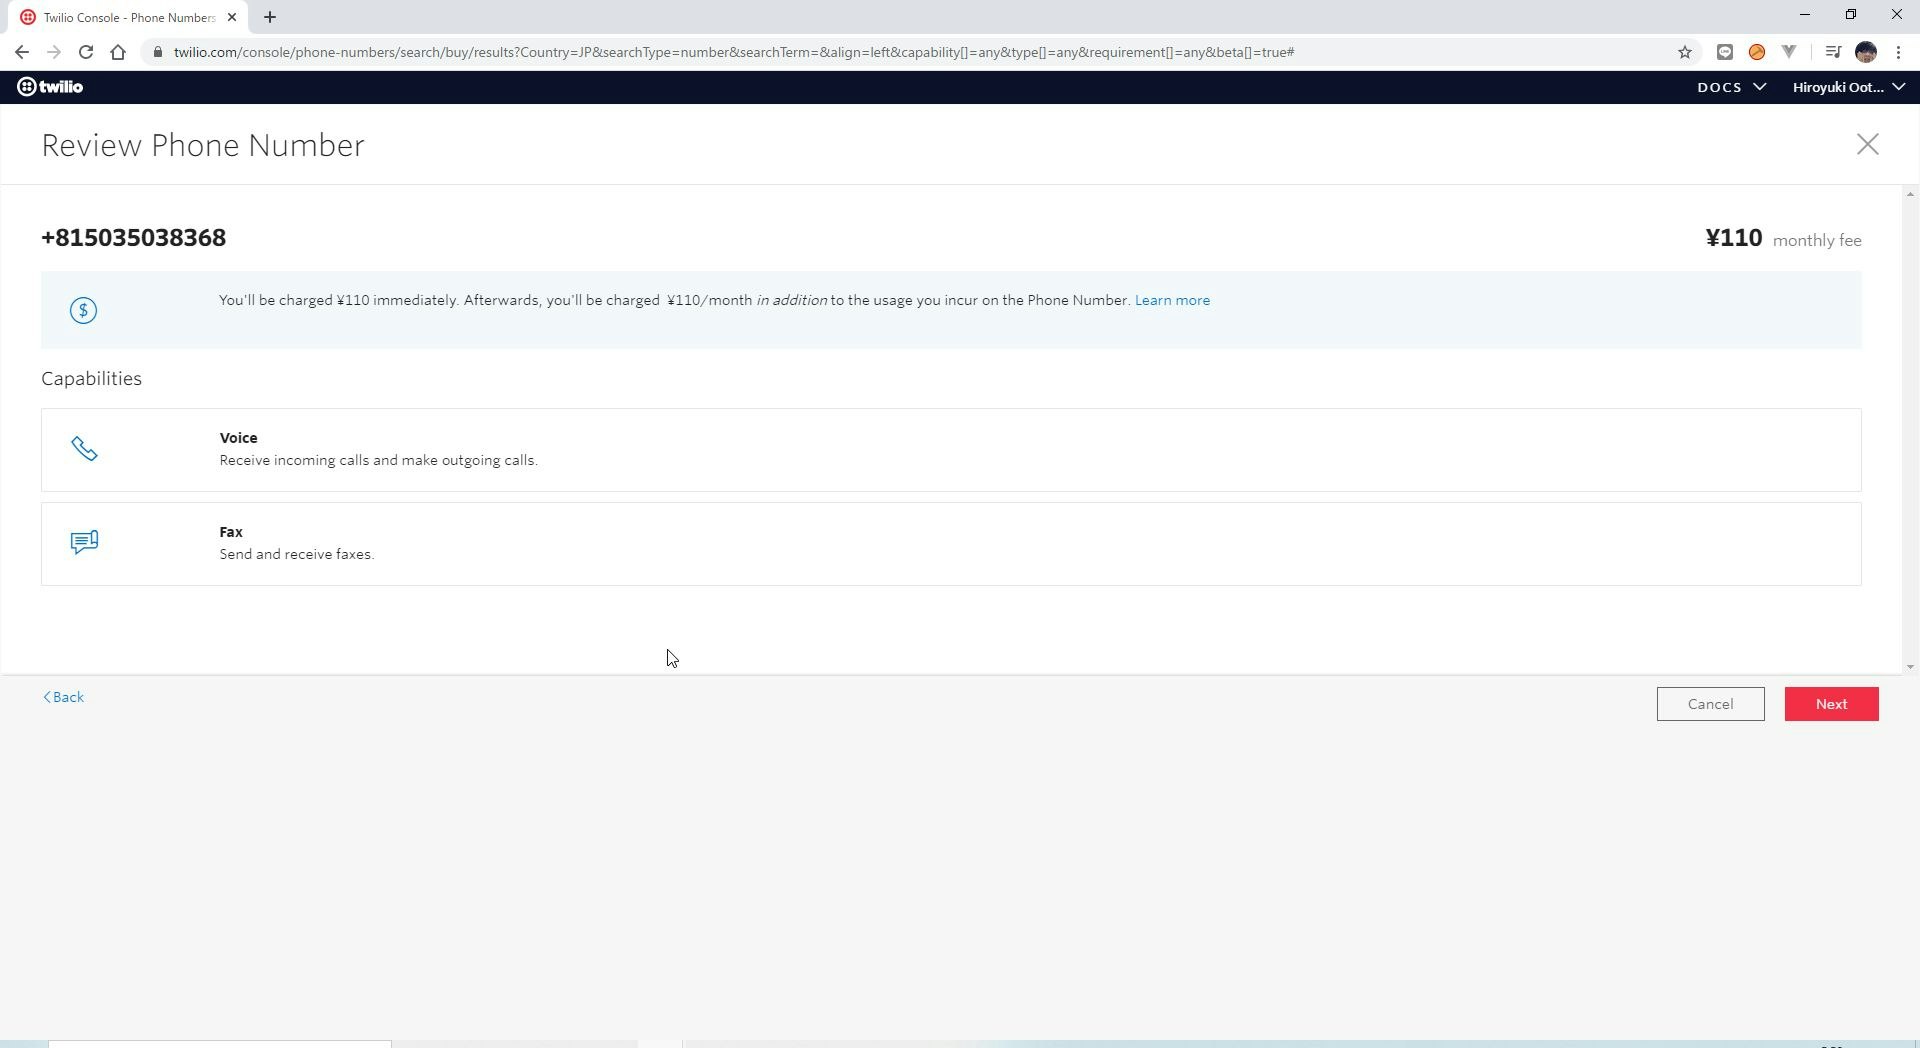
購入には110円かかります。電話番号の購入には運転免許証orパスポート等の情報をアップロードする必要性があり、認可されるまで1日ぐらいかかります。
Elastic SIP Trunkingの設定
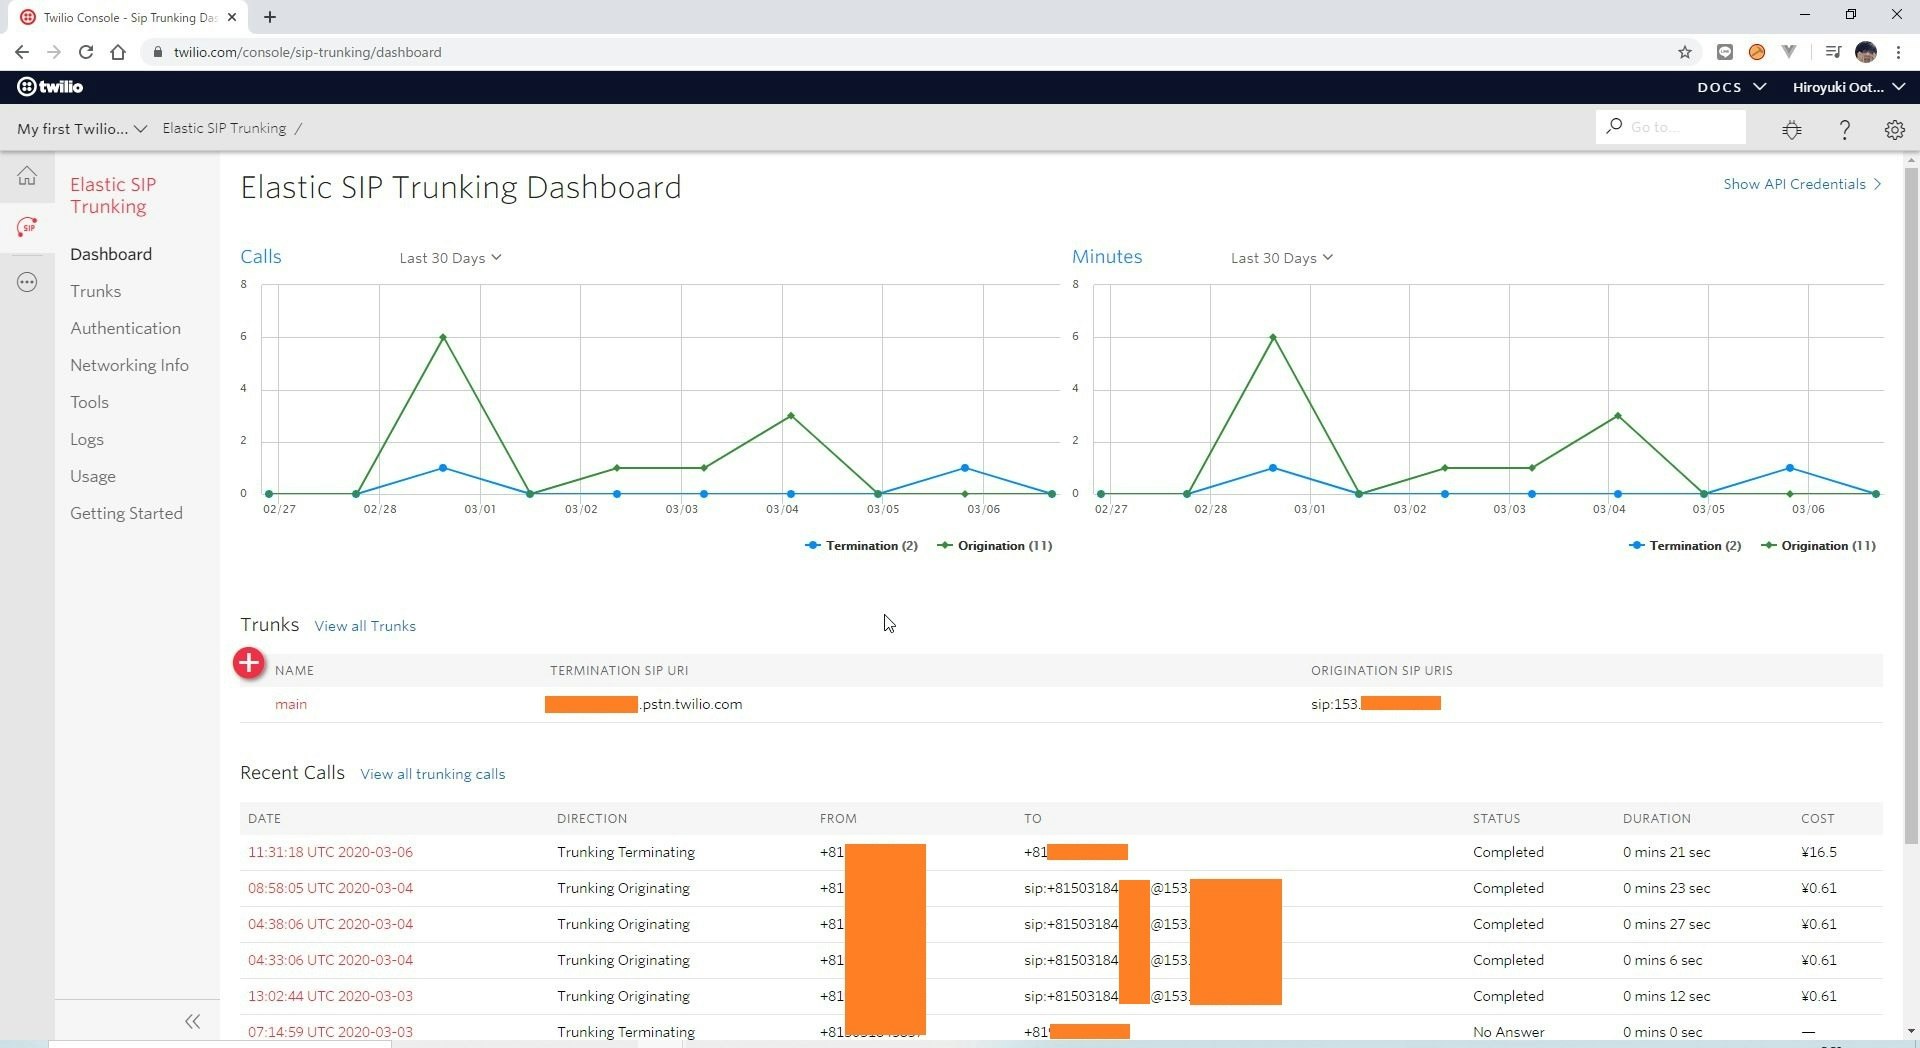
Twilio上のElastic SIP Trunkingをクリックし、SIP転送設定を追加します。
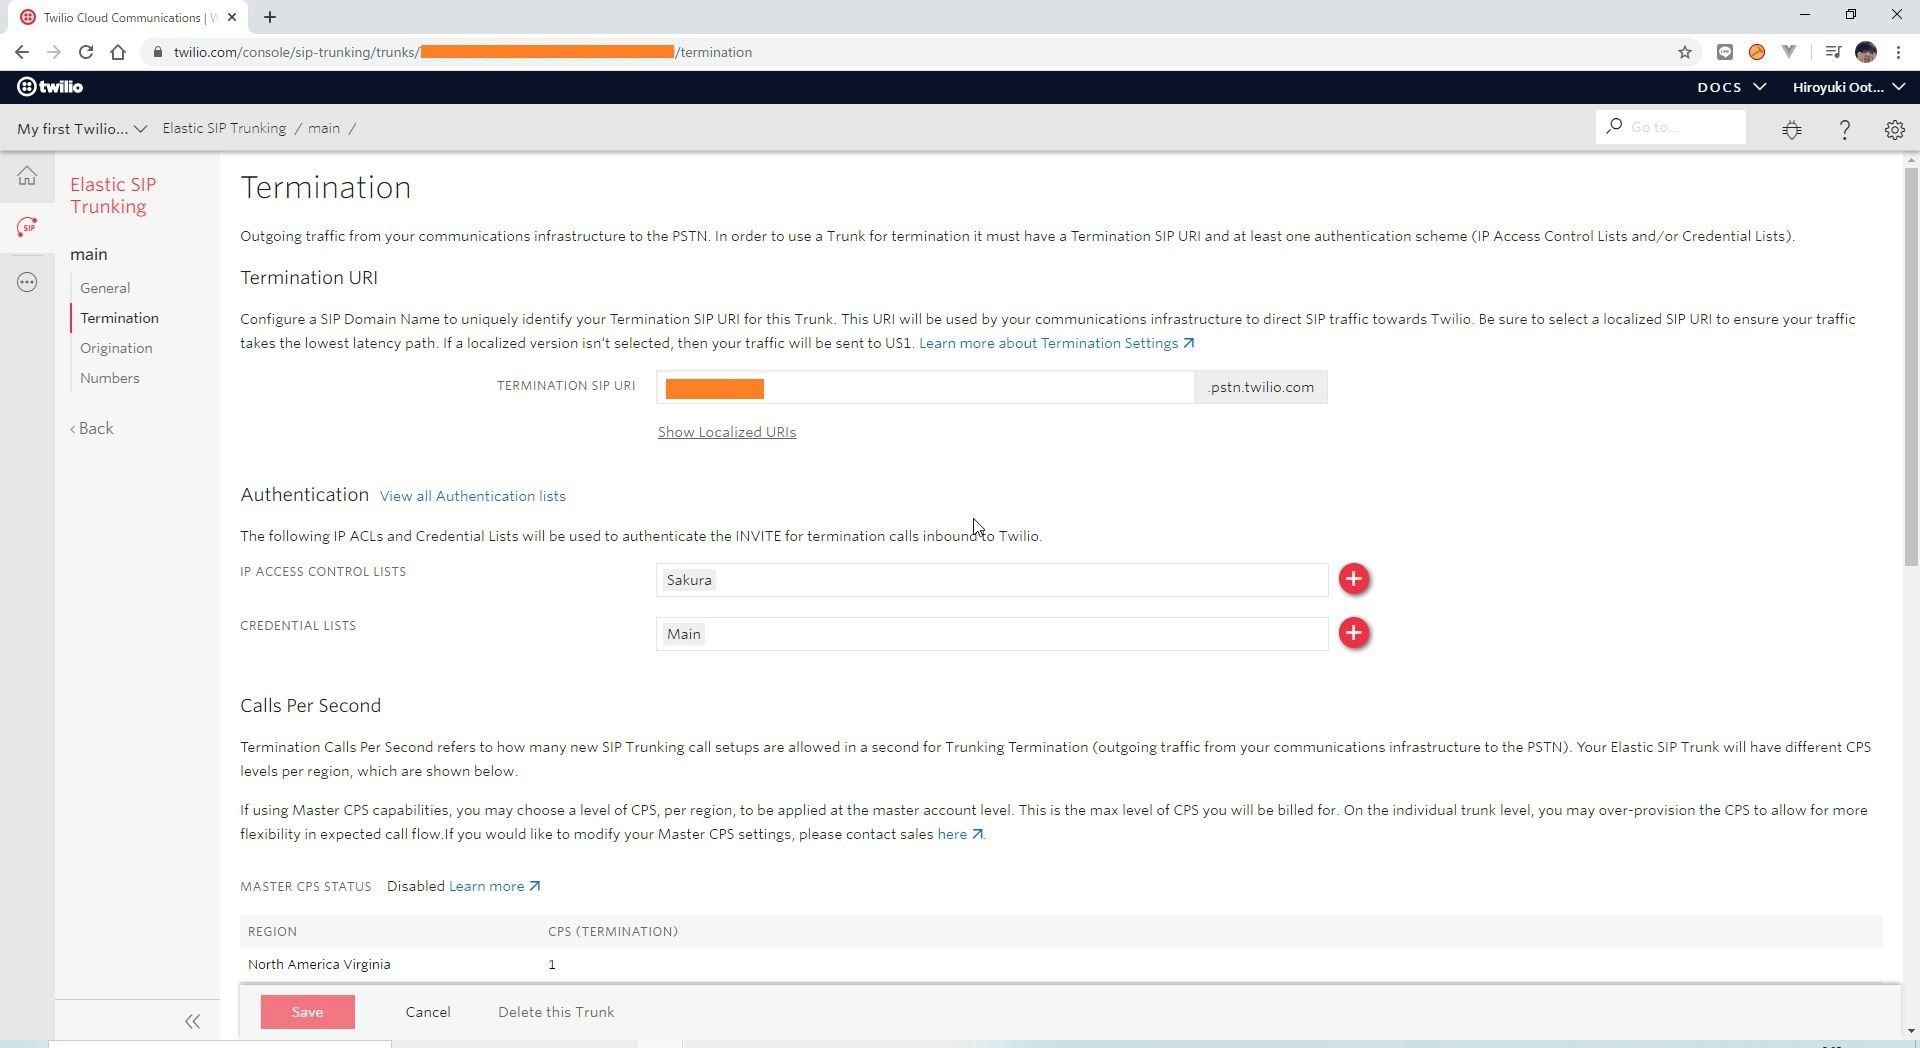
Termination (Outgoing)の設定
TRERMINATION SIP URLを設定します。ここで設定されるURLはOutgoing用で、Asterisk内部のSIPクライアントから外線に発信する時に叩くURLとなります。また、このエンドポイントに対する認証情報(ユーザー名とパスワード)も一緒に設定しておきましょう。
※ほかの人に推測されない&ほかの人が利用していないURLにする必要性があります。
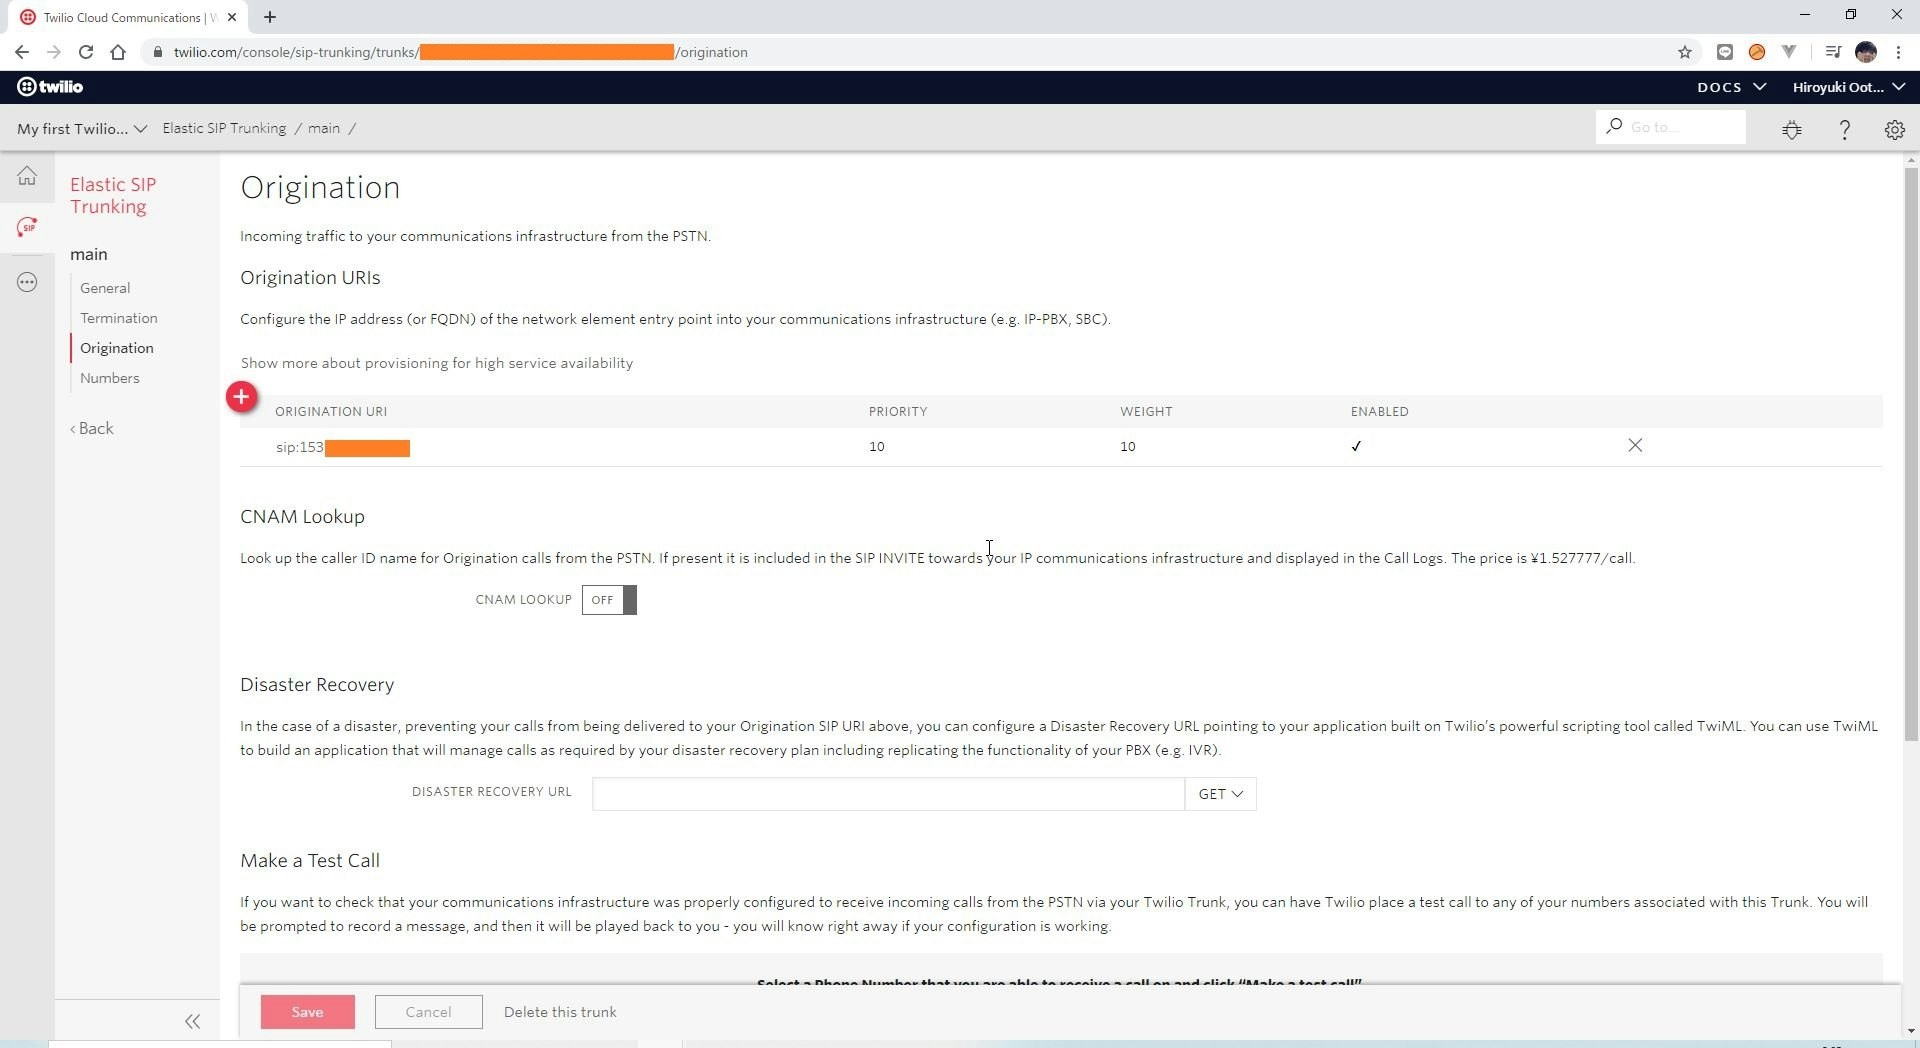
Origination (InComing)の設定
ORIGINATION URLを設定します。sip:<SIPサーバーのGlobalIP>という感じで設定します。
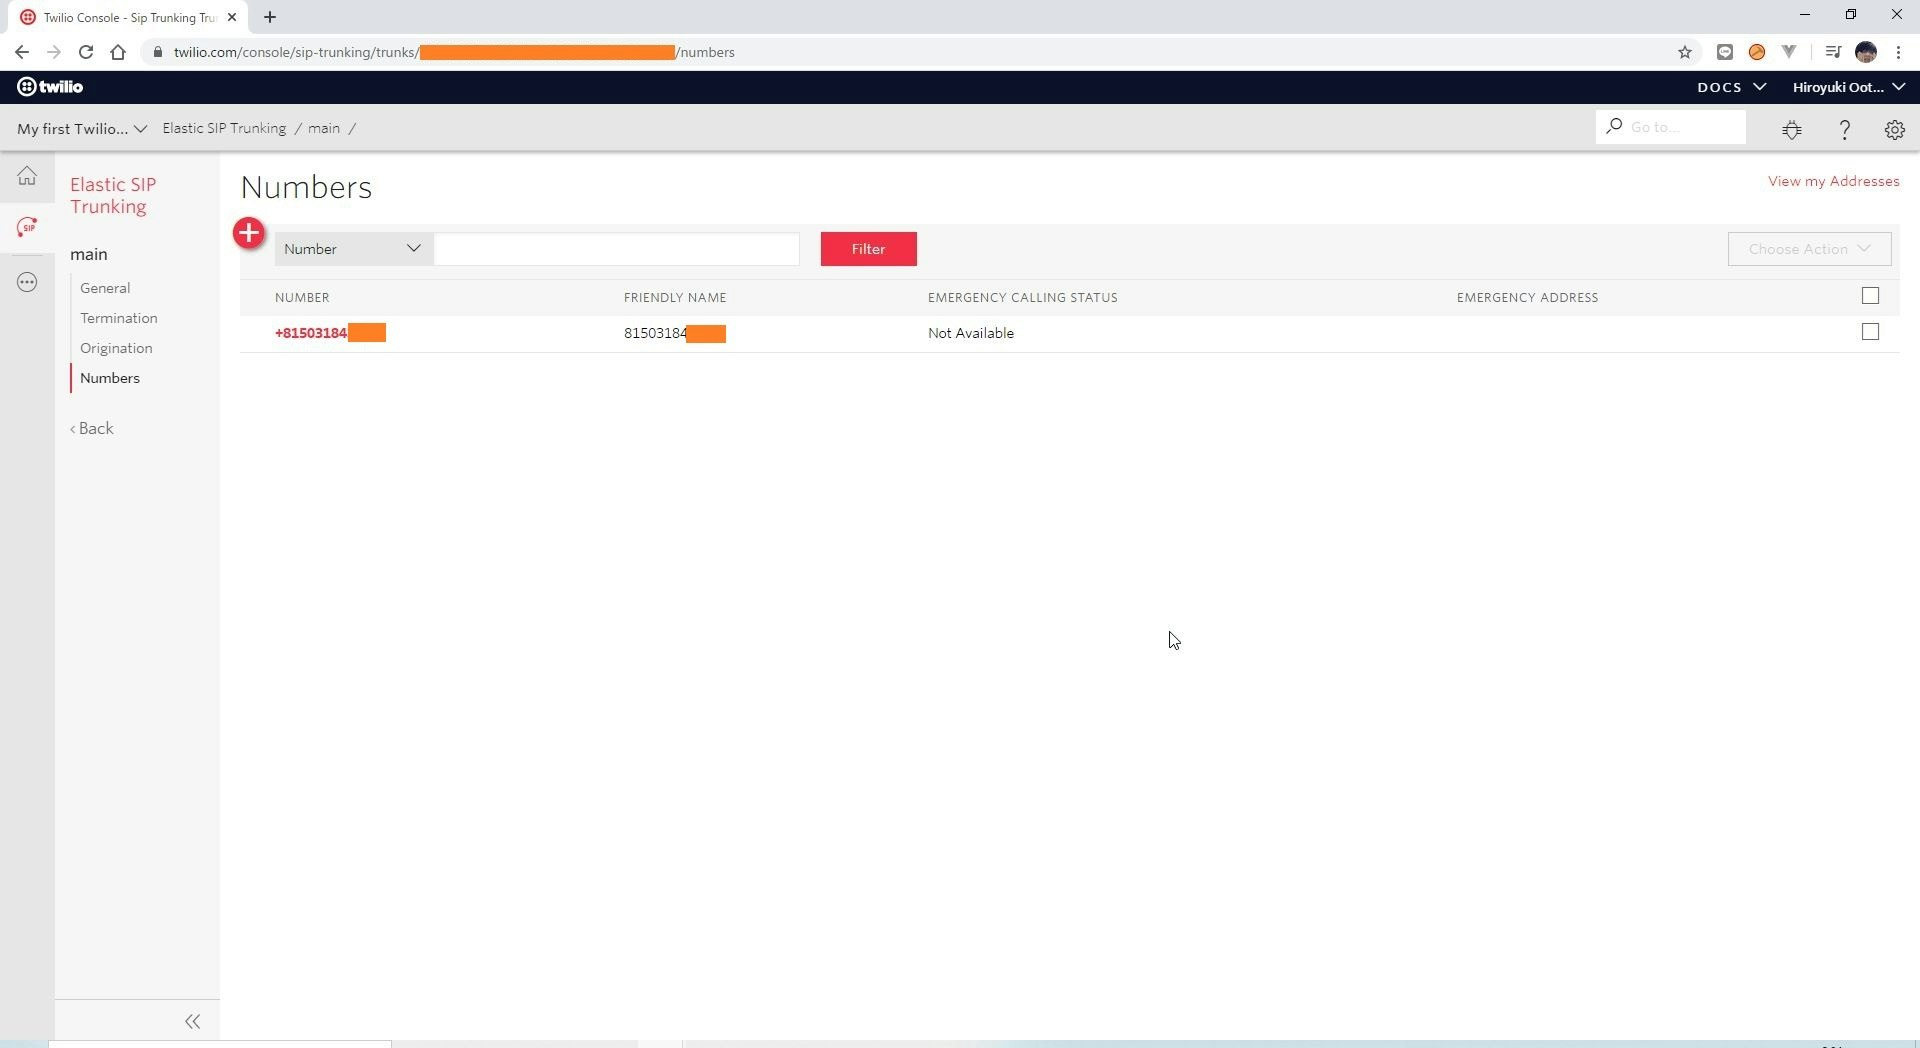
SIPトランク転送をする対象の電話番号紐づけ
前工程で購入した電話番号と紐づけます。これで購入した電話番号に電話がかかってきた場合、InComing設定したSIPサーバーにトランクが転送されるようになります。Twilio側の作業は一旦これで完了です。
Asterisk側
下記の情報は、随時ご自身の環境と照らし合わせながら進めて頂ければと思います。
-
Twilioで取得した電話番号
+81503184XXXX -
Twilio側のサーバーの設定
- TRERMINATION SIP URL:
XXXXXXXX.pstn.twilio.com:5060 - ユーザー認証
- USERNAME:
CREDENTIAL_USERNAME - PASSWORD:
CREDENTIAL_USERNAME
- USERNAME:
- TRERMINATION SIP URL:
extensions.confの変更
下記のように、extensions.confを編集する。
-
内部→外線への発信 (Outgoing)
- SIPクライアント(内線)からの発信は、twilio0というエンドポイントに流す
- クライアント側からの発信電話番号から1文字目を削除して
+81を付与する- 発信先が
090XXXXYYYYの場合は
- 発信先が
-
外線→内部への着信 (InComing)
- 6002へ転送
[from-internal]

exten => 100,1,Answer()
same => n,Wait(1)
same => n,Playback(hello-world)
same => n,Hangup()

exten => 6001,1,Dial(PJSIP/6001,30,r)
same => n,Hangup()

exten => 6002,1,n,Dial(PJSIP/6002,30,r)
same => n,Hangup()

exten => _0.,1,Set(CALLERID(all)="Mr Twilio" <+81503184XXXX>)
same => n,Dial(PJSIP/+81${EXTEN:1}@twilio0)

[from-twilio]

exten => _+81503184XXXX,1,Dial(PJSIP/6002,30,r)
same => n,Hangup()
pjsip.confの変更
今回、twilio0というエンドポイントを作る為に下記のような設定を追加しています。
[general]
allow=ulaw

[transport-udp]
type=transport
protocol=udp
bind=0.0.0.0

[6001]
type=endpoint
context=from-internal
disallow=all
allow=ulaw
auth=6001
aors=6001
rewrite_contact = yes

[6001]
type=auth
auth_type=userpass
password=unsecurepassword
username=6001

[6001]
type=aor
max_contacts=10

[6002]
type=endpoint
context=from-internal
disallow=all
allow=ulaw
auth=6002
aors=6002
rewrite_contact = yes

[6002]
type=auth
auth_type=userpass
password=unsecurepassword
username=6002

[6002]
type=aor
max_contacts=10

[twilio-trunks](!)
type=endpoint
transport=transport-udp
context=from-twilio
disallow=all
allow=ulaw

[auth-out](!)
type=auth
auth_type=userpass

[twilio0](twilio-trunks)
aors=twilio0-aors
outbound_auth=twilio0-auth

[twilio0-aors]
type=aor
contact=sip:XXXXXXXX.pstn.twilio.com:5060

[twilio0-ident]
type=identify
endpoint=twilio0
match=54.65.63.192
match=54.65.63.193
match=54.65.63.194
match=54.65.63.195
match=54.172.60.0
match=54.172.60.1
match=54.172.60.2
match=54.172.60.3

[twilio0-auth](auth-out)
password=CREDENTIAL_PASSWORD
username=CREDENTIAL_USERNAME
twilio0-identのmatch属性にIPアドレスがいくつか書いてあると思います。ドキュメントによると、これらのサーバーからInComingがくるようなのでAsteriskとFirewallの両方で許可する必要性があります。
北米バージニアゲートウェイを許可しているのは、TwilioのElastic SIP Trunkingのコンソール画面にあるMake a test callを有効化する為です。(これを有効化しないとテストコールが発信できない)
You MUST Whitelist ALL of Twilio's following IP address ranges and ports on your firewall for SIP signalling and RTP media traffic. This is important if you have Numbers in different regions and for resiliency purposes (e.g. if North America Virginia gateways are down, then North America Oregon gateways will be used). Twilio does not guarantee which region the media will egress from, without using the region parameter since it can depend on which PSTN-SIP Gateway delivers the call to which Twilio region.
参照: https://jp.twilio.com/docs/sip-trunking
テスト
正しく設定できると、Twilio経由で公衆電話回線網に対して発信と着信の両方ができるようになります。
-
InComingのテスト方法
- 購入した電話番号
0503184XXXXに対して電話をかける - 6002に設定したIP電話(SIPクライアント)が着信する
- 購入した電話番号
-
Outgoingのテスト方法
- Asteriskにぶら下がっているIP電話(SIPクライアント)から普通に電話をかける
- ※この時、0を抜いたり国際電話番号を付けないようにする
- 入力した電話番号の携帯が着信する
- Asteriskにぶら下がっているIP電話(SIPクライアント)から普通に電話をかける
Twilioのコンソールを確認すると、細かく履歴やエラー内容が確認する事ができます。もし問題がおきた場合はコンソールを確認する事でデバッグと対応が可能です。
まとめ
今回、Twilioとその機能であるElastic SIP Trunkingによって、公衆電話回線(PSTN)に対して発着信ができる状態にする事ができました。電話番号がネットで購入できる時代だからこそやれるって感じの内容ですね。Twilioを初めて使ったんですが、改めてすごいプロダクトだと思いました。
記事に不備等があればご連絡いただけますと幸いです。
※おそらくSIPの内容は暗号化されずにインターネットを駆け巡っている為、本番で使うには諸々工夫が必要です。

