kapt + KotlinPoetで、処理対象クラスのパッケージを指定してファイルを書き出します。
やり方は幾つか有りますが、この記事ではClassNameからパッケージ名・クラス名の情報を取得し、ProcessingEnvironmentから取得したfilerを指定して書き出す方法を紹介します。
バージョン類は以下の通りです。
-
Kotlin:1.4.31 -
KotlinPoet:1.7.2 -
AutoCommon:0.11 -
AutoService:1.0-rc7
サンプルコード
アノテーションを付けたクラスに対して、そのコードと同一パッケージにhello from ${クラス名}とプリントするコードを生成するサンプルです。
特に重要なのはgenerateHelloWorld関数です。
以下、こちらのサンプルコードを用いて解説していきます。
import com.google.auto.common.BasicAnnotationProcessor
import com.google.auto.service.AutoService
import com.google.common.collect.SetMultimap
import com.mapk.annotations.TargetAnnotation
import com.squareup.kotlinpoet.*
import javax.annotation.processing.Filer
import javax.annotation.processing.Processor
import javax.lang.model.SourceVersion
import javax.lang.model.element.Element
import javax.lang.model.element.ElementKind
import javax.lang.model.element.TypeElement

// 処理対象アノテーション
@Target(AnnotationTarget.CLASS)
@Retention(AnnotationRetention.RUNTIME)
@MustBeDocumented
annotation class TargetAnnotation

@AutoService(Processor::class)
class Processor : BasicAnnotationProcessor() {
    override fun getSupportedSourceVersion(): SourceVersion = SourceVersion.latestSupported()

    override fun getSupportedOptions(): Set<String> = setOf()

    override fun initSteps(): Iterable<ProcessingStep> {
        return listOf(TempProcessingStep(processingEnv.filer))
    }
}

class TempProcessingStep(private val filer: Filer) : BasicAnnotationProcessor.ProcessingStep {
    override fun annotations() = setOf(TargetAnnotation::class.java)

    override fun process(elementsByAnnotation: SetMultimap<Class<out Annotation>, Element>): Set<Element> {
        annotations()
            .flatMap { elementsByAnnotation[it] }
            .forEach {
                // 簡単のためクラスに付与する想定
                if (it.kind == ElementKind.CLASS) generateHelloWorld(it as TypeElement)
            }
        return emptySet()
    }

    // ハローワールドを出力する関数
    private fun generateHelloWorld(element: TypeElement) {
        val className = element.asType().asTypeName() as ClassName

        val funSpec = FunSpec.builder("helloWorld").apply {
            addStatement("""println("hello from ${className.simpleName}")""")
        }.build()

        val file = FileSpec.builder(className.packageName, "HelloFrom${className.simpleName}")
            .addFunction(funSpec)
            .build()

        file.writeTo(System.out) // デバッグ用にSystem.outにも出力
        file.writeTo(filer) // ファイルへ出力
    }
}
ClassNameの取得
処理対象のElementがTypeElementであれば、element.asType().asTypeName()で取得したTypeNameをClassNameにキャストできます。
private fun generateHelloWorld(element: TypeElement) {
    val className = element.asType().asTypeName() as ClassName
このClassElementからはパッケージ名やクラス名が簡単に取得できます。
val file = FileSpec.builder(className.packageName, "HelloFrom${className.simpleName}")
補足
TypeMirror.asTypeName()は現在Deprecatedされており、「kotlinpoet-metadataを使え」という旨の警告が出ますが、やり方が分からなかったためこの記事では無視しています。
この問題は恐らくKotlinとJavaで表現が違う型(IntやString)に対して起きるもので、今回取り扱う範囲では問題無いものと思っています。
出力先の指定
出力先はProcessingEnvironmentから取得したFilerを指定します。
ProcessingEnvironmentは、AbstractProcessor(BasicAnnotationProcessorの親クラス)を継承している場合、processingEnvフィールドから取得できます。
file.writeTo(filer) // ファイルへ出力
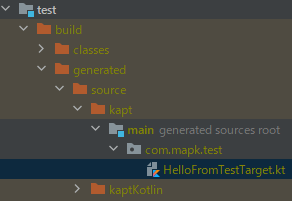
これを指定した場合、利用側で特に指定が無ければ${モジュールのroot}/build/generated/source/kapt/main/${指定したパッケージへのパス}が出力先になります。
実行結果
com.mapk.testというパッケージに以下のような処理対象を用意して実行した結果を示します。
package com.mapk.test

import com.mapk.annotations.TargetAnnotation

@TargetAnnotation
object TestTarget

fun main() { helloWorld() }
ビルドログ
file.writeTo(System.out)により、以下のように結果が確認できます。
# 略

> Task :test:processResources NO-SOURCE

> Task :test:kaptKotlin
package com.mapk.test

import kotlin.Unit

public fun helloWorld(): Unit {
  println("hello from TestTarget")
}

> Task :test:compileKotlin

# 略
生成されたコード
以下のようにコードが生成されます。
ちゃんとパッケージも指定できていることが分かります。
package com.mapk.test

import kotlin.Unit

public fun helloWorld(): Unit {
  println("hello from TestTarget")
}