公式に詳しい手順は書いているのですが、手順通りに進めても上手く行かない箇所があったため、備忘録を兼ねてYouCompleteMe(以下YCM)をインストールする手順を残します。
デモ
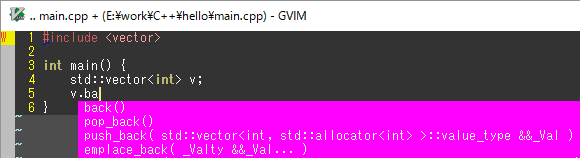
C++の補完もちゃんと動く
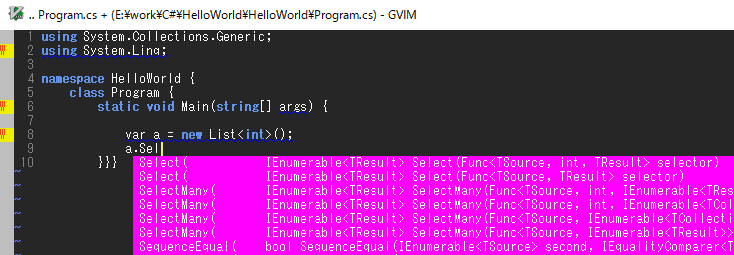
C#のLINQもちゃんと補完してくれる
環境
環境はすべて64bitです。
- Windows 10 Pro
-
Visual Studio Community 2017
- C++は必須。
- C#の補完もするならC#も、追加でC++インストール時のMSBuildも必要。
-
LLVM 5.0.0
- 5.0.0じゃないといけない、5.0.1だと上手くいかなかった。
- ダウンロード: Pre-Built Binaries:のClang for Windows (64-bit)
-
Python 3.5.x(リンクは3.5.4)
- ダウンロード: Windows x86-64 executable installer
- Git
また、Vimの環境は次の通りです。
- Vim 8.0.0596 +kaoriya (2017/05/02)
- vimproc
- vimproc_win64.dllをビルドする際に必要になるwin32.makはMicrosoft Windows SDK for Windows 7 and .NET Framework 4に含まれている
- NeoBundle
- ~~dein.vimではない。1~~dein.vimでもいけた
YCMのインストール
1. NeoBundleの場合
-
- vimrcにYCMを追加
NeoBundle 'Valloric/YouCompleteMe'
YCMプラグインフォルダは
path\to\\.vim\bundle\YouCompleteMe
1. dein.vimの場合
※dein.tomlは設定済みとする
-
- dein.tomlにYCMを追加、その時に
merged = 0を設定する 2
- dein.tomlにYCMを追加、その時に
[[plugins]]
repo = 'Valloric/YouCompleteMe'
merged = 0
YCMプラグインフォルダは
path\to\.vim\dein\repos\github.com\Valloric\YouCompleteMe
2. から続き
-
- YCMプラグインフォルダへ
\YouCompleteMe\third_party\ycmd\cpp\ycm\CMakeLists.txt
を開き、LLVMへのパスを追加する。
この設定はスキップすれば最新バージョンを自動でダウンロードして使用してくれるので手軽。
# 25行あたり
set( PATH_TO_LLVM_ROOT "path/to/LLVM" CACHE PATH "Path to the root of a LLVM+Clang binary distribution" )
-
- YCMのビルド
コマンドプロンプトを「VS 2017用 x64 Native Tools コマンドプロンプト」で開き、
MSBuild.exeとcmake.exeにパスを通す
※パスは省略
**********************************************************************
** Visual Studio 2017 Developer Command Prompt v15.5.2
** Copyright (c) 2017 Microsoft Corporation
**********************************************************************
[vcvarsall.bat] Environment initialized for: 'x64'

>where msbuild
C:\Program Files (x86)\Microsoft Visual Studio\2017\Community\MSBuild\15.0\Bin\MSBuild.exe
C:\Windows\Microsoft.NET\Framework64\v4.0.30319\MSBuild.exe

>where cmake
情報: 与えられたパターンのファイルが見つかりませんでした。

>set path=C:\Program Files (x86)\Microsoft Visual Studio\2017\Community\Common7\IDE\CommonExtensions\Microsoft\CMake\CMake\bin;%path%

>where cmake
C:\Program Files (x86)\Microsoft Visual Studio\2017\Community\Common7\IDE\CommonExtensions\Microsoft\CMake\CMake\bin\cmake.exe
このままYCMのパスへ行き、念のためgit submodule udpateをしておく
path\.vim\bundle\YouCompleteMe>git submodule update --init --recursive
ようやくビルド、pythonによるビルド時のビルドオプションに補完したい言語を指定する、
--allを指定すると、C-family(C、C++、Objective C、Objective C++)、C#、Python、Go、TypeScript、JavaScript、Rustでコード補完が効くようになる。
path\.vim\bundle\YouCompleteMe>python install.py --all
ビルドに10分くらいかかる
C++用の設定
C++の補完用の設定にthird_party\ycmd\examples.ycm_extra_conf.pyをコピーして使う。
自分はユーザーホームディレクトリに置いてるのでvimrcにそれを読み込むように設定する。
let g:ycm_global_ycm_extra_conf = $HOME . '/.ycm_extra_conf.py'
このままではC++の補完が効かないのでC++ヘッダのincludeディレクトリを設定するのだが、この時にVisual Studio 2015(VC14)のだと上手くいった。3
flags = [
'-Wall',
'-Wextra',
# '-Werror',
'-fexceptions',
'-DNDEBUG',
'-std=c++14',
'-x',
'c++',
# C++
'-I',
'C:/Program Files (x86)/Microsoft Visual Studio 14.0/VC/include',
# Boost
'-I',
'E:/SDKs/boost_1_65_1',
]
参考
- YCM公式: https://github.com/Valloric/YouCompleteMe#full-installation-guide
- win32.makがない: https://qiita.com/s_of_p/items/fe522eb6b1d48b8b3885#win32mak-%E3%81%8C%E3%81%AA%E3%81%84