はじめに
VSCodeの拡張機能を自作してみたので忘備録としていろいろ書いておく。
ほかにも拡張機能自作記事はいっぱいあるので基本的なとこは書かず、ほかの記事であまりなかったところを書いていこうと思う。
作ったもの
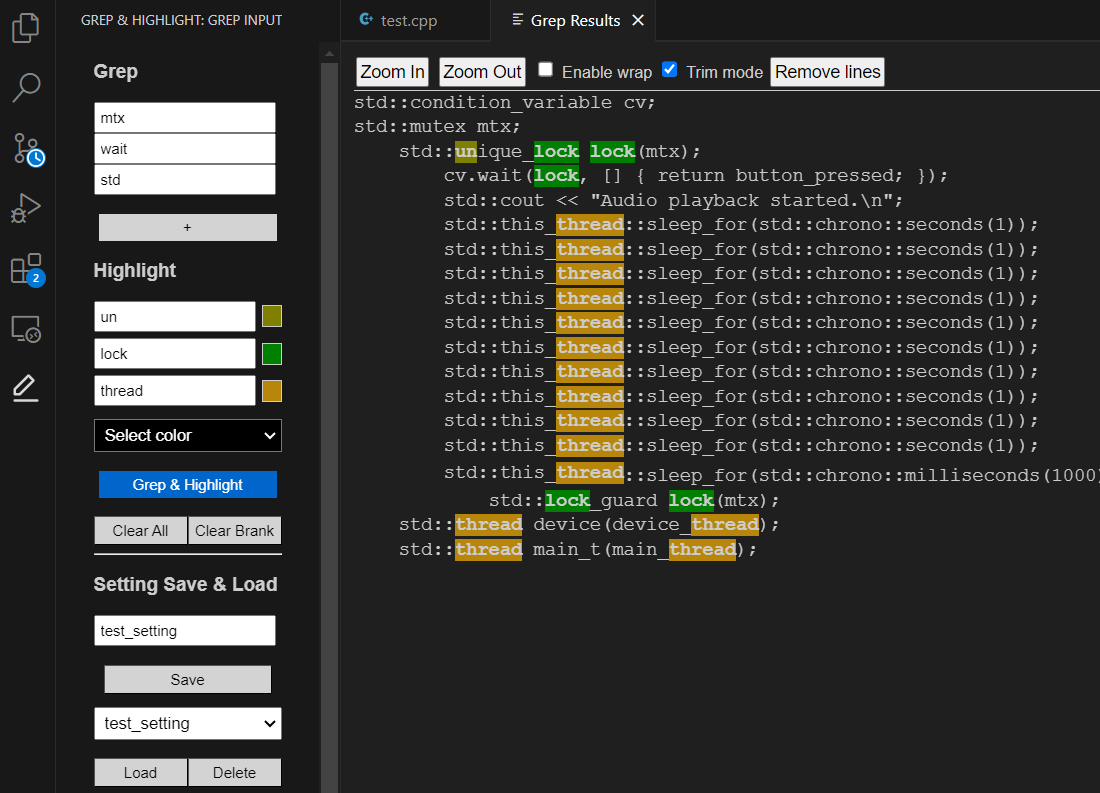
ログを解析するためのツール。以下のように左のサイドバーからGrepしたい単語、ハイライトをかけたい単語とその色を設定して、「Grep & Highlight」を押すと、現在開いているテキストファイルをGrepとHighlightしてくれる。
また、Grepしたい単語、ハイライトをかけたい単語はそのセットを名前を付けてSave、Loadできる。
拡張機能から「Grep and Highlight」で検索すると出てくるのでよかったら使ってみてください。

コードは以下
開発時の忘備録
サイドバーの作り方
今回はWebViewで作っているのでそのやり方。
まずはpackage.jsonを以下のように書く。名前は変更してもいいが、コメントにあるように一致させておく必要があるところに気を付ける。grepInputViewは後ほどextension.jsで使用する。
  "activationEvents": [
    "onView:grepInputView"  // contributes, views, grepSidebar, id と一致させる
  ],
  "main": "./dist/extension.js",
  "contributes": {
    "viewsContainers": {
      "activitybar": [
        {
          "id": "grepSidebar",  // contributes, views, grepSidebar, id と一致させる
          "title": "Grep & Highlight",
          "icon": "media/icon.svg"  // サイドバーのアイコン
        }
      ]
    },
    "views": {
      "grepSidebar": [
        {
          "type": "webview",
          "id": "grepInputView",
          "name": "Grep Input"
        }
      ]
    },
次にextension.tsを編集。
vscode.window.registerWebviewViewProviderには先ほどの名前(grepInputView)でWebviewを登録する。
export function activate(context: vscode.ExtensionContext) {
  console.log('Grep extension is activated');

  const provider = new GrepInputViewProvider(context.extensionUri, context);
  context.subscriptions.push(
    vscode.window.registerWebviewViewProvider('grepInputView', provider)
  );
GrepInputViewProviderは以下のような感じ。resolveWebviewViewのwebviewView.webview.htmlでサイドバーに表示させたいHTMLをセットする。resolveWebviewViewはサイドバーが表示される際に呼ばれる。
class GrepInputViewProvider implements vscode.WebviewViewProvider {
  constructor(
    private readonly extensionUri: vscode.Uri,
    private readonly context: vscode.ExtensionContext // context を受け取る
  ) {}

  resolveWebviewView(
    webviewView: vscode.WebviewView,
    context: vscode.WebviewViewResolveContext,
    token: vscode.CancellationToken
  ) {
    webviewView.webview.options = {
      enableScripts: true
    };

    webviewView.webview.html = this.getHtml();
これでサイドバーが表示できるはず。
ダークテーマ、ライトテーマで切り替える
vscode.window.activeColorTheme.kindで切り替えられる。
  private getHtml(): string {
    const lightColors = "['none', 'lightyellow', 'khaki', 'gold', 'lightsalmon', 'salmon', 'lightcoral', 'pink', 'hotpink', 'lightgreen', 'lime', 'aquamarine', 'skyblue', 'dodgerblue', 'fuchsia']";
    const darkColors = "['none', 'dimgray', 'slategray', 'darkolivegreen', 'olive', 'darkgreen', 'seagreen', 'teal', 'cadetblue', 'navy', 'indigo', 'purple', 'darkred', 'firebrick',  'chocolate', 'sienna', 'darkgoldenrod']";
    const Colors = vscode.window.activeColorTheme.kind === vscode.ColorThemeKind.Dark
      ? darkColors
      : lightColors;
最後に表示したときの情報を保持する
サイドバーは一瞬エクスプローラーに切り替えるだけでも再表示の処理が行われ、何もしなければ表示がリセットされる。そのため、入力が更新されるたび以下のようにlaststateを更新しておき、再表示時にリストアする。
ちなみにサイドバーが閉じられた際の処理も作れるみたいだが、閉じられた時にはWebviewもなくなっているようで、WebViewから現在の状態を取得して保存するような処理はうまくいかなかった。
  // state を保存するメソッド
  private async saveStateFromWebview(grepWords: string[], searchWords: { word: string; color: string }[], settingName: string, webview: vscode.Webview) {
    const response = {grepWords: grepWords, searchWords: searchWords, settingName: settingName};
    if (response) {
      this.context.workspaceState.update('lastState', response);
      console.log('State saved:', response);
    }
  }
リストア処理
    const lastState = this.context.workspaceState.get<{ grepWords: string[], searchWords: { word: string; color: string }[], settingName: string }>('lastState');
    if (lastState) {
      webviewView.webview.postMessage({
        command: 'loadSettings',
        grepWords: lastState.grepWords,
        searchWords: lastState.searchWords,
        settingName: lastState.settingName
      });
    }
設定を保存する、ロードする、削除する
package.jsonにconfigurationを設定しておく。
    "configuration": {
      "title": "Grep Extension",
      "properties": {
        "grepExtension.settings": {
          "type": "object",
          "default": {},
          "description": "Saved settings for the Grep extension"
        }
      }
    }
保存、ロード、削除は以下のようにすることで保存できる。grepExtensionは上と一致させる。削除は直接できないのでundefinedをセットして更新することで削除する。
  private async saveSettings(name: string, grepWords: string[], searchWords: { word: string; color: string }[], webview: vscode.Webview) {
    const config = vscode.workspace.getConfiguration('grepExtension');
    const currentSettings = config.get<{ [key: string]: any }>('settings') || {};
    currentSettings[name] = { grepWords, searchWords };
    await config.update('settings', currentSettings, vscode.ConfigurationTarget.Global);
    vscode.window.showInformationMessage(`Settings '${name}' saved`);
    this.getSettingsList(webview);
  }

  private async deleteSetting(name: string, webview: vscode.Webview) {
    if (!name) {
      vscode.window.showErrorMessage('No setting selected');
      return;
    }

    const config = vscode.workspace.getConfiguration('grepExtension');
    const currentSettings = config.get<{ [key: string]: any }>('settings') || {};
    currentSettings[name] = undefined;
    await config.update('settings', currentSettings, vscode.ConfigurationTarget.Global);

    vscode.window.showInformationMessage(`Settings '${name}' deleted`);

    // 削除後に一覧を更新
    this.getSettingsList(webview);
    webview.postMessage({ command: 'Complete' });
  }
現在開いているエディタからテキストデータ取得
以下のようにvscode.window.activeTextEditorで取得できる。かんたん。
  private async grepInActiveEditor(grepWords: string[], searchWords: { word: string; color: string }[]) {
    const editor = vscode.window.activeTextEditor;
    if (!editor) {
      vscode.window.showErrorMessage('No active editor found');
      return;
    }

    const doc = editor.document;
    let results: string[] = [];

    for (let line = 0; line < doc.lineCount; line++) {
      const text = doc.lineAt(line).text;
      if (grepWords.some(word => text.includes(word))) {
        //results.push(`${String(line + 1).padStart(8, ' ')}: ${text}`);
        results.push(`${text}`);
      }
    }
エディターのところにWebViewを表示する
サイドバーではなく結果を表示するときの話。vscode.window.createWebviewPanelでパネルを作成し、HTMLをセットすればOK。
  private async showResultsInWebview(results: string[], searchWords: { word: string; color: string }[]) {
    const panel = vscode.window.createWebviewPanel(
      'grepResults',
      'Grep Results',
      vscode.ViewColumn.One,
      { enableScripts: true }
    );

    const highlightedResults = results.map(line => {
      searchWords.forEach(({ word, color }) => {
        const regex = new RegExp(`(${word})`, 'gi');
        line = line.replace(regex, `<span style="background-color: ${color}; font-weight: bold;">$1</span>`);
      });
      line = `<div class="log-line">${line}</div>`;
      return line;
    }).join('');

    panel.webview.html = `
      <!DOCTYPE html>
WebView - 拡張機能間の通信
WebView -> 拡張機能
以下はWebView側のコード。
const vscode = acquireVsCodeApi();
...
vscode.postMessage({ command: 'saveSettings', name: settingName, grepWords, searchWords });
拡張機能側のコードは以下のような感じ。
    webviewView.webview.onDidReceiveMessage(async (message) => {
      if (message.command === 'grep') {
        this.grepInActiveEditor(message.grepWords, message.searchWords);
      } else if (message.command === 'saveSettings') {
        this.saveSettings(message.name, message.grepWords, message.searchWords, webviewView.webview);
      } else if (message.command === 'loadSettings') {
        this.loadSettings(message.name, webviewView.webview);
      } else if (message.command === 'deleteSetting') {
        this.deleteSetting(message.name, webviewView.webview);
      } else if (message.command === 'Logger') {
        this.Loggger(webviewView.webview, message.msg);
      } else if (message.command === 'saveSettings_current') {
        this.saveStateFromWebview(message.grepWords, message.searchWords, message.settingName, webviewView.webview);
      }
      webviewView.webview.postMessage({ command: 'Complete' });
    });
WebView <- 拡張機能
拡張機能側のコードは以下のような感じ。
webview.postMessage({ command: 'loadSettings', grepWords: state.grepWords, searchWords: state.searchWords, settingName: state.settingName });
WebView側のコードは以下のような感じ。
window.addEventListener('message', event => {
  const message = event.data;
  if (message.command === 'loadSettings')