概要
DXという言葉が生まれて久しいですが、なかなか取り組めていない企業も多いと思います。特に、中小企業などでは、専門の担当者を置く余裕もなかなかないでしょう。
DX、もとい業務の自動化・デジタル化を実現する手段としてRPAがありますが、その中の1つであるMicrosoft PowerAutomateを使ってfreeeと連携する方法をまとめてみました。
作ったもの
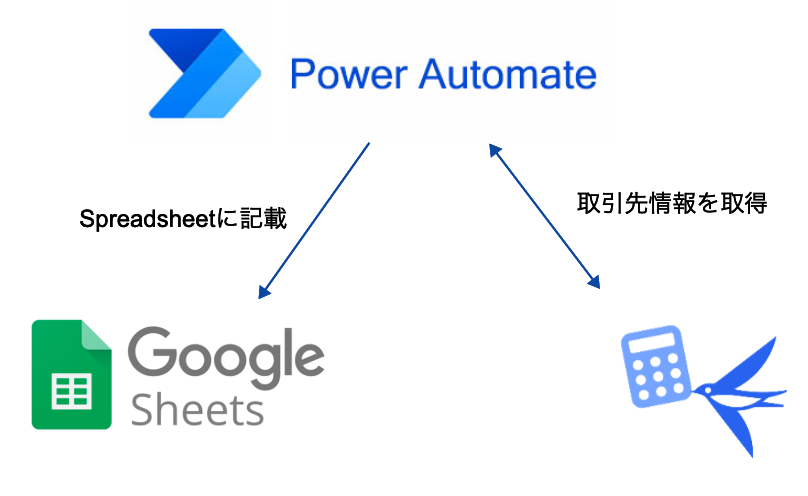
freeeに入っている取引先情報をGoogle SpreadSheetに転記する仕組みを作ってみました。freee以外のシステムと連携するときに利用することを想定した仕組みです。
構成図はこんな感じになっています。
作成手順は下記の通り
- freeeで連携用のアプリ登録
- PowerAutomateからfreeeへのコネクションを作成
- 記載用のGoogle Spreadsheetを用意
- PowerAutomateのフローを作成
- 動作確認
では行ってみましょう!
freeeで連携用のアプリ登録
PowerAutomateからfreeeに接続するために使うアプリをfreee開発者サイトから登録します。基本的な流れはfreee公式のチュートリアルを参考にしてください。
作成時には、下記2つを設定してください。
- 基本設定の「コールバックURL」を
https://global.consent.azure-apim.net/redirectにしておく - 権限設定で「取引先」の「参照」にチェックをいれておく。
PowerAutomateからfreeeへのコネクションを作成
まず前提として、Microsoft PowerAutomateでは色んなサービスと接続するためのコネクタが用意されていますが、freeeとのコネクタは公式では用意されていません。
なので、カスタムコネクタを使用してfreee APIに接続します。
カスタムコネクタの定義をSwaggerでインポート
GUIでポチポチ作成もできるのですが、SwaggerのAPI定義で作成することもできるので、そちらで作成します。少し長いですが、定義をそのまま記載します。
{
  "swagger": "2.0",
  "info": {
    "title": "freee",
    "description": "",
    "version": "1.0"
  },
  "host": "api.freee.co.jp",
  "basePath": "/api/1/",
  "schemes": [
    "https"
  ],
  "consumes": [],
  "produces": [],
  "paths": {
    "/partners": {
      "get": {
        "responses": {
          "default": {
            "description": "default",
            "schema": {
              "type": "object",
              "properties": {
                "partners": {
                  "type": "array",
                  "items": {
                    "type": "object",
                    "properties": {
                      "id": {
                        "type": "integer",
                        "format": "int32",
                        "description": "id"
                      },
                      "code": {
                        "type": "string",
                        "description": "code"
                      },
                      "company_id": {
                        "type": "integer",
                        "format": "int32",
                        "description": "company_id"
                      },
                      "name": {
                        "type": "string",
                        "description": "name"
                      },
                      "update_date": {
                        "type": "string",
                        "description": "update_date"
                      },
                      "available": {
                        "type": "boolean",
                        "description": "available"
                      },
                      "shortcut1": {
                        "type": "string",
                        "description": "shortcut1"
                      },
                      "shortcut2": {
                        "type": "string",
                        "description": "shortcut2"
                      },
                      "org_code": {
                        "type": "string",
                        "format": "undefined",
                        "description": "org_code",
                        "title": ""
                      },
                      "country_code": {
                        "type": "string",
                        "description": "country_code"
                      },
                      "long_name": {
                        "type": "string",
                        "description": "long_name"
                      },
                      "name_kana": {
                        "type": "string",
                        "description": "name_kana"
                      },
                      "default_title": {
                        "type": "string",
                        "description": "default_title"
                      },
                      "phone": {
                        "type": "string",
                        "description": "phone"
                      },
                      "contact_name": {
                        "type": "string",
                        "description": "contact_name"
                      },
                      "email": {
                        "type": "string",
                        "description": "email"
                      },
                      "payer_walletable_id": {
                        "type": "integer",
                        "format": "int32",
                        "description": "payer_walletable_id"
                      },
                      "transfer_fee_handling_side": {
                        "type": "string",
                        "description": "transfer_fee_handling_side"
                      },
                      "address_attributes": {
                        "type": "object",
                        "properties": {
                          "zipcode": {
                            "type": "string",
                            "description": "zipcode"
                          },
                          "prefecture_code": {
                            "type": "integer",
                            "format": "int32",
                            "description": "prefecture_code"
                          },
                          "street_name1": {
                            "type": "string",
                            "description": "street_name1"
                          },
                          "street_name2": {
                            "type": "string",
                            "description": "street_name2"
                          }
                        },
                        "description": "address_attributes"
                      },
                      "partner_doc_setting_attributes": {
                        "type": "object",
                        "properties": {
                          "sending_method": {
                            "type": "string",
                            "description": "sending_method"
                          }
                        },
                        "description": "partner_doc_setting_attributes"
                      },
                      "partner_bank_account_attributes": {
                        "type": "object",
                        "properties": {
                          "bank_name": {
                            "type": "string",
                            "description": "bank_name"
                          },
                          "bank_name_kana": {
                            "type": "string",
                            "description": "bank_name_kana"
                          },
                          "bank_code": {
                            "type": "string",
                            "description": "bank_code"
                          },
                          "branch_name": {
                            "type": "string",
                            "description": "branch_name"
                          },
                          "branch_kana": {
                            "type": "string",
                            "description": "branch_kana"
                          },
                          "branch_code": {
                            "type": "string",
                            "description": "branch_code"
                          },
                          "account_type": {
                            "type": "string",
                            "description": "account_type"
                          },
                          "account_number": {
                            "type": "string",
                            "description": "account_number"
                          },
                          "account_name": {
                            "type": "string",
                            "description": "account_name"
                          },
                          "long_account_name": {
                            "type": "string",
                            "description": "long_account_name"
                          }
                        },
                        "description": "partner_bank_account_attributes"
                      }
                    }
                  },
                  "description": "partners"
                }
              }
            },
            "headers": {
              "Content-Type:application/json;charset=utf-8": {
                "description": "Content-Type:application/json;charset=utf-8",
                "type": "string"
              }
            }
          }
        },
        "summary": "partners",
        "description": "取引先一覧の取得",
        "operationId": "PartnersList",
        "parameters": [
          {
            "name": "company_id",
            "in": "query",
            "required": false,
            "type": "integer"
          },
          {
            "name": "start_update_date",
            "in": "query",
            "required": false,
            "type": "string"
          },
          {
            "name": "end_update_date",
            "in": "query",
            "required": false,
            "type": "string"
          },
          {
            "name": "offset",
            "in": "query",
            "required": false,
            "type": "integer"
          },
          {
            "name": "limit",
            "in": "query",
            "required": false,
            "type": "integer"
          },
          {
            "name": "keyword",
            "in": "query",
            "required": false,
            "type": "string"
          }
        ]
      }
    }
  },
  "definitions": {},
  "parameters": {},
  "responses": {},
  "securityDefinitions": {
    "oauth2_auth": {
      "type": "oauth2",
      "flow": "accessCode",
      "authorizationUrl": "https://accounts.secure.freee.co.jp/public_api/authorize",
      "tokenUrl": "https://accounts.secure.freee.co.jp/public_api/token",
      "scopes": {}
    }
  },
  "security": [
    {
      "oauth2_auth": []
    }
  ],
  "tags": []
}
細かい定義の説明は割愛しますが、会計APIリファレンスの取引先(GET)の内容をSwaggerに書き起こしています。
上記の内容をjsonファイルで保存し、PowerAutomateの データ→カスタムコネクタ から カスタムコネクタの新規作成→OpenApiファイルをインポートします を選んでインポートしてください。
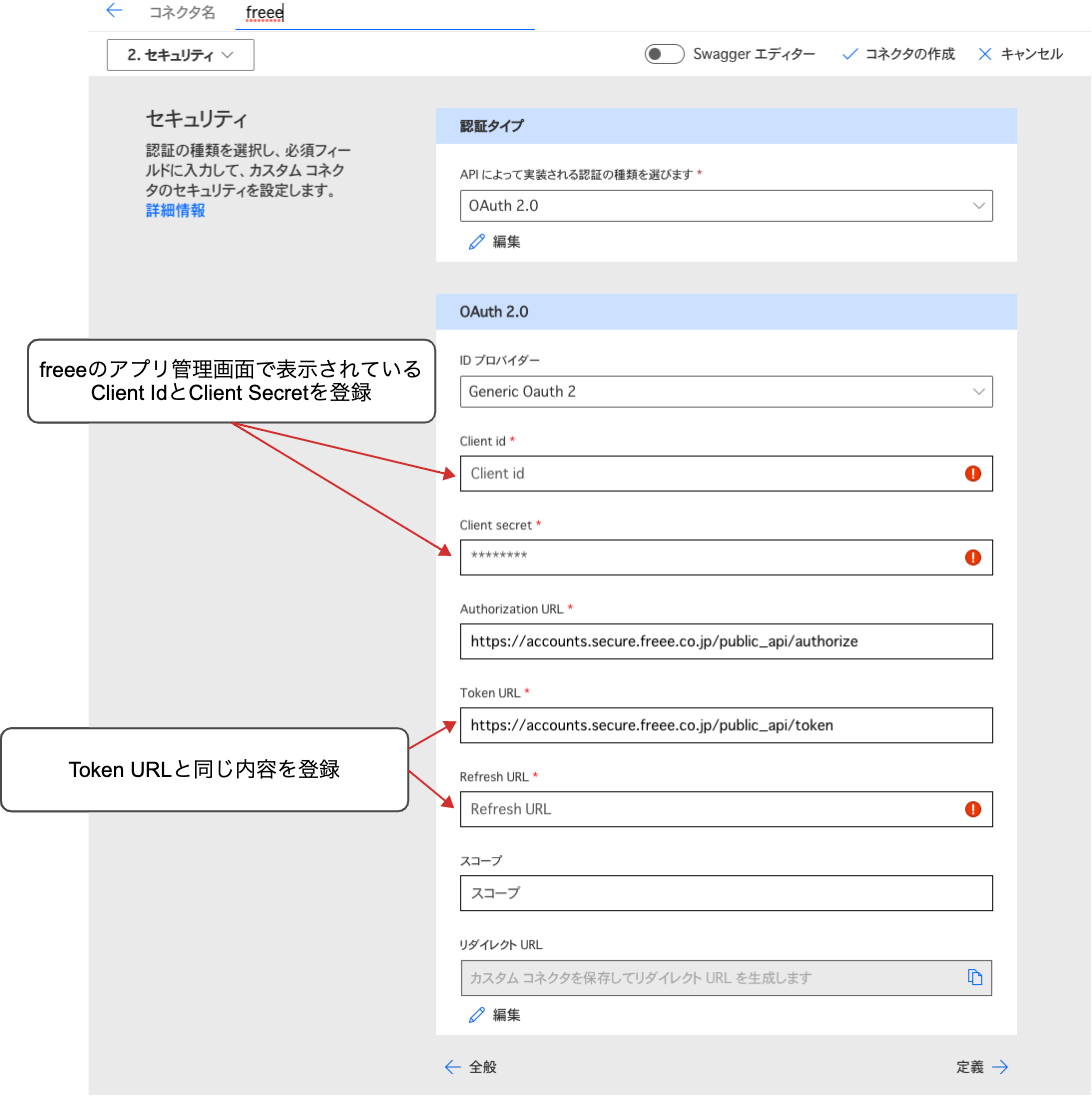
カスタムコネクタで使うアプリ情報を登録
インポートしたあとに、接続するアプリのClientIDとClientSecret、Refresh Tokenを登録する必要があります。画像の内容の通り登録ください。
登録したら、この時点で一度カスタムコネクタを作成しておきます。
カスタムコネクタの接続を作成
このカスタムコネクタで使う接続情報を作成します。
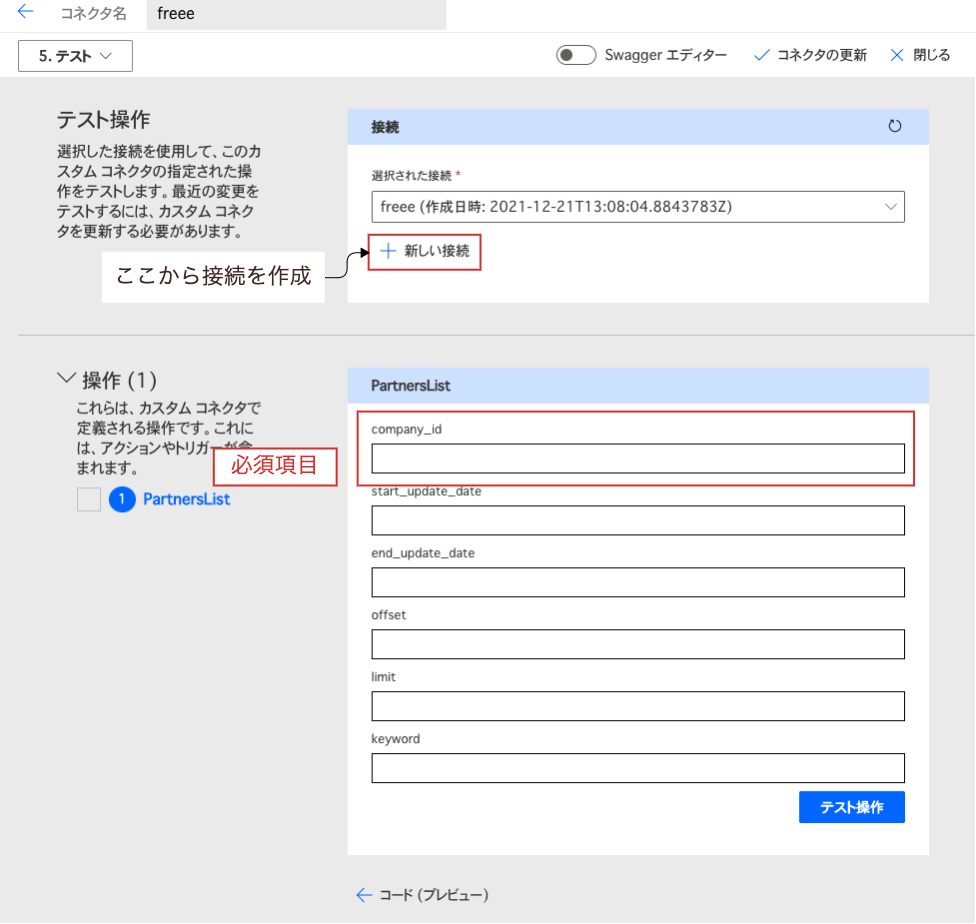
左上のプルダウンから「5.テスト」を選んで、「テスト操作」のところにある「+新しい接続」をクリックします。すると、ポップアップが開くので、freee APIの認証をします。
これでカスタムコネクタの作成は完了です。
作成したカスタムコネクタをテストをすることもできますが、company_idのパラメータは必須なので、使う事業所のIDを設定してテストしてください。
clientIDなどが正しく登録されていれば動作します。事業所IDはこちらで調べることができます。
記載用のGoogle Spreadsheetを用意
freeeから取得した取引先情報を記載するSpreadSheetを用意します。
これはどのGoogleアカウントでもいいんですが、仮に下記のようなファイル・シート名として話を進めていきます。
また、「取引先名」という列も作成しておきます。
ファイル名: freee連携
シート名: 取引先一覧
A列: 取引先名
PowerAutomateのフローを作成
最後に、PowerAutomateのフローを作成します。
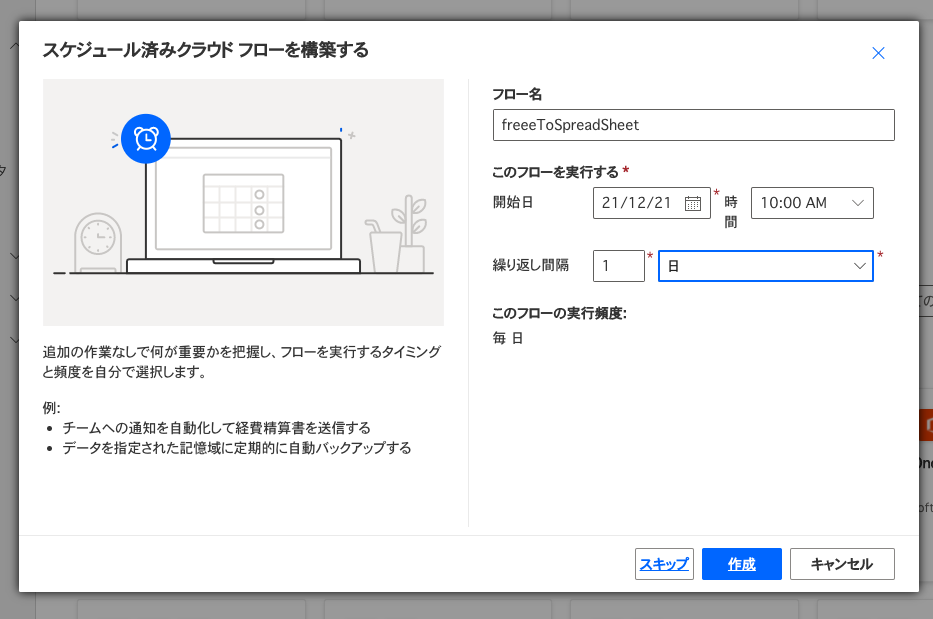
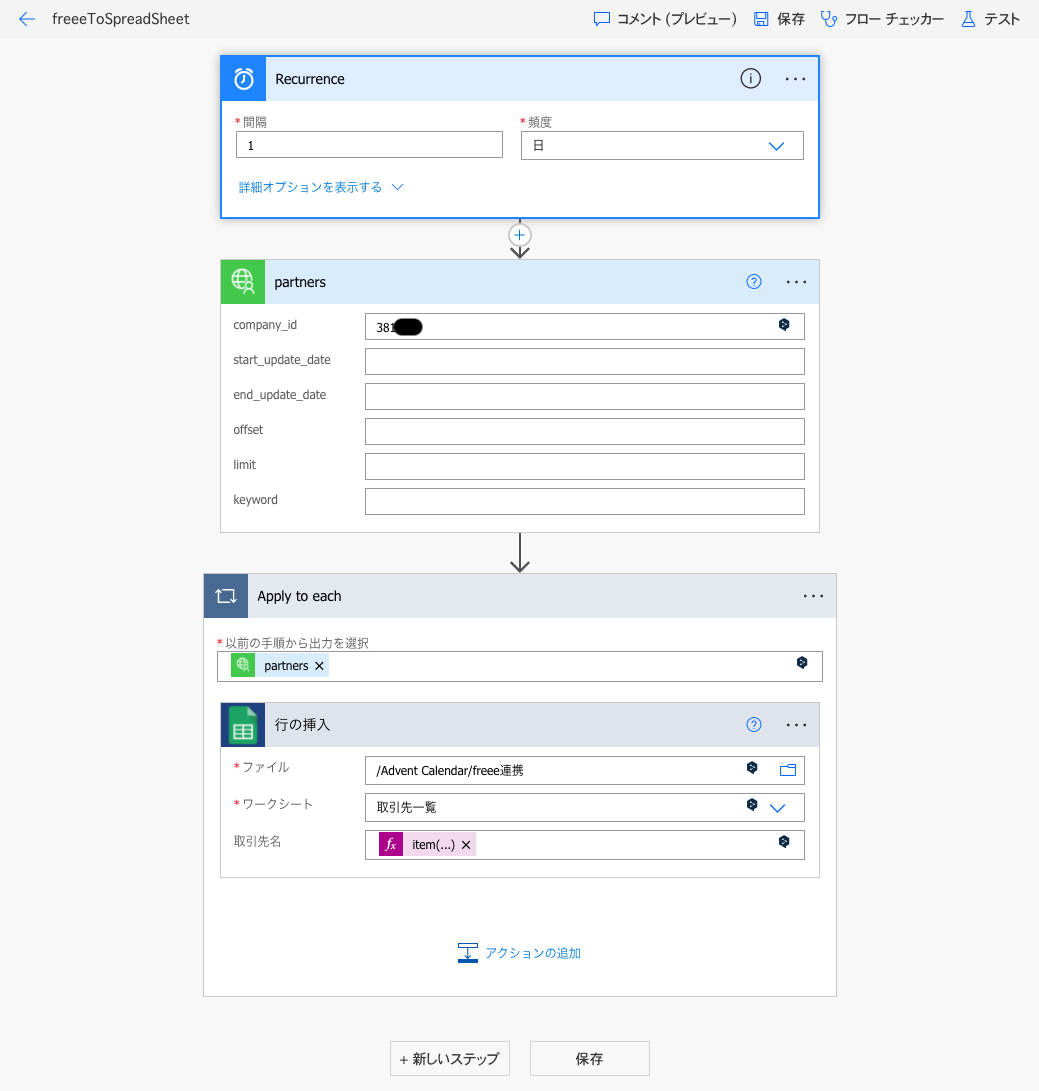
PowerAutomateのフロー実行タイミングはいくつかありますが、ここではスケジュール実行で作成したいと思います。下記のような日次で実行するフローを作成します。
フローの内容は下記のようになります。
PowerAutomateのフロー作成の細かい説明は割愛しますので、他サイトや公式などで確認いただければと思います。
処理の流れとしては、
- 作成したfreeeのカスタムコネクタで取引先APIをコール
- 1で得た結果をループでまわす
- 1件ずつGoogle Spreadに行挿入していく
という形です。
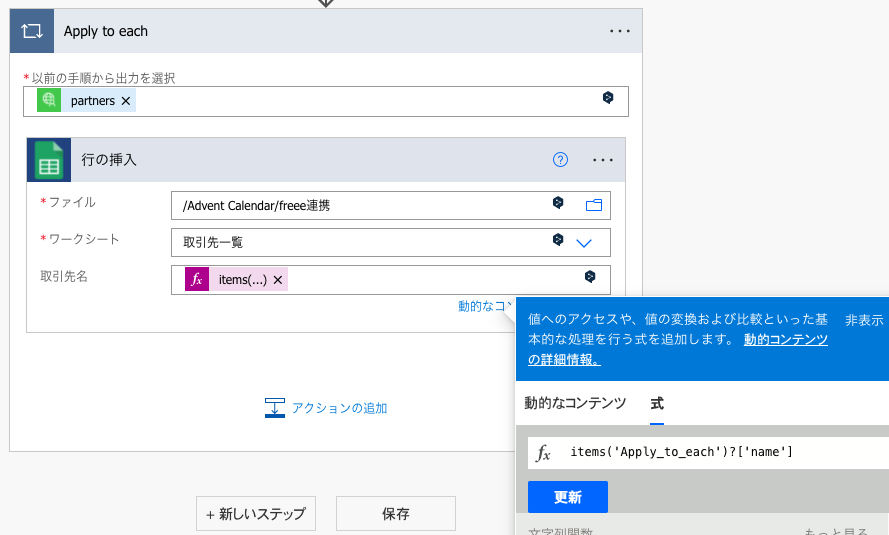
また、最後の「行の挿入」のところの「取引先名」なんですが、これは少しややこしく、下記画像のように直接式を記載する必要がありますので注意してください。(GUIで選ぶことができない)
今回は @items('Apply_to_each')?['name'] という式になります。
動作確認
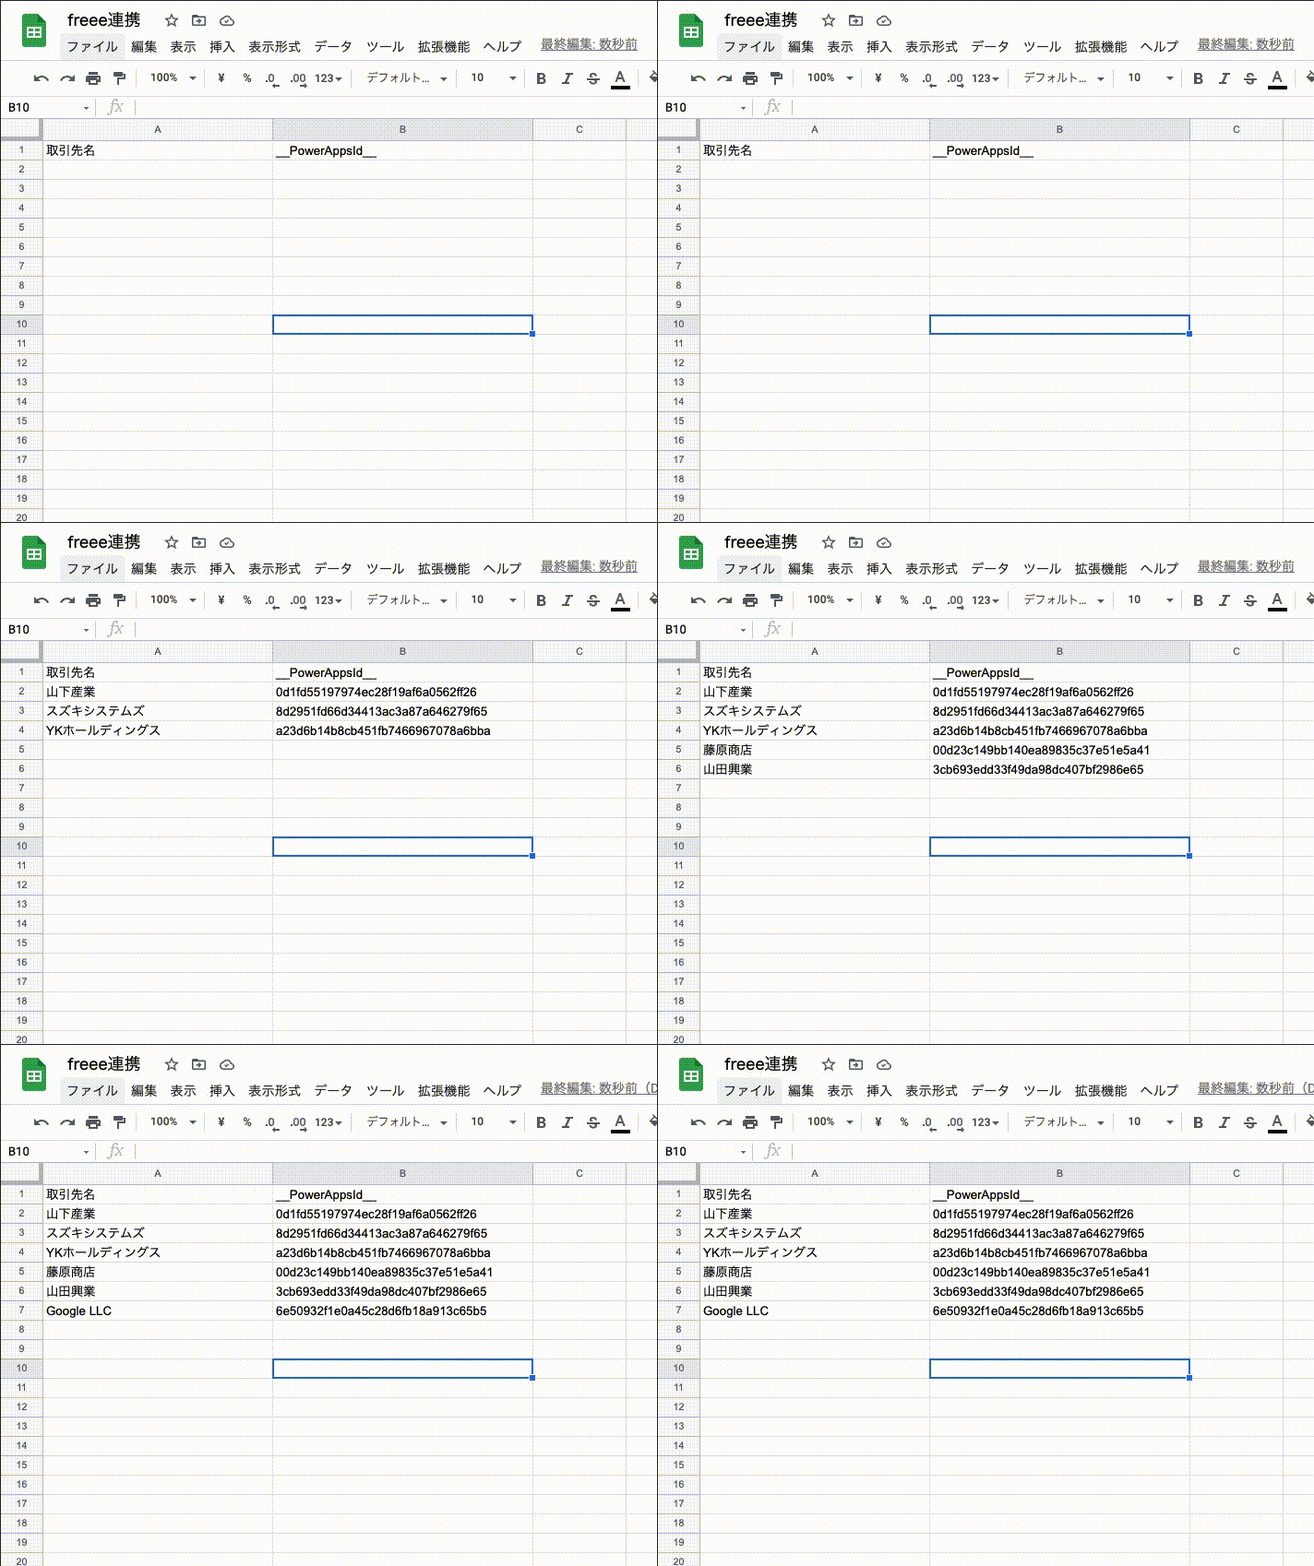
作成したフローを保存して、右上の「テスト」から実行してください。
正常動作すれば下記のように取引先名が登録されます。
まとめ
いかがでしたでしょうか。
中小企業では一部のデータはfreeeで管理されているが、Excel管理のものも残っている・・・なんていうこともよくあると思います。
そのときに、RPAを使ってfreeeのデータをExcelやSpreadに連携することができれば業務の効率化を推進することができるかもしれません。
今回は取引先情報だけを紹介しましたが、PowerAutomateのカスタムコネクタで連携するAPIを増やせば、他の情報とも連携することが可能かと思います。
この記事が少しでも助けになれば幸いです。
それでは!
