はじめに
今回は、ML-AgentsのインストールとPythonの環境構築を行います。
環境
- Windows11
- Anaconda
インストールするもの
- Python 3.7 (公式では3.6または3.7に対応していますが、ML-Agentsの土台になっているPyTorchがWindowsでは3.7から3.9のみに対応しているので、結局3.7しか選択肢がありません)
- Unity 2021.2.18f1
- ML-Agents Release 19
- PyTorch 1.8.2LTS
Pythonのインストール
Anacondaはすでにインストールされているものとします。インストールされていない方は、Qiitaの環境構築記事などを参考にインストールをお願いします。
Anacondaを使ってPythonの仮想環境を作成します。Anaconda Promptを起動して、以下のようにして仮想環境を作成します。
(base) C:\Users\ユーザー名> conda create -n MLAgentsLowLevelAPI python=3.7
 done
 To activate this environment, use

     $ conda activate MLAgentsLowLevelAPI
 To deactivate an active environment, use

     $ conda deactivate
以下のコマンドで、仮想環境が正常に作成されていることを確認してください。
(base) C:\Users\ユーザー名> conda info --envs
conda environments:
base                  *  C:\Users\ユーザー名\anaconda3
MLAgentsLowLevelAPI      C:\Users\ユーザー名\anaconda3\envs\MLAgentsLowLevelAPI
これ以降、この仮想環境で操作していきます。
(base) C:\Users\ユーザー名>conda activate MLAgentsLowLevelAPI

(MLAgentsLowLevelAPI) C:\Users\ユーザー名>
これ以降、コマンドプロンプトはデフォルトでMLAgentsLowLevelAPIにあることにして、単に$で表現します。
PyTorchのインストール
次に作成した仮想環境にPyTorchをインストールします。PyTorchのバージョンは2022年8月現在の安定版の1.8.2(CPU版)を使います。
$ pip3 install torch==1.8.2 torchvision==0.9.2 torchaudio===0.8.2 --extra-index-url https://download.pytorch.org/whl/lts/1.8/cpu

Looking in indexes: https://pypi.org/simple, https://download.pytorch.org/whl/lts/1.8/cpu
Collecting torch==1.8.2
  Using cached https://download.pytorch.org/whl/lts/1.8/cpu/torch-1.8.2%2Bcpu-cp37-cp37m-win_amd64.whl (191.8 MB)
Collecting torchvision==0.9.2
  Using cached https://download.pytorch.org/whl/lts/1.8/cpu/torchvision-0.9.2%2Bcpu-cp37-cp37m-win_amd64.whl (847 kB)
Collecting torchaudio===0.8.2
  Using cached https://download.pytorch.org/whl/lts/1.8/torchaudio-0.8.2-cp37-none-win_amd64.whl (109 kB)
Collecting typing-extensions
  Using cached typing_extensions-4.3.0-py3-none-any.whl (25 kB)
Collecting numpy
  Using cached numpy-1.21.6-cp37-cp37m-win_amd64.whl (14.0 MB)
Collecting pillow>=4.1.1
  Using cached Pillow-9.2.0-cp37-cp37m-win_amd64.whl (3.3 MB)
Installing collected packages: typing-extensions, pillow, numpy, torch, torchvision, torchaudio
Successfully installed numpy-1.21.6 pillow-9.2.0 torch-1.8.2+cpu torchaudio-0.8.2 torchvision-0.9.2+cpu typing-extensions-4.3.0
mlagentsのインストール
Pythonパッケージのmlagentsをインストールします。mlagents-learnもmlagents-envsもmlagentsパッケージに含まれているます。バージョンはML-AgentsのRelease19に対応する0.28.0を指定します。
$ python -m pip install mlagents==0.28.0
Collecting mlagents==0.28.0
  Using cached mlagents-0.28.0-py3-none-any.whl (164 kB)
~中略~
Successfully installed MarkupSafe-2.1.1 absl-py-1.2.0 attrs-22.1.0 cachetools-5.2.0 cattrs-1.0.0 charset-normalizer-2.1.0 cloudpickle-2.1.0 google-auth-2.10.0 google-auth-oauthlib-0.4.6 grpcio-1.47.0 h5py-3.7.0 idna-3.3 importlib-metadata-4.12.0 markdown-3.4.1 mlagents-0.28.0 mlagents-envs-0.28.0 oauthlib-3.2.0 protobuf-3.19.4 pyasn1-0.4.8 pyasn1-modules-0.2.8 pypiwin32-223 pywin32-304 pyyaml-6.0 requests-2.28.1 requests-oauthlib-1.3.1 rsa-4.9 six-1.16.0 tensorboard-2.9.1 tensorboard-data-server-0.6.1 tensorboard-plugin-wit-1.8.1 urllib3-1.26.11 werkzeug-2.2.1 zipp-3.8.1
インストールが成功した場合、mlagents-learnコマンドが使えるようになります。
$ mlagents-learn --help
usage: mlagents-learn.exe [-h] [--env ENV_PATH] [--resume] [--deterministic]
                          [--force] [--run-id RUN_ID]
                          [--initialize-from RUN_ID] [--seed SEED]
                          [--inference] [--base-port BASE_PORT]
                          [--num-envs NUM_ENVS] [--num-areas NUM_AREAS]
                          [--debug] [--env-args ...]
                          [--max-lifetime-restarts MAX_LIFETIME_RESTARTS]
                          [--restarts-rate-limit-n RESTARTS_RATE_LIMIT_N]
                          [--restarts-rate-limit-period-s RESTARTS_RATE_LIMIT_PERIOD_S]
                          [--torch] [--tensorflow] [--results-dir RESULTS_DIR]
                          [--width WIDTH] [--height HEIGHT]
                          [--quality-level QUALITY_LEVEL]
                          [--time-scale TIME_SCALE]
                          [--target-frame-rate TARGET_FRAME_RATE]
                          [--capture-frame-rate CAPTURE_FRAME_RATE]
                          [--no-graphics] [--torch-device DEVICE]
                          [trainer_config_path]
~中略~
Torch Configuration:
  --torch-device DEVICE
                        Settings for the default torch.device used in
                        training, for example, "cpu", "cuda", or "cuda:0"
                        (default: None)
Unityのインストール
ML-Agents公式では、Release 19時点でUnity 2020.3LTS以降を推奨していますが、この記事ではUnity 2021.2.18f1を使用します。これには、Unity 2021.2以降で使用できるDedicated Serverビルドを使用したいという理由があります。Dedicated Serverビルドでは、サーバーサイドでUnityを使用することを想定して、レンダリングに関する処理が省かれるため、高速化が期待できます。学習の収束を速めるために採用したいので、今回の記事ではUnity 2021.2以降のUnityの使用を推奨します。インストールには、以下の画像のようにUnity HubからAdd Moduleを選択して
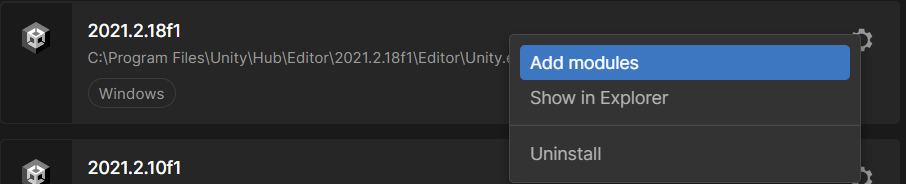
以下のようにWindows Dedicated Server Build Supportを選択する必要があります。

ML-Agents Release19のインストール
ML-AgentsのGitHubリポジトリから直接ダウンロードします。ここのサイトからSource code (zip)をダウンロードします。

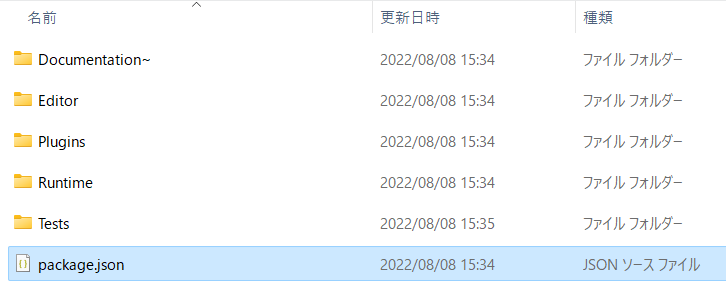
zipファイルを展開してml-agents-release_19というフォルダを生成しましょう。そこにはUnity用のパッケージが存在しているので、それを利用してインストールします。まずUnityHubからUnityプロジェクトを作成しましょう。

次に、WindowからPackage Managerを開いてください。

そこから+ボタンを選択して、Add package from diskを選択します。

ダウンロードしてきたml-agents-release_19 > com.unity.ml-agents > package.jsonと進んで選択します。
これによって自動的にインポートが始まり、ML-Agentsがインポートされます。

ProjectビューのPackageフォルダにML Agentsフォルダが作成されていればインストール成功です。
おわりに
2022年8月時点のインストール方法を解説しました。ML-AgentsのRelease19はpreviewパッケージなので、PackageManagerから直接インストールすることができません。今後も活発に開発が進んでいくパッケージだと思われるので、情報の鮮度に注意しつつ環境構築を行って下さい。