Serverless Framework 使って Stripe の Webhook からのメッセージを処理するサンプル書いたので、使い方とか解説。
コード自体は Serverless Examples にプルリクしてマージしてもらってあるので、そちらを取ってきてください。
https://github.com/serverless/examples/tree/master/aws-node-stripe-integration
これは Stripe の Webhook から投げられるメッセージを AWS API Gateway 経由で AWS Lambda で処理したい時に使います。
セットアップ
Serverless Framework のインストール方法は割愛。
Installing The Serverless Framework を参考にしてね。
サンプルコードの取得
https://github.com/serverless/examples/ を git clone するなりしてから、aws-node-stripe-integration ディレクトリを持ってきてください。
追記: GitHub 上のプロジェクトは serverless install で一発コピーできるそうです。thx @horike37
$ serverless install --url https://github.com/serverless/examples/tree/master/aws-node-stripe-integration
Serverless: Downloading and installing "aws-node-stripe-integration"...
Serverless: Successfully installed "aws-node-stripe-integration"
依存 npm パッケージのインストール
この example では、npm パッケージ config, js-yaml, stripe を使ってるので、まずは npm install で依存パッケージをインストール。
$ npm install
Stripe API Key の書き換え
Stripe の API Key を config/local.yaml ってファイルに書いてください。
ソースを GitHub 等で公開しないのであれば、config/default.yaml の中身を書き換えてもいいよ。
stripe:
    test_sk: 'Stripe_Test_Secret_Key_here'
    live_sk: 'Stripe_Live_Secret_Key_here'
サンプルコードの解説
event object の取得
実際に Webhook から送られたデータを処理しているのは handler.js です。
Webhook 経由で event object が投げられると event.body に JSON 形式でセットされてくるので、最初にそれを JSON.parse() してます。
https://github.com/serverless/examples/blob/master/aws-node-stripe-integration/handler.js#L18
event object の構造は、Stripe API リファレンスを参考にしてください。
https://stripe.com/docs/api#event_object
event object の正当性チェック
events.retrieve() で、受け取った event object が正当なものかをチェックしてます。
https://github.com/serverless/examples/blob/master/aws-node-stripe-integration/handler.js#L22
events.retrieve() から呼び出される callback 関数内では err だった場合の処理を入れてないので、これは実装してください。
event type ごとの処理
受け取った event の種類は stripeEvent.type を見ればわかります。
それに合わせて Slack 通知するなりなんなりの処理を実装してくださいね。
https://github.com/serverless/examples/blob/master/aws-node-stripe-integration/handler.js#L33-L40
event type のリストは、Stripe API リファレンスを参考にしてください。
https://stripe.com/docs/api#event_types
デプロイ!
AWS API Gateway エンドポイントの作成
まずは、そのまま sls deploy すると Test 環境用の一式がデプロイされます。
$ serverless deploy
Serverless: Packaging service...
Serverless: Uploading CloudFormation file to S3...
Serverless: Uploading service .zip file to S3 (2.15 MB)...
Serverless: Updating Stack...
Serverless: Checking Stack update progress...
.....
Serverless: Stack update finished...
Serverless: Removing old service versions...
Service Information
service: aws-node-stripe-integration
stage: development
region: us-east-1
api keys:
  None
endpoints:
  POST - https://xxxxxxxxx.execute-api.us-east-1.amazonaws.com/test/stripe/incoming
functions:
  incoming: aws-node-stripe-integration-test-incoming

Stack Outputs
ServiceEndpoint: https://xxxxxxxxx.execute-api.us-east-1.amazonaws.com/test
ServerlessDeploymentBucketName: aws-node-stripe-integration-serverlessdeploymentbuck-xxxxxxxxxxxx
IncomingLambdaFunctionQualifiedArn: arn:aws:lambda:us-east-1:000000000000:function:aws-node-stripe-integration-test-incoming:20
endpoints ってのが、API Gateway の endpoint になります。
本番環境( Live )用の API Gateway endpoint を作成するには --stage live をつけてデプロイ
$ serverless deploy --stage live
Stripe Webhook の設定
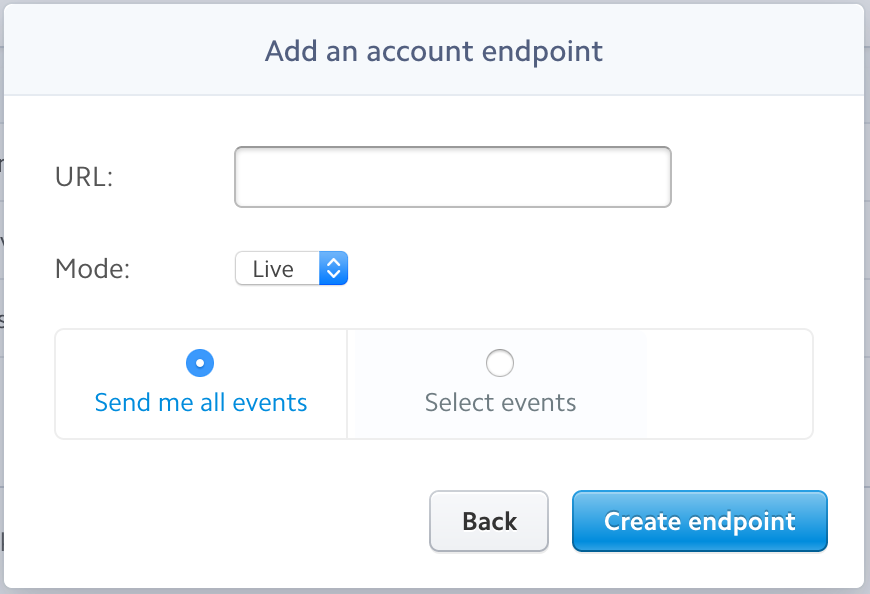
Stripe の管理画面から Webhook URL を設定します。
https://dashboard.stripe.com/account/webhooks の「Add endpoint」をクリック。

Test 環境用の Webhook を設定したい場合は「Mode」Test を、Live 環境用の Webhook を設定したい場合は「Mode」Live を選択して「URL」欄に先ほど serverless deploy した時に作成された API Gateway の endpoint を入力して「Create endpoint」をクリックするだけです。
Serverless Framework のおかげで、簡単にできちゃいますねー。
現場からは以上です。