2020-03-15 追記 MAAS への誘い
- MAAS を入れると下記のようなことから開放されます。死にませんが、死ぬほど簡単なので試してみて
- さらに Juju を使ってやると OpenStack 等が簡単にデプロイできます
References
About
Ubuntu Server 18.04 LTS で検証。
そう、時代は Ubuntu Server 。
Ubuntu Server 18.04 LTS で Preseed する際の注意点
これ超重要です。 Subiquity インストーライメージをそのまま流用しても d-i を使った Preseed インストールはできません。この目で boot: で止まったのを確認しました。
せいぜいイメージを見つけて boot=casper でブートできたとしても Subiquity のインストーラが普通に立ち上がるだけです。あと、 Subiquity でデフォルト全域インストール指定すると swap パーティションは作られなくなりました。
Preseed に使う Ubuntu Server 用のイメージは一般的なダウンロードページではなく、
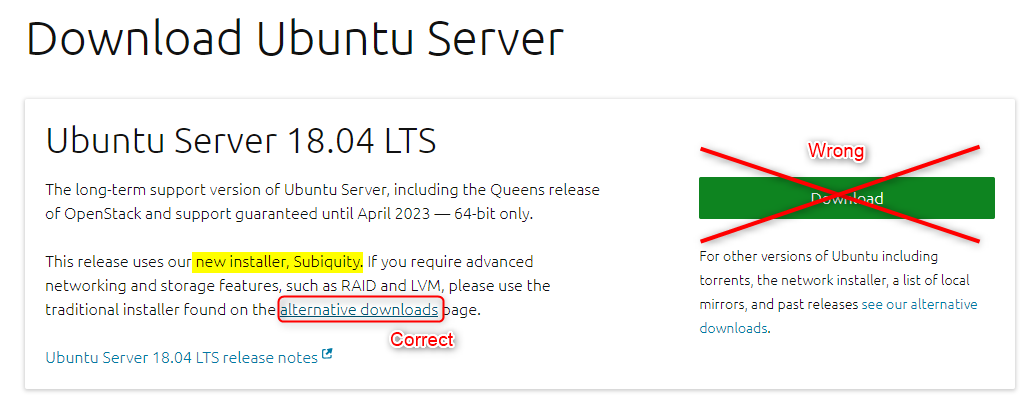
This release uses our new installer, Subiquity. If you require advanced networking and storage features, such as RAID and LVM, please use the traditional installer found on the alternative downloads page.
とのことから
Alternative downloads ->
Alternative Ubuntu Server installer
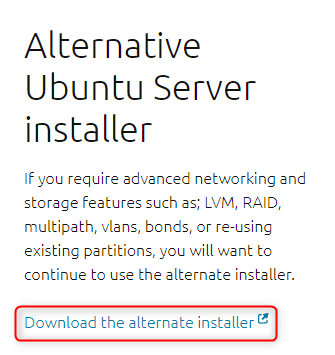
を選びましょう。
それ以外は 18.04 も 16.04 も Preseed の方法論に大差ありません。
もっとも、 18.04 自体は systemd への統合がより強くなったということ以外を除けばですが。よくも悪くもモダンな感じになりました。
Introduction
最近、 CentOS 7.4 の firewalld があまり思わしく動かないため、比較的入るパッケージも古めなので CentOS から解脱して仕事でも Ubuntu Server を使っているのですが、仮想化ホストも Ubuntu Server にしようとしています。
前々から仮想化ホストセットアップのたびに物理サーバの OS インストールやってると何台も何台も何台も何台も何台も CentOS を仮想化ホストとしてセットアップする必要があり、ソフトウェア RAID1 構築して、 LVM 設定して、swapパーティション切って・・・と心を無にしてやる必要がありました。
Ubuntu Server のインストーラは BusyBox ベースであり、インタラクティブインストーラだけで完結できるほどお世辞にも使いやすいものとは言い難いので、より心を無にする必要があるのかと思いげんなりしました。
この記事書いた当初は 12.04 LTS で、今は 16.04 LTS 、もうすこしで 18.04 LTS が出るんですね。
以前からこの記事も結構バズっていたようで、自分の備忘録も兼ねていたので新版として改めることにいたしました。
流石に古すぎてこのままじゃ動かなかったので・・・。
仮想マシンなら vagrant up とかして 、Ansible やらシェルプロビジョニングやら、なんなら docker-compose でちゃちゃっと環境構築できちゃうと思いますが、この場合、物理サーバーそのものに Ubuntu をインストールしないといけないので Vagrant やその他のサービスは使えません。
こういう刺し身タンポポな作業は CentOS 系列では Kickstart 、Ubuntu 系列では Preseed を使ってサーバセットアップを自動化します。
必要最小限なインストールが完了したら Ansible なり Chef なりの構成管理ツールでちゃっちゃと料理してあげればいいのではないでしょうか。
どのインストール方式を選択するか
この記事はPreseedによるUbuntuインストールの自動化を勉強をしようとしている方向けに書いています。
Preseed を使うと言ってもインストールの仕方にはいろいろあって、一長一短です。
ざっと方法を並べると以下のとおりです。
- ISOイメージに
preseed.cfgを同梱して専用のDVDを作ってインストールする。 - PXEブート方式。pxelinuxのイメージをTFTPで取得して
preseed.cfgをネットから取得して、
それにしたがってネットワークインストールする。DVDいらずです。 - (1)で作成するISOイメージで
preseed.cfgの設定はネットワーク上からHTTPで取得する。
パッケージのインストールは主にDVDから行う。
大規模なインフラを構築する場合は(2)のPXEブート方式が一番自由度が高くていいのですが、
なにぶん、セットアップがめちゃくちゃ大変でネットワークからパッケージを引っ張ってくるのでものすごく遅いです。
実験用途で preseed.cfg をちょっと書き換えてテストするのには遅いし、ハードルが高めです。
これを高速化しようとすると apt のミラーをローカルに構築しなきゃいけないので、どんどん深みにハマっていつの間にか目的を見失ってしまいます。
preseed.cfg に関するドキュメントが全然なくて日本語の情報も少ないので何度も何度も
トライ・アンド・エラーすることになるので、 DVDが何十枚あっても足りないです。preseed.cfg はネットから取得するようにしたいですね。
なので、(3)を選択します。
Tips
- まずは VirtualBox (あるいは VMware )で何度も Preseed のテストをするといいです。
- スクリーンショットもとれる。
-
Alt+F4でログを見れる。(Macはoption+fn+F4)
システム構成
- isoイメージを作成する母艦: Ubuntu 18.04 LTS Desktop
- 今回カスタマイズするもの: Ubuntu Server 18.04 LTS amd64
- DHCP環境必須(静的IPをサーバーに設定するつもりでも必須です)
カスタムDVDを作成する
手順としては以下のとおりとなります。
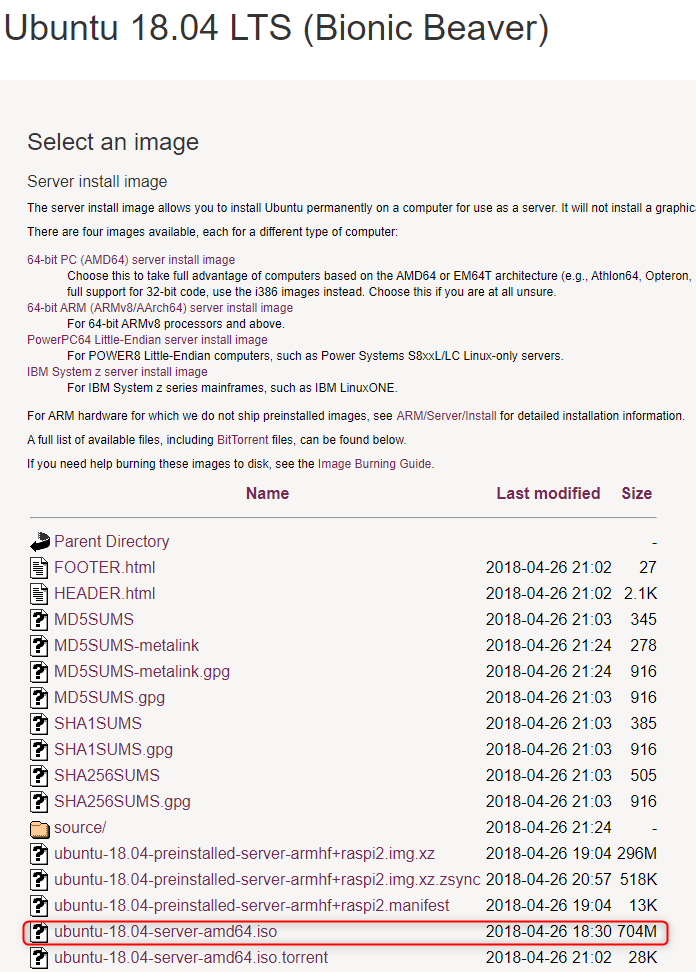
- isoイメージをダウンロード
- 母艦となるUbuntuでそのisoをマウントしてisolinuxの設定を書き換える
- カスタムisoイメージを作成
- それをDVDに焼く
- サーバーにDVDを入れて自動インストール
- 完了
ダウンロード
まずはUbuntu ServerのISOイメージを母艦にダウンロードします。
Download Ubuntu Server | Download | Ubuntu
必要なパッケージをインストール
sudo apt -y install syslinux mtools mbr genisoimage dvd+rw-tools
作業ディレクトリ作成
mkdir -p /var/tmp/ubuntu/{dvd-from,dvd-to}
cd /var/tmp/ubuntu/
マウント
sudo mount -t iso9660 -o loop,ro /var/tmp/ubuntu-18.04-server-amd64.iso /var/tmp/ubuntu/dvd-from
isoイメージからファイルコピー
$ cd /var/tmp/ubuntu/dvd-from
$ time find . ! -type l | cpio -pdum ../dvd-to/
1444156 blocks

real	0m12.280s
user	0m0.029s
sys	0m11.877s
展開された中身を見ると以下のようになっています。
$ ls /var/tmp/ubuntu/dvd-to -F
EFI/  README.diskdefines  boot/  dists/  doc/  install/  isolinux/  md5sum.txt  pics/  pool/  preseed/
isolinux.cfg ファイルの編集
これはブート時のメニュー定義ファイルです。
dvd-to/isolinux/isolinux.cfg の中身を以下の内容で全置換します。
読み取り専用になってるので ! を付加して強制的に書き込みます。
ごちゃごちゃしていて不安になるかもしれませんが、appendでくっつけているオプションは消すと自動化できません。
インストール時に確認画面が出てしまいます。
cd /var/tmp/ubuntu
# backup isolinux.cfg
cp dvd-to/isolinux/isolinux.cfg /var/tmp
Before
# D-I config version 2.0
# search path for the c32 support libraries (libcom32, libutil etc.)
path
include menu.cfg
default vesamenu.c32
prompt 0
timeout 300
ui gfxboot bootlogo
After
http://192.168.0.100/preseed.cfg の部分は自分で管理している Web サーバに読み替えてください。
このタイミングでは SSL での通信ができないので HTTP で通信できるサーバを調達して下さい。
Web サーバとして最低限動けば Raspberry Pi でもなんでもいいです。
default install
label install
  menu label ^Install Ubuntu Server
  kernel /install/vmlinuz
  append DEBCONF_DEBUG=5 auto=true locale=en_US.UTF-8 console-setup/charmap=UTF-8 console-setup/layoutcode=us console-setup/ask_detect=false pkgsel/language-pack-patterns=pkgsel/install-language-support=false interface=ens33 hostname=localhost domain=localdomain url=http://192.168.0.100/preseed.cfg vga=normal initrd=/install/initrd.gz quiet --
label hd
  menu label ^Boot from first hard disk
  localboot 0x80
DEBCONF_DEBUG=5 はデバッグ用のオプションでインストール時に Alt+F4 で仮想ターミナルを切り替えると preseed のログを見ることができます。
それとそのログは /var/log/installer/syslog に保存されるので後で眺めると勉強になります。ただし超長いです。
以下、簡単な説明です。
インストーラに与える引数
これは preseed.cfg にも記入するのですが、append 行でもくっつけておかないと確認画面が出てしまいます。
注意です。
auto=true locale=en_US.UTF-8 console-setup/charmap=UTF-8 console-setup/layoutcode=us console-setup/ask_detect=false pkgsel/language-pack-patterns=pkgsel/install-language-support=false interface=ens33 hostname=localhost domain=localdomain
preseed.cfg を読み込む先の指定
url=http://192.168.0.100/preseed.cfg
で preseed.cfg を読み込む先を設定します。インストーラはいったん DHCP で自身の IP アドレスを解決してからこのファイルを取りに行きます。
ここでは気軽に SSH しながら vim で preseed.cfg を編集できるような Web サーバから読み込むようにしています。
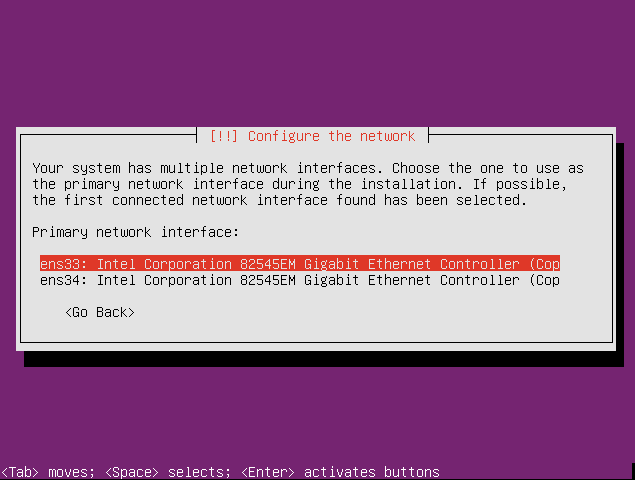
ネットワークまわりのつまづきポイント
最近はカーネルのバージョンも上がって認識されるネットワークインターフェース名も eth0 と言った名前から ens33 のような名前になっています。あるいは eno1 とか。
以降の eth0 の部分はあなたのマシンインターフェース認識状況に合わせて置き換えて下さい。
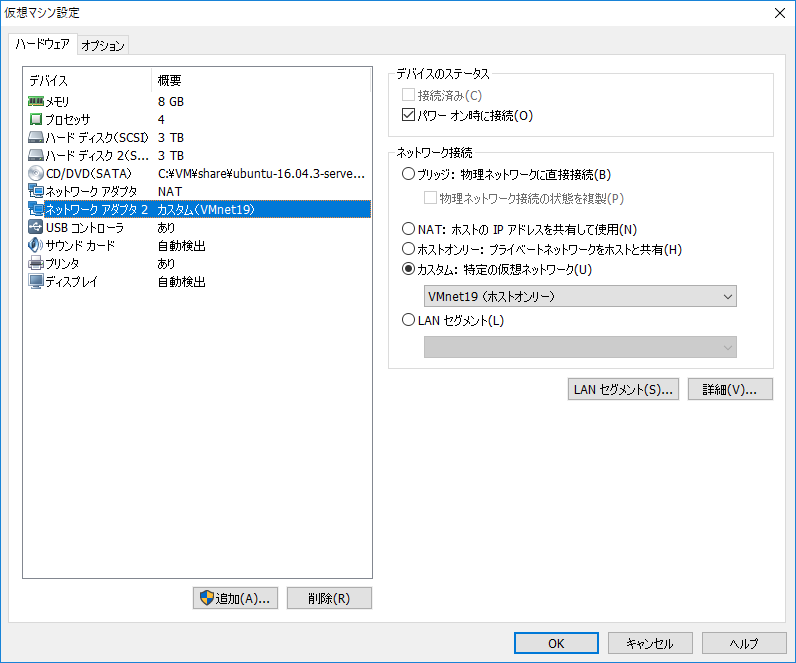
少なくとも Preseed の PoC(proof-of-concept) のために使っている VMware Workstation 12.5 Pro ではこう認識しています。
そうしないと以下のような悲しい画面を見ることになります。
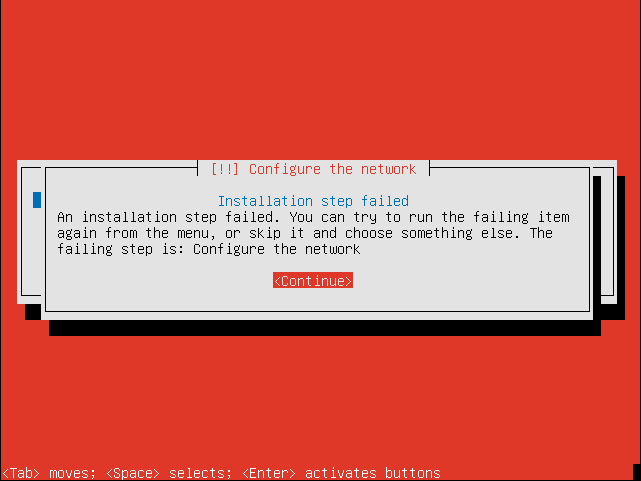
いろいろいじくり回して eth0 という名前で解決してもいいんでしょうけど私にそういう頭はないのでシステムの決めたことに従います。
あと、毎回めんどくさい場合はドキュメントに載っていますが、 interface=auto でもいいかも?試していません。
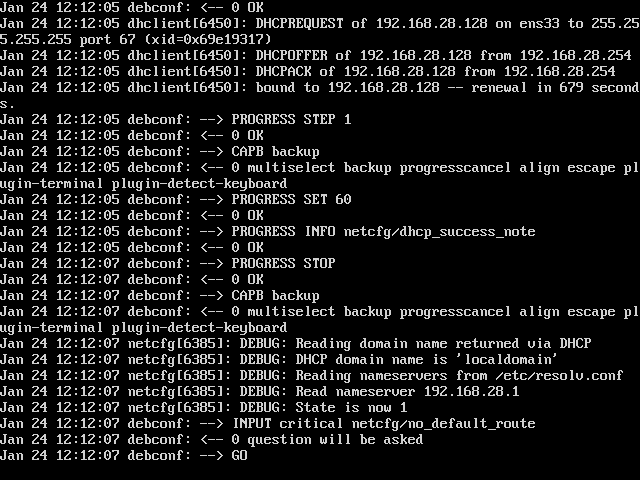
Alt+F4
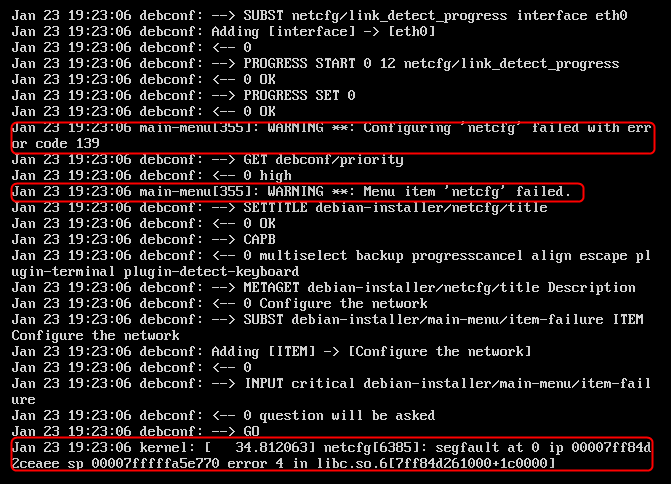
netcfg まわりでセグフォってますね。
悲しいですね。
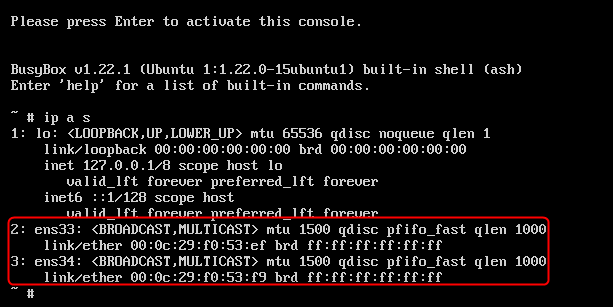
こうなった場合以下のようにして調べる。
Alt+F2 とキーインして

と出たらエンターしてコンソールに入る
赤字のように認識されています。
わかりやすいですね。
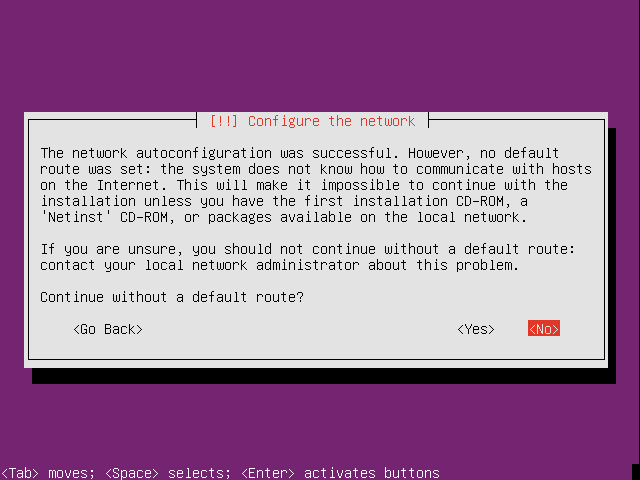
デフォルトルートがねえぞって怒られた
NIC が 2 枚あり、どちらもホストオンリーネットワーク等の場合はこうなります。
あるいはインターフェース名が入れ替わってしまっているか。
さあ ISO の作り直しです。
preseed.cfg のインターフェース名も一緒に置換しておきます。
boot エラーが発生する
preseed.cfg を作成する
いよいよ preseed.cfg を書きます。
Web サーバ上で次の2つのファイルを作成します。
# !/bin/sh
killall.sh; netcfg
最大の勘所は下記の通り。
- パーティション設計(partman)
- ネットワーク
partman なんて正直まともに読むのも辛いし書くのも辛い。
しかしこればっかりは公式ドキュメントなり、二次ソースなり、体当たりでトライアンドエラーでコツを覚えていくしかないです。
パーティショニングがうまく設定できないと自動化する意味はほとんどなくなりますからね。
この設定画面ボタンポチポチやるのがいやで Preseed やってるんですよ。
Single Disk, MBR, No LVM
- Disk Size: 80GiB
- Number of Disks: 1
- LVM: なし
- RAID: なし
- Partition Table Format: MBR
- Memory: 32GiB
# ===========================================================================================
# BOOT SEQUENCE CONFIGURATIONS START
# ENDの設定のところまではDVDメディア、USBメディアに同梱している場合にのみ有効になる設定。
# PXEブートの場合はこのセクションは無視される。
# この場合はpxelinuxのconfigのappendに直接記述する必要がある。
# ===========================================================================================
d-i debian-installer/language string en
d-i debian-installer/country string US
d-i debian-installer/locale string en_US.UTF-8
d-i localechooser/supported-locales en_US.UTF-8
d-i console-setup/ask_detect boolean false
d-i console-setup/layoutcode string us
d-i console-setup/charmap select UTF-8

# キーボードレイアウトの特性の設定(日本語キーボード)
d-i keyboard-configuration/layoutcode string jp
d-i keyboard-configuration/modelcode jp106

# ===========================================================================================
# ネットワークまわりの設定
# -------------------------------------------------------------------------------------------
# 静的IP
# -------------------------------------------------------------------------------------------
# preseed.cfgを外から持ってこようとするとどうしてもいったんDHCP解決しないといけない。
# そして以下の netcfg 項目は一回目は無視されるので d-i preseed/run のところで
# ネットワーク設定をリセットするハックが必要になる。
# そうすると静的IPとして設定を直してくれるようになる。
#
# 詳しくは以下:
# - https://help.ubuntu.com/lts/installation-guide/i386/preseed-contents.html
# - http://debian.2.n7.nabble.com/Bug-688273-Preseed-netcfg-use-autoconfig-and-netcfg-disable-dhcp-doesn-t-work-td1910023.html
#
# 以下の2項目を設定しないと静的IPとして処理されないので重要
d-i netcfg/use_autoconfig boolean false
d-i netcfg/disable_autoconfig boolean true

d-i netcfg/choose_interface select ens33
d-i netcfg/disable_dhcp boolean true
d-i netcfg/get_nameservers string 8.8.8.8 8.8.4.4 1.1.1.1
d-i netcfg/get_ipaddress string 192.168.1.201
d-i netcfg/get_netmask string 255.255.255.0
d-i netcfg/get_gateway string 192.168.1.1
d-i netcfg/confirm_static boolean true
d-i netcfg/get_hostname string stack01
d-i netcfg/get_domain string example.com
d-i netcfg/wireless_wep string
# -------------------------------------------------------------------------------------------
# DHCPのとき
# -------------------------------------------------------------------------------------------
# d-i netcfg/choose_interface select ens33
# d-i netcfg/disable_autoconfig boolean false
# d-i netcfg/get_hostname string openstack
# d-i netcfg/get_domain string sv.example.com
# d-i netcfg/wireless_wep string

# いったんリセット
d-i preseed/run string http://192.168.0.100/prescript.sh
# ===========================================================================================
# BOOT SEQUENCE CONFIGURATIONS END
# ===========================================================================================

# インストーラパッケージをダウンロードするミラーを選択する
# d-i mirror/protocol http
d-i mirror/country string manual
d-i mirror/http/hostname string jp.archive.ubuntu.com
d-i mirror/http/directory string /ubuntu/
d-i mirror/http/proxy string

# インストールするスイートを選択
# d-i mirror/suite xenial
d-i mirror/suite bionic

d-i clock-setup/utc boolean false
d-i time/zone string Japan
d-i clock-setup/ntp boolean false

# ===========================================================================================
# PARTMAN PARTITIONING SECTION START
# ===========================================================================================
# すべてのRAIDデバイス構成を破棄する
d-i partman-md/device_remove_md boolean true
# すべてのLVMデバイス構成を破棄する
d-i partman-lvm/device_remove_lvm boolean true

d-i partman/confirm_nooverwrite boolean true

d-i partman-auto/disk string /dev/sda
d-i partman-auto/method string regular

# Partition Design
# +++++++++++++++++++++++++++++++++++++++++++++++++++++++++++++++
# Disk size: 80GiB
# ---------------------------------------------------------------
# Mount Point           Min Size           Max Size
# ---------------------------------------------------------------
# /boot                     1GiB               1GiB
# /                        50GiB       unlimited
# swap                     32GiB              32GiB
# ---------------------------------------------------------------
# <limits>::=<minimal size>_<priority>_<maximal size>_<parted fs>
#
d-i partman-auto/expert_recipe string      \
           root ::                         \
             1024 10 1024 ext2             \
                $primary{ }                \
                $bootable{ }               \
                format{ }                  \
                use_filesystem{ }          \
                filesystem{ ext2 }         \
                mountpoint{ /boot }        \
             .                             \
             51200 30 -1 ext4              \
                $primary{ }                \
                method{ format }           \
                format{ }                  \
                use_filesystem{ }          \
                filesystem{ ext4 }         \
                mountpoint{ / }            \
             .                             \
             32768 20 32768 linux-swap     \
                $primary{ }                \
                method{ swap }             \
                format{ }                  \
            .

d-i partman-auto/choose_recipe select root
d-i partman-partitioning/confirm_write_new_label boolean true
d-i partman/choose_partition select Finish partitioning and write changes to disk
d-i partman/confirm boolean true
# ===========================================================================================
# PARTMAN PARTITIONING SECTION END
# ===========================================================================================

d-i base-installer/install-recommends boolean true
d-i base-installer/kernel/image string linux-generic

d-i passwd/root-login boolean false
d-i passwd/make-user boolean true
# d-i passwd/root-password password password
# d-i passwd/root-password-again password password
d-i passwd/user-fullname string Nick Smith
d-i passwd/username string nick
# d-i passwd/user-password password insecure
# d-i passwd/user-password-again password insecure
# You can generate encrypted password following in whois package:
# sudo apt -y install whois
# mkpasswd -m sha-512
d-i passwd/user-password-crypted password $6$32b4yZWXb6zgTb$RxIcuUYzYRMMHrq7jOCGTDQiVLoYxVbsiW2vgwb1GBrVo.0PAs/2bUM7wAWdBTaU9mQzri/YqEYvIuNXl6Gxv1
d-i user-setup/allow-password-weak boolean true
d-i user-setup/encrypt-home boolean false

d-i apt-setup/use_mirror boolean true

d-i debian-installer/allow_unauthenticated boolean true
tasksel tasksel/first multiselect none
# select additional install packages
d-i pkgsel/include string openssh-server \
                          tcpdump \
                          lvm2 \
                          curl wget \
                          vim tmux
d-i pkgsel/upgrade select none
d-i pkgsel/update-policy select none
d-i pkgsel/install-language-support boolean true
popularity-contest popularity-contest/participate boolean false
d-i pkgsel/updatedb boolean true

# GRUBインストーラー
d-i grub-installer/grub2_instead_of_grub_legacy boolean true
d-i grub-installer/only_debian boolean true
d-i grub-installer/bootdev string /dev/sda

# インストールが終了したらサーバー再起動
d-i finish-install/reboot_in_progress note
ちなみに上のレシピは
Preseed Recipe: Basic Configuration
で提供しています。
Single Disk, UEFI + GPT, No LVM
- Disk Size: 80GiB
- Number of Disks: 1
- LVM: なし
- RAID: なし
- Partition Table Format: GPT
- Memory: 32GiB
2019-05-30 必要に迫られて UEFI + GPT 対応の Preseed 修正しました(partman)。TX1310 M3 で普通にインストールしたら全然ブートしなくてなんでや!ってなりました。デフォルトで UEFI ブートモードになっているっぽい?
ポイントは下記。間違ってたら教えてください。
- GPT パーティションテーブルを構成する必要があるほどディスクが大きい時(2TB超え)
- BIOS システムとの互換性のため biosgrub という BIOS からブートする用のパーティションを用意する
- EFI System Partition(ESP) を用意すること UEFI ブートするときは必須。 VFAT(FAT32) でフォーマットする
links
- GPT対応のpreseedの書き方 — ペンギンと愉快な機械の日々
- Get expert_recipe, mdraid, LVM, GPT and grub2 Playing Together on Ubuntu Lucid and Debian Squeeze | Semi-Empirical Shenanigans
# ===========================================================================================
# BOOT SEQUENCE CONFIGURATIONS START
# ENDの設定のところまではDVDメディア、USBメディアに同梱している場合にのみ有効になる設定。
# PXEブートの場合はこのセクションは無視される。
# この場合はpxelinuxのconfigのappendに直接記述する必要がある。
# ===========================================================================================
d-i debian-installer/language string en
d-i debian-installer/country string US
d-i debian-installer/locale string en_US.UTF-8
d-i localechooser/supported-locales en_US.UTF-8
d-i console-setup/ask_detect boolean false
d-i console-setup/layoutcode string us
d-i console-setup/charmap select UTF-8

# キーボードレイアウトの特性の設定(日本語キーボード)
d-i keyboard-configuration/layoutcode string jp
d-i keyboard-configuration/modelcode jp106

# ===========================================================================================
# ネットワークまわりの設定
# -------------------------------------------------------------------------------------------
# 静的IP
# -------------------------------------------------------------------------------------------
# preseed.cfgを外から持ってこようとするとどうしてもいったんDHCP解決しないといけない。
# そして以下の netcfg 項目は一回目は無視されるので d-i preseed/run のところで
# ネットワーク設定をリセットするハックが必要になる。
# そうすると静的IPとして設定を直してくれるようになる。
#
# 詳しくは以下:
# - https://help.ubuntu.com/lts/installation-guide/i386/preseed-contents.html
# - http://debian.2.n7.nabble.com/Bug-688273-Preseed-netcfg-use-autoconfig-and-netcfg-disable-dhcp-doesn-t-work-td1910023.html
#
# 以下の2項目を設定しないと静的IPとして処理されないので重要
d-i netcfg/use_autoconfig boolean false
d-i netcfg/disable_autoconfig boolean true

d-i netcfg/choose_interface select ens33
d-i netcfg/disable_dhcp boolean true
d-i netcfg/get_nameservers string 8.8.8.8 8.8.4.4 1.1.1.1
d-i netcfg/get_ipaddress string 192.168.1.201
d-i netcfg/get_netmask string 255.255.255.0
d-i netcfg/get_gateway string 192.168.1.1
d-i netcfg/confirm_static boolean true
d-i netcfg/get_hostname string stack01
d-i netcfg/get_domain string example.com
d-i netcfg/wireless_wep string
# -------------------------------------------------------------------------------------------
# DHCPのとき
# -------------------------------------------------------------------------------------------
# d-i netcfg/choose_interface select ens33
# d-i netcfg/disable_autoconfig boolean false
# d-i netcfg/get_hostname string openstack
# d-i netcfg/get_domain string sv.example.com
# d-i netcfg/wireless_wep string

# いったんリセット
d-i preseed/run string http://10.1.2.254/automation/preseed/prescript.sh
# ===========================================================================================
# BOOT SEQUENCE CONFIGURATIONS END
# ===========================================================================================

# インストーラパッケージをダウンロードするミラーを選択する
# d-i mirror/protocol http
d-i mirror/country string manual
d-i mirror/http/hostname string jp.archive.ubuntu.com
d-i mirror/http/directory string /ubuntu/
d-i mirror/http/proxy string

# インストールするスイートを選択
# d-i mirror/suite xenial
d-i mirror/suite bionic

d-i clock-setup/utc boolean false
d-i time/zone string Japan
d-i clock-setup/ntp boolean false

# ===========================================================================================
# PARTMAN PARTITIONING SECTION START
# ===========================================================================================
# すべてのRAIDデバイス構成を破棄する
d-i partman-md/device_remove_md boolean true
# すべてのLVMデバイス構成を破棄する
d-i partman-lvm/device_remove_lvm boolean true

d-i partman/confirm_nooverwrite boolean true

d-i partman-auto/disk string /dev/sda
d-i partman-auto/method string regular

# Partition Design
# +++++++++++++++++++++++++++++++++++++++++++++++++++++++++++++++
# Disk size: 80GiB
# ---------------------------------------------------------------
# Mount Point           Min Size           Max Size
# ---------------------------------------------------------------
# /boot                     1GiB               1GiB
# /                        50GiB       unlimited
# swap                     32GiB              32GiB
# ---------------------------------------------------------------
# <limits>::=<minimal size>_<priority>_<maximal size>_<parted fs>
#
d-i partman-auto/expert_recipe string      \
             1 1 1 free                    \
                $gptonly{ }                \
                $primary{ }                \
                $bios_boot{ }              \
                method{ biosgrub }         \
             .                             \
             1024 1024 1024 fat32          \
                $gptonly{ }                \
                $primary{ }                \
                $bios_boot{ }              \
                method{ efi }              \
                format{ }                  \
             .                             \
           root ::                         \
             1024 10 1024 ext4             \
                $gptonly{ }                \
                $primary{ }                \
                $bootable{ }               \
                use_filesystem{ }          \
                filesystem{ ext4 }         \
                format{ }                  \
                mountpoint{ /boot }        \
             .                             \
             51200 30 -1 ext4              \
                $gptonly{ }                \
                $primary{ }                \
                method{ format }           \
                format{ }                  \
                use_filesystem{ }          \
                filesystem{ ext4 }         \
                mountpoint{ / }            \
             .                             \
             32768 20 32768 linux-swap     \
                $gptonly{ }                \
                $primary{ }                \
                method{ swap }             \
                format{ }                  \
            .

d-i partman-auto/choose_recipe select root
d-i partman-partitioning/confirm_write_new_label boolean true
d-i partman/choose_partition select Finish partitioning and write changes to disk
d-i partman/confirm boolean true
# ===========================================================================================
# PARTMAN PARTITIONING SECTION END
# ===========================================================================================

d-i base-installer/install-recommends boolean true
d-i base-installer/kernel/image string linux-generic

d-i passwd/root-login boolean false
d-i passwd/make-user boolean true
# d-i passwd/root-password password password
# d-i passwd/root-password-again password password
d-i passwd/user-fullname string Nick Smith
d-i passwd/username string nick
# d-i passwd/user-password password insecure
# d-i passwd/user-password-again password insecure
# You can generate encrypted password following in whois package:
# sudo apt -y install whois
# mkpasswd -m sha-512
d-i passwd/user-password-crypted password $6$32b4yZWXb6zgTb$RxIcuUYzYRMMHrq7jOCGTDQiVLoYxVbsiW2vgwb1GBrVo.0PAs/2bUM7wAWdBTaU9mQzri/YqEYvIuNXl6Gxv1
d-i user-setup/allow-password-weak boolean true
d-i user-setup/encrypt-home boolean false

d-i apt-setup/use_mirror boolean true

d-i debian-installer/allow_unauthenticated boolean true
tasksel tasksel/first multiselect none
# select additional install packages
d-i pkgsel/include string openssh-server \
                          tcpdump \
                          lvm2 \
                          curl wget \
                          vim tmux
d-i pkgsel/upgrade select none
d-i pkgsel/update-policy select none
d-i pkgsel/install-language-support boolean true
popularity-contest popularity-contest/participate boolean false
d-i pkgsel/updatedb boolean true

# GRUBインストーラー
d-i grub-installer/grub2_instead_of_grub_legacy boolean true
d-i grub-installer/only_debian boolean true
d-i grub-installer/bootdev string /dev/sda

# インストールが終了したらサーバー再起動
d-i finish-install/reboot_in_progress note
カスタム ISO イメージを作成する
いよいよ ISO イメージに固めます。
$ cd /var/tmp/ubuntu
$ time sudo genisoimage -N -J -R -D -V "PRESEED" -o ubuntu-18.04-server-amd64-preseed-over-http-cfg.iso -b isolinux/isolinux.bin -c isolinux/boot.cat -no-emul-boot -boot-load-size 4 -boot-info-table dvd-to

(snip)

 95.54% done, estimate finish Tue Jan 23 19:46:18 2018
 96.70% done, estimate finish Tue Jan 23 19:46:18 2018
 97.87% done, estimate finish Tue Jan 23 19:46:18 2018
 99.03% done, estimate finish Tue Jan 23 19:46:18 2018
Total translation table size: 2048
Total rockridge attributes bytes: 403541
Total directory bytes: 1994752
Path table size(bytes): 13484
Max brk space used 3aa000
429167 extents written (838 MB)

real    0m13.047s
user    0m0.604s
sys     0m3.110s
アカウントパスワードの設定
クリアテキストで preseed.cfg に書くこともできますが、当然ながら whois パッケージに入っている mkpasswd コマンドで暗号化したパスワードを記述することも可能です。
sudo apt -y install whois
$ mkpasswd -m sha-512
Password: foobarblah
$6$32b4yZWXb6zgTb$RxIcuUYzYRMMHrq7jOCGTDQiVLoYxVbsiW2vgwb1GBrVo.0PAs/2bUM7wAWdBTaU9mQzri/YqEYvIuNXl6Gxv1
d-i passwd/user-password-crypted password $6$32b4yZWXb6zgTb$RxIcuUYzYRMMHrq7jOCGTDQiVLoYxVbsiW2vgwb1GBrVo.0PAs/2bUM7wAWdBTaU9mQzri/YqEYvIuNXl6Gxv1
実行してみる
いきなり物理マシンにやるのはけっこうしんどいので仮想マシンでやってみます。
うまくいきましたか?
何も聞かれずにインストールが進む様は気持ちがいいですね。
ソフトウェアRAID1構成、LVM構成をやってみたい方はこちらのレシピをどうぞ。
Preseed Recipe: Soft RAID1, LVM
それでは、よい SRE ライフを。
One more thing
- ボンディング対応
partman を使ったパーティショニングの解説
TBD
参考サイト
- https://help.ubuntu.com/lts/installation-guide/example-preseed.txt
- ubuntu_documents/preseed at master · wnoguchi/ubuntu_documents
- Ubuntu Serverの全自動インストール環境作成 - kinneko@転職先募集中の日記
- Ubuntu Serverの完全自動インストールISOの作成(Preseeding) - SharpLab.
- PreseedによるUbuntu ServerのインストールCD作成手順(PDF)
- Appendix B. Automating the installation using preseeding
- Contents of the preconfiguration file (for precise)
- B.2. preseed の利用
- Advanced options
- preseedを使ってDebian GNU/Linux 5.0.4(netinst)のインストール自動化を行う手順 - 富士山は世界遺産
- Contents of the preconfiguration file (for precise)
- GPT対応のpreseedの書き方 — ペンギンと愉快な機械の日々
- Notes on using expert_recipe in Debian/Ubuntu Preseed Files | Semi-Empirical Shenanigans
- B.5. 高度なオプション
- Bug #901700 “netcfg segfauts when preseeding 12.04 LTS networkle...” : Bugs : netcfg package : Ubuntu
- B.4. Contents of the preconfiguration file (for xenial)
- B.2. Using preseeding
- Re: GPT preseed [ almost solved ]
- Generator for Debian preseed files
- RHEL7のNICのネーミングルール - めもめも
- PreseedでUbuntu 18.04をProvisioningした作業メモ (UEFI対応版) - Qiita