Laravel6とVue.jsを連携して、APIを実行するまでの手順を、メモがてら手順をまとめてみました。
SPAを作成しようとしている方などのご参考になれば嬉しいです😄
バージョン
composer: 2.2.7
php: 7.4.28
laravel: 6.20.44
npm: 6.14.12
node: 14.16.1
vue: 2.5.17
vue-router: 3.1.3
laravelプロジェクト作成
composer create-project "laravel/laravel=6.*" {プロジェクトのお名前} --prefer-dist
プロジェクトのディレクトリに移動して、以下コマンド実行
php artisan serve
- 以下のようなログが出力されます。出力されるURLをコピーしておきましょう。
Laravel development server started: {ここに出力されるURLをコピー!}
- コピーしたURLにブラウザでアクセスしてみて、以下のようにlaravelの初期画面が表示されていればLaravelの起動は完璧です!
laravel uiインストール
- Laravel UIとは、フロントエンドのフレームワーク(Vue,Reactなど)をLaravelで使用できるようにしてくれるライブラリです
- 以下コマンドでインストールしましょう
※laravel6の場合、laravelUIのバージョンを1系で指定しないとエラーになります!
composer require laravel/ui:1.2.0
laravel uiでvueをインストール
- 今回はVueを使ってフロントエンドを実装していくので、以下コマンドを実行しましょう
php artisan ui vue
必要なnpmのインストールして、コンパイル
- Laravel UIでVueを設定できたら、以下npmスクリプトを実行して必要なライブラリなどをインストールして、コンパイルします
npm install && npm run dev
-
npm run devで実際に実行しているコマンドは以下になります(こちらは実行しなくて大丈夫です)
cross-env NODE_ENV=development node_modules/webpack/bin/webpack.js --progress --config=node_modules/laravel-mix/setup/webpack.config.js
.gitignoreの編集
- もしプロジェクトをGitにあげている場合は、コンパイル後のファイルをGitの監視対象から外してもよいかもです
- ルートディレクトリにある
.gitignoreに/public/jsと/public/cssを追加しましょう
.gitignore
/node_modules
/public/hot
/public/storage
/public/js
/public/css
/storage/*.key
/vendor
.env
.env.backup
.phpunit.result.cache
Homestead.json
Homestead.yaml
npm-debug.log
yarn-error.log
resources/routes/web.phpの編集
- どんなルートにアクセスしても、
welcome.blade.phpに遷移するようにします
web.php
// 変更前
Route::get('/', function () {
    return view('welcome');
});

// 変更後
Route::get('/{any?}', function () {
    return view('welcome');
})->where('any', '.*');
vue-routerのインストール
- VueのルーティングをしてくれるVueRouterをインストールしましょう(VueRouterの詳しい説明は割愛します...)
- VueRouterは、Vueとのバージョン依存があります!今回のVueのバージョンは2なのでVueRouterのバージョンは3を指定してインストールします
npm install vue-router@3.1.3
router.jsを作成
-
resources/jsディレクトリ配下に、VueRouterのルーティング設定を記載するrouter.jsを作成します - ザックリ説明をすると、
pathにパスを指定して、componentに対象のパスに遷移した際に表示するコンポーネント、nameにこのルートを呼び出す時に使用することができる名前を設定している感じです
router.js
import Home from "./components/Home";
import VueRouter from "vue-router";

const routes = [
    {
        path: "/",
        component: Home,
        name: "HOME"
    }
];

const router = new VueRouter({
    mode: 'history',
    routes,
});

export default router;
resources/js/app.jsを編集
-
app.jsは一番大事なファイルです。ここにVueの色々な設定を書いていきます - ライブラリやモジュールを使いたい際は、ここでインポートすることが多いです
- 開くと、以下のように、色々ゴチャゴチャ書いてあります
app.js
/**
 * First we will load all of this project's JavaScript dependencies which
 * includes Vue and other libraries. It is a great starting point when
 * building robust, powerful web applications using Vue and Laravel.
 */

require('./bootstrap');

window.Vue = require('vue');

/**
 * The following block of code may be used to automatically register your
 * Vue components. It will recursively scan this directory for the Vue
 * components and automatically register them with their "basename".
 *
 * Eg. ./components/ExampleComponent.vue -> <example-component></example-component>
 */

// const files = require.context('./', true, /\.vue$/i)
// files.keys().map(key => Vue.component(key.split('/').pop().split('.')[0], files(key).default))

Vue.component('example-component', require('./components/ExampleComponent.vue').default);

/**
 * Next, we will create a fresh Vue application instance and attach it to
 * the page. Then, you may begin adding components to this application
 * or customize the JavaScript scaffolding to fit your unique needs.
 */

const app = new Vue({
    el: '#app',
});
- 以下のように書き換えましょう
- 先ほど作成した
router.js(Vueルータの設定ファイル)を使えるように、読み込んであげています
app.js
require('./bootstrap');

import router from "./router";
import VueRouter from "vue-router";

import Vue from 'vue';
Vue.use(VueRouter);

const app = new Vue({
    el: "#app",
    router
});
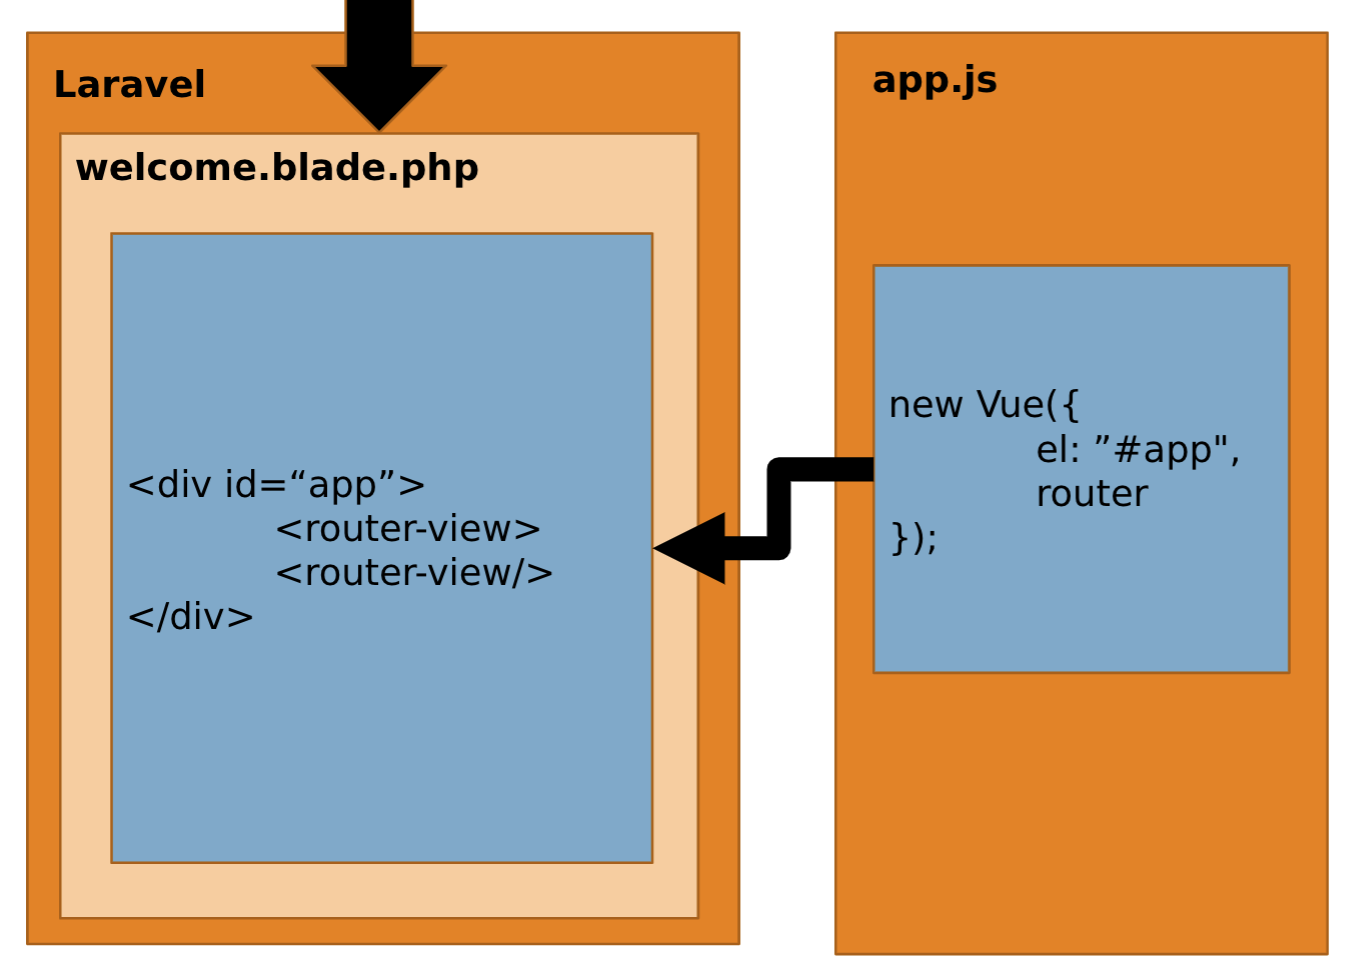
resources/views/welcome.blade.phpの編集
- headerにapp.jsを読み込む
scriptタグを追加して、bodyの中は、idがappのdivタグと、router-viewというタグだけにします - この
router-viewタグは、この範囲内はVueRouterでルーティングをしますよ〜というタグです。VueRouterを使用する際は必ずこのタグを使用します
welcome.blade.php
<!DOCTYPE html>
<html lang="{{ str_replace('_', '-', app()->getLocale()) }}">
    <head>
        <meta charset="utf-8">
        <meta name="viewport" content="width=device-width, initial-scale=1">
        <title>Laravel+Vue</title>
        <script defer src="{{ mix('js/app.js') }}"></script>
    </head>
    <body>
        <div id="app">
            <router-view><router-view/>
        </div>
    </body>
</html>
- ユーザーには常に
welcome.blade.phpを表示して、その中のdivタグ(id="app")に、resources/js/app.jsでVueインスタンスを入れ込んでいるようなイメージです
resources/js/components/Home.vueを作成
- Vueコンポーネントの細かい説明に関しては、今回は割愛させていただきます...
-
resources/js/components/ディレクトリ配下にHome.vueを作成して、以下のように編集しましょう - 画面に「Hello, Vue.js!」という文字列を表示しています
Home.vue
<template>
<div class="container">
  <h1>Hello Vue.js!</h1>
</div>
</template>
<script>
export default {
  data () {
    return {};
  }
}
</script>
<style scoped>
.container {
  margin: auto;
  width: 60%;
  padding: auto;
}
</style>
プロジェクトのディレクトリで以下コマンドを実行
- 以下のnpmスクリプトを実行することで、フロントエンドの変更を検知して勝手にコンパイルしてくれるようになります
npm run watch
- 実際に実行しているコマンドは以下になります(こちらは実行しなくて大丈夫です)
cross-env NODE_ENV=development node_modules/webpack/bin/webpack.js --progress --config=node_modules/laravel-mix/setup/webpack.config.js -- --watch
- ブラウザをリロードしてみて、以下のようにうまく
Home.vueの内容が表示されていればVueとLaravelの連携は完了です!🔥

APIを実装してみましょう!
- それでは、LaravelでAPIを作成して、Vueからそれを実行してみましょう
- APIの実行の流れは、以下のようなイメージです
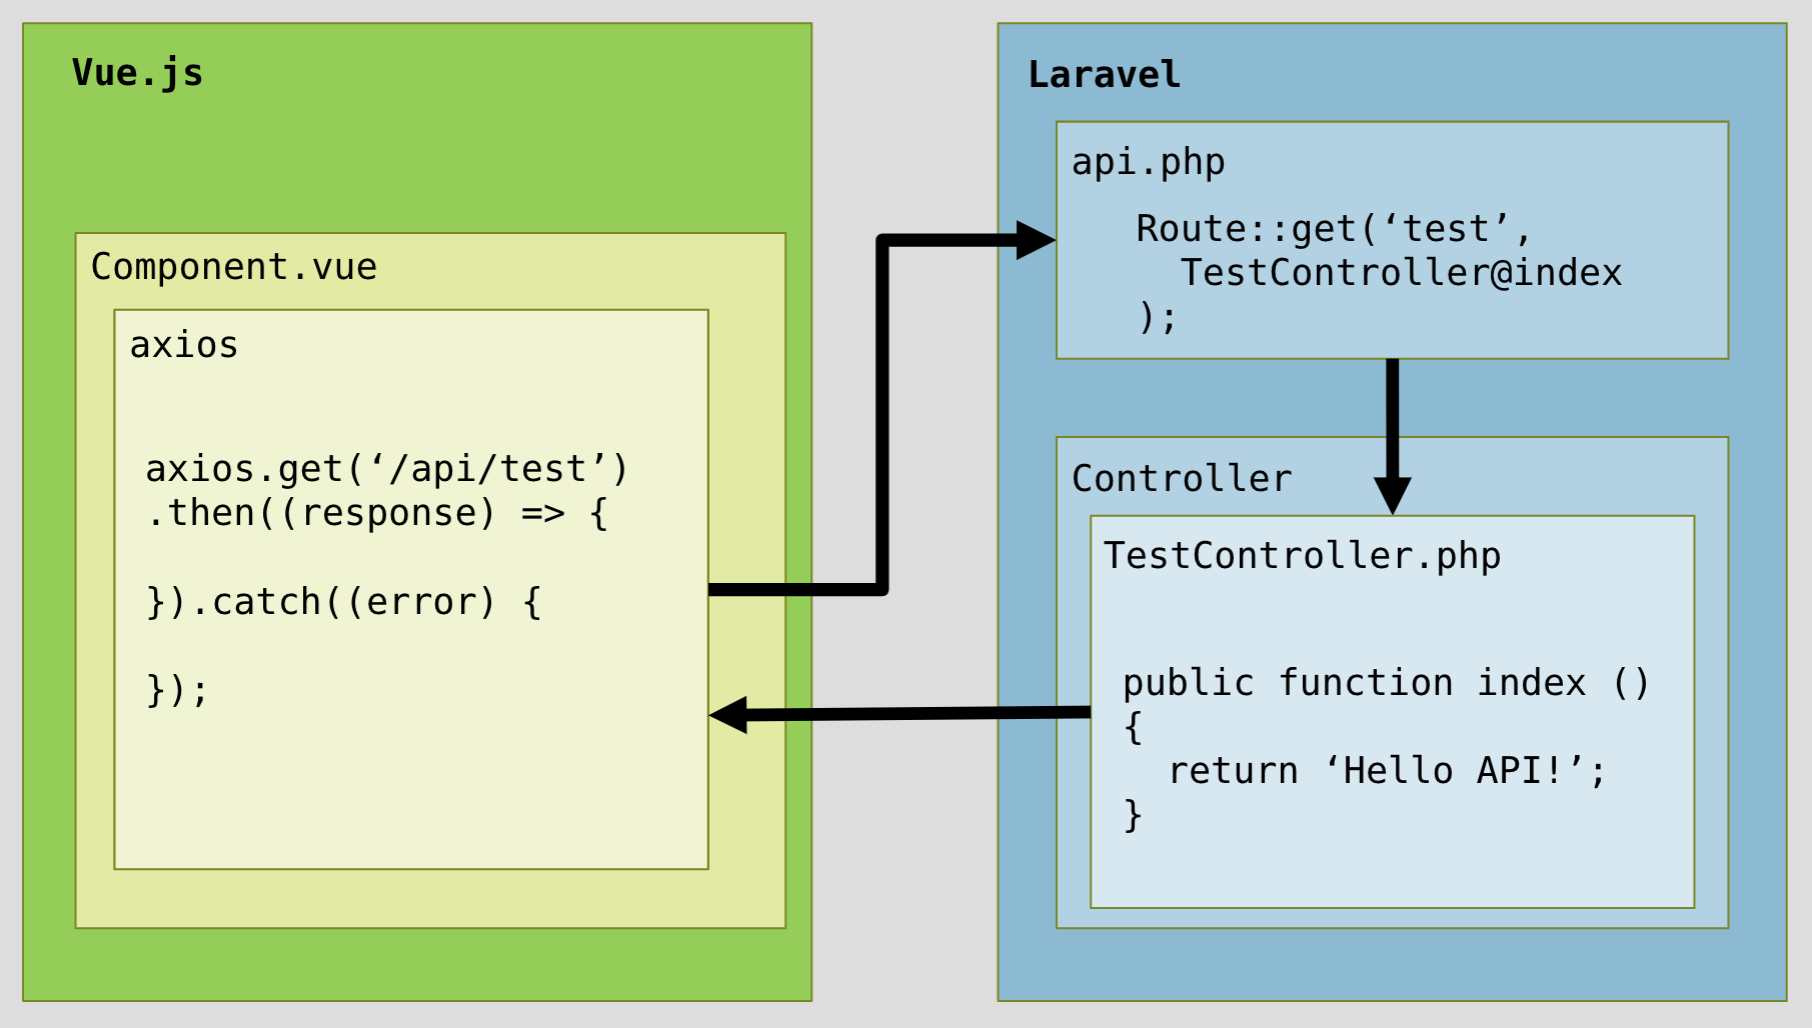
- Laravelの
api.phpにAPIのエンドポイント,実行するコントローラ,メソッドを定義します - 実際の処理をコントローラに書きます
- Vueからはaxiosを使ってAPIを実行します。(axiosはVueをインストールした際に一緒にインストールされている為、デフォルトで使用可能になっています!)
api.phpを編集
- エンドポイント
testにアクセスされた場合、TestControllerのindexメソッドを実行するルートを作成します
api.php
Route::get('test', 'TestController@index');
-
api.phpで定義されたルートには、/apiURIプレフィックスがデフォルトで適用されています。VueでAPIを実行する際は、axiosのURLには/apiの後にapi.phpで指定したエンドポイントを入れましょう - 今回の場合、
api.phpで定義したルートのエンドポイントがtestなので、実際にAPIを実行する際は、/api/testという感じでURLを指定します
axios.get('/api/test').then((response) => {
  // 成功処理
}).catch((error) => {
  // 失敗処理
});
TestControllerを作成
- 以下コマンドを実行して、コントローラを作成します
php artisan make:controller TestController
-
TestControllerが作成されたら、以下のように編集してください - 単純に
Hello API!という文字列を返すメソッドindexを作成しています
TestController.php
<?php

namespace App\Http\Controllers;

use Illuminate\Http\Request;

class TestController extends Controller
{
    public function index () {
        return 'Hello API!';
    }
}
Home.vueからAPIを実行
- それではVueからAPIを実行する準備をしましょう
-
Home.vueを以下のように編集しましょう
Home.vue
<template>
<div class="container">
  <h1>Hello Vue.js!</h1>
  <button @click="executeApi()">APIを実行</button>
  <h2>Data: <span style="color:red;">{{ apiData }}</span></h2>
</div>
</template>
<script>
export default {
  data () {
    return {
      apiData: ''
    };
  },
  methods: {
    executeApi () {
      axios.get('/api/test').then((response) => {
        this.apiData = response.data;
      }).catch((error) => {
        console.error(error);
      });
    }
  }
}
</script>
<style scoped>
.container {
  margin: auto;
  width: 60%;
  padding: auto;
}
</style>
- ボタンを押すと、メソッド
executeApiが実行されます -
executeApiの中で、axiosを使用してAPIを実行します - 正常終了で、
dataのapiDataにレスポンスの内容を入れます
ブラウザで動作確認
- ブラウザにアクセスしてリロードしてみると、以下のような画面が表示されます

- 「APIを実行」ボタンを押下して、実際にAPIを実行してみましょう!
- 以下のように、
apiDataがAPIの実行結果に更新されて以下のような表示になれば、APIの実装が完了です🔥

実装完了🔥
以上でLaravelとVueの連携、APIの実装が完了しました!
今回は単純に文字列を返すAPIを実装しましたが、mysqlなどのデータベースと連携させて、APIを通してデータベースの値をあれこれすることも可能です!その実装方法もいずれ書いてみようと思います。
ご指摘、質問等ありましたら、是非コメントお願いします。
読んでいただき、ありがとうございました!