はじめに
API ManagementとApplication Gatewayを組み合わせて使用するケースはよくあるが、今回はAPI ManagementをInternalモードでVNETにデプロイした場合に、どのようにApplication Gatewayと組み合わせて構成できるかを試してみた。
試した構成
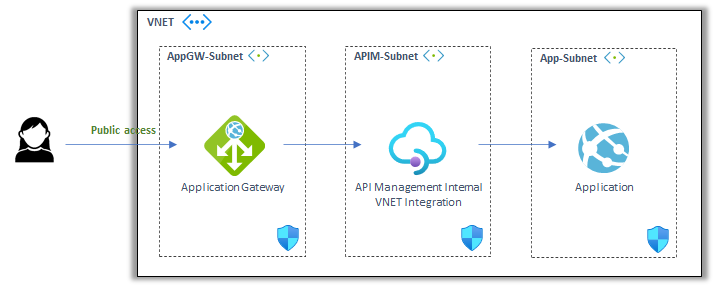
図のように一つのVNETの中にサブネットを作成して、Application Gateway, API Management, 実際のAPIをホストするリソース(Web AppでもVMでもFunctionsでもOK)用に準備する。API ManagementはInternalモードなのでPublic IPを持たない。Application GatewayはPublic IPを持ち、Application GatewayにのみInternetからアクセスが可能とする。
構成にあたって注意するポイント
先に結論となるが、実際に構成してみて判明したポイントは下記の通り。
- API ManagementをInternalモードでVNETにデプロイすると、Private IPはアサインされるがFQDNはアサインされない。しかし、API ManagementはIPアドレスでリクエストを受け付けないので、カスタムドメインを設定する必要がある。
- 勝手に内部の名前解決をケアしてくれないので、Private DNSにレコードを追加する必要がある。
- Application Gatewayは信頼できるバックエンドとしてRoot CAを必要とする。テスト用にカスタムドメインをAPI Managementで使用する場合に自己署名証明書を使う場合はRoot CAも一緒に生成する必要がある。
- 全般的に、うまくいかない場合に原因究明しにくい場合があるので、同じネットワーク内に仮想マシンを立てて、ネットワーク内テストをする環境も合わせて構築したほうが良いかもしれない。
設定方法
各種リソースのデプロイ
リソースグループの作成
export MyResourceGroup="myRG"

# Create Reource Groups
az group create --name $MyResourceGroup --location japaneast
VNETの作成
export MyVnet="myVNET"
export VnetPrefix="10.0.0.0/16"
export AppGWSubnet="AppGW-Subnet"
export AppGWSubnetPrefix="10.0.10.0/24"
export APIMSubnet="APIM-Subnet"
export APIMSubnetPrefix="10.0.20.0/24"
export APISubnet="APIM-Subnet"
export APISubnetPrefix="10.0.30.0/24"

# Create a VNET
az network vnet create -g $MyResourceGroup -n $MyVnet --address-prefix $VnetPrefix

# Create a Subnet for Application Gateway
az network vnet subnet create -g $MyResourceGroup --vnet-name $MyVnet -n $AppGWSubnet \
    --address-prefixes $AppGWSubnetPrefix

# Create a Subnet for API Management
az network vnet subnet create -g $MyResourceGroup --vnet-name $MyVnet -n $APIMSubnet \
    --address-prefixes $APIMSubnetPrefix

# Create a Subnet for API
az network vnet subnet create -g $MyResourceGroup --vnet-name $MyVnet -n $APISubnet \
    --address-prefixes $APISubnetPrefix
API Managementの作成
今回はテスト用途なのでdeveloperの価格レベルでデプロイした。
export APIMName="myapim"
export location="japaneast"
export publisherEmail="xxxxx@xxxxxx.com"
export publisherName="xxxxxxxx"

# Create an API Management
az apim create --name $APIMName \
    -g $MyResourceGroup \
    -l $location \
    --publisher-email $publisherEmail \
    --publisher-name $publisherName \
    --sku-name Developer \
    --virtual-network Internal
Application Gatewayの作成
export AppGWName="myappgw"
export privateIP="10.0.10.254"
export publicIPName="myappgwpubip"

# Create a Public IP address
az network public-ip create -g $MyResourceGroup -n $publicIPName -l $location

# Create an Application Gateway
az network application-gateway create \
    -g $MyResourceGroup \
    -n $AppGWName \
    --max-capacity 10 \
    --min-capacity 0 \
    --sku Standard_v2 \
    --vnet-name $vnetName \
    --subnet $AppGWSubnet \
    --private-ip-address $privateIP \
    --public-ip-address $publicIPName \
    --http-settings-cookie-based-affinity Disabled
API Managementのネットワーク & カスタムドメインの設定
API ManagementのVNET設定
Azure Portal内のAPI Management管理ページの Virtual Network から配置したいVNETとサブネットを選択して保存する。

この設定が完了すると、Private IPが割り振られるので、そのIPをメモしておき、Private DNS Zoneの作成時に指定する。ここでは例として 10.0.20.5 とする。
Private DNS Zoneの作成
export name="fabrikam.com"
export dnsRecord="api"
export ipv4="10.0.20.5"
export MyLinkName="vnetlink"

# Create a Private DNS Zone
az network private-dns zone create -g $MyResourceGroup -n $name

# Add a recode
az network private-dns record-set a add-record -g $MyResourceGroup -z $name -n $dnsRecord -a $ipv4

# Link to VNET
az network private-dns link vnet create -g $MyResourceGroup -n $MyLinkName -z $name -v $MyVnet -e False
自己署名証明書とRoot CAの作成
ルート証明書作成
ルートキーの作成
# Create a Root Key
openssl ecparam -out contoso.key -name prime256v1 -genkey
ルート証明書の作成。コマンドを実行するといろいろ聞かれるので、必要な情報を入力する。
# Self-sign with Root Key
openssl req -new -sha256 -key contoso.key -out contoso.csr
-----
Country Name (2 letter code) [AU]:JP
State or Province Name (full name) [Some-State]:Tokyo
Locality Name (eg, city) []:Somewhere
Organization Name (eg, company) [Internet Widgits Pty Ltd]:Contoso
Organizational Unit Name (eg, section) []:DC
Common Name (e.g. server FQDN or YOUR name) []:www.contoso.com
Email Address []:user@contoso.com

Please enter the following 'extra' attributes
to be sent with your certificate request
A challenge password []: yourPassword
An optional company name []:
サーバ証明書に自己署名する
openssl x509 -req -sha256 -days 365 -in contoso.csr -signkey contoso.key -out contoso.crt
サーバー証明書作成
サーバー証明書のキーを作成
# Create a key for server certificate
openssl ecparam -out fabrikam.com.key -name prime256v1 -genkey
CSRの生成
# Generate CSR
openssl req -new -sha256 -key fabrikam.com.key -out fabrikam.com.csr
-----
Country Name (2 letter code) [AU]:JP
State or Province Name (full name) [Some-State]:Tokyo
Locality Name (eg, city) []:Somewhere
Organization Name (eg, company) [Internet Widgits Pty Ltd]:Fabrikam
Organizational Unit Name (eg, section) []:IT
Common Name (e.g. server FQDN or YOUR name) []:api.fabrikam.com
Email Address []:xxxxx@fabrikam.com

Please enter the following 'extra' attributes
to be sent with your certificate request
A challenge password []:yourPassword
An optional company name []:
CSRとキーで証明書を生成して署名する
# Generate and sign certificate with CSR and Key,
openssl x509 -req -in fabrikam.com.csr -CA  contoso.crt -CAkey contoso.key -CAcreateserial -out fabrikam.com.crt -days 365 -sha256

# Validate key new generated
openssl x509 -in fabrikam.com.crt -text -noout
KeyとCertからpfxファイルに変換する
# Convert from key and cert to pfx
openssl pkcs12 -export -inkey fabrikam.com.key -in fabrikam.com.crt -out fabrikam.com.pfx
API Managementでカスタムドメインを設定して証明書をインポートする
Azure Portal内のAPI Management管理ページの Custom Domains にアクセスし、+ Add からカスタムドメインを作成する。ここでは使用するホスト名 api.fabrikam.com を指定し、証明書を設定する。Key Vault上に配置して指定するのが推奨だが、ここでアップロードして設定することも可能。また、ここでは例として Gateway を指定しているが、カスタムドメインとして設定したいタイプのサービスをここで選択する。

SSLとカスタムドメイン設定を検証する
OpenSSLコマンドで以下のように実行して正常にレスポンスが返ってくれば成功。
# Validate configuration with OpenSSL
openssl s_client -connect api.fabrikam.com:443 -servername api.fabrikam.com -showcerts
Application Gatewayの設定
バックエンドのAPI Managementに関係する設定のみをここに記載する。
バックエンドプール

HTTP設定
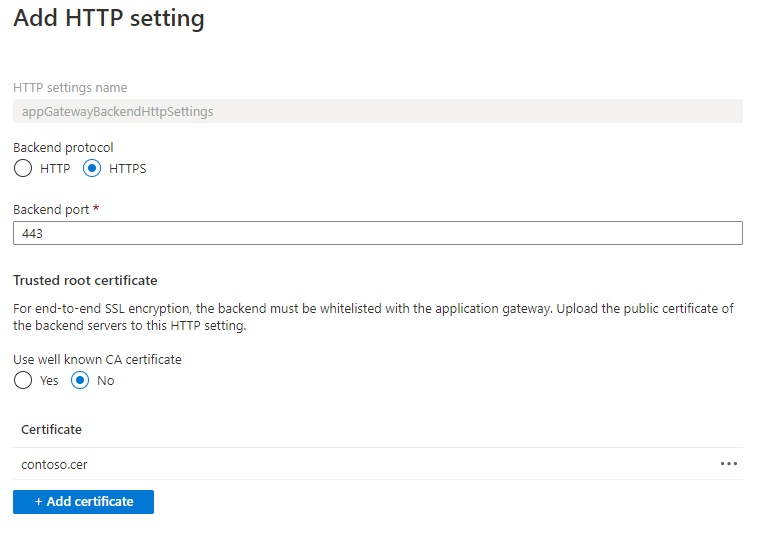
ここでバックエンドのHTTP設定をする。ここでは通信の暗号化のためにバックエンドサーバのルート証明書を設定する。
先の手順でcontso.crtを生成したが、手元のマシンでCER形式の変換したうえでアップロードすること。
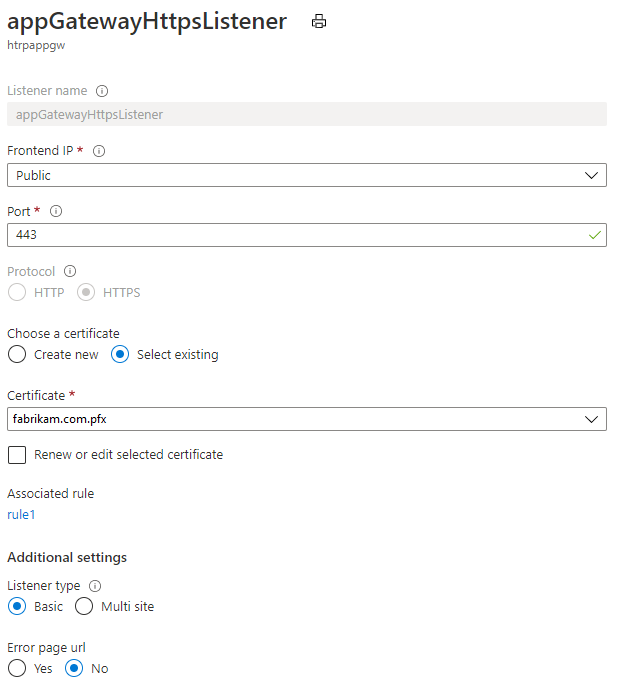
リスナー設定
ここでは先の手順で作成したpfx形式の証明書をアップロードする。
プローブ設定
API Managementのヘルスチェック用のPathは /status-0123456789abcdef のため、この値をPath欄に設定する。

以上で環境まわりの設定は完了となる。あとは実際のAPIをAPI Managementにインポートして、Application Gatewayをエンドポイントとしてcallしてテストして動作すればOK。