1 - Introduction
2 - Geometry Layout:建物の箱を作る。
- Alt+オブジェクトの操作で、元オブジェクトを残したままそのコピーを操作する形になる。
- オブジェクトの形状そのものを変更する場合、Modes->Geometory Editing
- L+Clickでシーン中にPointLightを設置。これを右クリックしてPilotモードにすることで暗さを軽減できる。
3 - Adding Windows and Doors:ドアを作る。
- 既存のGeometoryオブジェクトから一部分を削る。
- Brush TypeをSubtractiveにしてGeometoryに重ねる。
4 - Applying Materials to Geometry:床や壁にテクスチャを適用する。
- オブジェクトにMaterialをD&Dすることで適用できる。複数選択状態で行った場合は選択中のすべてに適用される。
- 適当なオブジェクトDetails->BSP/Select->Select All Adjacent Surfacesで内部の壁を一度に選択可能。
- Alignment->Align Surface Planar
- Surface Propertiesで角度等の変更。
5 - Adding Support Meshes:柱を設置していく。
6 - Decorative Supports
- 光源の位置調整。
- 光源のAffetcts WorldをTrueにすることでPreviewシャドウが出る。
- Ctrl+Gで選択中のオブジェクトをグループ化する。
7 - Building the Glass Walls
- 「t」ボタンにより透明オブジェクトの選択を有効/無効にできる。無効中は透明オブジェクトは貫通してオブジェクトの選択を行う(Setting->Allow Translucent Selection)
8 - Setup for the Sliding Door:窓・天窓にガラスをはめこむ。ドアの準備。
9 - Blueprint Doorway - Part 1
10 - Blueprint Doorway - Part 2
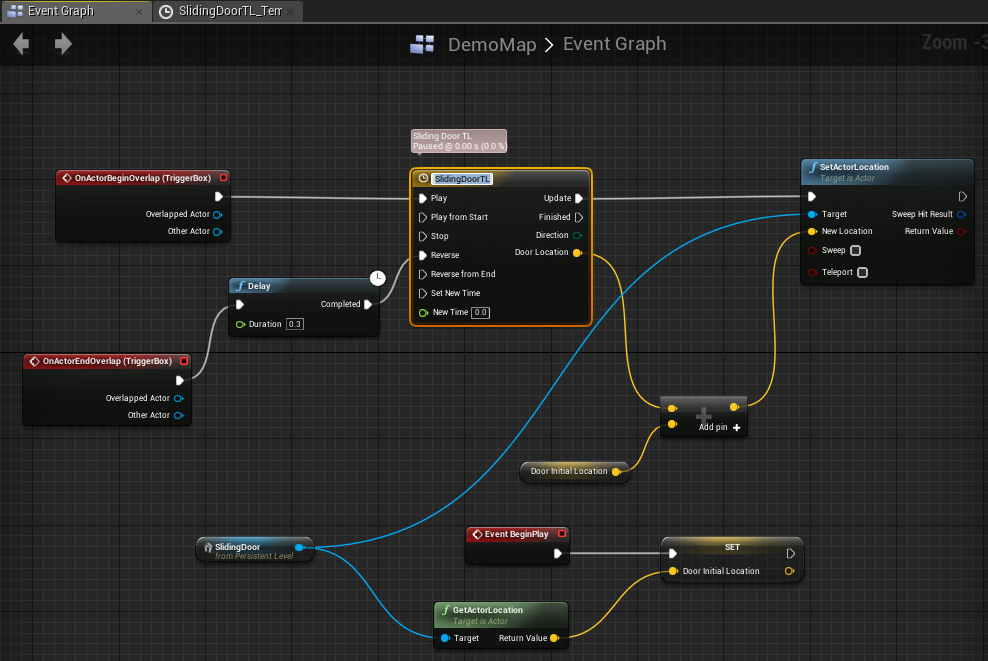
Level Blueprintを使用して自動ドアを実装する。
- Alt+P:Play
- Blueprints->Open Level BlueprintでLevel Blueprintを開く。
- シーンでオブジェクトを選びながらEvent Graph中で右クリックすることにより、選択中のオブジェクトを対象としたイベントを生成可能。
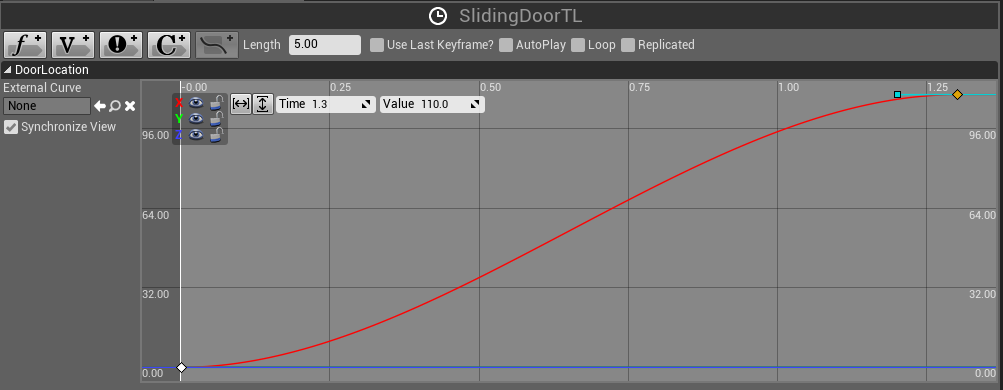
- Timelineは右クリックでキーを追加、縦・横値を中央上の2値で指定。キーを選択しながら右クリックでCubic等をグラフに設定可能。
- 実際に動かしている最中にもBlueprintで処理フローがアニメーションで確認できる。
11 - Adding Props and Lighting
- Ctrl+Gで光の放射ギズモを消すことが可能。もしくはShow->Advance->Light RadiusをOFFにする。(Alt+R)
- オブジェクトのDetails->Physics->Simulate Physicsでゲーム中のアクションに対しオブジェクトが物理挙動するようになる。