概要
M5StackのBLE機能を使って、iOSのアプリ"KORG Gadget2"のTB-303クローン"Chicago"の"CUTOFF"と"PEAK"をコントロールするデモです。
デモ
M5Stack x KORG Gadget2 Chicago
(YouTube)
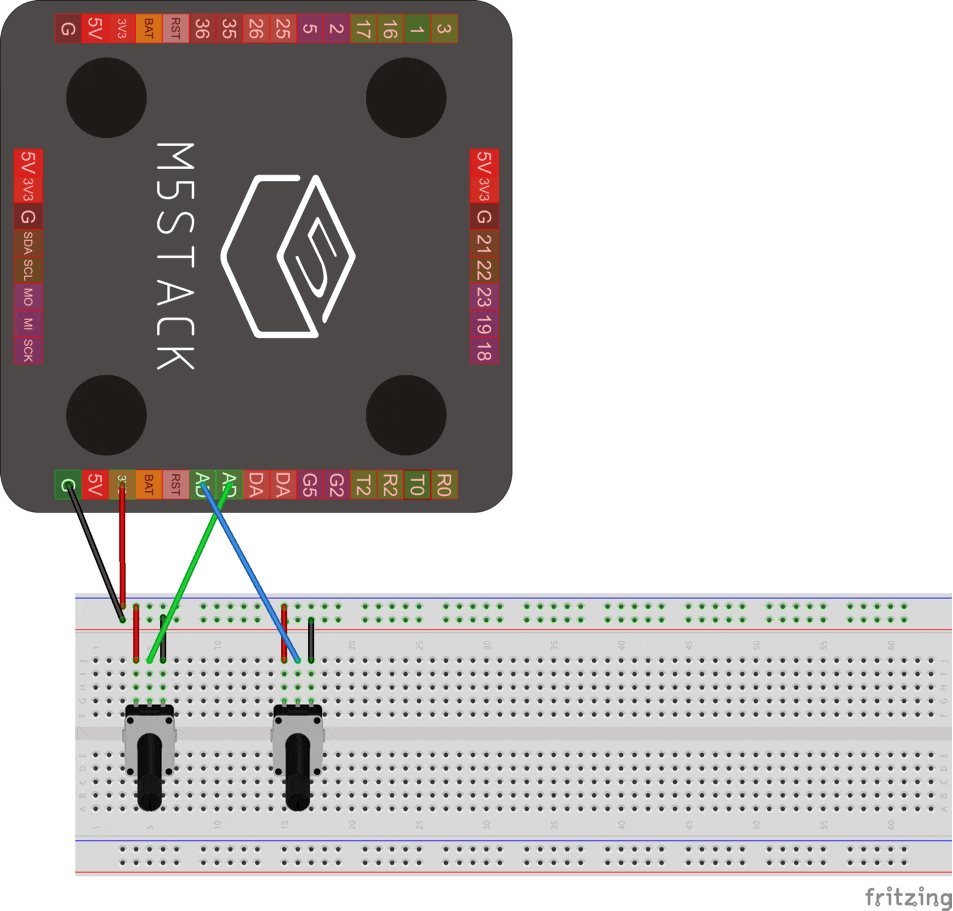
回路図

ボリュームは、Bカーブの10k ohm"RK09K1130AAU 10KB"を利用しました。
開発環境
Arduino 1.8.9
M5StackとBLEを利用するには、諸々ライブラリ導入が必要ですが、今回は、割愛します。
詳しくは、「M5Stack」ではじめる電子工作を参考にしてみてください。
(M5Stackライブラリの導入: p20~p30, BLEライブラリの導入: p179)
ソース
cc_ble_midi_sample.ino
# define LOAD_FONT4
# include <M5Stack.h>
# include <BLEDevice.h>
# include <BLEServer.h>

//BLE関連
//デバイス名
const char *DEVICE_NAME = "m5-stack-ble-midi";

//BLE MIDIのサービスとキャラクタラスティック
const char *SERVICE_UUID = "03B80E5A-EDE8-4B33-A751-6CE34EC4C700";
const char *CHAR_UUID = "7772E5DB-3868-4112-A1A9-F2669D106BF3";

//BLEデータ
BLEServer *pServer;
BLECharacteristic *pCharacteristic;
bool isConnected = false;

//MIDIデータ関連
//ccデータバッファ
int cc[128];

//volumeの値のバッファ
int value[2];

//BLE MIDIデータ
unsigned char buff[] = {0x80, 0x80, 0xB0, 0x01, 0x64};

//BLE関連関数
// サーバーのコールバック関数
class cbServer: public BLEServerCallbacks {
  void onConnect(BLEServer *pServer) {
    isConnected = true;
    M5.Lcd.clear();
    M5.Lcd.drawCentreString(" BLE Connected  ", 160, 120, 4);
  };

  void onDisconnect(BLEServer *pServer) {
    isConnected = false;
    M5.Lcd.clear();
    M5.Lcd.drawCentreString(DEVICE_NAME, 160, 120, 4);
  }
};

//マッピングと制限を行う関数
int mapAndLimit(int value, int fromLow, int fromHigh, int toLow, int toHigh) {
  int tmp, maxValue, minValue;

  if(toLow < toHigh)
  {
    minValue = toLow;
    maxValue = toHigh;
  }
  else
  {
    minValue = toHigh;
    maxValue = toLow;
  }

  tmp = map(value, fromLow , fromHigh, toLow, toHigh);
  tmp = tmp > maxValue ? maxValue : tmp;
  tmp = tmp < minValue ? minValue : tmp;
  return tmp;
}

//MIDI関連関数
//BLE MIDIのCCデータを送信
void notifyCC(int ccNum, int value, int sensitivity)
{
  if(abs(cc[ccNum] - value) > sensitivity)
  {
    //元情報にデータを入れておく
    cc[ccNum] = value;

    //valueをCC(ccNum)のデータにする
    buff[2] = 0xb0;
    buff[3] = ccNum;
    buff[4] = value;

    //MIDIデータをNotify
    pCharacteristic->setValue(buff, 5);
    pCharacteristic->notify();
  }
}

void setup(){
  int i;

  // M5Stackの初期化
  M5.begin();

  // スピーカーをオフにする
  dacWrite(25, 0);

  // 入力に設定
  pinMode(35, INPUT);
  pinMode(36, INPUT);

  //Btnバッファの初期化
  for(i = 0; i < 128; i++)
  {
    cc[i] = 64;
  }

  // BLE初期化
  BLEDevice::init(DEVICE_NAME);

  // サーバーの作成
  BLEServer *pServer = BLEDevice::createServer();
  // コールバック関数の設定
  pServer->setCallbacks(new cbServer());

  // サービスの作成
  BLEService *pService = pServer->createService(SERVICE_UUID);

  // キャラクタリスティックの作成
  pCharacteristic = pService->createCharacteristic(
    CHAR_UUID,
    BLECharacteristic::PROPERTY_READ | BLECharacteristic::PROPERTY_NOTIFY
  );

  // サービスの開始
  pService->start();

  //アドバタイジングの開始
  pServer->getAdvertising()->addServiceUUID(SERVICE_UUID);
  pServer->getAdvertising()->start();

  //ディスプレイにデバイスネームを表示
  M5.Lcd.drawCentreString("m5-stack-ble-midi", 160, 120, 4);
}

void loop() {
  if (isConnected)
  {
    //ボリュームを読み込み
    value[0]= analogRead(35);
    value[0] = mapAndLimit(value[0], 0, 4095, 0, 127);

    value[1]= analogRead(36);
    value[1] = mapAndLimit(value[1], 0, 4095, 0, 127);

    //ボリュームのデータをCC1, CC71に送信
    notifyCC(1, value[0], 1);
    notifyCC(71, value[1], 1);

    // 少し休ませる
    delay(10);
  }
}
細かい説明は、またいつか。
参考資料
- MIDI1.0規格書
- Bluetooth LE MIDI Specification(閲覧には、MIDI会員登録が必要)