はじめに
Android Studioを使ってAndroidアプリを開発する場合、プロジェクトごとに毎回毎回同じような設定やコードを書いていて無駄な時間を使っていると感じることはないでしょうか?
Templateを使うことで、こんな無駄な作業を省略することができます。
今回は、既存のTemplateの中身を見てTemplateのしくみを調べていきます。
Templateのしくみ
Templateの構成
Macの場合、下記ディレクトリにTemplateが配置されています。
/Applications/Android Studio.app/Contents/plugins/android/lib/templates/
空のFragmentを作る下記Templateを参考に作成していきます。
/Applications/Android Studio.app/Contents/plugins/android/lib/templates/other/BlankFragment/
このBlankFragmentには、下記のファイルが入っています。
├── globals.xml.ftl
├── recipe.xml.ftl
├── root
│   ├── res
│   │   ├── layout
│   │   │   └── fragment_blank.xml.ftl
│   │   └── values
│   │       └── strings.xml
│   └── src
│       └── app_package
│           └── BlankFragment.java.ftl
├── template.xml
└── template_blank_fragment.png
template.xml
templateの大本になるファイルは、template.xmlです。
下記のようにtemplateの名前や説明、templateのカテゴリ、サムネイルの画像ファイル名を記述します。
<template
    format="5"
    revision="3"
    name="Fragment (Blank)"
    description="Creates a blank fragment that is compatible back to API level 4."
    minApi="7"
    minBuildApi="8">

    <!-- この記述によりFragment (Blank)がFragmentのカテゴリに表示されるようになる -->
    <category value="Fragment" />

    ...

    <thumbs>
        <thumb>template_blank_fragment.png</thumb>
    </thumbs>

    <globals file="globals.xml.ftl" />
    <execute file="recipe.xml.ftl" />

</template>
プロジェクトに配置するファイルの元ファイル
プロジェクトに配置されるファイルは、root/res/layout/fragment_blank.xml.ftl、root/res/layout/value/strings.xml、src/app_package/BlankFragment.java.ftlです。
この*.ftlファイル内には、下記のように変数が記述されており変数に値を埋め込むことでファイルの作成を行います。
package ${packageName};

<#if includeCallbacks>import android.content.Context;</#if>
<#if includeCallbacks>import android.net.Uri;</#if>
import android.os.Bundle;
import android${SupportPackage}.app.Fragment;
import android.view.LayoutInflater;
import android.view.View;
import android.view.ViewGroup;
<#if !includeLayout>import android.widget.TextView;</#if>
<#if applicationPackage??>
import ${applicationPackage}.R;
</#if>

...

public class ${className} extends Fragment {
   ...
}
この変数は、template.xmlで定義されています。
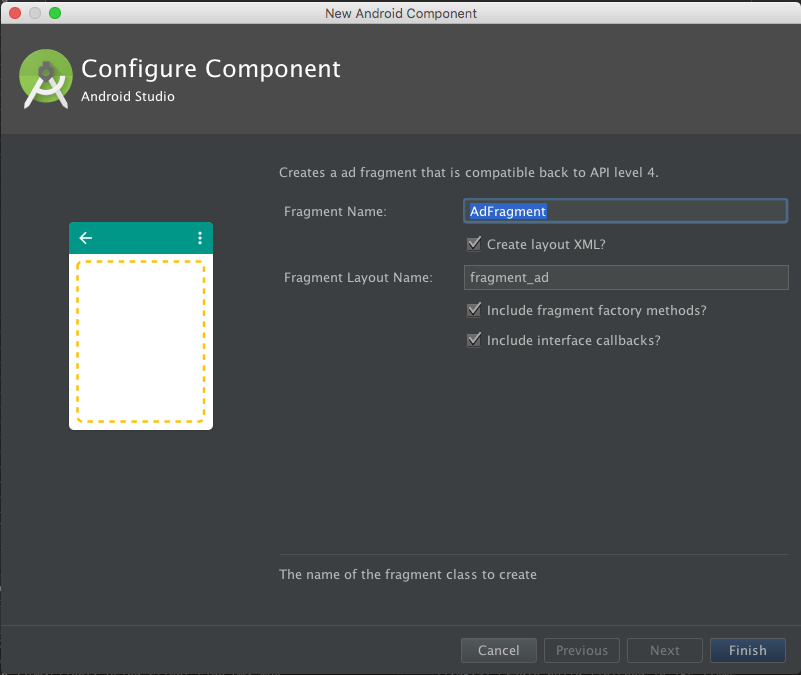
template.xmlで定義された変数は、Fragment作成時のウィザードで編集できるようになっています。
    ...
    <parameter
        id="className"
        name="Fragment Name"
        type="string"
        constraints="class|nonempty|unique"
        default="BlankFragment"
        help="The name of the fragment class to create" />
    ...
例えば、Fragmentのクラス名のclassNameはこのように定義されていており、Fragment作成時のウィザードでは、下記のように入力を受け付けられるようになっています。
recipe.xml.ftlは、src/app_package/BlankFragment.java.ftl等の元になるファイルをプロジェクト内に配置するための記述を行うファイルです。
recipe.xml.ftl
<?xml version="1.0"?>
<recipe>

    <#if useSupport><dependency mavenUrl="com.android.support:support-v4:${buildApi}.+"/></#if>
    <merge from="root/res/values/strings.xml" to="${escapeXmlAttribute(resOut)}/values/strings.xml" />

    <#if includeLayout>
        <instantiate from="root/res/layout/fragment_blank.xml.ftl"
                       to="${escapeXmlAttribute(resOut)}/layout/${escapeXmlAttribute(fragmentName)}.xml" />

        <open file="${escapeXmlAttribute(resOut)}/layout/${escapeXmlAttribute(fragmentName)}.xml" />
    </#if>

    <open file="${escapeXmlAttribute(srcOut)}/${className}.java" />

    <instantiate from="root/src/app_package/BlankFragment.java.ftl"
                   to="${escapeXmlAttribute(srcOut)}/${className}.java" />

</recipe>
このファイルでtemplateのディレクトリにある*.ftlファイルをプロジェクトのどの位置に配置するのかを記述しています。
プロジェクトの配置位置を示すsrcOutやresOutは、globals.xml.ftlに定義されています。
このファイル内に書いてあるキーワードは、それぞれ下記の意味になります。
| キーワード | 意味 |
|:-----------:|:------------|:
| dependency | build.gradleに追加する依存ライブラリ |
| instance | 新規にファイルを作成する |
| merge | ファイルをマージする(xmlとgradleのみに対応) |
| open | ファイル作成後、Android Studioでファイルを開く |
まとめ
以上が、Android Studioのtemplateの大まかなしくみになります。
これらの要素を使用して毎回作成しているファイル郡をtemplateにしておくことで、作業時間の短縮が可能になります。
次回は、今回説明した要素を使ってみてAdsenseのバナーを画面下部に表示するFragmentを作成してみます。
Android Studioでの開発を爆速化させるテンプレート作成術 〜Adsenseのバナーを画面下部に表示するFragment〜
