はじめに
この記事ではとりあえずAzure CosmosDBのAPIをサクッとたたいてみたいといったときに、PostmanからAPIをたたくまでの手順を紹介します。
公式のリファレンスは以下にあります。
https://learn.microsoft.com/en-us/rest/api/cosmos-db/
1. CosmosDB の作成
本手順ではCosmos DBアカウントのAPIを コア(SQL) で作成した場合の連携方法を紹介します。
他のAPIを選択して作成した場合は各リファレンスを参照して必要に応じて変更してください。
Cosmos DBアカウントの作成ができたら「コンテナーの追加」からコンテナーを作成します。設定は以下の通りです。
| 項目 | 設定値 |
|---|---|
| Database id(Create Newを選択) | testdb |
| Container id | sensors |
| Partition key | /sensor_id |
Containerがデータベースのテーブルのイメージで、その中にレコード(document)を格納していきます。
Partitionはデータを格納する場所の物理的な分割するためのキーです。
OKボタンをクリックしコンテナーを作成します。
URIとkeyの取得
APIを利用するためにURIとkeyを 設定 > キー から取得します。
URI と プライマリキー の値を利用するため値をひかえておきます。
2. Postmanの準備
今回はPublicのPostman Collectionを使わせてもらうため、CollectionのImportと初期設定を行います。
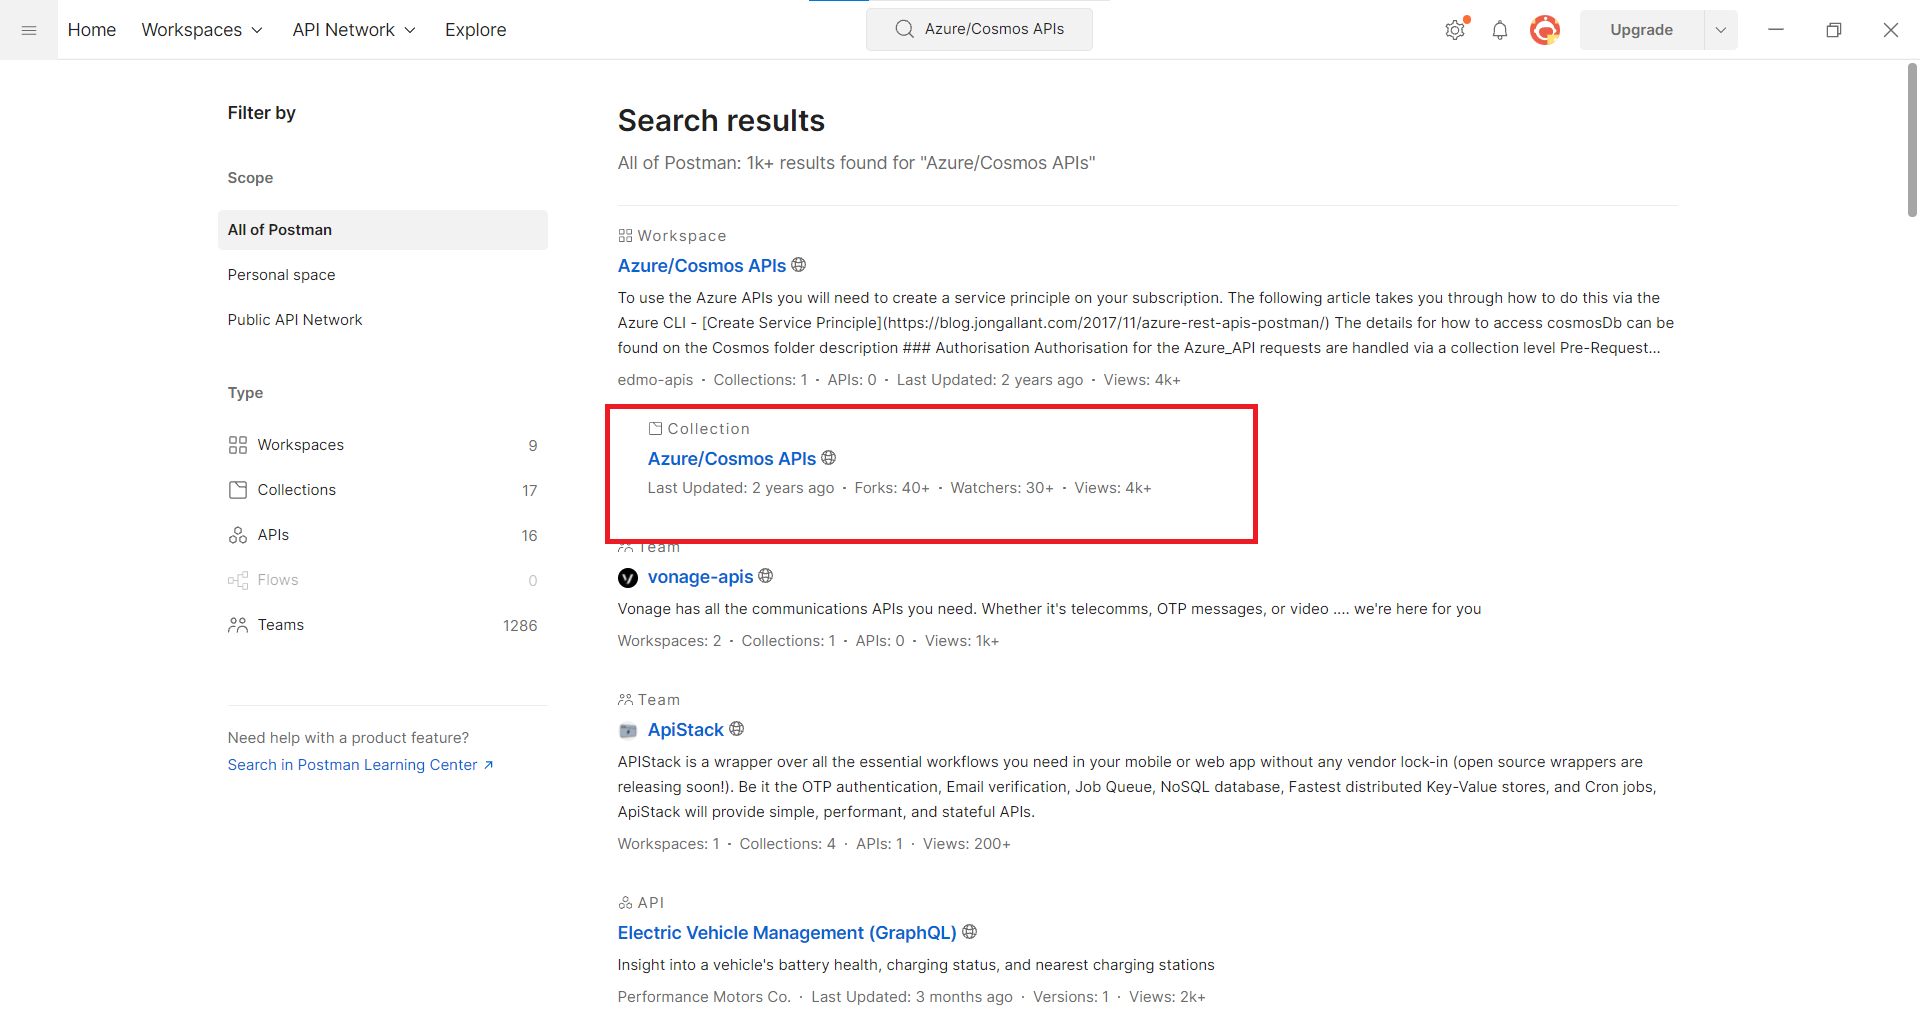
Postman の Explore からAzure/Cosmos APIsと検索し赤枠のCollectionをクリックします。

Collections > Azure/Cosmos APIsの3点リーダをクリックしExportからjsonファイルをダウンロードします。
Export後、PostmanのWorkspaceを新規に作成しダウンロードしたjsonをImportします。
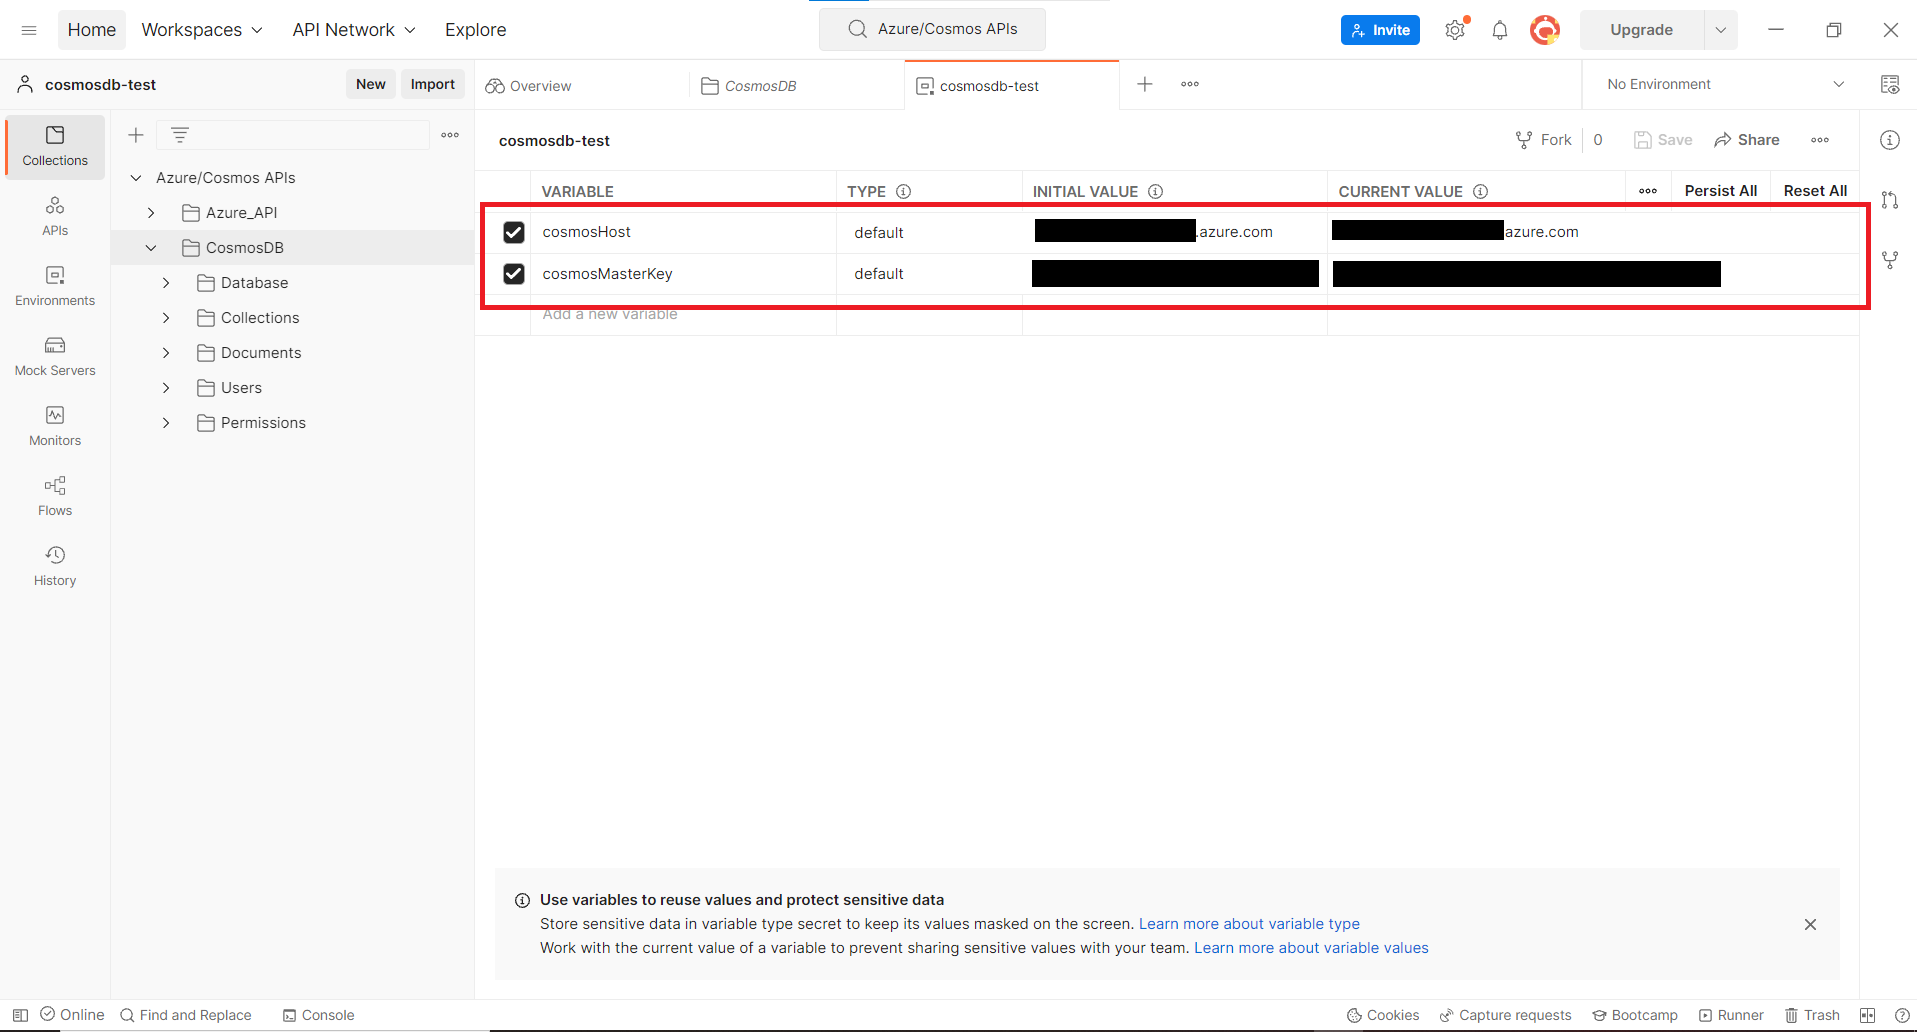
Import後Collectionの「CosmosDB」のドキュメントを確認し、記載の通りenvironment variablesに以下の2種類を設定します。
Environment quick look > Addから新規environmentを以下のように作成し、保存し指定します。
environmentの名前は任意で問題ありません。
| VARIABLE | INITIAL VALUE(CURRENT VALUE) |
|---|---|
| cosmosHost | 1で確認したURI |
| cosmosMasterKey | 1で確認したプライマリキー |
3. PostmanからCosmosDB APIを実行
1で作成したdbに対して、以下の3種類をPostmanから実行してみます。
①document(データレコード)の作成
②document一覧の取得
③クエリーを利用し特定のdocumentを取得
3.1 document(データレコード)の作成
ImportしたPostman Collection の CosmosDB > Documents > Create Documentを利用します。
ParamsのPath Variablesを以下のように設定します。
| KEY | VALUE |
|---|---|
| dbName | testdb |
| collectionName | sensors |
Headersに以下を追加します。
| KEY | VALUE |
|---|---|
| x-ms-documentdb-partitionkey | ["api-test-sensor-001"] |
続いてbodyに作成するレコードを以下のように設定します。
{
    "id": "api-test-sensor-001_001",
    "sensor_id": "api-test-sensor-001",
    "temperature": 20.1
}
設定後、実行すると以下のようなレスポンスが返ってきてレコードの登録ができます。
{
    "id": "api-test-sensor-001_001",
    "sensor_id": "api-test-sensor-001",
    "temperature": 20.1,
    "_rid": "JZA3APsp2PIBAAAAAAAAAA==",
    "_self": "dbs/JZA3AA==/colls/JZA3APsp2PI=/docs/JZA3APsp2PIBAAAAAAAAAA==/",
    "_etag": "\"0000f210-0000-0700-0000-637f47480000\"",
    "_attachments": "attachments/",
    "_ts": 1669285704
}
同様に以下のようにHeaderとbodyを変更し、2つ目のレコードも登録します。
Header
| KEY | VALUE |
|---|---|
| x-ms-documentdb-partitionkey | ["api-test-sensor-002"] |
body
{
    "id": "api-test-sensor-002_001",
    "sensor_id": "api-test-sensor-002",
    "temperature": 18.4
}
3.2 document一覧の取得
ImportしたPostman Collection の CosmosDB > Documents > List Documentsを利用します。
ParamsのPath Variablesを以下のように設定します。
| KEY | VALUE |
|---|---|
| dbName | testdb |
| collectionName | sensors |
設定後、実行すると以下のようにdocument一覧のレスポンスを取得できます。
{
    "_rid": "JZA3APsp2PI=",
    "Documents": [
        {
            "id": "api-test-sensor-001_001",
            "sensor_id": "api-test-sensor-001",
            "temperature": 20.1,
            "_rid": "JZA3APsp2PIBAAAAAAAAAA==",
            "_self": "dbs/JZA3AA==/colls/JZA3APsp2PI=/docs/JZA3APsp2PIBAAAAAAAAAA==/",
            "_etag": "\"0000f210-0000-0700-0000-637f47480000\"",
            "_attachments": "attachments/",
            "_ts": 1669285704
        },
        {
            "id": "api-test-sensor-002_001",
            "sensor_id": "api-test-sensor-002",
            "temperature": 18.4,
            "_rid": "JZA3APsp2PICAAAAAAAAAA==",
            "_self": "dbs/JZA3AA==/colls/JZA3APsp2PI=/docs/JZA3APsp2PICAAAAAAAAAA==/",
            "_etag": "\"0000f310-0000-0700-0000-637f49d90000\"",
            "_attachments": "attachments/",
            "_ts": 1669286361
        }
    ],
    "_count": 2
}
3.3 クエリーを利用し特定のdocumentを取得
ImportしたPostman Collection の CosmosDB > Documents > Query Documentを利用します。
ParamsのPath Variablesを以下のように設定します。
| KEY | VALUE |
|---|---|
| dbName | testdb |
| collectionName | sensors |
bodyを以下のように設定します。
{
    "query": "SELECT * FROM sensors s WHERE s.sensor_id = \"api-test-sensor-001\"",
    "parameters":[]
}
設定後、以下のようにレコードのレスポンスを取得できます。
{
    "_rid": "JZA3APsp2PI=",
    "Documents": [
        {
            "id": "api-test-sensor-001_001",
            "sensor_id": "api-test-sensor-001",
            "temperature": 20.1,
            "_rid": "JZA3APsp2PIBAAAAAAAAAA==",
            "_self": "dbs/JZA3AA==/colls/JZA3APsp2PI=/docs/JZA3APsp2PIBAAAAAAAAAA==/",
            "_etag": "\"0000f210-0000-0700-0000-637f47480000\"",
            "_attachments": "attachments/",
            "_ts": 1669285704
        }
    ],
    "_count": 1
}
補足
今回はとりあえず叩ける、というところに注力したため触れませんでしたが、Azure CosmosDBのAPIを呼び出すためにはリクエストヘッダーに署名したトークンを追加したりしなければいけません。
以下はAccess control in the Azure Cosmos DB SQL API - Azure Cosmos DB REST API | Microsoft Docsに記載されているNode.jsでのトークン生成のサンプルです。SDKを使わない場合はこちらのようにヘッダーへ署名したトークンなどの追加するための処理を実装する必要が有ります。
var crypto = require("crypto");

function getAuthorizationTokenUsingMasterKey(verb, resourceType, resourceId, date, masterKey) {
    var key = new Buffer(masterKey, "base64");

    var text = (verb || "").toLowerCase() + "\n" +
               (resourceType || "").toLowerCase() + "\n" +
               (resourceId || "") + "\n" +
               date.toLowerCase() + "\n" +
               "" + "\n";

    var body = new Buffer(text, "utf8");
    var signature = crypto.createHmac("sha256", key).update(body).digest("base64");

    var MasterToken = "master";

    var TokenVersion = "1.0";

    return encodeURIComponent("type=" + MasterToken + "&ver=" + TokenVersion + "&sig=" + signature);
}
今回はPublicのCollectionを利用しましたが、上記のような必要なヘッダー追加の処理は組み込んでくれています。
ImportしたCollectionの Azure/Cosmos APIS > CosmosDB > Pre-request Scriptを見ると必要なヘッダーが算出され、RFC1123timeとauthTokenという名前でenv変数に格納されている処理があるのが分かります。
また、各リクエストのHeadersを見ると上記変数をx-ms-dateとAuthorizationヘッダーに指定するよう設定してくれていることが分かります。
まとめ
PostmanでAzure CosmosDBのAPIをたたいてみることができました。
VantiqからAzure CosmosDBのAPIを呼び出す場合も上記ヘッダー追加処理を実装しなければいけません。
詳細はVantiqから直接Azure CosmosDBのAPIを呼び出してみたをご覧ください。
