一番良いのはVisualStudio2010でコンパイルすることなのか?
詳しく分からないが、VisualStudio2015でコンパイルするとReleaseがコンパイルできない状態に陥ったりした。
この原因としてはWindowsランタイムが更新されているかららしい。
VisualStudio2010でBaseClassesやPushSouceFilterをコンパイルするとあっさりとコンパイルできる。
なのでここではVisualStudio2010を用いてPushSouceFilterのライブラリファイルを作成することにする。
ランタイムとやらが新しいバージョンと古いバージョンでコンパイルしてライブラリファイルを作った場合に、その後にVisualStudio2015などでそのライブラリファイルを利用する時にどう影響するのか?
.libファイルにしてしまえばランタイムの新しい古いは関係ないのか?
知識がなくて不明なのでここは調べる必要あり。
まずはVisualStudio2010を手に入れる
VISUAL STUDIO 2010 EXPRESSと旧版のダウンロード先まとめ http://wolfish.org/blog/p2010042901/というサイトからVisual Studio 2010 Expressをまずダウンロードする。
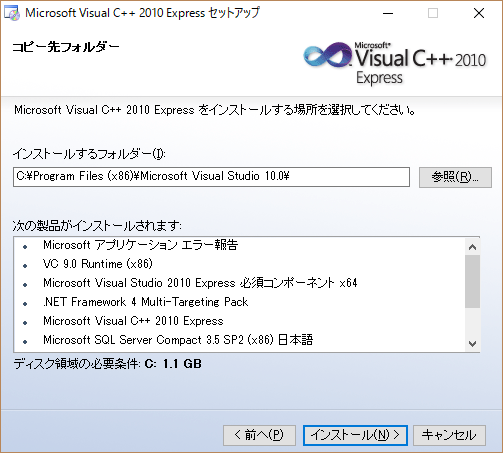
これを使ってコンパイルまでするのが一番確実。ダウンロードできたらVisualC++2010 Expressを選択。
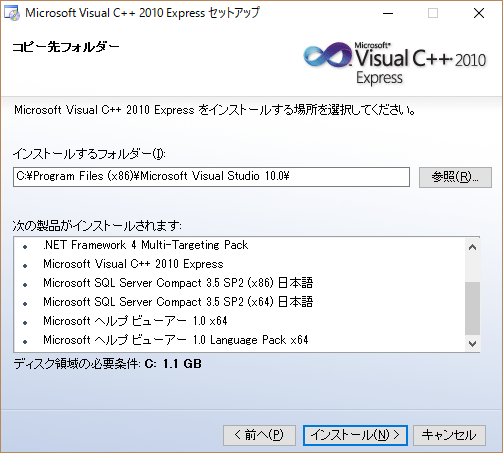
Microsoft SilverlightとかMicroSoft SQL Server 2008 Express Service Pack1(x64)とかはインストールオプションでチェックを外す。
インストールするファイルは以下のとおり。


次にSDKversion7.1を手に入れる
VisualStudio2015Communityとかが入ってるとダウンロードができないことがある。面倒だがアンインストールするなりして、これはどうにかするしかない。VisualStudio2015だとReleaseでエラーが出た。
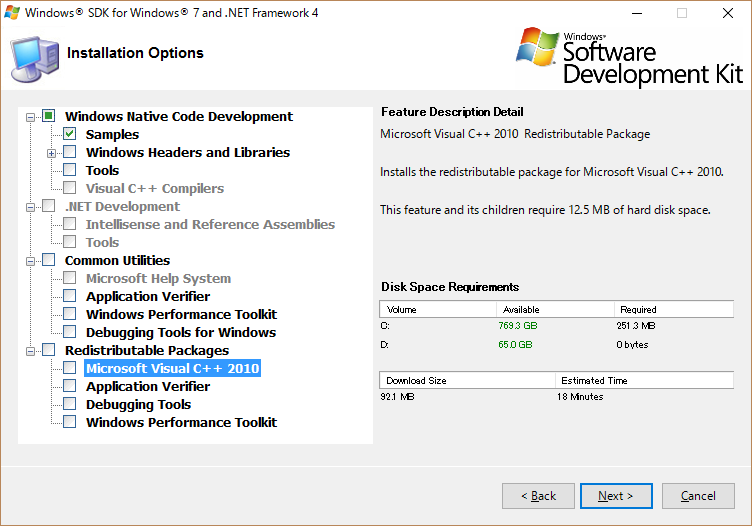
Redistributable PackagesのMicrosoftVisualC++はまずは、インストールしないでおく。
・Samplesと・Windows Headers and Librariesに☑を入れる。
※画像と違うので注意。Redistributable PackagesのMicrosoft Visual C++ 2010をインストールしてしまうと、Windows SDK 7.1 用 Microsoft Visual C++ 2010 Service Pack 1 コンパイラ更新プログラムがインストールできなくなる可能性があるので注意。

ここで、C:\Program Files\Microsoft SDKs\Windows\v7.1\Samples\multimedia\directshowにbaseclassesというフォルダがあり(これがDirectShowのベースとなるDLLを作る元)、C:\Program Files\Microsoft SDKs\Windows\v7.1\Samples\multimedia\directshow\filtersにpushsourceというフォルダ(これががデスクトップキャプチャをするPushSourceDesktop.cppの存在場所)あることを確認する。
Windows SDK 7.1 用 Microsoft Visual C++ 2010 Service Pack 1 コンパイラ更新プログラムをインストール
これをインストールしないと、コンパイルするときにx64でコンパイルができない。
Windows SDK 7.1 用 Microsoft Visual C++ 2010 Service Pack 1 コンパイラ更新プログラム https://www.microsoft.com/ja-jp/download/details.aspx?id=4422をダウンロードしてインストール。
まずはbaseclasses.slnのコンパイル
x64でコンパイルするために追加のライブラリディレクトリにアドレスを追加
C:\Program Files\Microsoft SDKs\Windows\v7.1\Samples\multimedia\directshow\baseclassesの中のbaseclasses.slnをVisualStudio2010で開く。
変換が必要ですとの注意がでるが、OKでバックアップを取って進む。
コンパイルするとWarningが出るかもしれないがそれは無視する。2重宣言みたいなやつ。
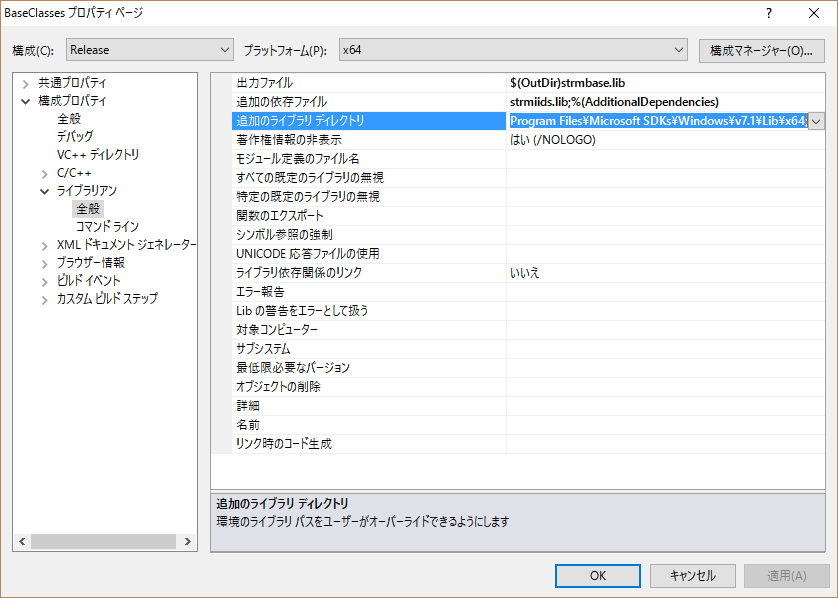
64bitでコンパイルするためには、下記のようにSDKv7.1のLib\x64を追加のライブラリへ記入する。
Debugの時はstrmbasd.libが、Releaseの時はstrmbase.libが生成されるので、下記のように出力ファイルにあらかじめ記入してもOK。
pushsource.slnのコンパイル
x64の場合だけ注意が必要で、プロジェクトのプロパティのリンカーの全般の追加のライブラリディレクトリに同じようにC:\Program Files\Microsoft SDKs\Windows\v7.1\Lib\x64を追加する必要がある。
これをしないとx64ではコンパイルできない。
ここまででDLLの作成は終了 動くかどうか確かめる
ここで動くかどうか確かめてみる。必要なのはGraphEditというexeファイル。
Microsoftは再配布を行っていないとのことだが、ダウンロードは[ここ(GraphEdit 非公式ガイド)](regsvr32.exe PushSource.dll)からできる。
まず、登録するファイルがc:\aaaa.dllの場合、
- ActiveX.DLLの登録 C:>regsvr32 c:\aaaa.dll
- ActiveX.DLLの削除 C:>regsvr32 /u c:\aaaa.dll
それかcdでdllファイルがあるフォルダまで飛んでから、regsvr32 PushSource.dllを実行する。
そうすると、GraphEditのDirectShowにPushSourceDesktopFilterが追加される。
GraphEditの操作方法は省略。いじりまくると分かる。とりあえずこれでフィルターは完成。
OpenCVのソースについて
cap_dshow.cpp
今のところこのファイルしか分からないが、RendererFilterを作っているだろうと思われる部分が見受けられた。
//以下使用例
/*
    //videoInputオブジェクトを作成する
    videoInput VI;

    //利用可能なデバイスのリストをプリントし、見つかったデバイス番号を返す
    int numDevices = VI.listDevices();

    int device1 = 0;  //this could be any deviceID that shows up in listDevices
    int device2 = 1;  //this could be any deviceID that shows up in listDevices

    //もし異なるフレームレートでキャプチャしたければ(デフォルトは30)
    //このfpsを得られなければ、下のコードをここに書く。
    //VI.setIdealFramerate(dev, 60);

    //setup the first device - there are a number of options:

    VI.setupDevice(device1);                           //setup the first device with the default settings
    //VI.setupDevice(device1, VI_COMPOSITE);           //or setup device with specific connection type
    //VI.setupDevice(device1, 320, 240);               //or setup device with specified video size
    //VI.setupDevice(device1, 320, 240, VI_COMPOSITE); //or setup device with video size and connection type

    //VI.setFormat(device1, VI_NTSC_M);                //if your card doesn't remember what format it should be
                                                       //call this with the appropriate format listed above
                                                       //NOTE: must be called after setupDevice!

    //optionally setup a second (or third, fourth ...) device - same options as above
    VI.setupDevice(device2);

    //As requested width and height can not always be accomodated
    //make sure to check the size once the device is setup

    int width   = VI.getWidth(device1);
    int height  = VI.getHeight(device1);
    int size    = VI.getSize(device1);

    unsigned char * yourBuffer1 = new unsigned char[size];
    unsigned char * yourBuffer2 = new unsigned char[size];

    //to get the data from the device first check if the data is new
    if(VI.isFrameNew(device1)){
        VI.getPixels(device1, yourBuffer1, false, false);   //fills pixels as a BGR (for openCV) unsigned char array - no flipping
        VI.getPixels(device1, yourBuffer2, true, true);     //fills pixels as a RGB (for openGL) unsigned char array - flipping!
    }

    //same applies to device2 etc

    //to get a settings dialog for the device
    VI.showSettingsWindow(device1);


    //Shut down devices properly
    VI.stopDevice(device1);
    VI.stopDevice(device2);
このソースコードを見る限り、まずはvideoInput::listDevices関数を調べてみる必要がある。
ここでnumDevicesとしてデバイス番号が見つかれば映像がキャプチャされることになるのだろう。
videoInput::listDevices関数
余談 SCFHというニコ生配信用フリーウェア
ニコ生のゲーム配信ソフトにSCFHというフリーウェアがある。これを使ってみた。
ダウンロードして実行してみると、OpenCVで認識ができた。これを使って仮想Webカメラとしてモニターをキャプチャすることはできるのだが、なんか気持ち悪いのでちゃんとコーディングすることを目指す。
突如終了
Wind32APIを用いた方が良いとの話をもらったので、ここでDirectShowを用いた実装はひとまず中止する。
Win32APIで実装できたらまた記事に載せる。
