iOSアプリ開発においてViewのスナップショット画像を撮影比較する便利なツールがあります。
ios-snapshot-test-case
この記事では、ios-snapshot-test-caseを快適に運用する5つのtipsを紹介します。
またこの記事で紹介するサンプルプロジェクトはこちらにあります。
尚、このツールの概要・導入・活用術については@imaizume さんのこちらのスライドが大変学びが多くお勧めです。
https://speakerdeck.com/imaizume/practical-snapshot-testing
アニメーションを無効にする
アニメーションがあるとスナップショット画像が安定せず、画像に差分が発生 (XCTest失敗) してしまいます。
そこで、テストの時はアニメーションを無効化しておくのがオススメです。
こちらのAPIを利用します。
class func setAnimationsEnabled(_ enabled: Bool)
テストの時のみアニメーションを無効にする方法を2つ紹介します。
方法1: 実行引数
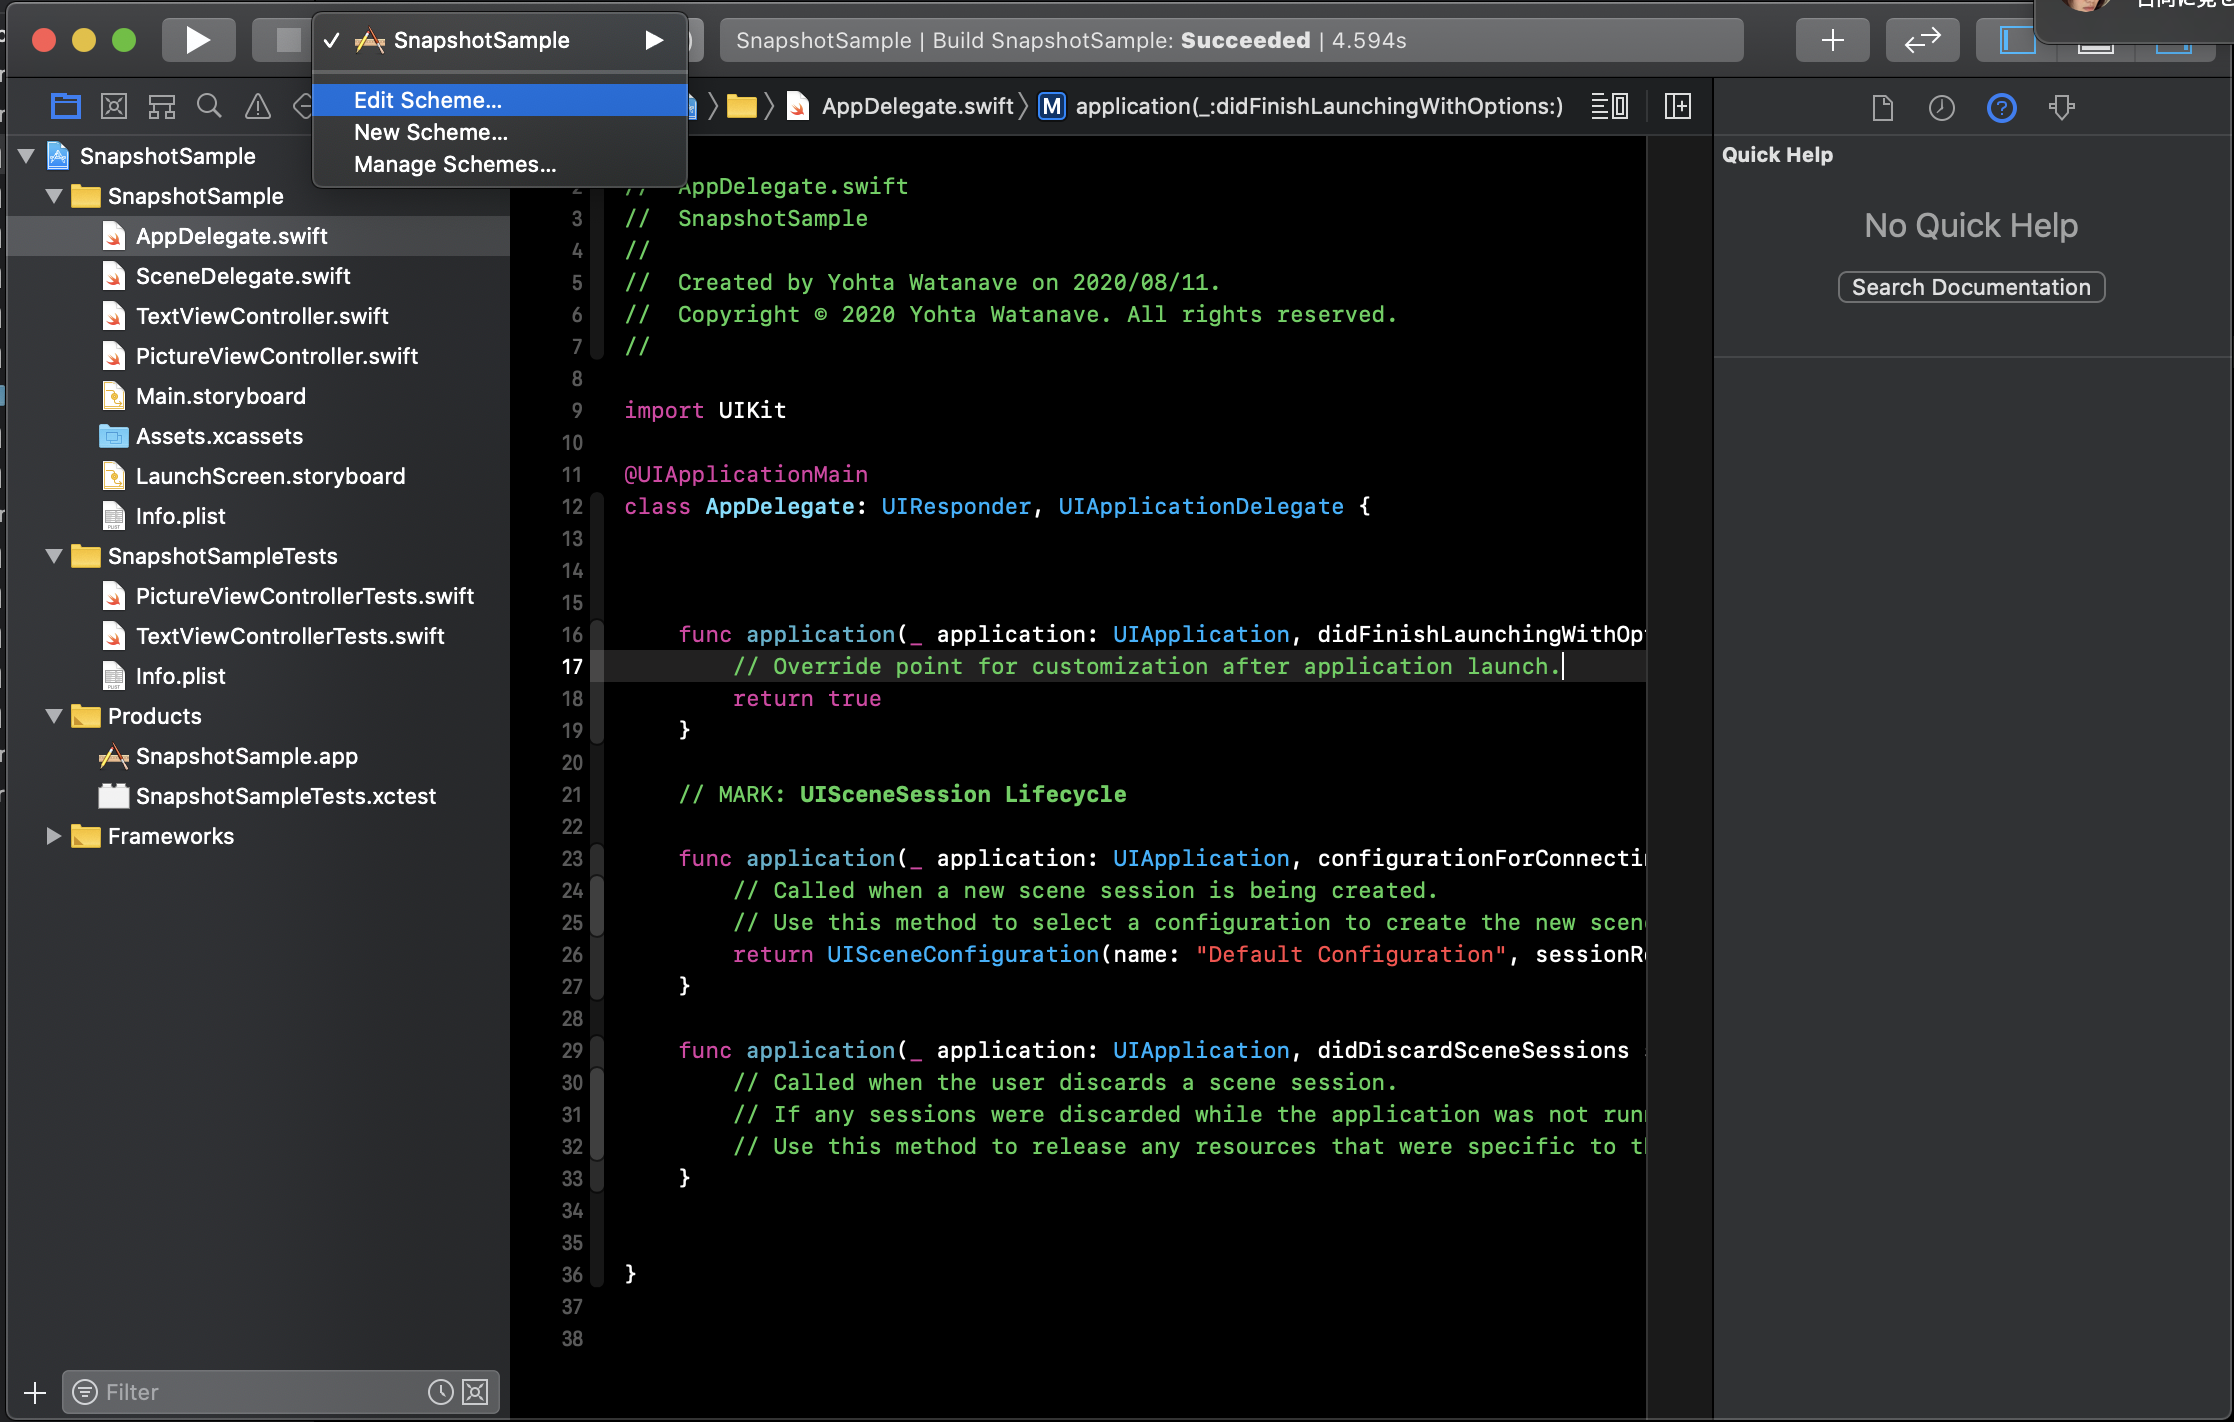
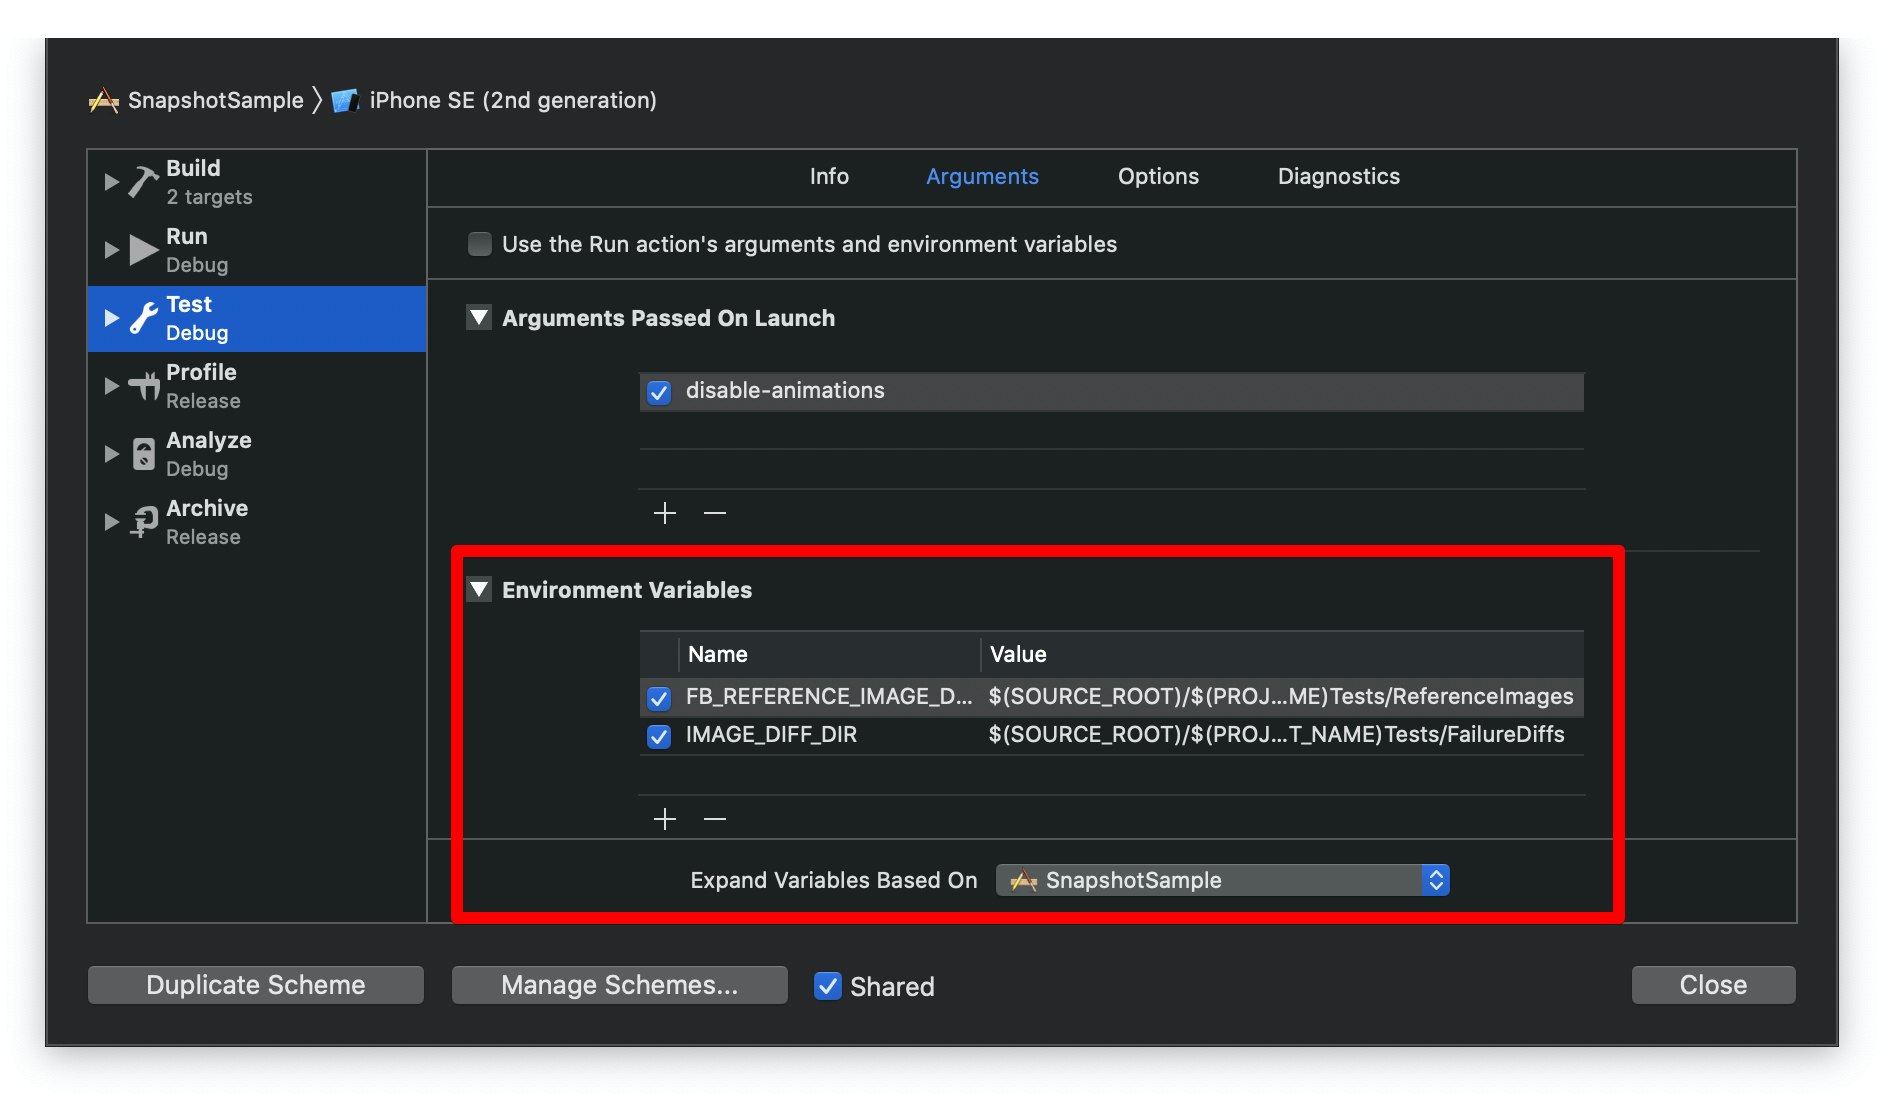
Testの実行引数を指定します。
文字列 disable-animations は任意でなんでも結構です。
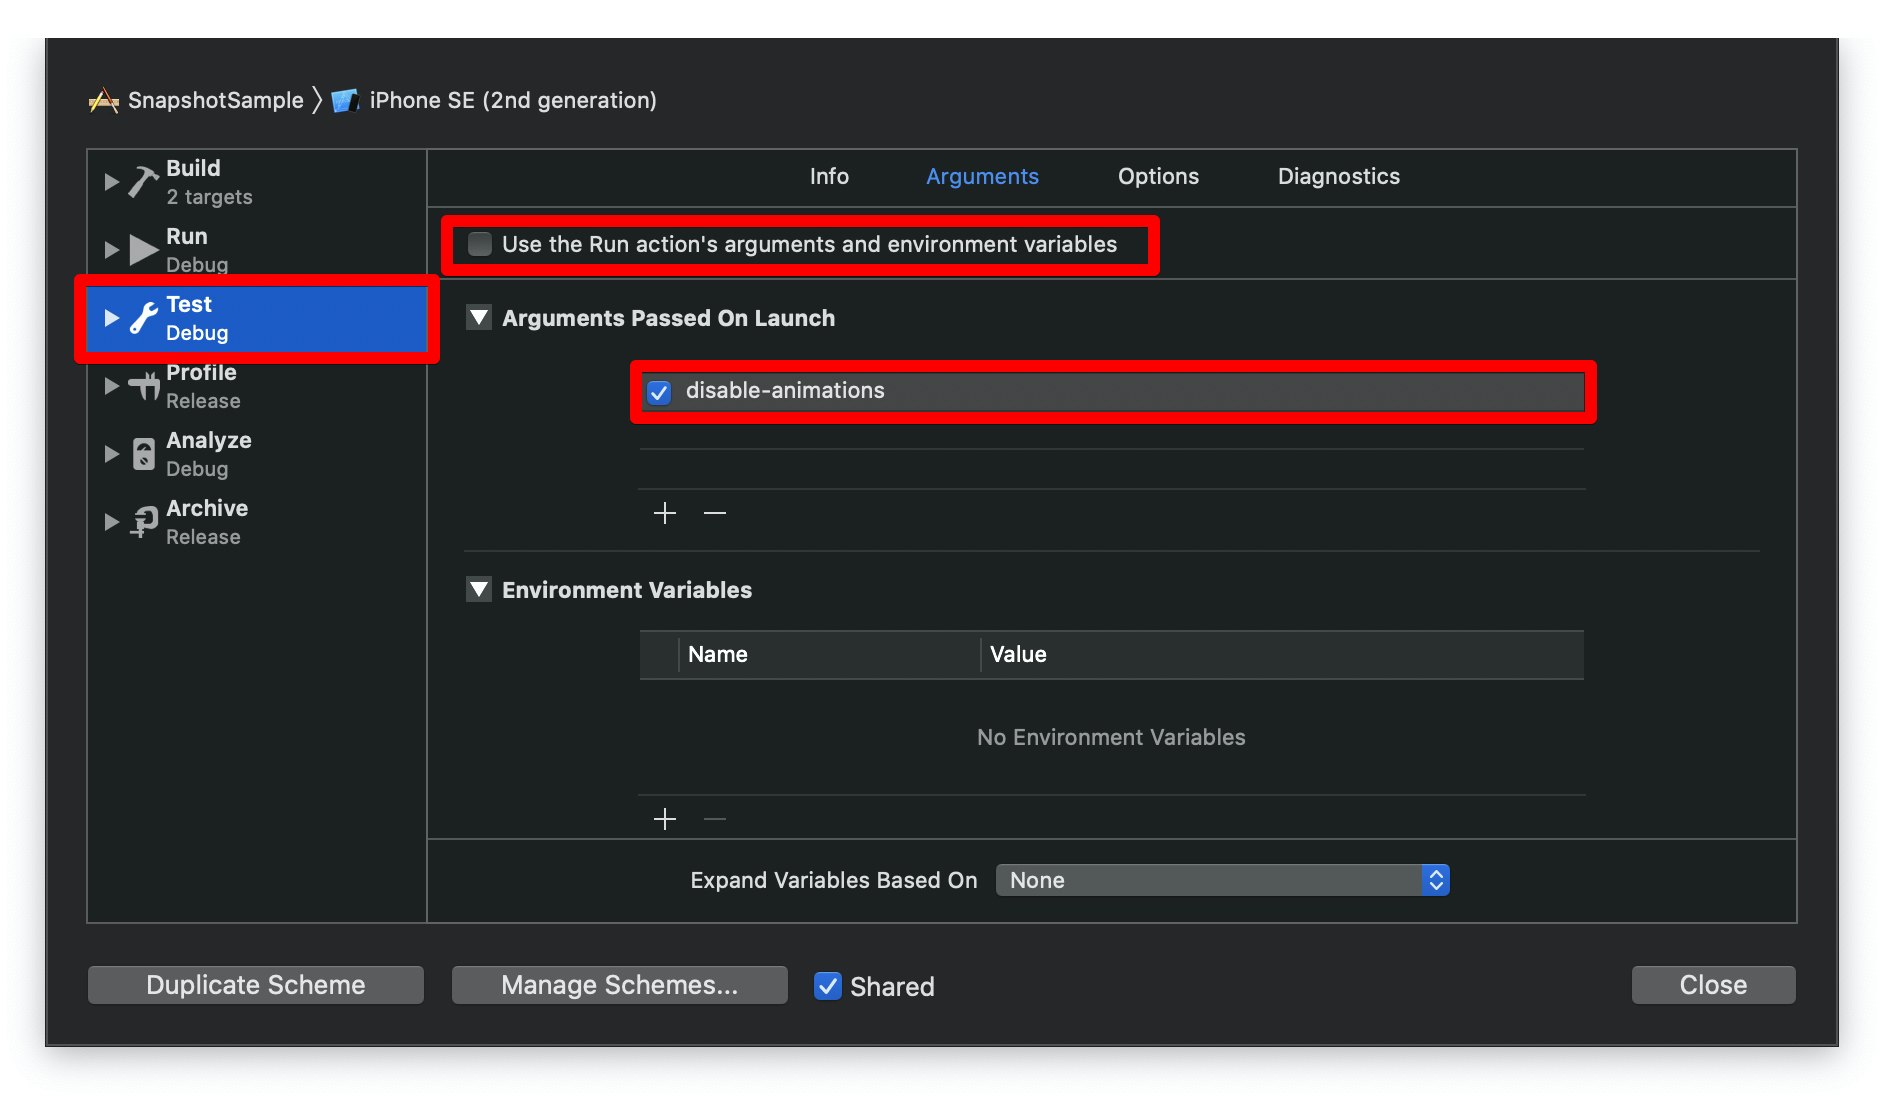
デバック実行時の環境変数を上書きしてしまうため、以下の設定も必要です。
特に $(SOURCE_ROOT) などの環境変数を展開するために Expand Variables Based Onでアプリターゲットします。
AppDelegateで実行引数にdisable-animationsが含まれていたら、アニメーションを無効化します
import UIKit

@UIApplicationMain
class AppDelegate: UIResponder, UIApplicationDelegate {

    func application(_ application: UIApplication, didFinishLaunchingWithOptions launchOptions: [UIApplication.LaunchOptionsKey: Any]?) -> Bool {
        if ProcessInfo.processInfo.arguments.contains("disable-animations") {
            UIView.setAnimationsEnabled(false)
        }
        return true
    }

}
方法2: テスト専用のAppDelegateを実装する
UIApplicationやAppDelegateのクラスを動的に指定するこちらのAPIを利用します。
func UIApplicationMain(_ argc: Int32,
                     _ argv: UnsafeMutablePointer<UnsafeMutablePointer<Int8>?>,
                     _ principalClassName: String?,
                     _ delegateClassName: String?) -> Int32
main.swiftというファイルを追加し、以下のように実装します。
クラス名やtarget名は適宜変更してください。
ミソはTestターゲットのAppDelegateがあればソレを採用する。なければ、アプリターゲットのAppDelegateを採用するようになっている点です。
import UIKit

UIApplicationMain(CommandLine.argc,
                  CommandLine.unsafeArgv,
                  nil,
                  NSStringFromClass(NSClassFromString("SnapshotSampleTests.AppDelegate") ?? AppDelegate.self)
)
アプリターゲットのAppDelegateから@UIApplicationMainアノテーションを削除します。
  import UIKit

- @UIApplicationMain
  class AppDelegate: UIResponder, UIApplicationDelegate {
TestターゲットにAppDelegate.swiftを追加し、アニメーションを無効化します。
import UIKit

class AppDelegate: UIResponder, UIApplicationDelegate {

    func application(_ application: UIApplication, didFinishLaunchingWithOptions launchOptions: [UIApplication.LaunchOptionsKey: Any]?) -> Bool {
        UIView.setAnimationsEnabled(false)
        return true
    }

}
言語設定
日本語のテキストを扱うときは、ローカル環境とCI環境でフォントが異なり、スナップショットに差分が出ることがしばしばあります。
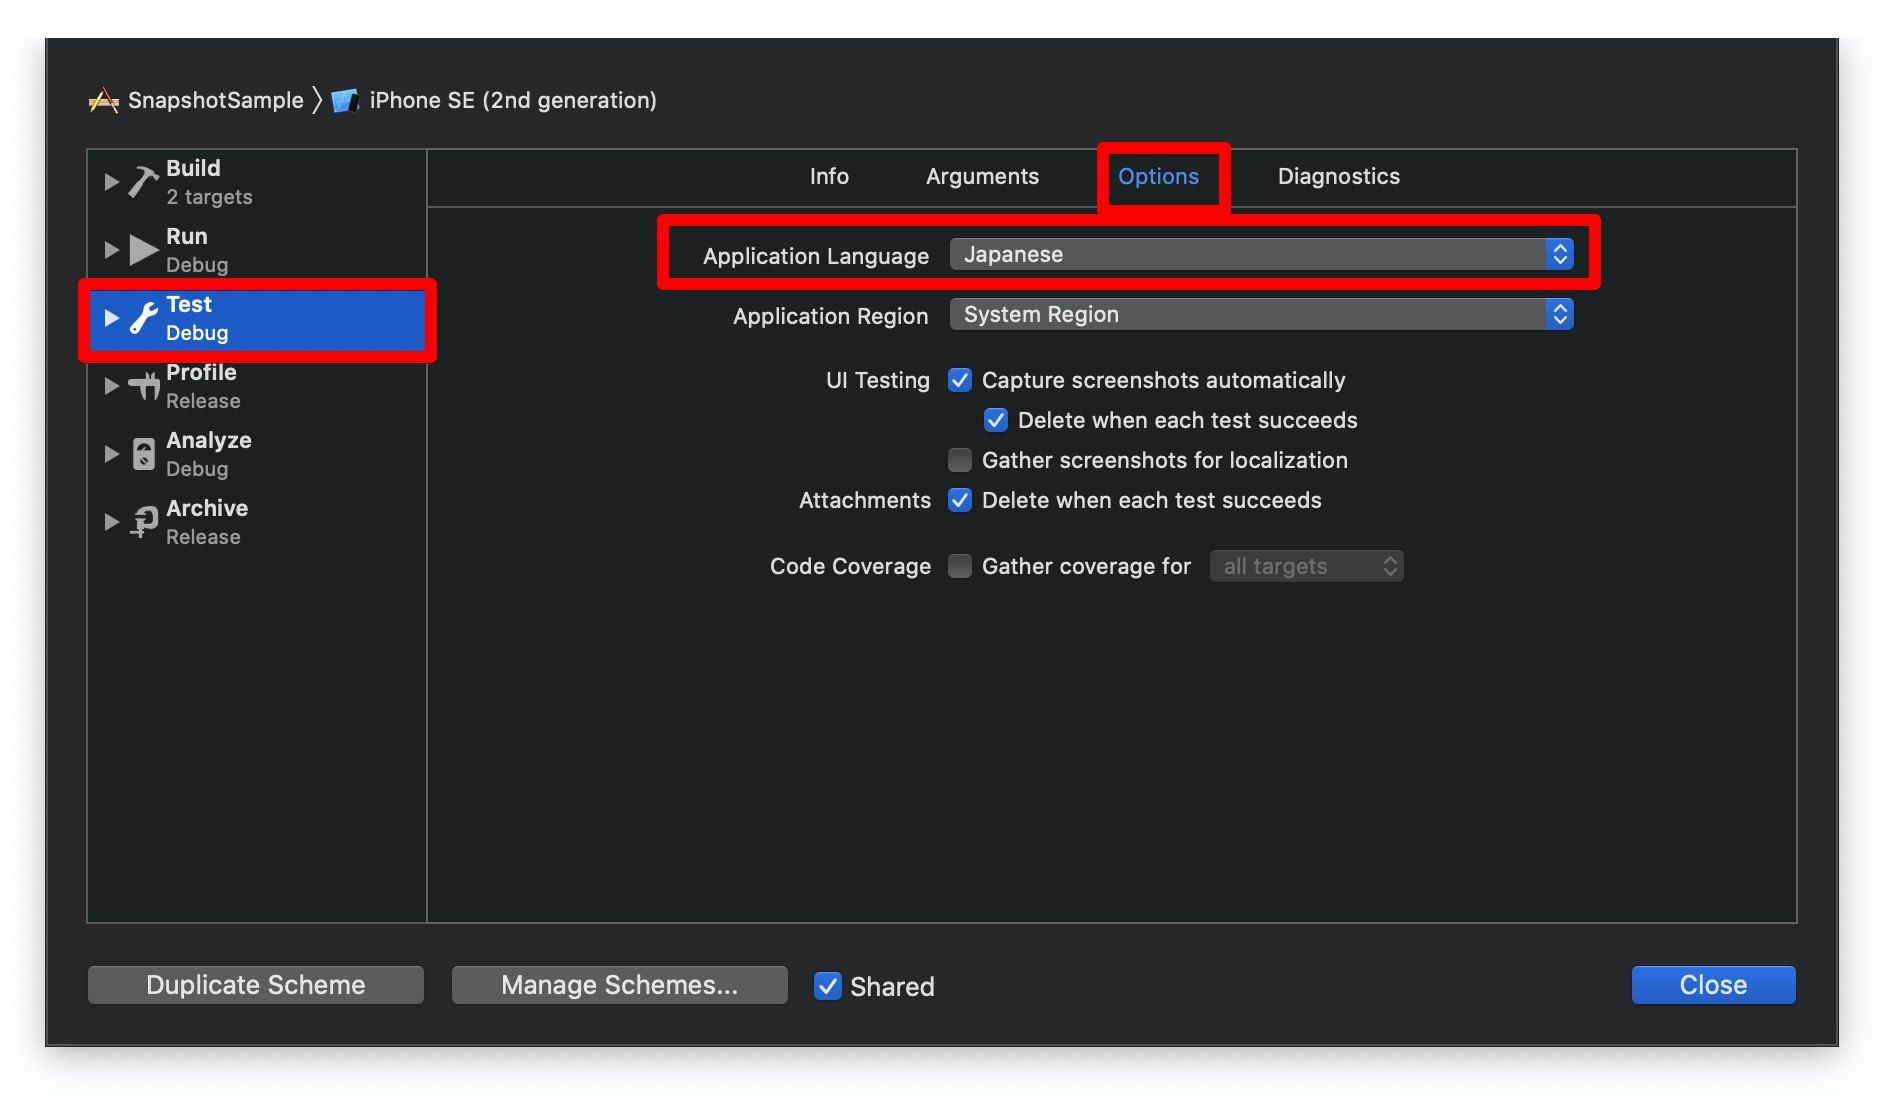
そのため、テスト実行時の言語設定を施しておくと、スナップショットテストが安定します。
Japaneseを指定します
CIの成果物に差分画像を含めておく
Bitrise等のCI環境でスナップショットテストを実行し画像に差分が発生した際に、どんな差分だったのか?そのままでは確認するすべがありません。
(CI環境でのみ画像に差分が発生することは多いです)
そこでCIの成果物にスナップショットテストの差分画像を含めておくことをお勧めすます。
例えば、bitriseでしたらこのような設定で可能です。
テスト失敗時に成果物を公開するように
is_always_run: true や run_if: ".IsBuildFailed" などを指定する必要があります。
    - xcode-test@2:
        inputs:
        - project_path: "$BITRISE_PROJECT_PATH"
        - simulator_device: iPhone SE (2nd generation)
        - scheme: "$BITRISE_SCHEME"
    - zip-directory-and-export-its-path@1:
        is_always_run: true
        run_if: ".IsBuildFailed"
        inputs:
        - include_directory: 'true'
        - directory_to_zip: "./SnapshotSampleTests/FailureDiffs"
    - deploy-to-bitrise-io@1:
        is_always_run: true
        run_if: ".IsBuildFailed"
        inputs:
        - notify_user_groups: none
        - is_enable_public_page: 'true'
        - deploy_path: "$ZIP_FILE"

RecordModeの切り替えは共通にしておく
スナップショットを撮影するFBSnapshotTestCaseクラスは recordModeフラグを持っています。このフラグがtrueの場合はリファレンス画像を更新します。falseの場合は画像の差分をチェックします。
SDKのメジャーバージョン更新時など、全ての画像を一括更新かけることもありますので、このフラグはグローバルな物を代入するようにしておくと便利です。
実装例
便利メソッドの作り方
dark modeとlight mode両方のスナップショットを撮影する便利メソッドの実装例です。
参考
extension FBSnapshotTestCase {

    func snapshotBothMode(_ viewController: UIViewController, file: StaticString = #file, line: UInt = #line) {
        let window = UIWindow(frame: UIScreen.main.bounds)
        window.rootViewController = viewController
        window.makeKeyAndVisible()

        FBSnapshotVerifyView(window, identifier: "light", file: file, line: line)
        window.overrideUserInterfaceStyle = .dark
        FBSnapshotVerifyView(window, identifier: "dark", file: file, line: line)
    }

}
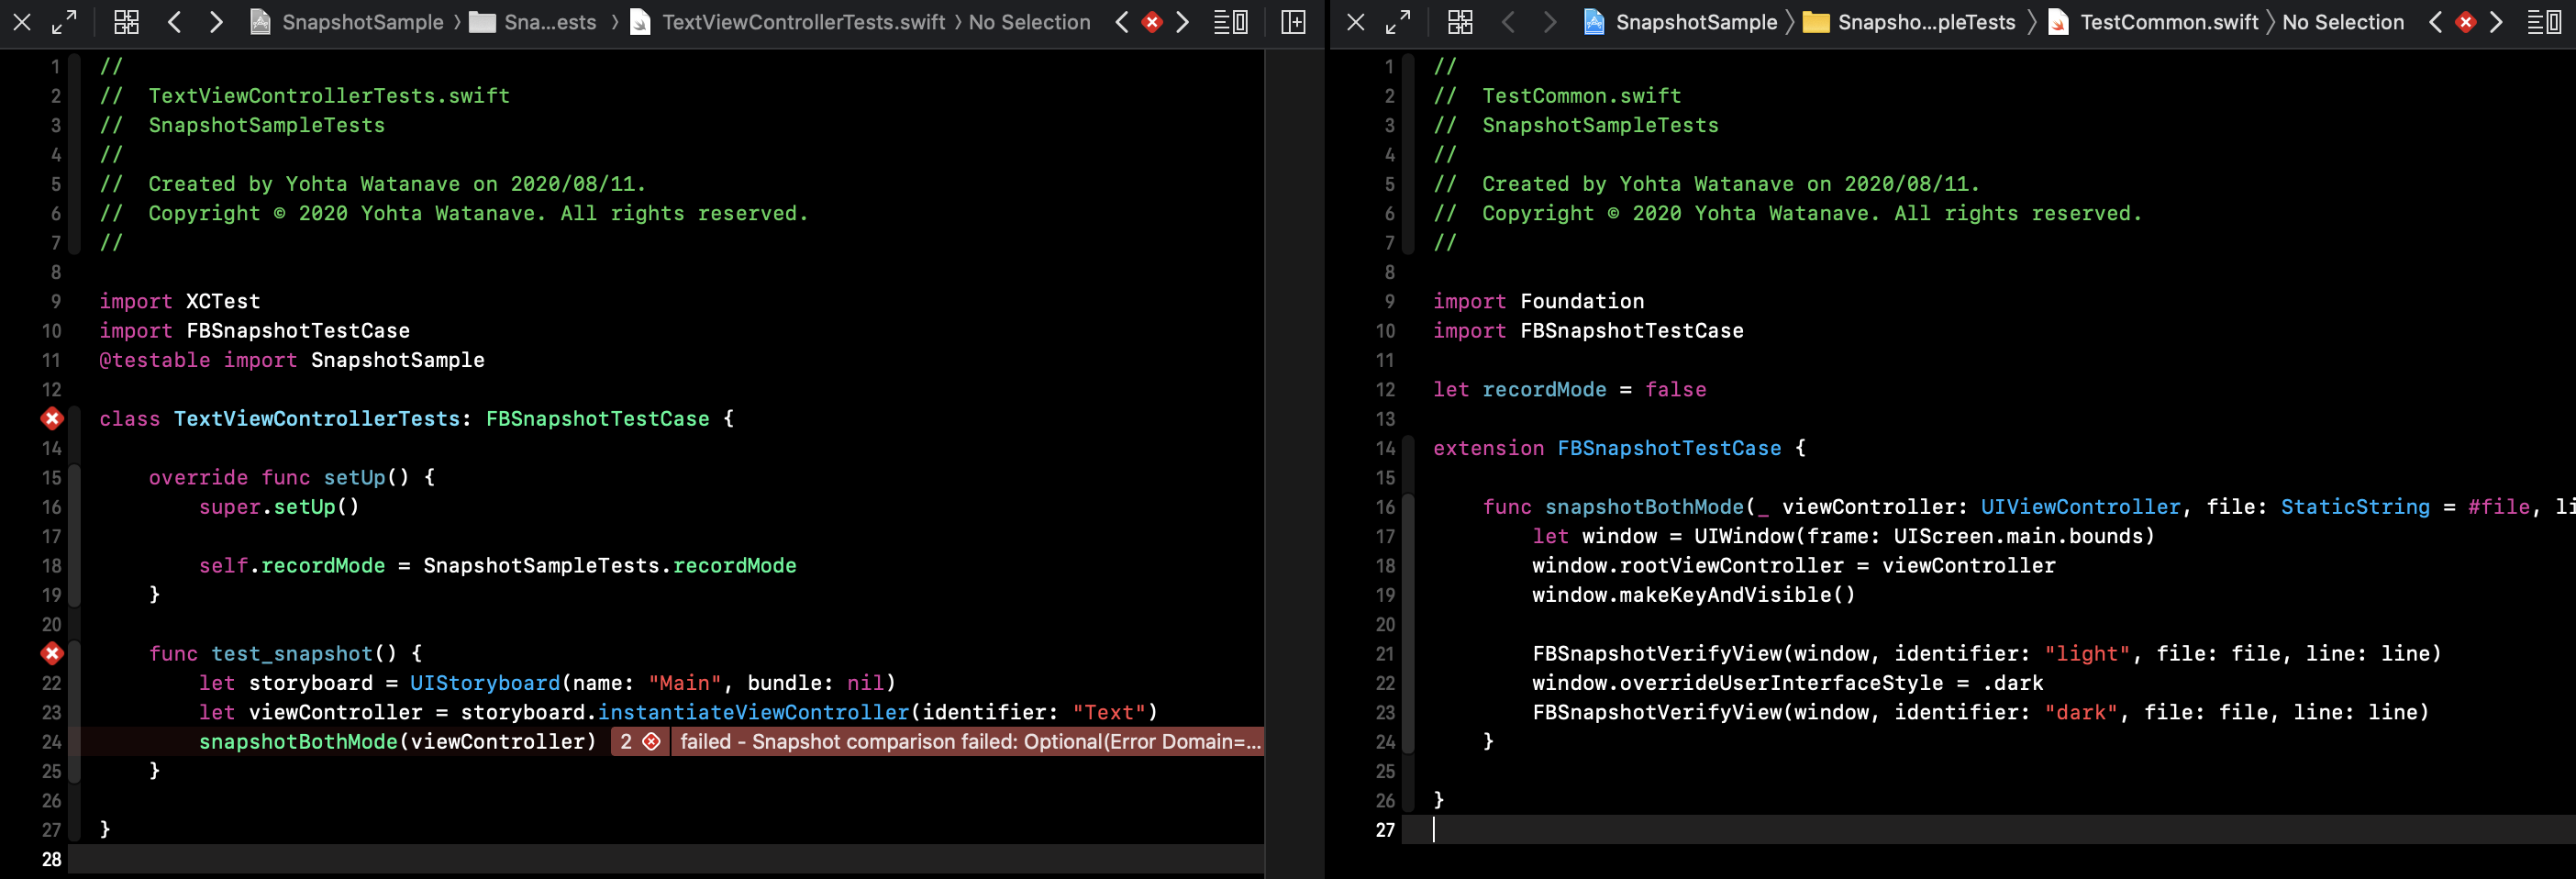
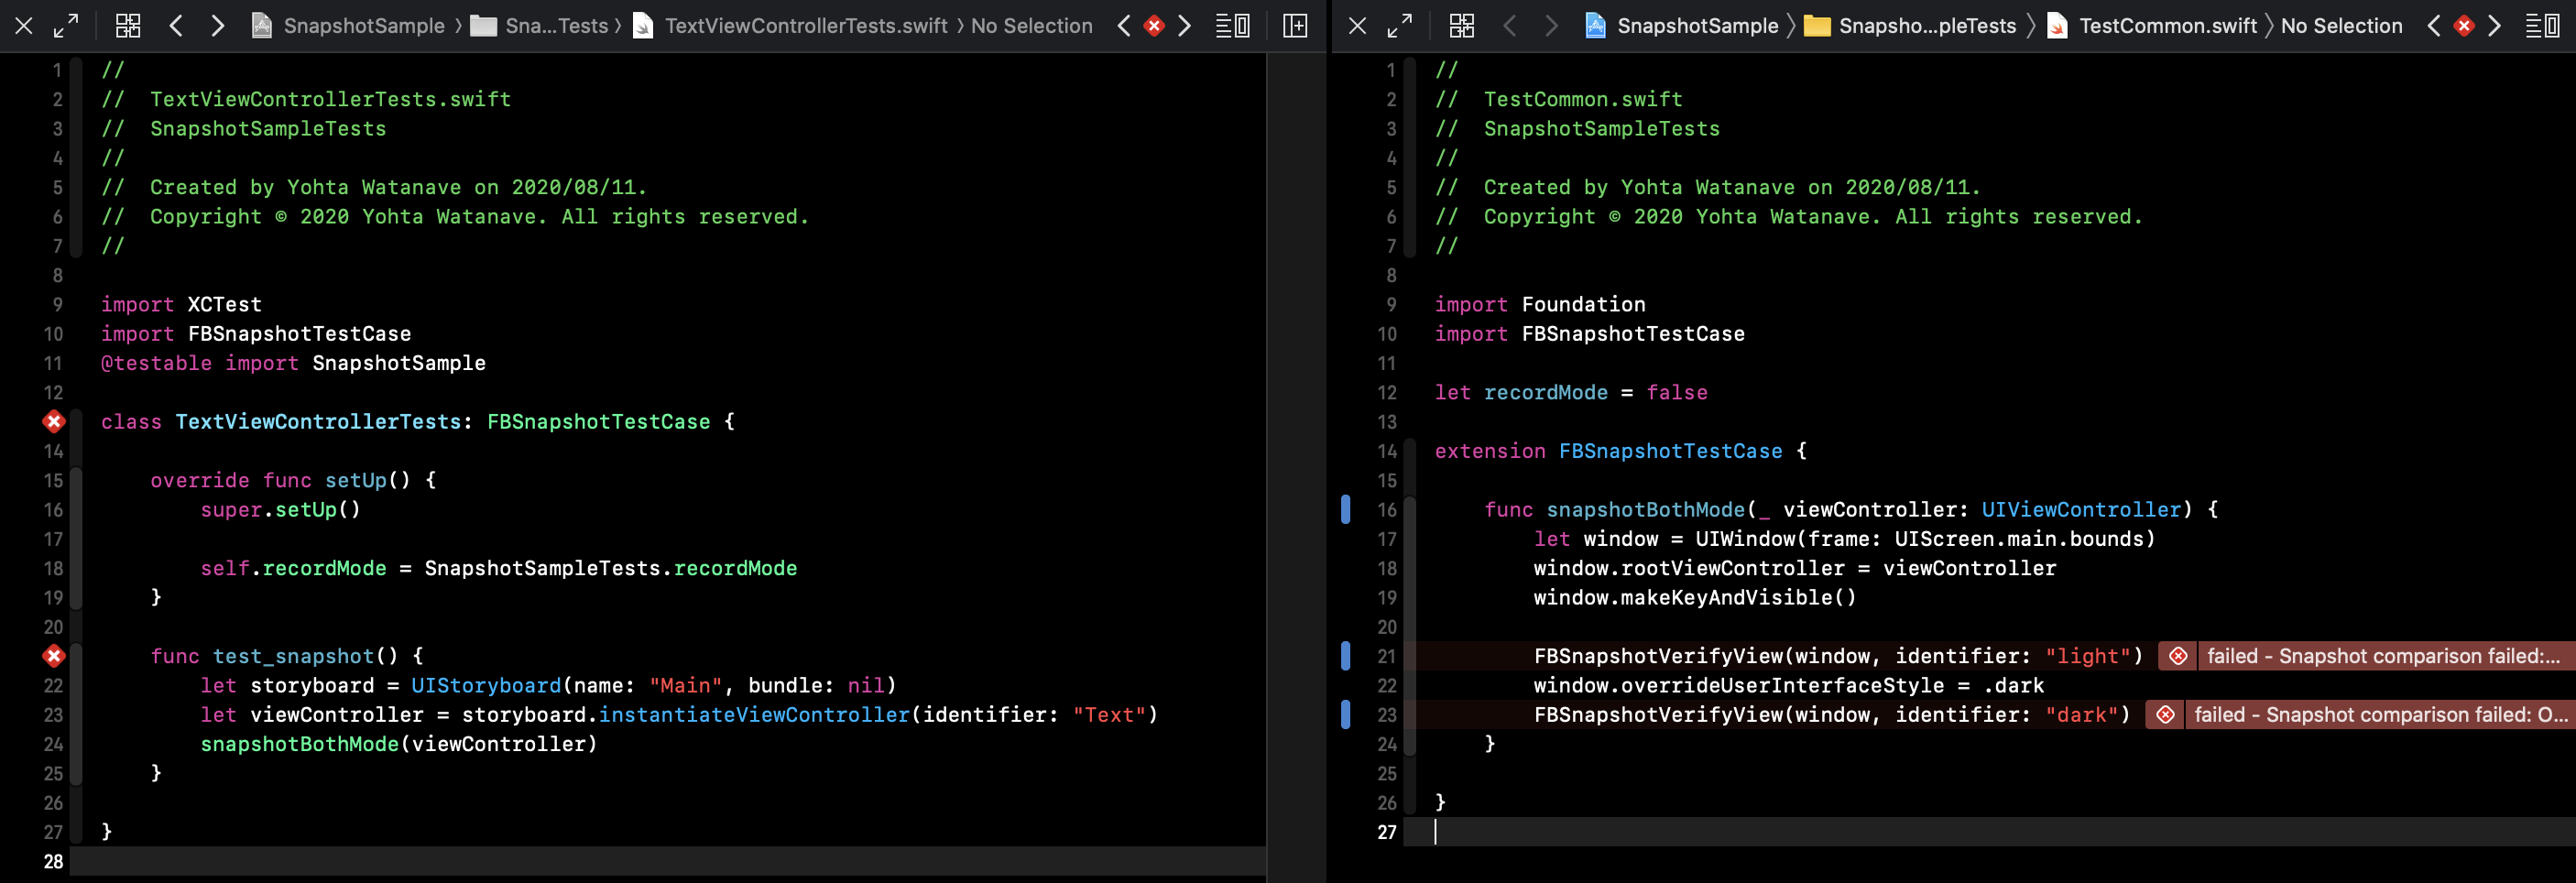
引数にファイル名と行番号が含まれているのがミソです。
このファイル名と行番号が指定された箇所がテスト失敗として扱われます。
これは標準のXCAssertが備えている機能ですので、スナップショットテスト以外にも応用が可能です。
https://developer.apple.com/documentation/xctest/1500669-xctassert
ファイル名と行番号が指定した場合
独自メソッド snapshotBothModeの呼び出し箇所でテスト失敗となります
ファイル名と行番号が指定しない場合
独自メソッド snapshotBothModeの内部でテスト失敗となります
Dangerでスナップショットを強制する
せっかくios-snapshot-test-caseを導入しても、スナップショットを比較するテストの実装を忘れてしまうと意味がありません。
そこで、Pull-Requestの静的チェックツールDangerでスナップショットテストの実装をチェックしてみましょう。
参考
スナップショットの実装をチェックする最低限の設定をしたサンプルです。
https://github.com/watanavex/SnapshotSample/blob/e0a061a825a96d5cf5c950bac3ed77b545afcdde/Dangerfile
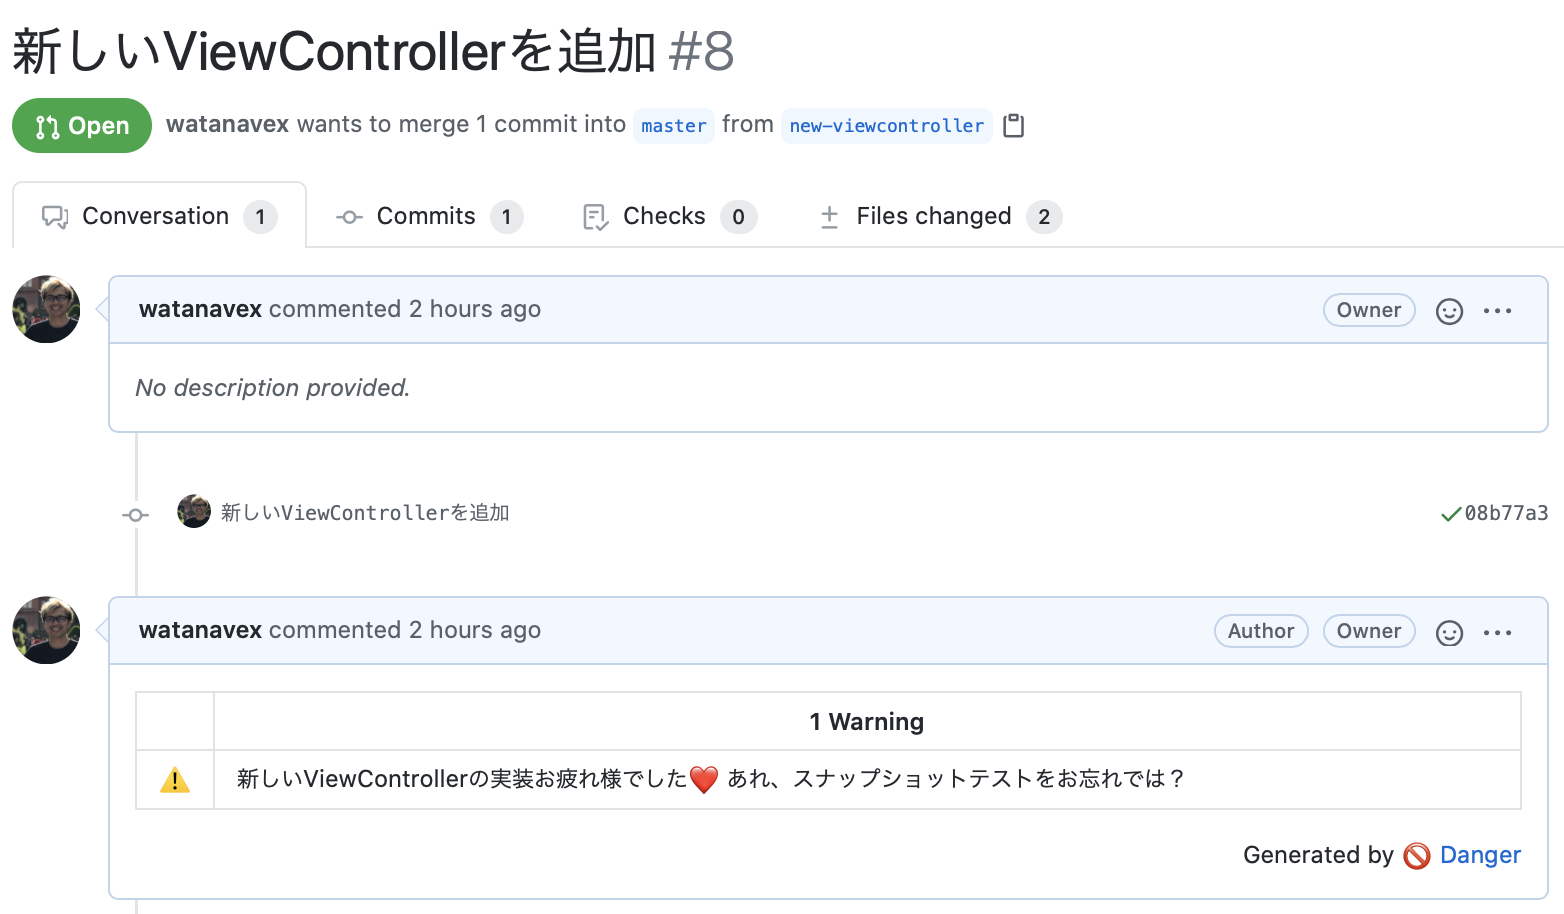
Pull-Requestではこのようにワーニングが発生します。
