経緯
仕事相手の外人が、自分の名前のドメインをとっていてかっこいいなあと思っていた。
Google がいつの間にかドメインサービスも始めていたので Google でドメイン取得して GCP でWebページ公開までやってみよう、と思ったため。
8年間支払い続けたニコニコ動画へのお布施をやめるきっかけが欲しかったという理由もある。
よく意味が分からないかもしれないが、私もこの気持ちの意味はよくわかっていない。
2017/1/8 追記 Firebase 使ったほうがよさそうです。
今回はカスタムドメインで個人のページをSSLで公開するのが最終目標で、その場合 Firebase を使ったほうがよさそう。
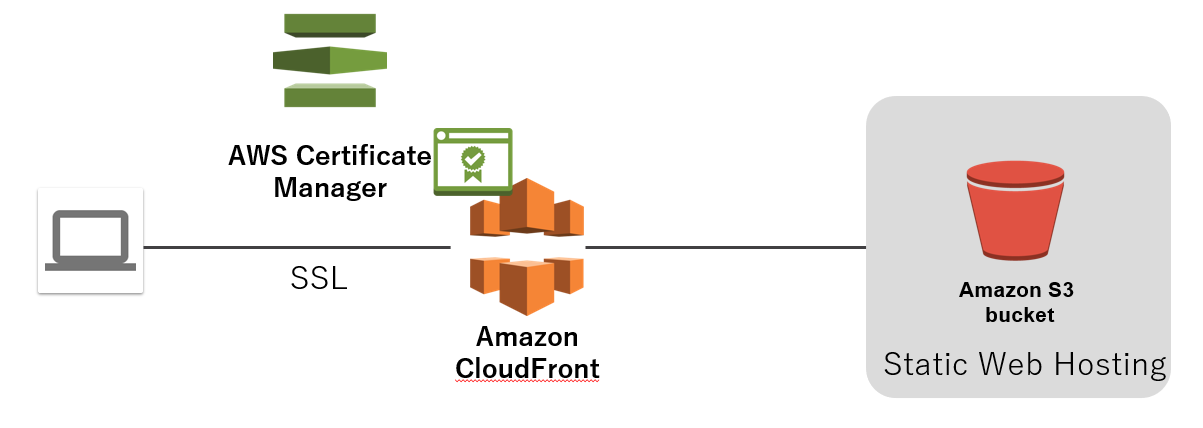
やりたかったのは AWS だとこんな感じ
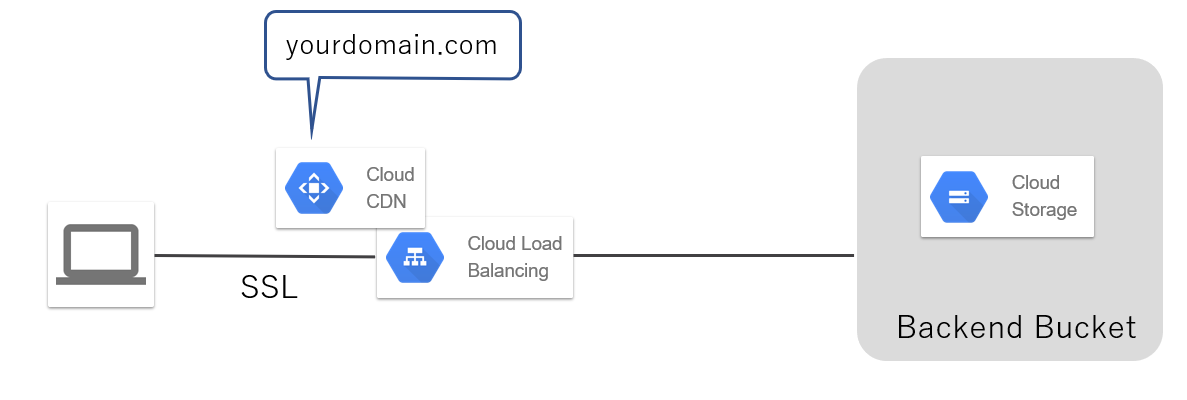
GCP の Cloud CDN は LoadBalancer とセットで使うしかない。
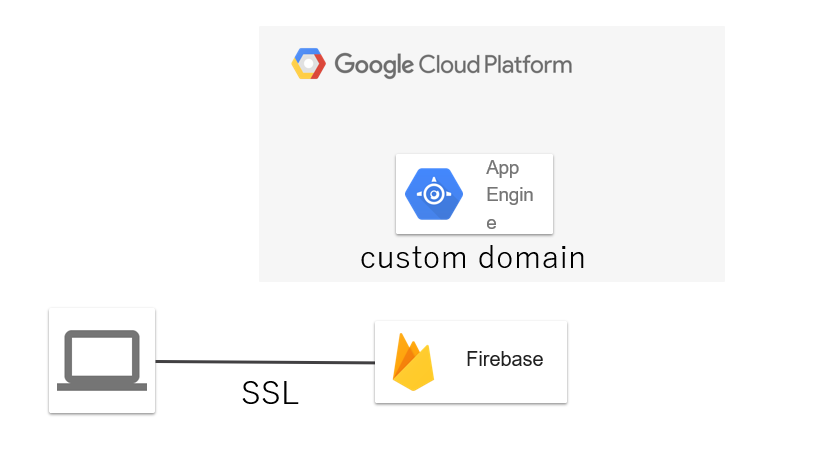
ということで、今回の用途だと Firebase を Hosting に使って カスタムドメインを設定するのがよさそう。
参考:Firebase Hostingで公開したWebサイトにカスタムドメインを設定するやり方
Simple...
せっかく調査したので、その2 までは書くかなぁ…。
やること
基本的に CI で回せるように CLI で行う。
-
今回やること
- ドメインは Google Domains で取得
- Webページは GCP Storage で公開
-
次回やる予定
- HTTPS を設定する(多分 Google Cloud CDN)
- コンテンツは GitHub でバージョン管理し CI ツールでアップロードする
Google Domains で ドメインの取得
CLIでやるって言ったな、ありゃ嘘だ。
ブラウザで以下のページを開く。
取得したいドメインを入力して、検索を押す。
個人用ドメインなので .me や .life と迷ったが、無難に .com を選択した。
バケットに入れて購入処理をすれば完了。
.comドメインだと、通常は ¥1400/year ポッキリ
DNS での CNAME 設定
参考:Cloud Storage >ドキュメント > 静的ウェブサイトのホスティング
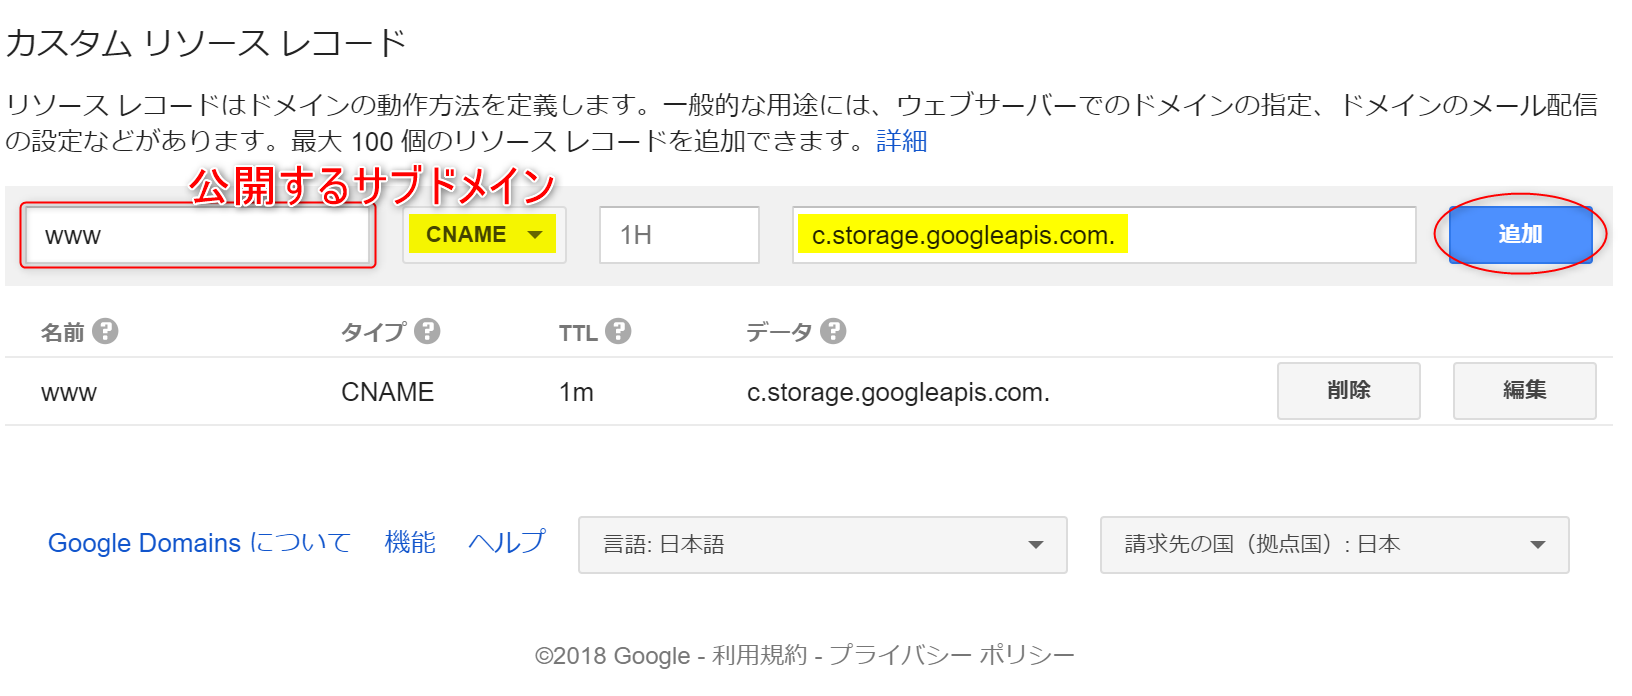
Google Domains の管理画面で、先ほど購入したドメインの DNS アイコンをクリックする。
ページの一番下までスクロールして「カスタム リソース レコード」に GCP Storage の CNAME c.storage.googleapis.com. を登録する。
Google Domains の設定は以上。
なぜこの CNAME を設定するだけでOKなのかはよくわからないけれど、 c.storage.googleapis.com. がヘッダなんかをみて良しなに処理してくれるのだろう。
GCP Storage を作成
Google Cloud SDK のインストール
CI のことを考えると、CLI に触れておきたい。
Google が提供している SDK に含まれる gsutil で Storage の操作ができるので、Google Cloud SDK をインストールする。
Scoop なら、以下のようにして GCloud SDK を落としてくる。
# extras bucket の登録
PS> scoop bucket add extras

# gcloud sdk のインストール
PS> scoop install gcloud
Installing 'gcloud' (183.0.0) [64bit]
インストールが終了するとそのまま Google へのログインを促されるので、そのままログインする。
Welcome! This command will take you through the configuration of gcloud.

Your current configuration has been set to: [default]

You can skip diagnostics next time by using the following flag:
  gcloud init --skip-diagnostics

Network diagnostic detects and fixes local network connection issues.
Checking network connection...done.
Reachability Check passed.
Network diagnostic (1/1 checks) passed.

You must log in to continue. Would you like to log in (Y/n)? #y
自動でブラウザが立ち上がるので、対象のGoogleアカウントでログイン
# ログイン成功
You are logged in as: [yourmail@gmail.com].

# (デフォルト)プロジェクトの選択
Pick cloud project to use:
 [1] fir-demo-project
 [2] janken-12837
 [3] janken2-6ade1
 [4] Create a new project

# 新しいプロジェクトを作成
Please enter numeric choice or text value (must exactly match list
item): 4

# プロジェクト名の設定
Enter a Project ID. Note that a Project ID CANNOT be changed later.
Project IDs must be 6-30 characters (lowercase ASCII, digits, or
hyphens) in length and start with a lowercase letter.
# web-yourdomain-com など
適当なIDを作成。グローバルな名前なので、被っていると後ろに番号が付いたり…する?
細かい挙動はよく検証していない。
失敗したら、
PS> gcloud init --skip-diagnostics
もしくは
PS> gcloud projects create --name web-domain --set-as-defalut
で、設定しなおせる。
Bucket の作成
Domain を 同一のアカウントで購入していれば、ドメイン名のバケットが作成可能。
PS> gcloud domains list-user-verified
ID
yourdomain.com ## 購入したドメインが Verify 済みになっているはず


PS> gsutil ls gs://
BadRequestException: 400 Unknown project id: 0 # バケットが存在しない

PS> gsutil mb -c multi_regional -l asia gs://www.yourdomain.com
Creating gs://www.yourdomain.com/...

PS> gsutil ls gs://
gs://www.yourdomain.com/ # 作ったバケットが表示されていればOK
htmlファイルのアップロード
とりあえずテスト用のhtmlをアップしてみる。
# Htmlファイルの作成
> echo "Hello GCP Storage" > index.html
> echo "page not found" > 404.html

# 公開設定でアップロード
> gsutil cp -a public-read .\index.html .\404.html gs://www.haniyama.com
Copying file://.\index.html [Content-Type=text/html]...
Copying file://.\404.html [Content-Type=text/html]...
\ [2 files][   74.0 B/   74.0 B]
Operation completed over 2 objects/74.0 B.
とりあえず、これで http://www.yourdomain.com/index.html に アクセスできるようになる。
しかし、 http://www.yourdomain.com/ にアクセスすると Access Denaied になってしまう。
そこで以下のコマンドで main_page_suffix と error_page を設定する。
# main_page_suffix と error_page を設定
> gsutil web set -m index.html -e 404.html gs://www.yourdomain.com
これで http://www.yourdomain.com/ で index.html が、 http://www.yourdomain.com/not_exsit で 404.html が表示されればOK
今回はここまで。


