Squid とは
squid(スクウィッド)はプロキシ (Proxy) サーバ、ウェブキャッシュサーバなどに利用されるフリーソフトウェア。GPLでライセンスされている。 Squidの用途は、重複リクエストに対したキャッシュ応答によるウェブサーバの高速化や、ネットワーク資源を共有する人々が行うWorld Wide WebやDNSなどの様々なネットワーククエリのキャッシュなど、多岐にわたる。元来はUnix系のコンピュータで動作させる目的で設計されている。
スクイドではなくスクウィッドらしい。
はじめに
ちょっと検証用にパスワード認証があるWebプロキシ(フォワーディングプロキシ)つくってくれん?と言われたので、Vagrantで構築することに。
検証用なので、本番運用することとかは考えておらず、セキュリティはあまり考慮していません。本番運用はしないでください。
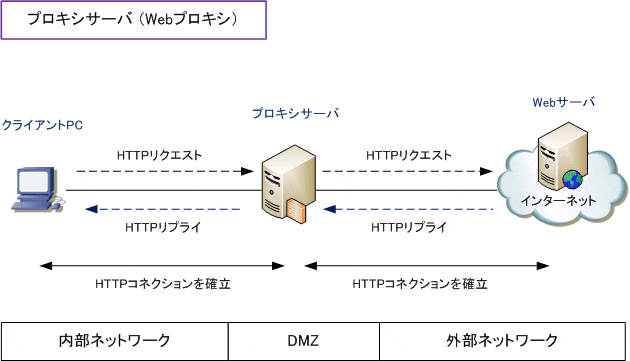
Webプロキシ(フォワーディングプロキシ)とは
あなたの会社にもありますよね。
概要
ネットワーク構成はこんな感じだとします。
     GW
==============
|10.10.1.252 |------ 10.10.2.x (開発機)
==============
      |
      |
   開発用NW
==============
|10.10.1.100 |------- bridge ------ eth1    VirtualBox
==============                       |   =================
   外部NW                              = | VirtualMachine|
==============                       |   =================
|192.168.1.x |------- bridge ------ eth2      squid
==============
      |
      |
     GW
==============
|192.168.1.1 |------ Web
==============
開発機から GW経由で Vagrant(Ubuntu)上の squid につながり、eth2 から外部NW 経由で外に出るようにします。
なお、検証のため squid にはBasic認証をかけることにします。
完成品
- Vagrantfile
# -*- mode: ruby -*-
# vi: set ft=ruby :

# All Vagrant configuration is done below. The "2" in Vagrant.configure
# configures the configuration version (we support older styles for
# backwards compatibility). Please don't change it unless you know what
# you're doing.
Vagrant.configure("2") do |config|
  config.vm.box = "bento/ubuntu-16.04"

  config.vm.synced_folder "./squid/", "/etc/squid/", type:"virtualbox"
  config.vm.synced_folder "./logs/", "/var/log/squid/", type:"virtualbox"

  config.vm.network :public_network, ip: "10.10.1.100", bridge: "Intel(R) Ethernet Connection (4) I219-V" # 開発NW
  config.vm.network :public_network, bridge: "Intel(R) Dual Band Wireless-AC 8265"  # 外部NW

  config.vm.provision "shell", run:"always", inline: <<-SHELL
    route add -net 10.10.2.0 gw 10.10.1.252 netmask 255.255.255.0 eth1
    route add default gw 192.168.1.1
    sed -i -e "/^nameserver\s10.*$/ s/^#*/# /g" /etc/resolv.conf
  SHELL

  # delete default gw on eth0
  config.vm.provision "shell",
    run: "always",
    inline: "eval `route -n | awk '{ if ($8 ==\"eth0\" && $2 != \"0.0.0.0\") print \"route del default gw \" $2; }'`"

  # squid のインストール
  config.vm.provision "shell", inline: <<-SHELL
    echo "install squid..."
    apt-get update
    # DO OVERRIDE CURRENT SETTING
    # N or O  : keep your currently-installed version
    yes N | apt-get install -y squid
    echo "install finished!"
  SHELL

  # squid の起動
  config.vm.provision "shell", run: "always", inline: "service squid start"

  # show vm ip
  config.vm.provision "shell",
    run: "always",
    inline: "ip a | grep 10.100.1. | awk '{printf \"proxy ip is %s\\n\", $2}' | sed -e 's/\\/24/:8080/g'"
end
設定ファイルは、Ubuntuでsquidを使って個人プロキシサーバーを作る - Qiitaを参考にしました。
# SSL接続時に443ポート以外のCONNECTを拒否
acl SSL_ports port 443
acl CONNECT method CONNECT
http_access deny CONNECT !SSL_ports

# 匿名化
forwarded_for off
request_header_access X-Forwarded-For deny all
request_header_access Via deny all
request_header_access Cache-Control deny all
# request_header_access Referer deny all

# Password
auth_param basic program /usr/lib/squid/basic_ncsa_auth /etc/squid/passwd
acl password proxy_auth REQUIRED
http_access allow password

# 接続先ポートのホワイトリスト (とりあえず最低限)
acl Safe_ports port 80  # http
acl Safe_ports port 443 # https
http_access deny !Safe_ports

# 許可するIP
acl dev src 10.10.2.0/24
http_access allow localhost
http_access allow dev

# 上記のルールに一致しない場合は拒否
http_access deny all

# squidのポート
http_port 8080

# core出力場所
coredump_dir /var/spool/squid

# キャッシュ設定を無効
no_cache deny all
ハマったところ
Vagrant での Bridge 接続
Vagrant で Bridge 接続するには
config.vm.network :public_network
もしくは
config.vm.network :public_network, bridge: "network name"
とする必要がある。今回は開発NWと外部NWと二ついるので、2回書く。
config.vm.network :public_network #外部NW
config.vm.network :public_network, ip: "10.100.10.100" #開発NW
そうすると vagrant up したときに、使えるネットワークインターフェイスを聞かれるのでそれぞれ別のインターフェイスを指定する。
=> default: Available bridged network interfaces:
1) Intel(R) Dual Band Wireless-AC 8265
2) Intel(R) Ethernet Connection (4) I219-V
==> default: When choosing an interface, it is usually the one that is
==> default: being used to connect to the internet.
    default: Which interface should the network bridge to? #2 開発用NWを選ぶ

=> default: Available bridged network interfaces:
1) Intel(R) Dual Band Wireless-AC 8265
2) Intel(R) Ethernet Connection (4) I219-V
==> default: When choosing an interface, it is usually the one that is
==> default: being used to connect to the internet.
    default: Which interface should the network bridge to? #1 外部NWを選ぶ
いちいち選択するの面倒な場合は
# %ProgramFiles%\Oracle\VirtualBox に Path を通す
VBoxManage.exe list bridgedifs
で出てくるインターフェースの NAME 属性を指定します。
config.vm.network :public_network, bridge: "Intel(R) Dual Band Wireless-AC 8265"
参考:環境変数で Vagrant の bridge を指定できるようにする - Qiita
squid の設定
password 認証をつけるには
auth_param basic program /usr/lib/squid/basic_ncsa_auth /etc/squid/passwd
acl password proxy_auth REQUIRED
http_access allow password
のようにプラグインを指定します。/usr/lib/squid/ 以下にはいろいろな認証プラグインがあるので、環境に合わせて利用します。
Basic認証用の passwd ファイルは以下のようにして作成します。
sudo htpasswd -C /etc/squid/passwd user
htpasswd コマンドは apache2-utils に含まれる
sudo apt-get install apache2-utils
を利用するか、実験用のファイルならWebでpasswdファイルを作れるツールを使ってもよさそうです。
Vagrant で squid 入れるときに気を付けること
Vagrant で squid 使うときは、おそらく設定変更しやすいように conf ファイル等は File sync でマウントすることになるだろうと思います。
  config.vm.synced_folder "./squid/", "/etc/squid/", type:"virtualbox"
  config.vm.synced_folder "./logs/", "/var/log/squid/", type:"virtualbox"
この状態で apt-get install squid すると、既存の設定ファイルを上書きするか?というプロンプトが出て、インストール途中でエラーがでて止まってしまいました。
そこで yes コマンドを利用して、自動で設定ファイルを上書きするようにします。
  config.vm.provision "shell", inline: <<-SHELL
    apt-get update
    # DO OVERRIDE CURRENT SETTING
    # N or O  : keep your currently-installed version
    yes N | apt-get install -y squid
  SHELL
yes N で No を突き付けています。なんかシュールですね。
ネットワーク設定
改めてネットワーク構成を見てみます。
     GW
==============
|10.10.1.252 |------ 10.10.2.x
==============
      |
      |
   開発用NW
==============
|10.10.1.100 |------- bridge ------ eth1    VirtualBox
==============                       |   =================
   外部NW                              = | VirtualMachine|
==============                       |   =================
|192.168.1.x |------- bridge ------ eth2      squid
==============
      |
      |
     GW
==============
|192.168.1.1 |------ Web
==============
開発NWはサブネットで切られていています。
開発機である、10.10.2.x から Web までたどり着くには、ルーティング設定をしなければいけないので、GW設定を追加で行うことにします。
参考: https://www.vagrantup.com/docs/networking/public_network.html#default-router
10.10.1.252 の GW を追加(eth1)
route add -net 10.10.2.0 gw 10.10.1.252 netmask 255.255.255.0 eth1
デフォルトゲートウェイを追加
Web に出るほうのGWを指定する
route add default gw 192.168.1.1
/etc/resolv.conf を修正
NAT の GW や 10.100.1.x が resolv.conf にあると、うまくWeb側にアクセスできなかったのでコメントアウトしておく
sed -i -e "/^nameserver\s10.*$/ s/^#*/# /g" /etc/resolv.conf
これはもっと良い方法があるかもしれないです。
デフォルトGWの削除
参考サイトそのまま、route add default しているので必要ないかもしれないです(未検証)
  # delete default gw on eth0
  config.vm.provision "shell",
    run: "always",
    inline: "eval `route -n | awk '{ if ($8 ==\"eth0\" && $2 != \"0.0.0.0\") print \"route del default gw \" $2; }'`"
まとめ
これで vagrant up 一発でプロキシが立ち上がる環境が出来上がりました。
開発環境だけでなく、実際の運用環境もどんどんコード化して効率よく仕事をしたいです。
