成果物
API GatewayのWebsocket APIを使用してリアルタイムチャットアプリを作成してみました。

経緯
以前、以下の記事でSocket.IOをNextJSのサーバーサイドに実装しチャットアプリを作成しました。
NextJSのサーバーサイドにSocket.IOを実装する際の問題点
- Vercelにデプロイすることができない(Websocketのカスタムサーバーを建てることが出来ない)
- 別途WebsocketサーバーをEC2などに構築する必要がありそう
- EC2にサーバーを構築する場合、料金が高くなる
そこでサーバーレスでWEbsocketを構築する方法であるAPI GateweayのWebsocketを使用してみることにしました。
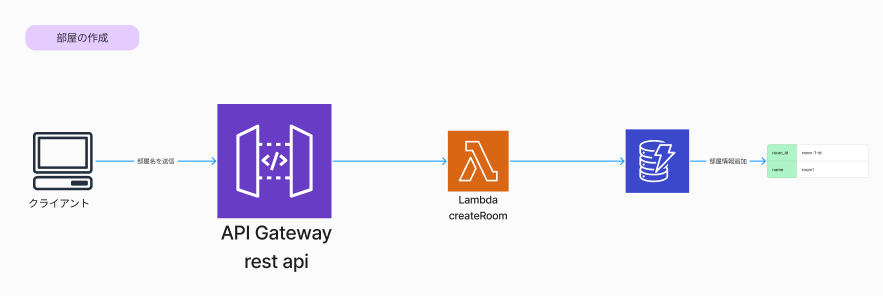
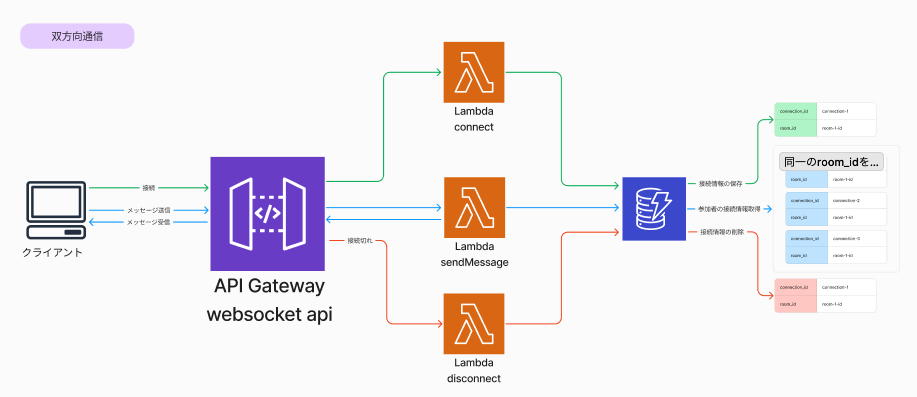
全体のイメージ
目次
- DynamoDBにテーブル作成
- roomsテーブル
- connectionsテーブル
- Lambda関数の作成
- createRoom関数
- getAllRooms関数
- connect関数
- sendMessage関数
- disconnect関数
- API Gatewayの作成
- rest api作成
- websocket api作成
- フロントエンドの実装
DynamoDBにテーブル作成
以下構成のテーブルを作成します。
roomsテーブル
| 属性名 | 説明 |
|---|---|
| room_id | 部屋の識別子を保持 |
| name | 部屋名を保持 |
connectionsテーブル
| 属性名 | 説明 |
|---|---|
| connection_id | 接続情報を保持 |
| joined_room_id | 部屋の識別子を保持 |
roomsテーブルの作成
部屋情報を保持するテーブルを作成します。
役割:部屋情報の一覧を取得するために使用します。
手順
- AWSマネジメントコンソールからDynamoDBを検索
- サイドメニューから 「テーブル」 ⇨ 「テーブルを作成」
- テーブル名・パーティションキーを以下に設定
- テーブル名:
rooms - パーティションキー:
room_id
- テーブル名:
- 「テーブル作成」を押す
connectionsテーブルの作成
Websocketの接続IDを保持するテーブルを作成します。
役割:自分の入室している部屋の取得、部屋に入室している参加者の一覧を取得など
- AWSマネジメントコンソールからDynamoDBを検索
- サイドメニューから 「テーブル」 ⇨ 「テーブルを作成」
- テーブル名・パーティションキーを以下に設定
- テーブル名:
connections - パーティションキー:
connection_id
- テーブル名:
- 「テーブル作成」を押す
- テーブル一覧からconnectionsテーブルを選択
- タブから「インデックス」 ⇨ 「インデックスの作成」を選択
- パーティションキー・インデックス名を以下に設定
- パーティションキー:
joined_room_id - インデックス名:
joined_room_id-index
- パーティションキー:
- 「インデックスの作成」を押す
部屋に入室している参加者の一覧を取得するためにパーティションキーではないjoined_room_idで検索できるようにしたいためグローバルセカンダリインデックス(GSI)を作成しました。
以上でDynamoDBのテーブル作成は終わりです。
Lambda関数作成
以下の4つの関数を作成していきます。
- createRoom関数
- getAllRooms関数
- connect関数
- sendMessage関数
- disconnect関数
createRoom関数作成
DynamoDBに部屋情報を新規作成する関数を作成します。
手順
- AWSマネジメントコンソールからLambdaを検索
- ダッシュボード右上の「関数の作成」
- 関数名・ランタイムを以下に設定
- 関数名:
createRoom - ランタイム:Node.js
- 関数名:
- 「関数の作成」を押す
- コードに以下「createRoomのコード」を記述し「Deploy」押す
- 「設定」タブ ⇨ 「アクセス権限」から「ロール名」をクリック
- 許可ポリシーの「AWSLambdaBasicExecutionRole」をクリック
- 「編集」で以下の許可ポリシーを追加する
- 「次へ」 ⇨ 「変更を保存」でポリシーを反映
createRoom関数のコード
import {
  ApiGatewayManagementApiClient,
  PostToConnectionCommand,
} from "@aws-sdk/client-apigatewaymanagementapi";
import { DynamoDBClient } from "@aws-sdk/client-dynamodb";
import {
  PutCommand,
  DynamoDBDocumentClient,
  GetCommand,
} from "@aws-sdk/lib-dynamodb";
import { randomUUID } from 'crypto';

export const handler = async (event) => {
  const client = new DynamoDBClient({});
  const docClient = DynamoDBDocumentClient.from(client);

  const body = JSON.parse(event.body);
  const roomName = body.roomName
  const roomId = randomUUID()

  // DynamoDBにレコード追加
  const putRoomCommand = new PutCommand({
    TableName: "rooms",
    Item: {
      room_id: roomId,
      name: roomName,
    },
    // 既に同一のroom_idが存在する場合、レコードを追加しない
    ConditionExpression: "attribute_not_exists(room_Id)",
  });

  try {
    await docClient.send(putRoomCommand);

    return {
      statusCode: 200,
      headers: {
        "Access-Control-Allow-Origin": "*",
        "Access-Control-Allow-Methods": "OPTIONS,POST,GET",
        "Access-Control-Allow-Headers": "Content-Type",
      },
      body: JSON.stringify({
        message: "Room created successfully",
        roomId,
      }),
    };
  } catch (error) {
    return {
      statusCode: 500,
      headers: {
        "Access-Control-Allow-Origin": "*",
        "Access-Control-Allow-Methods": "OPTIONS,POST,GET",
        "Access-Control-Allow-Headers": "Content-Type",
      },
      body: JSON.stringify({
        message: "Failed to create room",
        error: error.message,
      }),
    };
  }
};
許可ポリシーの追加
{
    "Statement": {
        {
			"Sid": "Statement1",
			"Effect": "Allow",
			"Action": [
				"dynamodb:*"
			],
			"Resource": "*"
		},
		{
			"Sid": "Statement2",
			"Effect": "Allow",
			"Action": [
				"execute-api:*"
			],
			"Resource": "*"
		}
    }
}
getAllRooms関数作成
DynamoDBに保持した部屋情報を全て返す関数を作成します。
手順
- AWSマネジメントコンソールからLambdaを検索
- ダッシュボード右上の「関数の作成」
- 関数名・ランタイムを以下に設定
- 関数名:
getAllRooms - ランタイム:Node.js
- 関数名:
- 「関数の作成」を押す
- コードに以下「getAllRooms関数のコード」を記述し「Deploy」押す
- 「設定」タブ ⇨ 「アクセス権限」から「ロール名」をクリック
- 許可ポリシーの「AWSLambdaBasicExecutionRole」をクリック
- 「編集」で以下の許可ポリシーを追加する
- 「次へ」 ⇨ 「変更を保存」でポリシーを反映
getAllRooms関数のコード
import { DynamoDBClient } from "@aws-sdk/client-dynamodb";
import { DynamoDBDocumentClient, ScanCommand } from "@aws-sdk/lib-dynamodb";

export const handler = async (event) => {
  const client = new DynamoDBClient({});
  const docClient = DynamoDBDocumentClient.from(client);

  const getAllRoomsCommand = new ScanCommand({
    TableName: "rooms",
  });

  try {
    const allRooms = await docClient.send(getAllRoomsCommand);

    const response = {
      statusCode: 200,
      body: JSON.stringify({
        rooms: allRooms.Items,
      }),
    };
    return response;
  } catch (error) {
    return {
      statusCode: 500,
      body: JSON.stringify({
        message: "Failed to fetch rooms",
        error: error.message,
      }),
    };
  }
};
今回はお試しで作成しているのでScanで全件取得していますが、データ量が増えるケースではQueryで取得したほうが料金、パフォーマンス的に嬉しいはずです。
許可ポリシーの追加
{
    "Statement": {
        {
			"Sid": "Statement1",
			"Effect": "Allow",
			"Action": [
				"dynamodb:*"
			],
			"Resource": "*"
		},
		{
			"Sid": "Statement2",
			"Effect": "Allow",
			"Action": [
				"execute-api:*"
			],
			"Resource": "*"
		}
    }
}
connect関数作成
Websocket APIに接続する関数を作成します。
手順
- AWSマネジメントコンソールからLambdaを検索
- ダッシュボード右上の「関数の作成」
- 関数名・ランタイムを以下に設定
- 関数名:
connect - ランタイム:Node.js
- 関数名:
- 「関数の作成」を押す
- コードに以下「connect関数のコード」を記述し「Deploy」押す
- 「設定」タブ ⇨ 「アクセス権限」から「ロール名」をクリック
- 許可ポリシーの「AWSLambdaBasicExecutionRole」をクリック
- 「編集」で以下の許可ポリシーを追加する
- 「次へ」 ⇨ 「変更を保存」でポリシーを反映
connect関数のコード
import { DynamoDBClient } from "@aws-sdk/client-dynamodb";
import {
  PutCommand,
  DynamoDBDocumentClient,
  GetCommand,
} from "@aws-sdk/lib-dynamodb";

export const handler = async (event) => {
  const client = new DynamoDBClient({});
  const docClient = DynamoDBDocumentClient.from(client);

  const roomId = event.queryStringParameters?.roomId
  const connectionId = event.requestContext.connectionId;

  const putConnectionCommand = new PutCommand({
    TableName: "connections",
    Item: {
      connection_id: connectionId,
      joined_room_id: roomId
    },
  });

  await docClient.send(putConnectionCommand);

  return {
    statusCode: 200,
    headers: {
      "Access-Control-Allow-Origin": "*",
      "Access-Control-Allow-Methods": "OPTIONS,POST,GET",
      "Access-Control-Allow-Headers": "Content-Type",
    },
  };
};
許可ポリシーの追加
{
    "Statement": {
        {
			"Sid": "Statement1",
			"Effect": "Allow",
			"Action": [
				"dynamodb:*"
			],
			"Resource": "*"
		},
		{
			"Sid": "Statement2",
			"Effect": "Allow",
			"Action": [
				"execute-api:*"
			],
			"Resource": "*"
		}
    }
}
sendMessage関数作成
部屋の参加者全員にメッセージを送信する関数。
手順
- AWSマネジメントコンソールからLambdaを検索
- ダッシュボード右上の「関数の作成」
- 関数名・ランタイムを以下に設定
- 関数名:
sendMessage - ランタイム:Node.js
- 関数名:
- 「関数の作成」を押す
- コードに以下「sendMessage関数のコード」を記述し「Deploy」押す
- 「設定」タブ ⇨ 「アクセス権限」から「ロール名」をクリック
- 許可ポリシーの「AWSLambdaBasicExecutionRole」をクリック
- 「編集」で以下の許可ポリシーを追加する
- 「次へ」 ⇨ 「変更を保存」でポリシーを反映
sendMessage関数のコード
import {
  ApiGatewayManagementApiClient,
  PostToConnectionCommand,
} from "@aws-sdk/client-apigatewaymanagementapi";
import { DynamoDBClient } from "@aws-sdk/client-dynamodb";
import {
  PutCommand,
  DynamoDBDocumentClient,
  GetCommand,
  QueryCommand
} from "@aws-sdk/lib-dynamodb";

export const handler = async (event) => {
  const client = new DynamoDBClient({});
  const docClient = DynamoDBDocumentClient.from(client);
  const connectionId = event.requestContext.connectionId;

  const getConnectionIdCommand = new GetCommand({
    TableName: "connections",
    Key: {
      connection_id: connectionId,
    },
  });
  const connection = await docClient.send(getConnectionIdCommand);
  const roomId = connection.Item.joined_room_id;

  const getJoinedRoomConnectionIdsCommand = new QueryCommand({
    TableName: "connections",
    IndexName: "joined_room_id-index",
    KeyConditionExpression: "joined_room_id = :roomId",
    ExpressionAttributeValues: {
      ":roomId": roomId,
    },
  });

  const joinedRoomConnectionIdsResponse = await docClient.send(getJoinedRoomConnectionIdsCommand);
  const joinedRoomConnectionIds = joinedRoomConnectionIdsResponse.Items

  const body = JSON.parse(event.body);
  const message = {
    type: "message",
    message: body.data.message
  }

  const apigClient = new ApiGatewayManagementApiClient({
    endpoint:
      "https://" +
      event.requestContext.domainName +
      "/" +
      event.requestContext.stage,
  });

  const sendMessages = joinedRoomConnectionIds.map(async (connectionId) => {
    const apigCommand = new PostToConnectionCommand({
      ConnectionId: connectionId.connection_id,
      Data: JSON.stringify({ message }),
    });

    await apigClient.send(apigCommand);
  });

  await Promise.all(sendMessages);

  return {
    statusCode: 200,
  };
};
許可ポリシーの追加
{
    "Statement": {
        {
			"Sid": "Statement1",
			"Effect": "Allow",
			"Action": [
				"dynamodb:*"
			],
			"Resource": "*"
		},
		{
			"Sid": "Statement2",
			"Effect": "Allow",
			"Action": [
				"execute-api:*"
			],
			"Resource": "*"
		}
    }
}
disconnect関数作成
Websocket APIの接続が切れた時に発火する関数。
手順
- AWSマネジメントコンソールからLambdaを検索
- ダッシュボード右上の「関数の作成」
- 関数名・ランタイムを以下に設定
- 関数名:
disconnect - ランタイム:Node.js
- 関数名:
- 「関数の作成」を押す
- コードに以下「disconnect関数のコード」を記述し「Deploy」押す
- 「設定」タブ ⇨ 「アクセス権限」から「ロール名」をクリック
- 許可ポリシーの「AWSLambdaBasicExecutionRole」をクリック
- 「編集」で以下の許可ポリシーを追加する
- 「次へ」 ⇨ 「変更を保存」でポリシーを反映
disconnect関数のコード
import { DynamoDBClient } from "@aws-sdk/client-dynamodb";
import {
  PutCommand,
  DynamoDBDocumentClient,
  GetCommand,
  DeleteCommand,
  QueryCommand
} from "@aws-sdk/lib-dynamodb";

export const handler = async (event) => {
  const client = new DynamoDBClient({});
  const docClient = DynamoDBDocumentClient.from(client);
  const connectionId = event.requestContext.connectionId;

  const getConnectionIdCommand = new GetCommand({
    TableName: "connections",
    Key: {
      connection_id: connectionId,
    },
  });
  const connection = await docClient.send(getConnectionIdCommand);
  const roomId = connection.Item.joined_room_id;

  const deleteCommand = new DeleteCommand({
    TableName: "connections",
    Key: {
      connection_id: connectionId,
    },
  });
  await docClient.send(deleteCommand);

  const getJoinedRoomConnectionIdsCommand = new QueryCommand({
    TableName: "connections",
    IndexName: "joined_room_id-index",
    KeyConditionExpression: "joined_room_id = :roomId",
    ExpressionAttributeValues: {
      ":roomId": roomId,
    },
  });

  const joinedRoomConnectionIdsResponse = await docClient.send(getJoinedRoomConnectionIdsCommand);
  const joinedRoomConnectionIds = joinedRoomConnectionIdsResponse.Items

  if (joinedRoomConnectionIds.length === 0) {
    const deleteCommand = new DeleteCommand({
      TableName: "rooms",
      Key: {
        room_id: roomId,
      },
    });
    await docClient.send(deleteCommand);
  }

  return {
    statusCode: 200,
  };
};
許可ポリシーの追加
{
    "Statement": {
        {
			"Sid": "Statement1",
			"Effect": "Allow",
			"Action": [
				"dynamodb:*"
			],
			"Resource": "*"
		},
		{
			"Sid": "Statement2",
			"Effect": "Allow",
			"Action": [
				"execute-api:*"
			],
			"Resource": "*"
		}
    }
}
API Gatewayの作成
REST API作成
手順
- AWSマネジメントコンソールからAPI Gatewayを検索
- 右上の「APIを作成」ボタンを押す
- APIタイプを選択で「Rest API」の「構築」ボタンを押す
- APIの詳細は以下を設定
- 新しいAPIを選択
- API名:
chat-rest-api - エンドポイントタイプ:リージョン
Lambda関数の統合(createRoom関数)
- リソース画面で「メソッドを作成」
- メソッド詳細は以下を設定
- メソッドタイプ:POST
- 統合タイプ:Lambda関数
- Lambdaプロキシ統合:OFF
- Lambda関数:
createRoom
- 「メソッドを作成」を押す
Lambda関数の統合(getAllRooms関数)
- リソース画面で「メソッドを作成」
- メソッド詳細は以下を設定
- メソッドタイプ:GET
- 統合タイプ:Lambda関数
- Lambdaプロキシ統合:OFF
- Lambda関数:
getAllRooms
- 「メソッドを作成」を押す
その他
- リソースの詳細画面に戻り、「CORSを無効にする」を押す
- 「APIをデプロイ」を押す
- フロントエンドの実装で使用するエンドポイントのURLが発行されます
Wensocket API作成
手順
- AWSマネジメントコンソールからAPI Gatewayを検索
- 右上の「APIを作成」ボタンを押す
- APIタイプを選択で「Websocket API」の「構築」ボタンを押す
- APIの詳細は以下を設定
- API名:
chat-websocket-api - ルート選択式:
request.body.action
- API名:
- 「Next」を押す
- ルートを追加は以下を設定
- 事前定義されたルートは以下を設定
- 「$connectルートを追加」を押す
- 「$disconnectルートを追加」を押す
- カスタムルートは以下を設定
- 「カスタムルートを追加」を押す
- ルートキー:
sendMessage
- 事前定義されたルートは以下を設定
- 「Next」を押す
- 統合をアタッチは以下を設定
- $connect
- 統合タイプ:Lambda
- Lambda関数:前項で作成したconnect関数
- $disconnect
- 統合タイプ:Lambda
- Lambda関数:前項で作成したdisconnect関数
- sendMessage
- 統合タイプ:Lambda
- Lambda関数:前項で作成したsendMessage関数
- $connect
- ステージ名を
productionで「Next」を押す - フロントエンドの実装で使用するWebSocket URLが発行されます
フロントエンドの実装
フロントエンドはNext.JSで作りました。
フォルダ構成
── src
   └── app
       ├── _components
       │   └── layouts
       │       └── MainWrpperContent.tsx
       │
       ├── page.tsx
       ├── pages
           ├── create-room
           │   └── page.tsx
           ├── room
           │   └── page.tsx
           └── rooms
               └── page.tsx
import { ReactNode } from "react";

type Props = {
  children: ReactNode;
};

export const MainWrapperContent = ({ children }: Props) => {
  return (
    <main className="w-screen h-screen">
      <div className="w-3/4 mx-auto">{children}</div>
    </main>
  );
};
import Link from "next/link";
import { MainWrapperContent } from "./_components/layouts/MainWrpperContent";

const Home = () => {
  return (
    <MainWrapperContent>
      <div className="py-24 text-center">
        <h1 className="md:text-9xl text-6xl">
          <span className="border-l-[18px] pl-10"></span>Chat
        </h1>
        <ul className="text-center pt-20">
          <li className="py-5 text-xl">
            <Link href="/pages/create-room">Create room</Link>
          </li>
          <li className="py-5 text-xl">
            <Link href="/pages/rooms">Join room</Link>
          </li>
        </ul>
      </div>
    </MainWrapperContent>
  );
};

export default Home;
"use client";

import { MainWrapperContent } from "@/app/_components/layouts/MainWrpperContent";
import { useRouter } from "next/navigation";
import { useState } from "react";

const CreateRoom = () => {
  const [roomName, setRoomName] = useState("");
  const router = useRouter();

  const onCreateRoom = async () => {
    if (roomName === "") return;

    const res = await fetch(
      "rest apiのURL",
      {
        method: "POST",
        headers: { "Content-Type": "application/json" },
        body: JSON.stringify({ roomName }),
      }
    );
    const data = await res.json();
    const roomId = data.roomId;
    router.push(`/pages/room?roomId=${roomId}&roomName=${roomName}`);
  };

  return (
    <MainWrapperContent>
      <div className="flex flex-wrap items-center justify-center text-center h-screen">
        <div>
          <div className="w-full">
            <input
              type="text"
              placeholder="please room name"
              className="p-2 text-black md:w-96 w-72"
              onChange={(e) => setRoomName(e.target.value)}
            />
          </div>
          <div className="w-full pt-14">
            <button onClick={() => onCreateRoom()}>Create</button>
          </div>
        </div>
      </div>
    </MainWrapperContent>
  );
};

export default CreateRoom;
"use client";
import { MainWrapperContent } from "@/app/_components/layouts/MainWrpperContent";
import { useSearchParams } from "next/navigation";
import { useEffect, useState } from "react";
type ReceiveMessage = {
message: {
type: "message" | "join";
message: string;
};
};
const Room = () => {
const [socket, setSocket] = useState<WebSocket>();
const [inputMessage, setInputMessage] = useState("");
const [receiveMessages, setReceiveMessages] = useState<string[]>([]);
const searchParams = useSearchParams();
const roomId = searchParams.get("roomId");
const roomName = searchParams.get("roomName");
useEffect(() => {
if (!roomId) return;
const socket = new WebSocket(
`[WebSocket URL]?roomId=${roomId}`
);
setSocket(socket);
socket.onmessage = (event) => {
const receiveMessage: ReceiveMessage = JSON.parse(event.data);
if (!receiveMessage?.message?.type) return;
setReceiveMessages((currentMessages) => {
return [...currentMessages, receiveMessage.message.message];
});
};
return () => {
socket.close();
};
}, []);
const sendMessage = (event: React.KeyboardEvent<HTMLInputElement>) => {
if (event.nativeEvent.isComposing || event.key !== "Enter") return;
if (inputMessage.trim() === "") return;
socket?.send(
JSON.stringify({
action: "onMessage",
data: {
message: inputMessage,
},
})
);
setInputMessage("");
};
return (
<MainWrapperContent>
<div className="h-screen">
<div className="py-5 border-b border-dashed">
<h1>{roomName}</h1>
</div>
<ul className="h-3/4 w-full p-3 overflow-y-auto">
{receiveMessages.map((message, index) => (
<li key={index} className="py-2">
<p>{message}</p>
</li>
))}
</ul>
<div className="flex items-center w-full">
<span>></span>
<input
type="text"
className="text-black h-9 w-full outline-none p-2 bg-transparent border-b text-white"
value={inputMessage}
onChange={(e) => setInputMessage(e.target.value)}
onKeyDown={sendMessage}
/>
</div>
</div>
</MainWrapperContent>
);
};
export default Room;
"use client";

import { MainWrapperContent } from "@/app/_components/layouts/MainWrpperContent";
import Link from "next/link";
import { useEffect, useState } from "react";

type Room = {
  name: string;
  room_id: string;
};

type Response = {
  statusCode: number;
  body: string;
};

const Rooms = () => {
  const [rooms, setRooms] = useState<Room[]>([]);

  useEffect(() => {
    const getAllRooms = async () => {
      const res = await fetch(
        "https://pdw8ldywkc.execute-api.ap-northeast-1.amazonaws.com/production"
      );

      const resJson: Response = await res.json();

      setRooms(JSON.parse(resJson.body).rooms);
      console.log(JSON.parse(resJson.body).rooms);
    };

    getAllRooms();
  }, []);

  return (
    <MainWrapperContent>
      <div className="py-24">
        <h1 className="text-center text-6xl">Rooms</h1>
      </div>
      <ul className="flex flex-wrap align-center justify-around">
        {rooms.map((room, index) => {
          return (
            <li
              key={index}
              className="w-1/4 my-2 px-2 border-l-4 border-lime-500"
            >
              <Link
                href={`/pages/room?roomId=${room.room_id}&roomName=${room.name}`}
              >
                {room.name}
              </Link>
            </li>
          );
        })}
      </ul>
    </MainWrapperContent>
  );
};

export default Rooms;

