最近UnityでNative連携をしたのですが、結構はまったのでやり方を記しておきます。
既存の記事は古いものだったり、Swift3対応してなかったり、Unity側の関数をよんでなかったりしたので、一通り汎用でつかえそうなものとして残しておきます。
Native側の関数を呼び出すだけなら簡単なのですが、そこからデータを受け取ったりするのは結構やっかいです。
今回作成したアプリはGitHubにあげてあります。
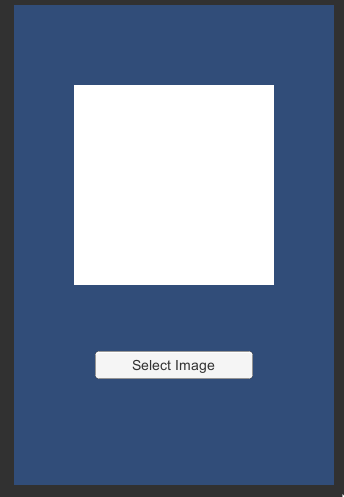
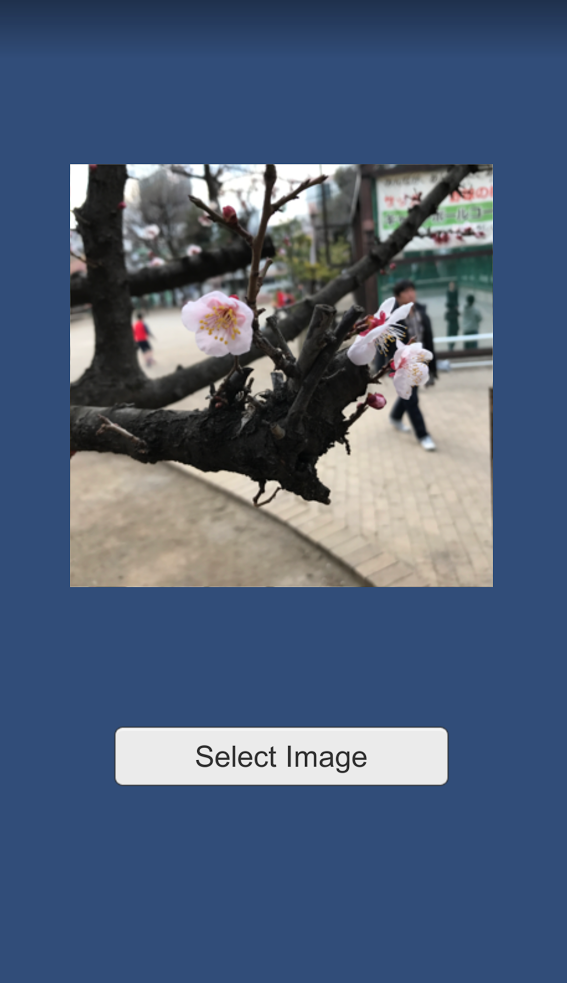
作りたいサンプルアプリ
題材として、カメラロールから画像を取得し、UnityのuGUIを使ってその画像を表示します。
作り終わったものはgithubに公開しています。
環境
- Unity: 5.5.1f1
- Xcode: 8.2.1
- Swift: 3.0.2
- Android Studio: 2.3
- Java: 1.8
Unityアプリの作成
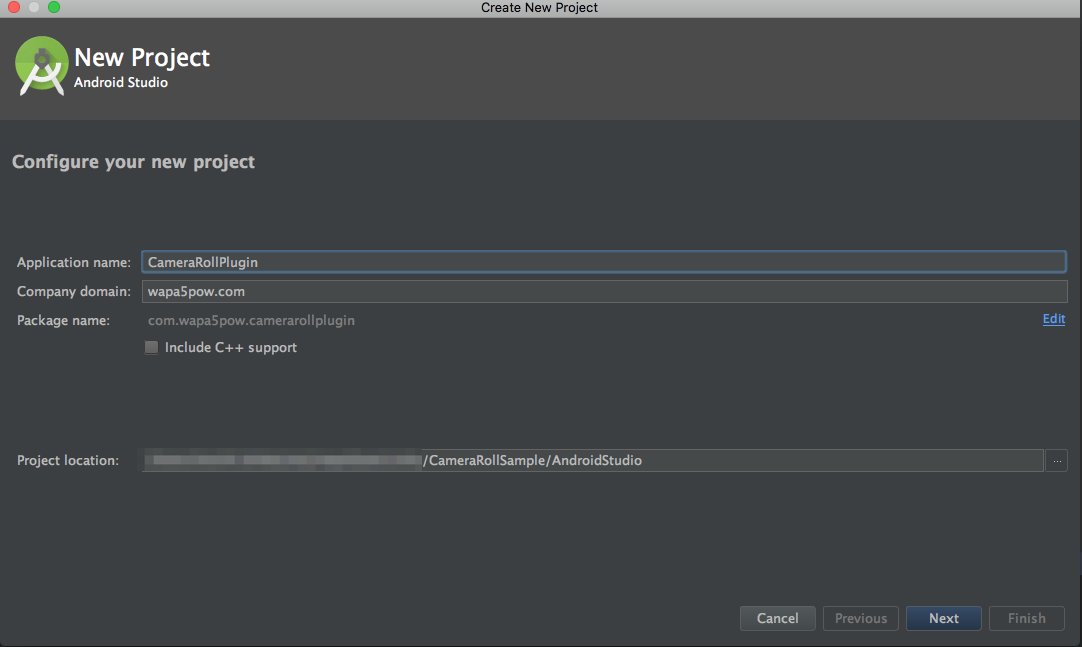
New ProjectでCameraRollSampleというプロジェクトを作成します。
この時点でのgithubはunity-uiというタグがついています。
iOS側の実装
注意1: ビルドしてうまくいかないときは、いっかいCleanしてからビルドしてください。
注意2: Unity側のC#のソースは実際にGitHub側から確認してください。
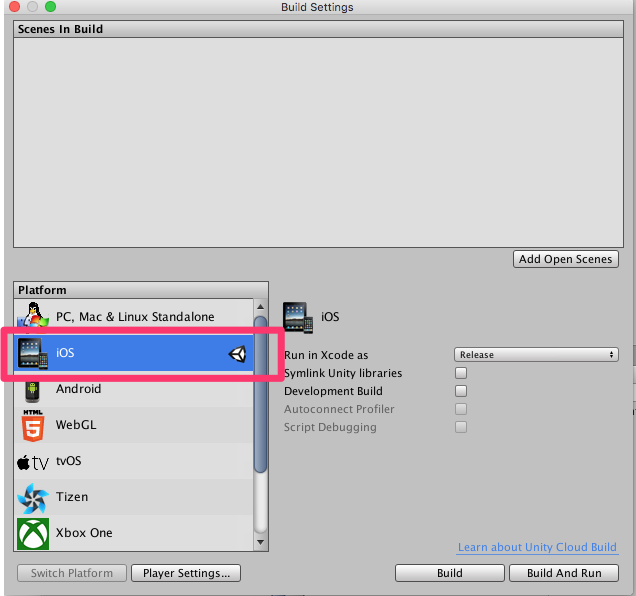
iOSのビルド設定にしてひとまずビルドしてみます。Build Identifierを適宜なおします。
ビルド先はBuilds/ios以下にします。なお、Xcode側でビルドした際に、Convert to Current Swift Syntaxとでるので、Convertとして先に進めます。
正しくビルドされました。つぎにiOS側でカメラロールを呼び出すために以下のコードをPlugins/iOS以下に足してからビルドします。
CameraRollViewController.swift
import UIKit

public class CameraRollViewController: UIViewController, UINavigationControllerDelegate, UIImagePickerControllerDelegate {

    static var filePath = "";

    public func open(_ path: String) {
        CameraRollViewController.filePath = path
        if UIImagePickerController.isSourceTypeAvailable(UIImagePickerControllerSourceType.photoLibrary) {

            let picker = UIImagePickerController()
            picker.delegate = self
            picker.sourceType = UIImagePickerControllerSourceType.photoLibrary

            self.present(picker, animated: true, completion: nil)
        }
    }

    public func imagePickerController(_ picker: UIImagePickerController, didFinishPickingMediaWithInfo info: [String : Any]) {
        if let pickedImage = info[UIImagePickerControllerOriginalImage] as? UIImage {
            var resizedImage = fixOrientation(image: pickedImage)
            resizedImage = crop(image: resizedImage)
            resizedImage = resize(image: resizedImage, newSize: CGSize(width: 341, height: 341))
            let imageData = UIImagePNGRepresentation(resizedImage)
            let fileUrl = URL(fileURLWithPath: CameraRollViewController.filePath)
            do {
                try imageData!.write(to: fileUrl, options: .atomic)
                UnitySendMessage("GameController", "SetImage", CameraRollViewController.filePath);
            } catch {
                print(error)
            }
        }
        picker.dismiss(animated: true, completion: nil)
    }

    // 縦にとると横で保存されているのでオリエンテーションを修正する
    func fixOrientation(image: UIImage) -> UIImage {
        if (image.imageOrientation == UIImageOrientation.up) {
            return image;
        }

        UIGraphicsBeginImageContextWithOptions(image.size, false, image.scale);
        let rect = CGRect(x: 0, y: 0, width: image.size.width, height: image.size.height)
        image.draw(in: rect)

        let normalizedImage : UIImage = UIGraphicsGetImageFromCurrentImageContext()!
        UIGraphicsEndImageContext();
        return normalizedImage;
    }

    private func crop(image: UIImage) -> UIImage {
        let newCropLength: CGFloat = min(image.size.width, image.size.height)
        let x = image.size.width / 2.0 - newCropLength / 2.0;
        let y = image.size.height / 2.0 - newCropLength / 2.0;

        let cropRect = CGRect(x: x, y: y, width: newCropLength, height: newCropLength)
        let imageRef = image.cgImage!.cropping(to: cropRect)
        let cropped : UIImage = UIImage(cgImage: imageRef!, scale: 0, orientation: image.imageOrientation)

        return cropped
    }

    private func resize(image: UIImage, newSize: CGSize) -> UIImage {
        let widthRatio = newSize.width / image.size.width
        let heightRatio = newSize.height / image.size.height
        let ratio = (widthRatio < heightRatio) ? widthRatio : heightRatio
        let resizedSize = CGSize(width: (image.size.width * ratio), height: (image.size.height * ratio))
        UIGraphicsBeginImageContext(resizedSize)
        image.draw(in: CGRect(x: 0, y: 0, width: resizedSize.width, height: resizedSize.height))
        let resizedImage = UIGraphicsGetImageFromCurrentImageContext()
        UIGraphicsEndImageContext()
        return resizedImage!
    }
}
UnitySwift-Bridging-Header.h
# import <Foundation/Foundation.h>
# import <UIKit/UIKit.h>
# import "UnityInterface.h"
CameraRollViewControllerPlugin.mm
# import <CameraRollSample-Swift.h>

extern "C" {
    void OpenCameraRoll(const char *path) {
        CameraRollViewController *cameraRollViewController = [CameraRollViewController new];

        [UnityGetGLViewController() addChildViewController:cameraRollViewController];
        [cameraRollViewController open:[NSString stringWithUTF8String:path]];
    }
}
なお、上記のCameraRollSample-Swift.hはObjective-C Generated Interface Header Nameの値にします。

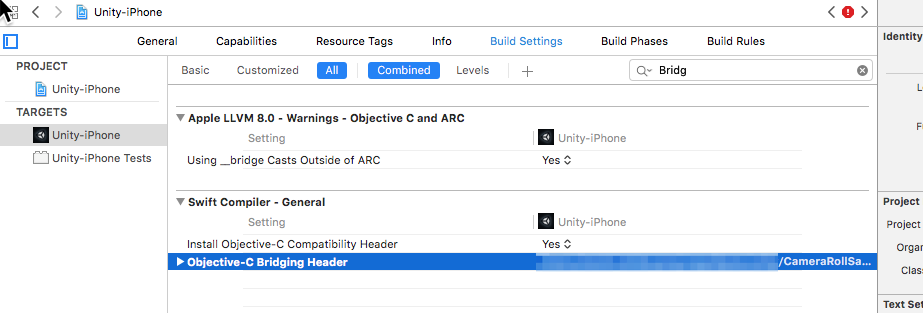
この時点でビルドすると、.../CameraRollSample/Builds/ios/Libraries/Plugins/iOS/CameraRollViewController.swift:28:17: Use of unresolved identifier 'UnitySendMessage'というエラーがでるので以下のように、設定する。

以下のようにBridging Headerに$(SRCROOT)/Libraries/Plugins/iOS/UnitySwift-Bridging-Header.hを設定。
つぎに、Runpath Search Pathsを設定します。@executable_path/Frameworksを入れます。

この時点でビルドはできますが、実行した時点で、Privacy設定がうまくいっていないのでボタンを押した際にクラッシュします。
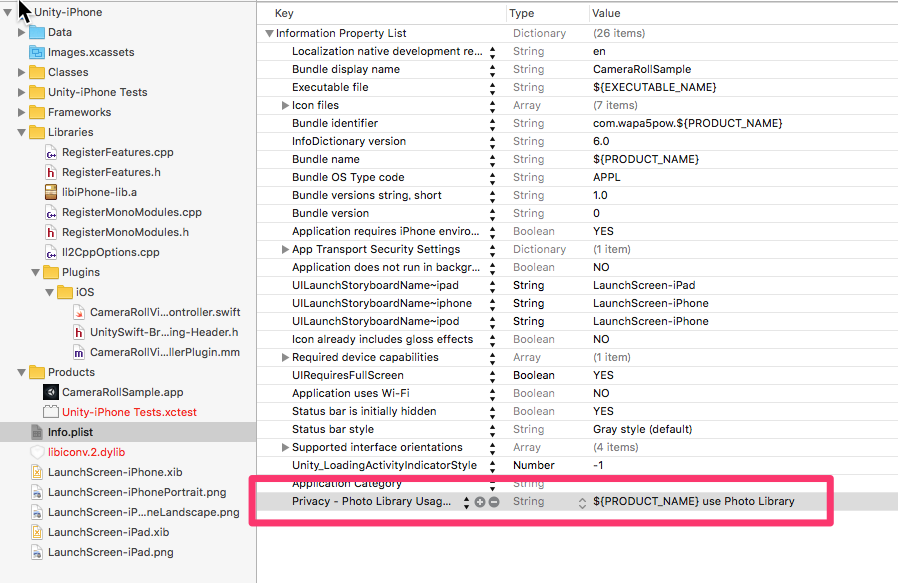
Info.plistにPrivacy - Photo Library Usage Descriptionを以下のように追加します。文言は自由にしてください。
うまくできました。今回のコードは、ios-camera-rollというタグがついて、GitHubにあげてあります。
Xcode側で、Swiftのコードなどを修正して、Unity側にプラグインに反映させたいときは以下のようにコピーすればいいかなと思います。
cp Builds/ios/Libraries/Plugins/iOS/* Assets/Plugins/iOS/
Android側の実装
注意: Unity側のC#のソースは実際にGitHub側から確認してください。
iOSのときは、ソースコードをUnityプロジェクトに配置すればいけましたが、Androidでは、AndroidStudioでプロジェクトをつくってそこで、AAR形式のアーカイブにしてからUnityに配置し、ビルドする形になります。
まずUnity側のビルド設定をAndroidにします。その後、ビルドして実際にAPKがAndroid端末に入るかどうか確かめます。なお、Minimum API Levelは14 (Android 4.0)にしました。この時点で統計によると、97.4%のようなので。
つぎに、AndroidStudioでプロジェクトを作ります。プロジェクトの作成場所は、任意ですが、今回は、Assetsと同じ位置に、AndroidStudioというフォルダ名で作成します。以下の設定以外はデフォルトでいきます。
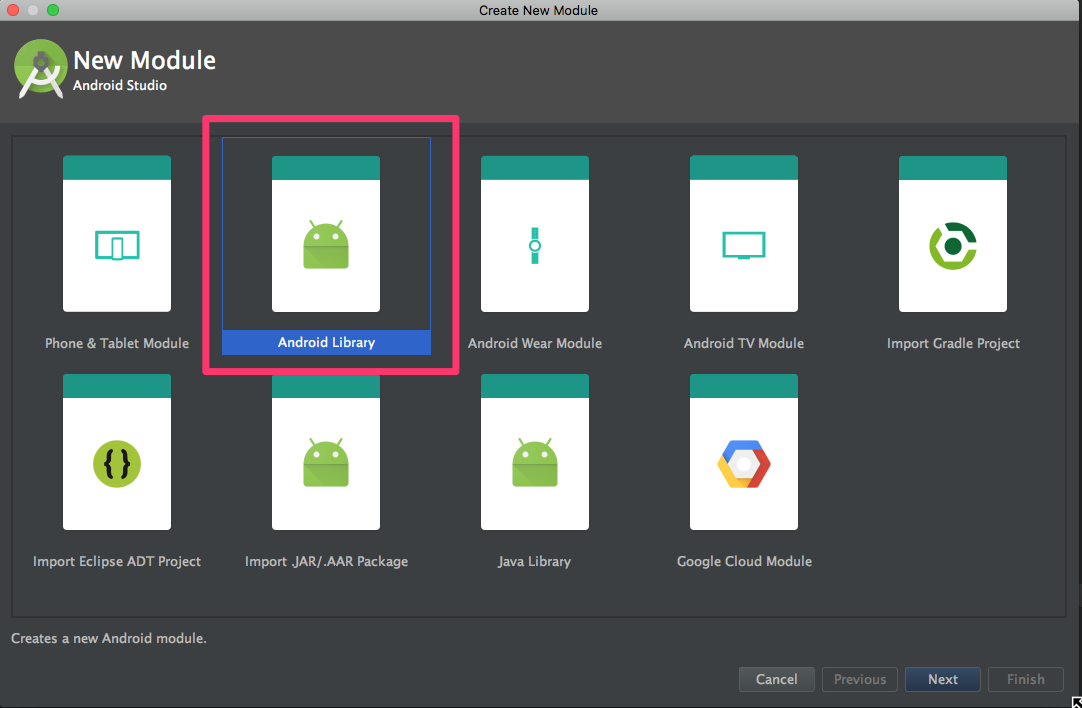
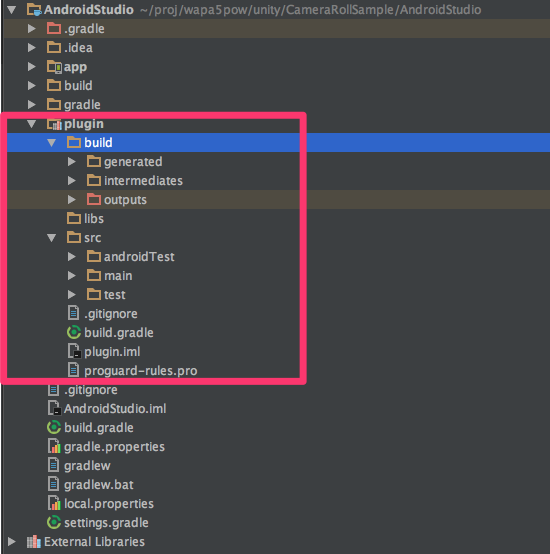
つぎに、AndroidStudio上でFile => New => Moduleで、Android Libraryを作ります。
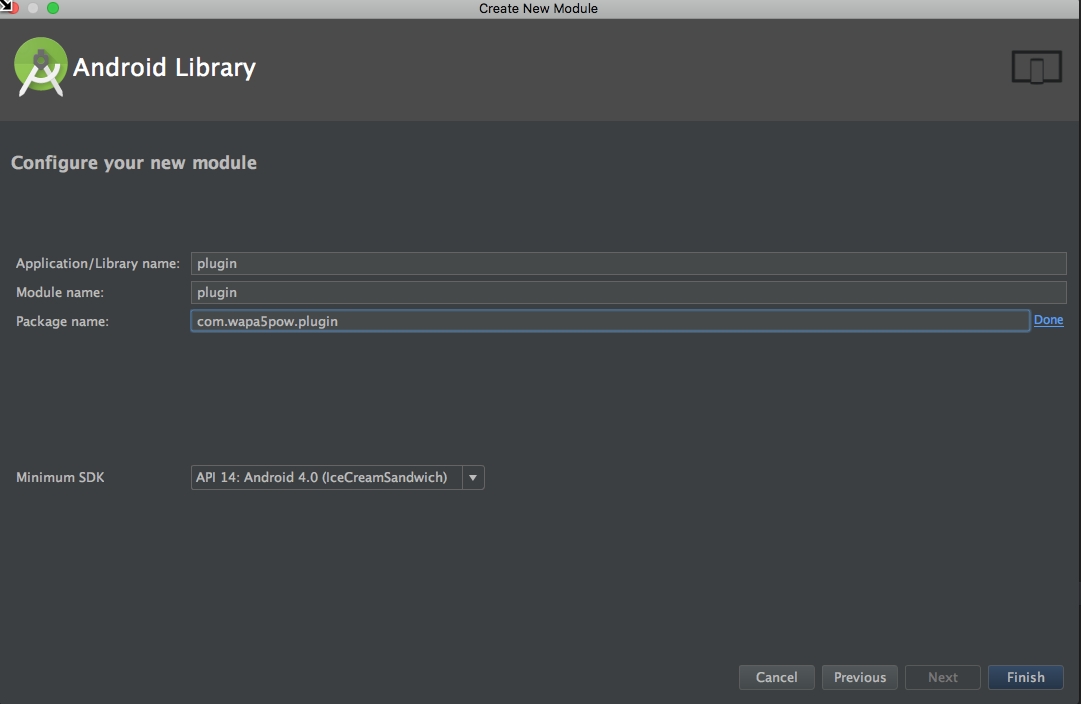
以下のようにprojectができます。appはいらないのでFile => Project Structure でModulesのappをマイナスボタンで削除しておきます。
つぎにUnityのclasses.jarをlibsフォルダに配置します。Unityのバージョンによっては元ファイルの場所が違うかもしれません。
cp /Applications/Unity/PlaybackEngines/AndroidPlayer/Variations/mono/Release/Classes/classes.jar AndroidStudio/plugin/libs/
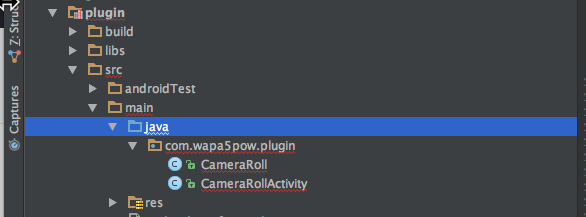
CameraRoll.javaとCameraRollActivity.javaを以下のように配置します。ソースコードはGitHubを参考にしてください。
plugin/build.gradleに以下を追加します。exportAarを実行すると、UnityのAssets/Plugins/Android以下にAndroidのjavaファイルをコンパイルしたAARファイルが配置されます。
android.libraryVariants.all { variant ->
    variant.outputs.each { output ->
        output.packageLibrary.exclude('libs/classes.jar')
    }
}

task exportAar(type: Copy, dependsOn: assemble)  {
    from './build/outputs/aar'
    into '../../Assets/Plugins/Android'
    include 'plugin-release.aar'
}
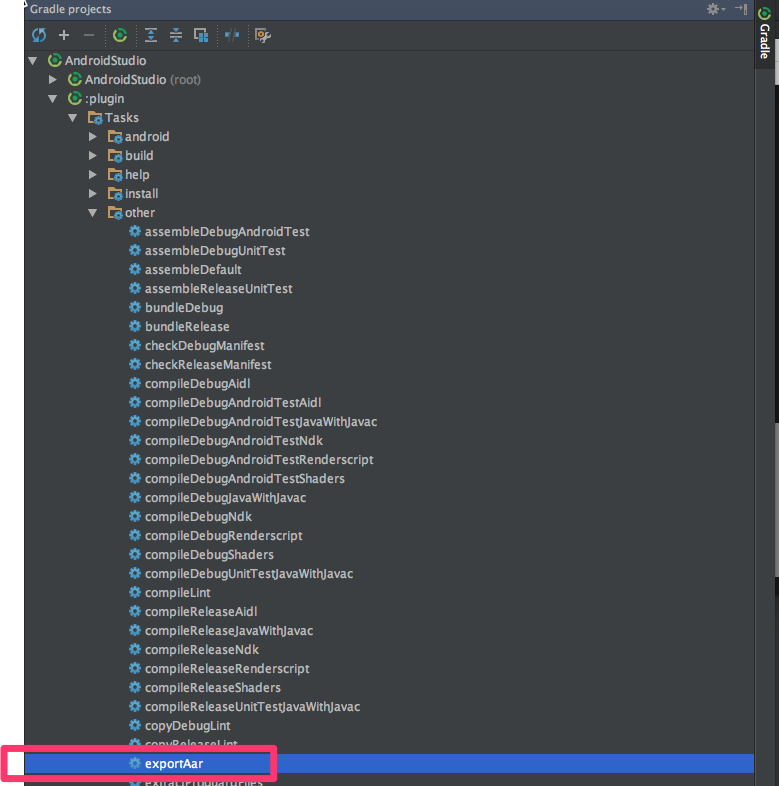
ビルドしてAARファイルをつくって、Unity側に配置するために、以下をダブルクリックします。終わったらAssets/Plugins/Android/plugin-release.aarが配置されていることを確かめます。
javaのコードで、Activityを新規追加したので、AndroidManifest.xmlに追加する必要があります。
cp /Applications/Unity//PlaybackEngines/AndroidPlayer/Apk/AndroidManifest.xml Assets/Plugins/Android/でUnityのデフォルトのAndroidManifest.xmlをコピーしたら以下のように追記します。
<manifest
    xmlns:android="http://schemas.android.com/apk/res/android"
    package="com.unity3d.player"
    xmlns:tools="http://schemas.android.com/tools"
    android:installLocation="preferExternal"
    android:versionCode="1"
    android:versionName="1.0">
    <supports-screens
        android:smallScreens="true"
        android:normalScreens="true"
        android:largeScreens="true"
        android:xlargeScreens="true"
        android:anyDensity="true"/>

    <application
        android:theme="@style/UnityThemeSelector"
        android:icon="@drawable/app_icon"
        android:label="@string/app_name"
        android:debuggable="true">
        <activity android:name="com.unity3d.player.UnityPlayerActivity"
                  android:label="@string/app_name">
            <intent-filter>
                <action android:name="android.intent.action.MAIN" />
                <category android:name="android.intent.category.LAUNCHER" />
            </intent-filter>
            <meta-data android:name="unityplayer.UnityActivity" android:value="true" />
        </activity>

        <!-- 追記部分 -->
        <activity android:name="com.wapa5pow.plugin.CameraRollActivity"
                  android:label="CameraRollActivity"
                  android:configChanges="keyboard|keyboardHidden|orientation">
        </activity>

    </application>
</manifest>
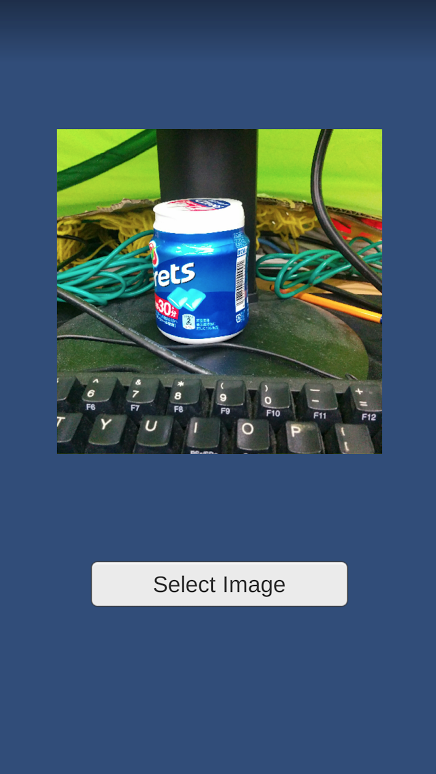
C#部分は、GitHubをみてください。ビルドして実機で試したら以下のように画像取得できました。
今回のコードは、android-camera-rollというタグがついて、GitHubにあげてあります。
まとめ
UnityのNative Plugin開発で結構つまずいたのでまとめたものを記しました。
Unityのバージョンがあがったり、Swiftのバージョンがあがっても、できるだけ追従していきたいと思います。