この記事はこれの続きです
概要
前回までは SpringBootが用意してくれる『user』という名前の固定ユーザーでしかログインできない というシステムでした。
そこから
- ユーザーIDとパスワードは独自の台帳を用意。
- ログインしたあとの画面ではユーザー名表示。
と変更していきます。
また、簡易サンプルのため、ユーザー台帳はデータベースを使わずハードコーディングします。
UserDetailsServiceを実装したクラスを新規作成
NekoUserDetailsService.java
package com.example.demo;


import org.springframework.security.core.userdetails.User;
import org.springframework.security.core.userdetails.UserDetails;
import org.springframework.security.core.userdetails.UserDetailsService;
import org.springframework.security.core.userdetails.UsernameNotFoundException;
import org.springframework.stereotype.Service;


@Service
public class NekoUserDetailsService implements UserDetailsService {


	@Override
    public UserDetails loadUserByUsername(String username) throws UsernameNotFoundException {


		//超簡易なサンプルのためユーザー台帳はデータベースなどに持たず、
		//あえてif文で実装しています。
        if (username.equals("user-1")) {

        	//超簡易なサンプルのためパスワードには『{noop}』を付けて
        	//あえて暗号化せず平文で処理しています。
        	//このユーザーでログインする時はパスワードには『usernopass-1』を入力します。
        	return User.withUsername("user-1").password("{noop}usernopass-1").build();

        } else if (username.equals("user-2")) {

        	return User.withUsername("user-2").password("{noop}usernopass-2").build();

        } else if (username.equals("admin")) {

        	return User.withUsername("admin").password("{noop}adminnopass").build();

        } else {

            throw new UsernameNotFoundException(username + "とかそんな名前のユーザーはいないが。");

        }


    }


}
ログイン成功時のController変更
LoginSuccessController.java
package com.example.demo;


import org.springframework.security.core.Authentication;
import org.springframework.security.core.context.SecurityContextHolder;
import org.springframework.stereotype.Controller;
import org.springframework.ui.Model;
import org.springframework.web.bind.annotation.GetMapping;


@Controller
public final class LoginSuccessController {


	@GetMapping("/login-success")
	public final String main(Model model) throws Exception {

		Authentication auth_ = SecurityContextHolder.getContext().getAuthentication();
		model.addAttribute("userName", auth_.getName());

		return "/login-success";

	}


}
ログイン成功画面のhtml変更
login-success.html
<!DOCTYPE html>
<html lang="ja" xmlns:th="http://www.thymeleaf.org" xmlns:sec="http://www.thymeleaf.org/thymeleaf-extras-springsecurity4">
<body>
	<h1>login-success</h1>

	<div th:text="${userName}"></div>

	<form th:action="@{/logout}" method="POST">
		<!-- aタグのリンクだとクロスサイトリクエストフォージェリー対策のhiddenパラメータが送られず、セッション破棄されないので注意 -->
		<button type="submit" value="go">ログアウト</button>
	</form>

</body>
</html>
動作
まずSpringBoot起動時に「パスワードはこの固定値使ってね」的なログが出なくなります。
『user』という名前でログインもできなくなります。
『admin』という名前のユーザーでログイン成功したら下記。

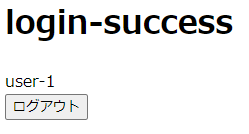
『user-1』という名前のユーザーでログイン成功したら下記。
最終的にこう
赤枠が追加 or 変更になったものです。

この記事の続き
参考サイトさん
バージョン
Microsoft Windows [Version 10.0.22631.3527]
JAVA 17.0.10
Spring Boot v3.1.11