前回の記事でMatterデバイス(接触センサー)を作成しました。
続いて、一つのデバイス(ESP32)に複数のエンドポイントがあるデバイスを作成します。
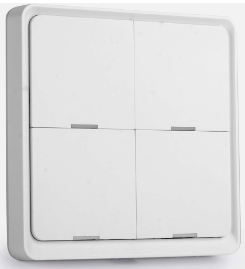
イメージとしては例えばこのような4gangなスイッチを1台のESP32で制御する感じです。
Alexaで使う場合うまく動かない?
Yacubane氏のリポジトリにTwoEndpointsPluginUnitという、単純にスマートプラグのEndpointを2つ乗せるサンプルがあります。
HomeKitから使う場合であれば、このサンプル通りで問題ありません。
しかしながら、2023年10月現在ではAlexaから使う場合はこのままではEndpoint1しか認識されない仕様のようで、もう一つのスマートプラグが認識されません。
Matterの仕様的には単純な N Endpoints / 1 Deviceで問題無い様に読めるので、今後AlexaのMatter対応が更新されれば変わるかもしれません。
実現方法
ところで、スマートホーム大好きな皆様ならご存知のMatter対応スマートリモコンであるSwitchbot Hub 2やNature remo nanoは物理的には一個のデバイスなのにAlexaからはエアコン、照明、テレビなど複数デバイスとして認識できています。
これはどうやって実装しているのでしょうか?
Nature開発チームの方のブログを読むと、AggregatorというDevice Type、Bridgged NodeというClusterが鍵を握っているようです。
本来、Matter⇔赤外線、Matter⇔BLEのようにブリッジするデバイス向けのようですが悪用(?)します。
コード
それではコードです。
#include "Matter.h"
#include <app/server/OnboardingCodesUtil.h>
#include <credentials/examples/DeviceAttestationCredsExample.h>
using namespace chip;
using namespace chip::app::Clusters;
using namespace esp_matter;
using namespace esp_matter::endpoint;

#define CONTACT_SENSOR_STATE_OPEN false
#define CONTACT_SENSOR_STATE_CLOSE true

/**
 *  The original sample code was made by Yacubane.
 *  https://github.com/Yacubane/esp32-arduino-matter/tree/master
 **/

// XIAO ESP32C3のBOOTボタンはGPIO9、devkit-CなどはGPIO0を使用する
const int TOGGLE_BUTTON_PIN = 9;

// Debounce for toggle button
const int DEBOUNCE_DELAY = 500;
int last_toggle;

// 接触センサのクラスターIDと接触状態のアトリビュートID
const uint32_t CLUSTER_ID = BooleanState::Id;
const uint32_t ATTRIBUTE_ID = BooleanState::Attributes::StateValue::Id;

// セットアップ後から操作する用のエンドポイントIDとアトリビュート
uint16_t contact_sensor_endpoint_id_1 = 0;
uint16_t contact_sensor_endpoint_id_2 = 0;
uint16_t contact_sensor_endpoint_id_3 = 0;
uint16_t contact_sensor_endpoint_id_4 = 0;

attribute_t *attribute_ref_1;
attribute_t *attribute_ref_2;
attribute_t *attribute_ref_3;
attribute_t *attribute_ref_4;

// There is possibility to listen for various device events, related for example
// to setup process. Leaved as empty for simplicity.
static void on_device_event(const ChipDeviceEvent *event, intptr_t arg) {}
static esp_err_t on_identification(identification::callback_type_t type,
                                   uint16_t endpoint_id, uint8_t effect_id,
                                   uint8_t effect_variant, void *priv_data) {
  return ESP_OK;
}

// Listener on attribute update requests.
// In this example, when update is requested, path (endpoint, cluster and attribute) is checked
static esp_err_t on_attribute_update(attribute::callback_type_t type,
                                     uint16_t endpoint_id, uint32_t cluster_id,
                                     uint32_t attribute_id,
                                     esp_matter_attr_val_t *val,
                                     void *priv_data) {
  if (type == attribute::PRE_UPDATE && cluster_id == CLUSTER_ID && attribute_id == ATTRIBUTE_ID) {
    // センサーは外部から操作できないので何もしない
  }
  return ESP_OK;
}
void setup() {
  Serial.begin(115200);
  pinMode(TOGGLE_BUTTON_PIN, INPUT);

  // Enable debug logging
  esp_log_level_set("*", ESP_LOG_INFO);

  // Matterノードの設定、デバイス名の設定
  node::config_t node_config;
  snprintf(node_config.root_node.basic_information.node_label, sizeof(node_config.root_node.basic_information.node_label), "ESP32 Multi Endpoint Sample");
  node_t *node = node::create(&node_config, on_attribute_update, on_identification);

  // 接触センサのendpoint / cluster / attributesをデフォルト値でセットアップ
  // 接触センサのRequirement clusterはidentifyとboolean_state
  contact_sensor::config_t contact_sensor_config;
  contact_sensor_config.boolean_state.state_value = CONTACT_SENSOR_STATE_OPEN; //センサ認識状態の初期値は開にする
  contact_sensor_config.identify.cluster_revision = 4; //Matter仕様書1.0での最新リビジョンは4
  contact_sensor_config.identify.identify_time = 0;
  contact_sensor_config.identify.identify_type = 0x02; //LEDインジケータでの識別

  // 複数台のエンドポイント(接触センサ)を一台のESP32に乗せるので、ブリッジにぶら下げる構成にする。
  // ぶら下がるエンドポイントにはbridged_node clusterを乗せる必要がある
  bridged_node::config_t bridged_node_config;
  bridged_node_config.bridged_device_basic_information.cluster_revision = 1;
  bridged_node_config.bridged_device_basic_information.reachable = true;

  //ブリッジ(Aggregator)のエンドポイントを作成
  endpoint_t *endpoint_1 = aggregator::create(node, ENDPOINT_FLAG_NONE, NULL);

  //ブリッジにぶら下がる4つの接触センサのエンドポイントを作成して、bridged_nodeとcontact_sensorの2種類のclusterを乗せる
  endpoint_t *endpoint_2 = bridged_node::create(node, &bridged_node_config, ENDPOINT_FLAG_NONE, NULL);
  contact_sensor::add(endpoint_2, &contact_sensor_config);
  endpoint_t *endpoint_3 = bridged_node::create(node, &bridged_node_config, ENDPOINT_FLAG_NONE, NULL);
  contact_sensor::add(endpoint_3, &contact_sensor_config);
  endpoint_t *endpoint_4 = bridged_node::create(node, &bridged_node_config, ENDPOINT_FLAG_NONE, NULL);
  contact_sensor::add(endpoint_4, &contact_sensor_config);
  endpoint_t *endpoint_5 = bridged_node::create(node, &bridged_node_config, ENDPOINT_FLAG_NONE, NULL);
  contact_sensor::add(endpoint_5, &contact_sensor_config);

  //接触センサのエンドポイントにデバイス名をつける
  //これにより、アレクサアプリでデバイス登録したときにデフォルト名が設定される
  //実際のブリッジデバイスでは動的に命名すると思うが、今回は固定なので…cluster::bridged_device_basic_information::attribute::create_node_label(cluster::get(endpoint_2, BridgedDeviceBasicInformation::Id), "ESP32 DIY Contact Sensor 1", strlen("ESP32 DIY Contact Sensor 1"));
  cluster::bridged_device_basic_information::attribute::create_node_label(cluster::get(endpoint_3, BridgedDeviceBasicInformation::Id), "ESP32 DIY Contact Sensor 2", strlen("ESP32 DIY Contact Sensor 2"));
  cluster::bridged_device_basic_information::attribute::create_node_label(cluster::get(endpoint_4, BridgedDeviceBasicInformation::Id), "ESP32 DIY Contact Sensor 3", strlen("ESP32 DIY Contact Sensor 3"));
  cluster::bridged_device_basic_information::attribute::create_node_label(cluster::get(endpoint_5, BridgedDeviceBasicInformation::Id), "ESP32 DIY Contact Sensor 4", strlen("ESP32 DIY Contact Sensor 4"));

  //接触センサのエンドポイントをブリッジに紐付ける
  set_parent_endpoint(endpoint_2, endpoint_1);
  set_parent_endpoint(endpoint_3, endpoint_1);
  set_parent_endpoint(endpoint_4, endpoint_1);
  set_parent_endpoint(endpoint_5, endpoint_1);

  // センサ状態のアトリビュートを取得
  attribute_ref_1 = attribute::get(cluster::get(endpoint_2, CLUSTER_ID), ATTRIBUTE_ID);
  attribute_ref_2 = attribute::get(cluster::get(endpoint_3, CLUSTER_ID), ATTRIBUTE_ID);
  attribute_ref_3 = attribute::get(cluster::get(endpoint_4, CLUSTER_ID), ATTRIBUTE_ID);
  attribute_ref_4 = attribute::get(cluster::get(endpoint_5, CLUSTER_ID), ATTRIBUTE_ID);

  // 接触センサのエンドポイントの各IDを取得
  contact_sensor_endpoint_id_1 = endpoint::get_id(endpoint_2);
  contact_sensor_endpoint_id_2 = endpoint::get_id(endpoint_3);
  contact_sensor_endpoint_id_3 = endpoint::get_id(endpoint_4);
  contact_sensor_endpoint_id_4 = endpoint::get_id(endpoint_5);

  // Setup DAC (this is good place to also set custom commission data, passcodes etc.)
  esp_matter::set_custom_dac_provider(chip::Credentials::Examples::GetExampleDACProvider());

  // Start Matter device
  esp_matter::start(on_device_event);

  // Print codes needed to setup Matter device
  PrintOnboardingCodes(chip::RendezvousInformationFlags(chip::RendezvousInformationFlag::kBLE));
}

// 接触センサの状態を取得
  esp_matter_attr_val_t get_boolean_attribute_value(esp_matter::attribute_t *att_ref) {
  esp_matter_attr_val_t boolean_value = esp_matter_invalid(NULL);
  attribute::get_val(att_ref, &boolean_value);
  return boolean_value;
}

// 接触センサの状態をセット
void set_boolean_attribute_value(esp_matter_attr_val_t *boolean_value, uint16_t endpoint_id) {
  attribute::update(endpoint_id, CLUSTER_ID, ATTRIBUTE_ID, boolean_value);
}

void loop() {
  // ボタンでセンサ1をトグル
  if ((millis() - last_toggle) > DEBOUNCE_DELAY) {
    if (digitalRead(TOGGLE_BUTTON_PIN) == LOW) {
      last_toggle = millis();

      // 接触センサの状態を取得、反転してセット
      esp_matter_attr_val_t contact_value_1 = get_boolean_attribute_value(attribute_ref_1);
      contact_value_1.val.b = !contact_value_1.val.b;
      Serial.print("contact_state1 : ");
      Serial.println(contact_value_1.val.b);
      set_boolean_attribute_value(&contact_value_1, contact_sensor_endpoint_id_1);
    }
  }

  //シリアルで'2,3,4'受信時に各センサをトグル
  if(Serial.available() > 0)
  {
    char buf = Serial.read();
    if(buf == '2')
    {
      esp_matter_attr_val_t contact_value_2 = get_boolean_attribute_value(attribute_ref_2);
      contact_value_2.val.b = !contact_value_2.val.b;
      Serial.print("contact_state2 : ");
      Serial.println(contact_value_2.val.b);
      set_boolean_attribute_value(&contact_value_2, contact_sensor_endpoint_id_2);
    }
    else if(buf == '3')
    {
      esp_matter_attr_val_t contact_value_3 = get_boolean_attribute_value(attribute_ref_3);
      contact_value_3.val.b = !contact_value_3.val.b;
      Serial.print("contact_state3 : ");
      Serial.println(contact_value_3.val.b);
      set_boolean_attribute_value(&contact_value_3, contact_sensor_endpoint_id_3);
    }
    else if(buf == '4')
    {
      esp_matter_attr_val_t contact_value_4 = get_boolean_attribute_value(attribute_ref_4);
      contact_value_4.val.b = !contact_value_4.val.b;
      Serial.print("contact_state4 : ");
      Serial.println(contact_value_4.val.b);
      set_boolean_attribute_value(&contact_value_4, contact_sensor_endpoint_id_4);
    }

    //シリアルバッファが空になるまでread
    while(Serial.available() > 0)
    {
      Serial.read();
    }
  }
}
動作
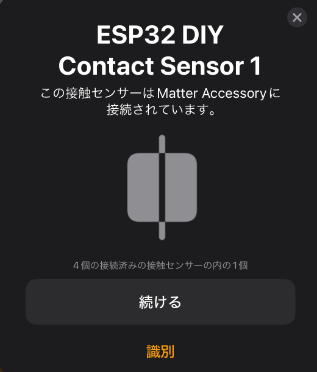
前回の記事同様、QRコードまたはペアリングコードを使用してAlexaかHomeKitへ登録します。

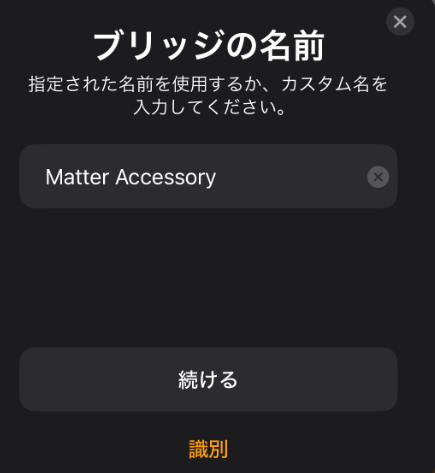
接触センサ4台 + ブリッジ1台の合計5台のデバイスが追加されるはずです。
BOOTボタンでContact Sensort1がトグルされます。
残りの2~4はシリアル通信で2~4を送信するとトグルされます。
2~4に実際にボタンを割り当てるもよし、別のセンサなどを割り当てるのも良しでしょう。
余談1 : Endpoint数の制約
Matterはローカルで動作させる分、メモリをそれなりに要求されるようです。
上記サンプルでは合計5 Endpointで動作していますが、増やしすぎると動作しなくなります。
搭載しているClusterにもよるのかもしれませんが4~6 Endpoints / 1 Deviceが限界のように思えます。
そういえばSwitchbot hub 2の登録台数上限が6個らしいのでこれも同じ理由なのかもしれません。
余談2 : HomeKitでのデバイス名について
HomeKitではnode_config.root_node.basic_information.node_labelに設定してもHomeKit認証を取らないと強制的にMatter Accessoryになるようです。
一方でBriddged deviceは反映されます。