Matter版の接触センサデバイスがほしい
以前、Rainmakerというサービスを使って仮想接触センサを自作、Alexaの定型アクションをトリガーする記事を書きました。
今回はRainmakerを使わずに最近話題のMatterで作成します。
解説箇所が多いので、さっとデバイスだけ作りたい人はコードのところまで飛ばしてください。
Matterだと何が嬉しい?
個人的に最大のメリットがMatterデバイスはローカルで完結できることです。
前の記事で言うと、もしRainmakerのサーバが気絶してしまうとデバイスは目の前にあるのに動かなくなってしまいます。
また、クラウド経由の分、センサの状態変化→Alexaへの通知に遅延が発生します。
窓やドアが開いてるかどうかを知りたいだけであれば遅延の影響は少ないですが、窓が開いた瞬間に連動して何かしたい、スイッチ代わりにしたいなどのケースでは遅延が致命的です。
というより接触センサは前者のユースケースが想定されているのでバッテリー持ちを優先させてポーリング間隔が長い(=レスポンスが遅い)モノが大半です。
あるいはAlexaスキルの開発が大変、中国系サーバーをなるべく使いたくないという方にもメリットがあるかと思います。
ちなみに
なぜ接触センサーに拘るかと言うと、Alexaの定型アクションをトリガーできる数少ない存在だからです。(上記記事参照)
一方でMatterにはON/Off SwitchやGeneric Switchというデバイスタイプが用意されています。
今後、Alexaのmatter対応が進めば、これでもトリガーできる様になるかもしれません。
2025/3/2追記
AlexaがGeneric Switchデバイスタイプに対応したのでこちらでもトリガー出来ます。
Node? Endpoint? Cluster? Attribute?
Matterデバイスを構成する要素としてNode、Endpoint、Cluster、Attributeがあります。
この記事では解説は割愛しますが、Nature Remoの開発者の方がまとめてくださっている内容が日本語でわかりやすいのでこちらをおすすめします。
Requirement Clusterについて
MatterデバイスとしてAlexaから認識されるためにはEndpointにRequirement Clusterが全て搭載されている必要があります。
ではRequirement Clusterはどこに書いてあるかというと、もちろん仕様書です。
DIY Smart Matterさんの記事を参考にpdfを手に入れます。
Matter 1.0 Device Library Specification 7.1より引用
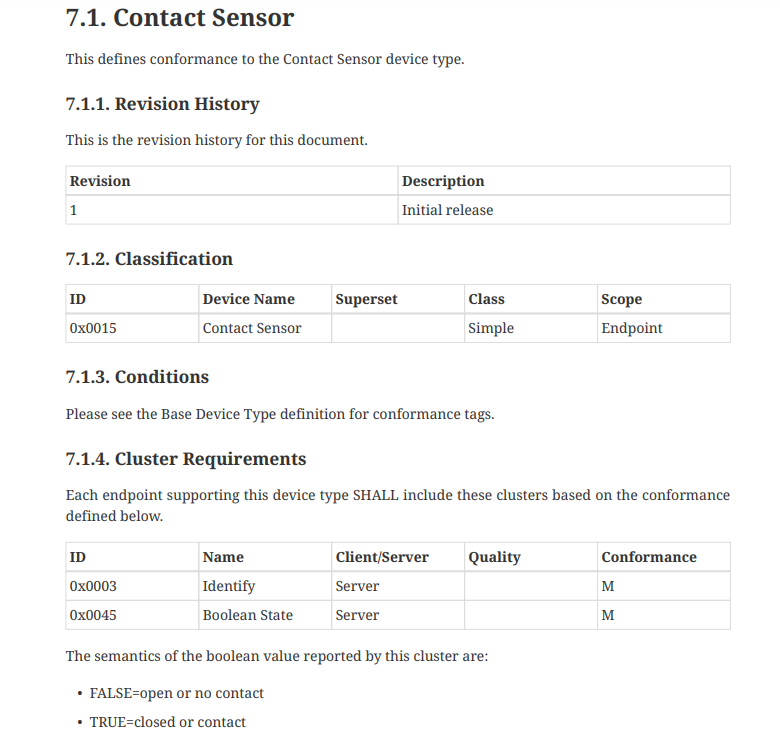
これを読むとContact Sensorに必要なのはIdentify ClusterとBoolean State Clusterだということがわかります。
なおHomeKitからはClusterが不足していても(Boolean State Clusterしか無くても)認識してもらえます
Boolean State Clusterはそのまま接触センサーの開/閉状態というのが容易に想像つきますがIdentify Clusterとはなんでしょうか。
Identify Clusterとは?
仕様書を読むとデバイスの識別に使う機能のようです(たぶん)
家中のドアや窓にセンサーをばら撒いた時に、今設定してるのはどこに設置したやつ?ってならないよう、例えばLEDを点滅させてアピールする、という想定のように思えます。
アトリビュートはidentify_timeとindentify_typeの二つ。
前者は識別モードの残り時間(単位は秒)。LEDで識別するなら点滅時間。毎秒減っていくらしい。
後者はアピール方法の定義のようです。
Matter 1.0 Application Cluster Specification 1.2.5.2より引用
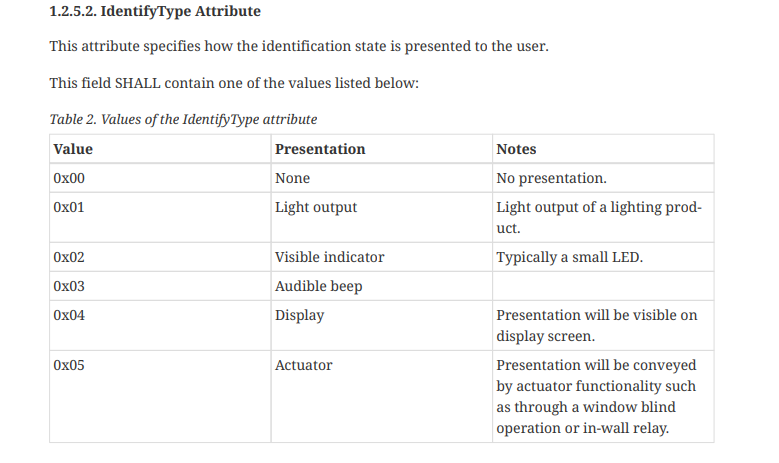
| 値 | アピール方法 |
|---|---|
| 0x00 | アピールの手段なし |
| 0x01 | 本体を光らせてアピール(電球内蔵するセンサーなどの場合) |
| 0x02 | LEDインジケータでアピール |
| 0x03 | ブザーなど音でアピール |
| 0x04 | 画面でアピール(画面付きデバイスの場合) |
| 0x05 | アクチュエータの動作でアピール(リレーやモータ付きデバイスの場合) |
といったところでしょうか。
Matter認定を通過するためにはきちんと実装しないとダメなのでしょうが、今回は自宅のみで動けばよいのでClusterだけダミーの定義して実際の識別機能は実装しません。
(そもそもAlexaアプリやホームアプリからどう操作したら識別モードに入れるのか正直わかりません)
2023/10/24追記
HomeKitはデバイス登録時のここでIdentify機能使えるようです
完全に見落としてて今気づいたけどIdentify Clusterの使い方はデバイス登録時のこれか!!! #Matter pic.twitter.com/rJbhnNYY2W
— わんこ (@wanko_in_lunch) October 24, 2023
コード
お待たせしました。それではMatter対応の接触センサのコードは以下になります。
esp-idfよりお手軽にarduinoでMatterデバイスを開発できるライブラリおよびサンプルコードを使用します。
ビルド設定やパーティション設定を弄る必要があるのでReadmeを読みましょう。
ボードはXIAO ESP32C3を使います。
Type-Cでコンパクトです。
アンテナを合わせるとM5Stampの方がフットプリント小さいですが、安いです。
#include "Matter.h"
#include <app/server/OnboardingCodesUtil.h>
#include <credentials/examples/DeviceAttestationCredsExample.h>
using namespace chip;
using namespace chip::app::Clusters;
using namespace esp_matter;
using namespace esp_matter::endpoint;

#define CONTACT_SENSOR_STATE_OPEN false
#define CONTACT_SENSOR_STATE_CLOSE true

/**
 *  The original sample code was made by Yacubane.
 *  https://github.com/Yacubane/esp32-arduino-matter/tree/master
 **/

// XIAO ESP32C3のBOOTボタンはGPIO9 devkit-CなどはGPIO0を使用する
const int TOGGLE_BUTTON_PIN = 9;

// Debounce for toggle button
const int DEBOUNCE_DELAY = 500;
int last_toggle;

// 接触センサのクラスターIDと接触状態のアトリビュートID
const uint32_t CLUSTER_ID = BooleanState::Id;
const uint32_t ATTRIBUTE_ID = BooleanState::Attributes::StateValue::Id;

// Endpoint and attribute ref that will be assigned to Matter device
uint16_t contact_sensor_endpoint_id_1 = 0;
uint16_t contact_sensor_endpoint_id_2 = 0;
attribute_t *attribute_ref_1;
attribute_t *attribute_ref_2;

// There is possibility to listen for various device events, related for example
// to setup process. Leaved as empty for simplicity.
static void on_device_event(const ChipDeviceEvent *event, intptr_t arg) {}
static esp_err_t on_identification(identification::callback_type_t type,
                                   uint16_t endpoint_id, uint8_t effect_id,
                                   uint8_t effect_variant, void *priv_data) {
  return ESP_OK;
}

// Listener on attribute update requests.
// In this example, when update is requested, path (endpoint, cluster and attribute) is checked
static esp_err_t on_attribute_update(attribute::callback_type_t type,
                                     uint16_t endpoint_id, uint32_t cluster_id,
                                     uint32_t attribute_id,
                                     esp_matter_attr_val_t *val,
                                     void *priv_data) {
  if (type == attribute::PRE_UPDATE && cluster_id == CLUSTER_ID && attribute_id == ATTRIBUTE_ID) {
    // センサーはデバイスから外部から操作できないので何もしない
  }
  return ESP_OK;
}

void setup() {
  Serial.begin(115200);
  pinMode(TOGGLE_BUTTON_PIN, INPUT);

  // デバッグレベルの設定(ただし、プリコンパイルされてるライブラリ側で設定済みのためここで変更しても反映されない)
  esp_log_level_set("*", ESP_LOG_INFO);

  // Nodeをセットアップ
  // node_labelを設定すると、Alexaでデバイスを登録した時に表示される。設定しない場合は「◯番目コンタクトセンサー」という名前になる
  // 2バイト文字はうまくいかないみたい?
  // HomeKitではHomeKit認定済みデバイス出ない場合は問答無用で「Matter Accessory」という名前で表示される
  node::config_t node_config;
  snprintf(node_config.root_node.basic_information.node_label, sizeof(node_config.root_node.basic_information.node_label), "DIY Contact Sensor");
  node_t *node_1 = node::create(&node_config, on_attribute_update, on_identification);

  // 接触センサのendpoint / cluster / attributesをデフォルト値でセットアップ
  // 接触センサのRequirement clusterはidentifyとboolean_state
  contact_sensor::config_t contact_sensor_config;
  contact_sensor_config.boolean_state.state_value = CONTACT_SENSOR_STATE_OPEN;
  contact_sensor_config.identify.cluster_revision = 4;
  contact_sensor_config.identify.identify_time = 0;
  contact_sensor_config.identify.identify_type = 0;

  // endpointを作成
  endpoint_t *endpoint_1 = contact_sensor::create(node_1, &contact_sensor_config, ENDPOINT_FLAG_NONE, NULL);

  // センサー状態のAttributeを取得
  attribute_ref_1 = attribute::get(cluster::get(endpoint_1, CLUSTER_ID), ATTRIBUTE_ID);

  // endpointのIDを取得
  contact_sensor_endpoint_id_1 = endpoint::get_id(endpoint_1);

  // Setup DAC (this is good place to also set custom commission data, passcodes etc.)
  esp_matter::set_custom_dac_provider(chip::Credentials::Examples::GetExampleDACProvider());

  // Start Matter device
  esp_matter::start(on_device_event);

  // QRコードを出力
  PrintOnboardingCodes(chip::RendezvousInformationFlags(chip::RendezvousInformationFlag::kBLE));
}

// 接触センサの状態を取得する関数
esp_matter_attr_val_t get_boolean_attribute_value(esp_matter::attribute_t *att_ref) {
  esp_matter_attr_val_t boolean_value = esp_matter_invalid(NULL);
  attribute::get_val(att_ref, &boolean_value);
  return boolean_value;
}

// 接触センサの状態をセットする関数
void set_boolean_attribute_value(esp_matter_attr_val_t *boolean_value, uint16_t endpoint_id) {
  attribute::update(endpoint_id, CLUSTER_ID, ATTRIBUTE_ID, boolean_value);
}


//
void loop() {
  // ボタンでセンサ1をトグル
  if ((millis() - last_toggle) > DEBOUNCE_DELAY) {
    if (digitalRead(TOGGLE_BUTTON_PIN) == LOW) {
      last_toggle = millis();

      // 接触センサの状態を取得、反転してセット
      esp_matter_attr_val_t contact_value_1 = get_boolean_attribute_value(attribute_ref_1);
      contact_value_1.val.b = !contact_value_1.val.b;
      Serial.print("contact_state1 : ");
      Serial.println(contact_value_1.val.b);
      set_boolean_attribute_value(&contact_value_1, contact_sensor_endpoint_id_1);
    }
  }
}
使い方
書き込み完了後、シリアルモニタに
https://project-chip.github.io/connectedhomeip/qrcode.html?data=なんたら
というURLが表示されるのでこのページを開くとQRコードが表示されます。
または
Manual pairing code: [12345678901]
という感じに11桁の数字が表示されるのでこれを入力することになります。
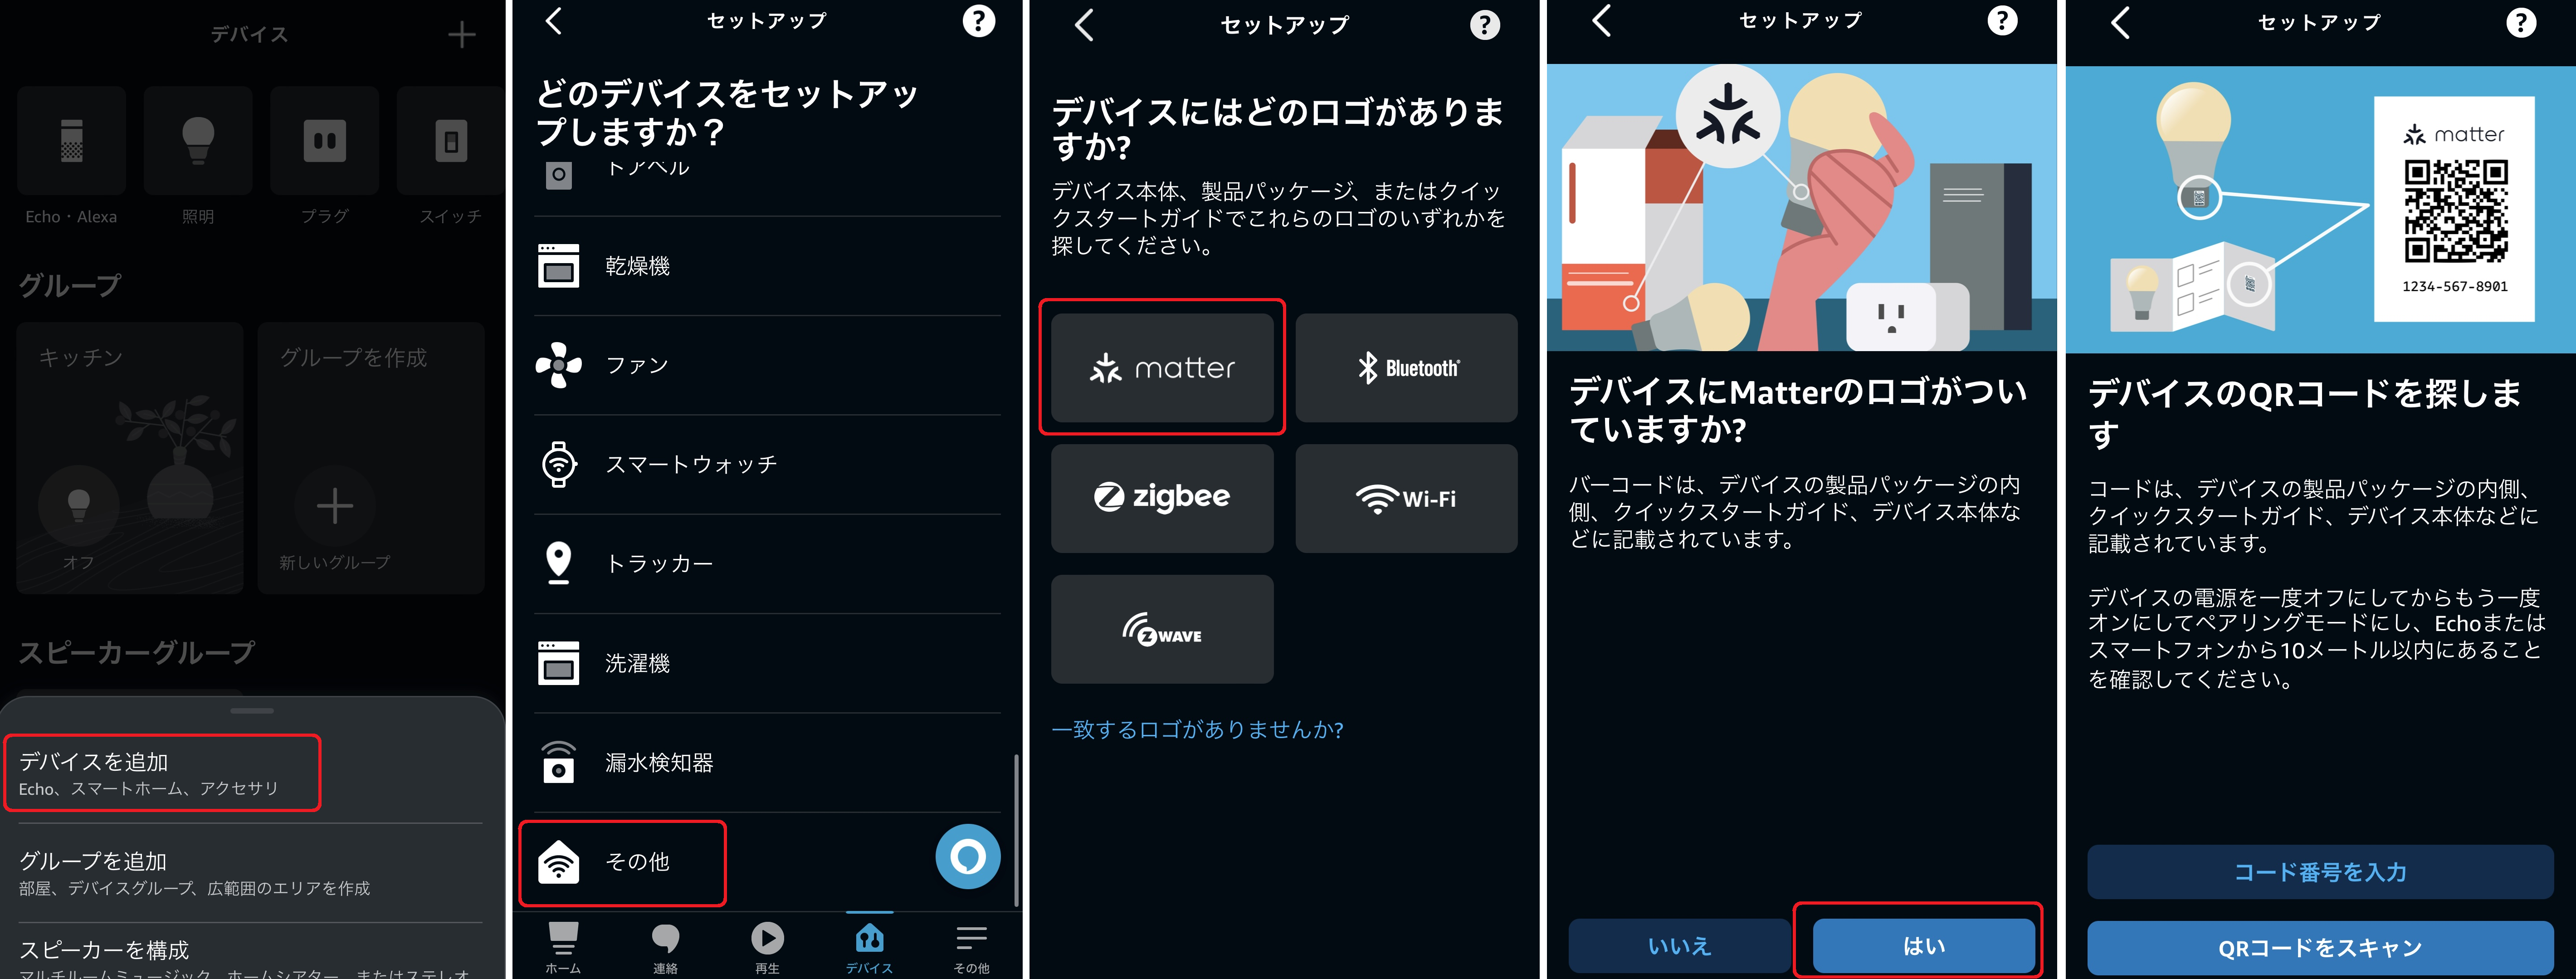
・Alexaに登録する場合
デバイス追加画面から「その他」→「matter」→「はい」
で先程のQRコードか11桁の番号を読み込ませます。
・HomeKitに登録する場合
ホームアプリからアクセサリを追加で先程のQRコードを読み込ませます。
または「その他のオプション…」を選び、11桁の番号を入力します。
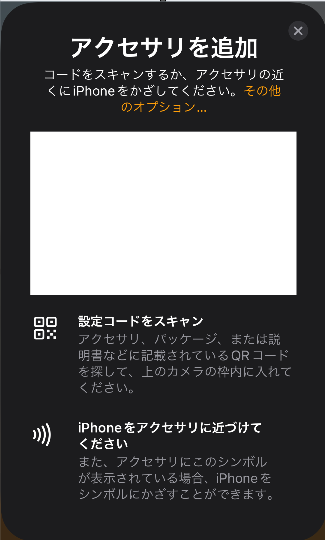
HomeKitの場合は認定済みじゃない云々の警告が出ますが、「このまま追加」で使用可能です。
・AlexaとHomeKit両方に登録したい場合
まずは上の手順に従ってどちらかで登録します。
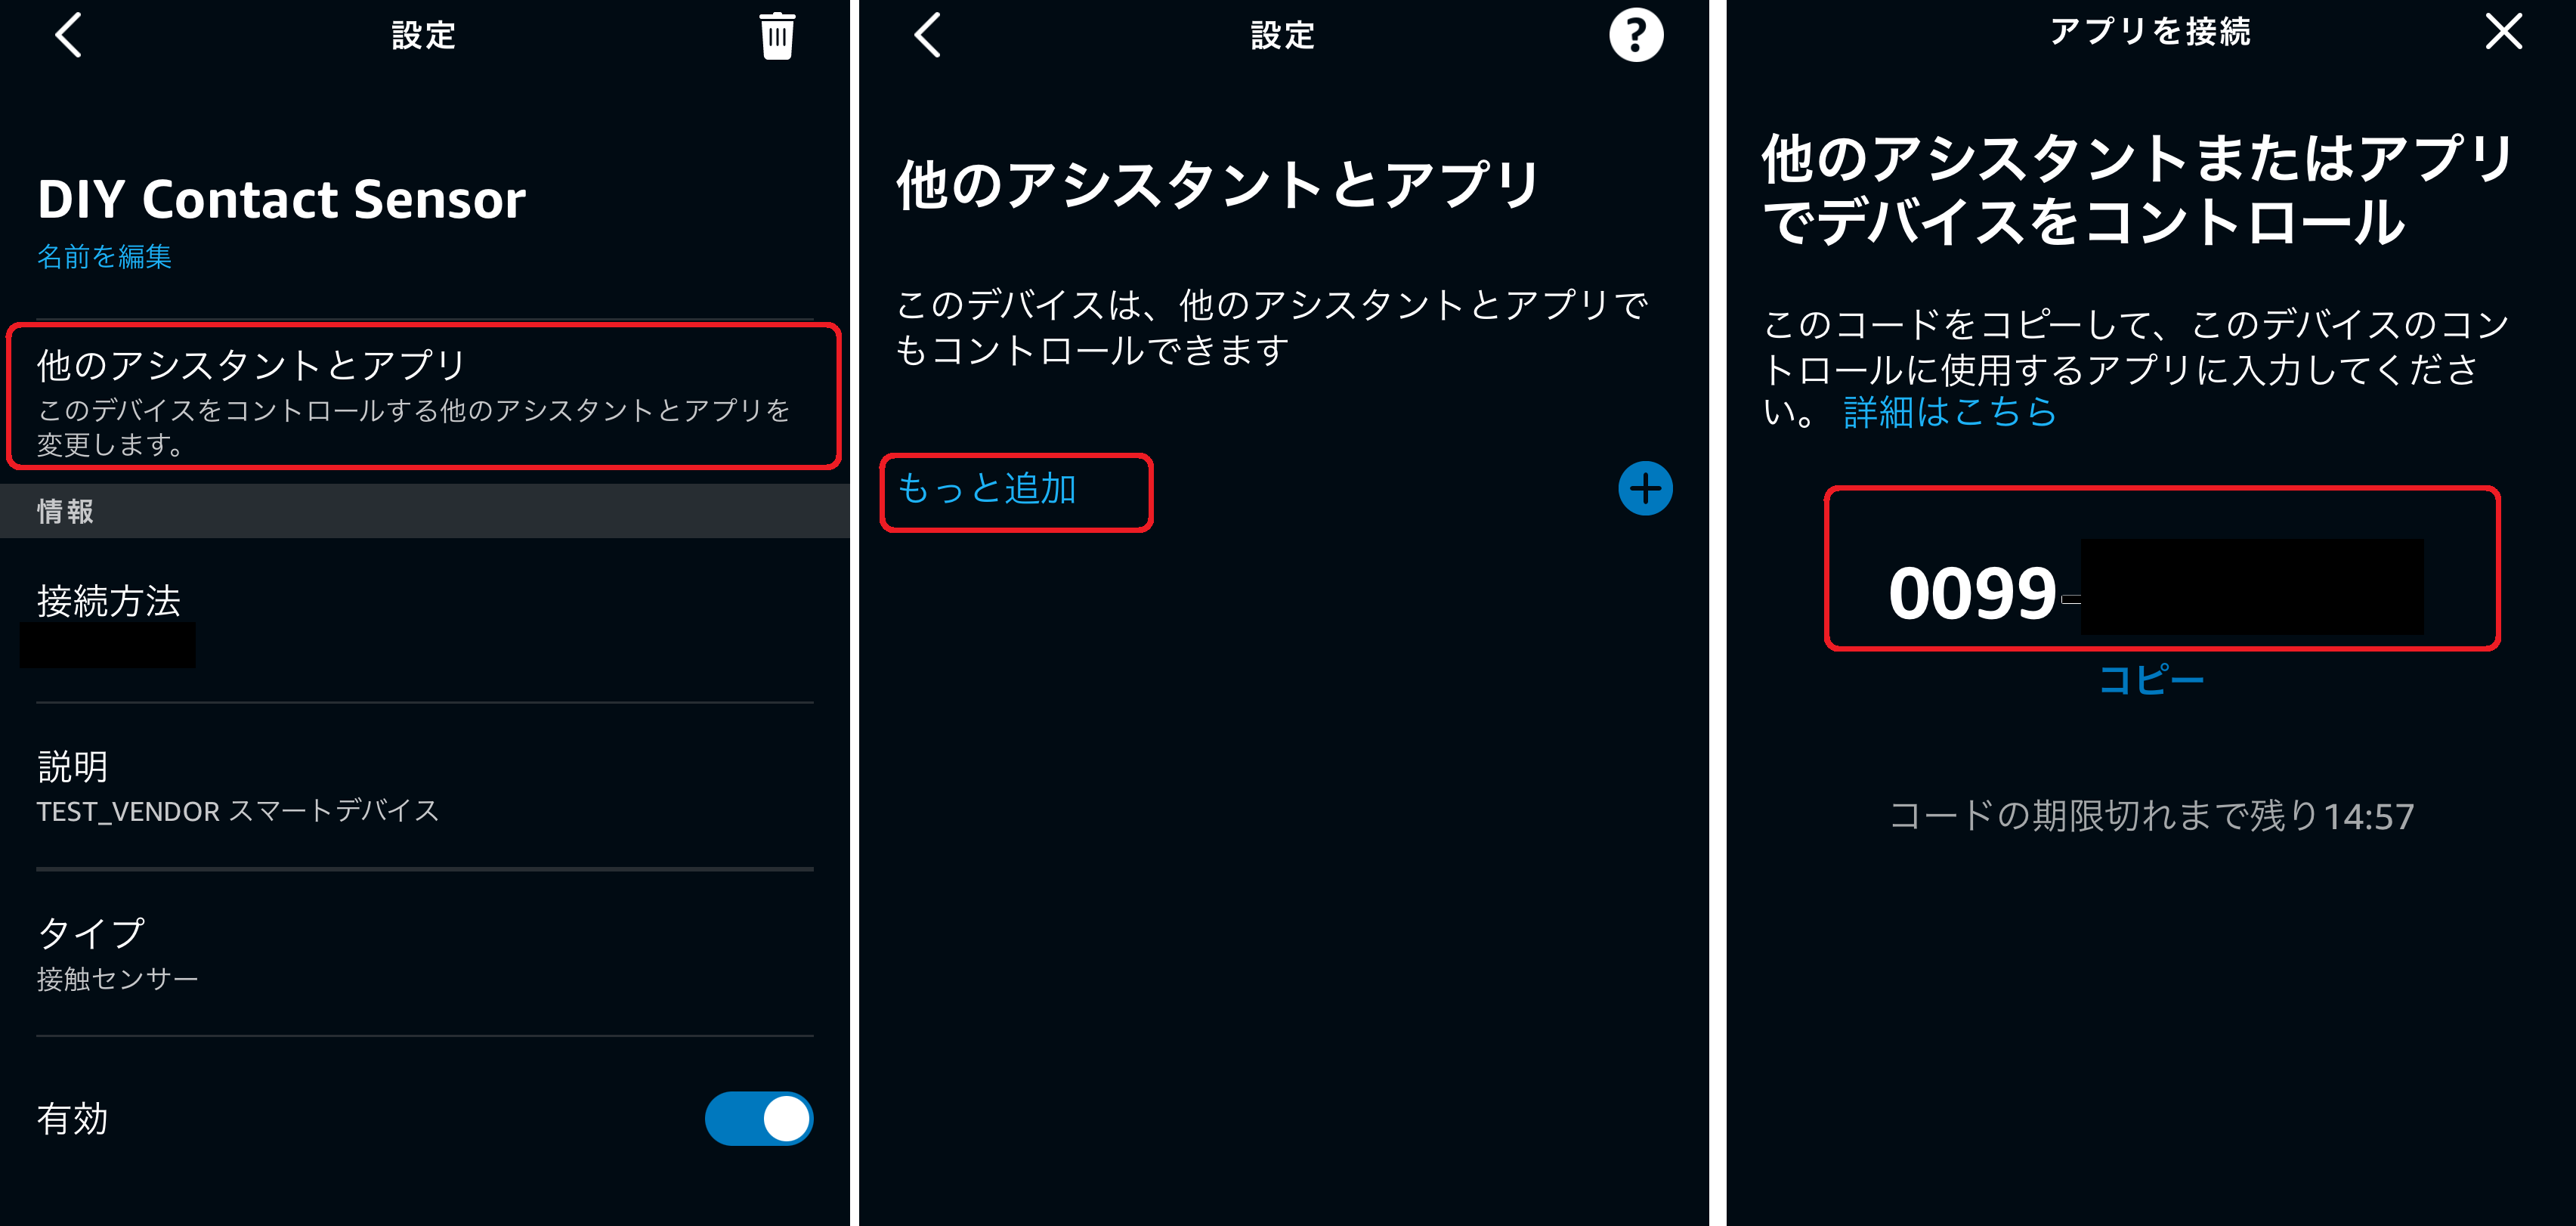
Alexaで先に登録した場合
デバイスの詳細画面→「他のアシスタントとアプリ」→「もっと追加」
で初回とは違う11桁の番号を手に入れて、これをホームアプリで追加します。
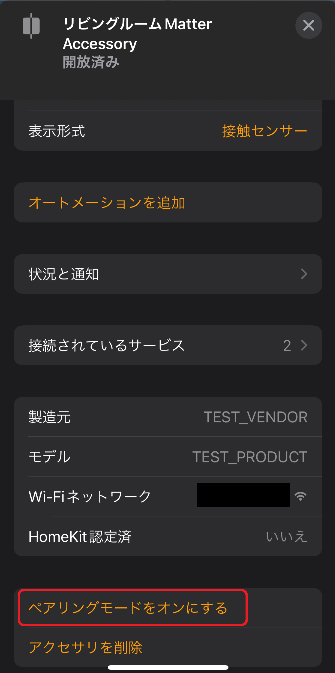
HomeKitで先に登録した場合
デバイスの詳細画面→一番下の「ペアリングモードをオンにする」
で初回とは違う11桁の番号を手に入れて、これをAlexaアプリで追加します。
動作
XIAO ESP32C3ボード上のBOOTボタンを500ms以上押すと、接触センサの開閉状態がトグルします。
例えばこれを定型アクションのトリガーにすればスイッチ代わりに使用可能です。
自作Matter接触センサーデバイス(スイッチを押すと接触状態がトグルする)でAlexa定型アクションをトリガーしてみたけど、壁スイッチ代わりにかなり実用的な応答速度じゃない??? pic.twitter.com/H24sYBtKWN
— わんこ (@wanko_in_lunch) October 13, 2023
まとめ
ESP32でMatterな接触センサを作成することができました。
今回はボード上のボタンでトグルさせましたが、実際にリードスイッチを接続したり、シリアル受信で変更したり、ミリ波センサを繋いだり、使い道は無数にあります。
(ミリ波センサ使う場合はcontact sensorではなくoccupancy sensorにするべきでしょうが)
またコード中の
contact_sensor::config_t
を
thermostat::config_t
に変えるとするとまた別のデバイスが簡単に作成できたりするので色々遊んでみようと思います。
次回は一台のESP32上に複数の接触センサを実装する方法をまとめます。