こんにちは。
ウィザードで生成されるIntentServiceのサブクラスに刻まれた謎のコードに迫りたいと思います。
開発環境
Android Studio 3.0.1
Build #AI-171.4443003, built on November 10, 2017
JRE: 1.8.0_152-release-915-b01 amd64
JVM: OpenJDK 64-Bit Server VM by JetBrains s.r.o
Windows 10 10.0
なお、Kotlinではコーディングしませんので、あしからず。
build.gradleは以下のようにしています。
apply plugin: 'com.android.application'

android {
    compileSdkVersion 27
    defaultConfig {
        applicationId "jp.co.casareal.genintentservice"
        minSdkVersion 15
        targetSdkVersion 27
        versionCode 1
        versionName "1.0"
    }
}

dependencies {
    implementation fileTree(dir: 'libs', include: ['*.jar'])
    implementation 'com.android.support:appcompat-v7:27.0.0'
}
エミュレータはAPI 27のを使用しました。
ウィザードで生成されるIntentServiceのサブクラス
ひょんなことから、IntentServiceを使ってみたくて以下の要領からIntentServiceを作ってもらったんです。
[パッケージ]を右クリック→[New]→[Service]→[Service(IntentService)]
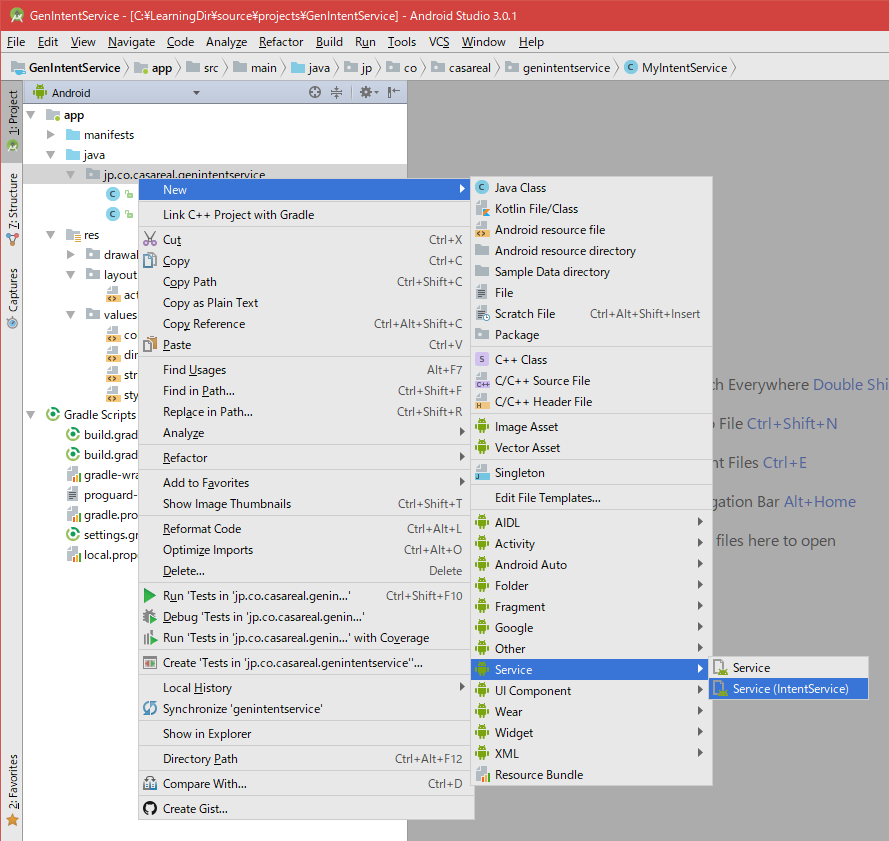
ウィザードで、クラス名を決めたら、finishボタンを押すと、以下のようなクラスがお膳立てされます。
package jp.co.casareal.genintentservice;

import android.app.IntentService;
import android.content.Intent;
import android.content.Context;

/**
 * An {@link IntentService} subclass for handling asynchronous task requests in
 * a service on a separate handler thread.
 * <p>
 * TODO: Customize class - update intent actions, extra parameters and static
 * helper methods.
 */
public class MyIntentService extends IntentService {
    // TODO: Rename actions, choose action names that describe tasks that this
    // IntentService can perform, e.g. ACTION_FETCH_NEW_ITEMS
    private static final String ACTION_FOO = "jp.co.casareal.genintentservice.action.FOO";
    private static final String ACTION_BAZ = "jp.co.casareal.genintentservice.action.BAZ";

    // TODO: Rename parameters
    private static final String EXTRA_PARAM1 = "jp.co.casareal.genintentservice.extra.PARAM1";
    private static final String EXTRA_PARAM2 = "jp.co.casareal.genintentservice.extra.PARAM2";

    public MyIntentService() {
        super("MyIntentService");
    }

    /**
     * Starts this service to perform action Foo with the given parameters. If
     * the service is already performing a task this action will be queued.
     *
     * @see IntentService
     */
    // TODO: Customize helper method
    public static void startActionFoo(Context context, String param1, String param2) {
        Intent intent = new Intent(context, MyIntentService.class);
        intent.setAction(ACTION_FOO);
        intent.putExtra(EXTRA_PARAM1, param1);
        intent.putExtra(EXTRA_PARAM2, param2);
        context.startService(intent);
    }

    /**
     * Starts this service to perform action Baz with the given parameters. If
     * the service is already performing a task this action will be queued.
     *
     * @see IntentService
     */
    // TODO: Customize helper method
    public static void startActionBaz(Context context, String param1, String param2) {
        Intent intent = new Intent(context, MyIntentService.class);
        intent.setAction(ACTION_BAZ);
        intent.putExtra(EXTRA_PARAM1, param1);
        intent.putExtra(EXTRA_PARAM2, param2);
        context.startService(intent);
    }

    @Override
    protected void onHandleIntent(Intent intent) {
        if (intent != null) {
            final String action = intent.getAction();
            if (ACTION_FOO.equals(action)) {
                final String param1 = intent.getStringExtra(EXTRA_PARAM1);
                final String param2 = intent.getStringExtra(EXTRA_PARAM2);
                handleActionFoo(param1, param2);
            } else if (ACTION_BAZ.equals(action)) {
                final String param1 = intent.getStringExtra(EXTRA_PARAM1);
                final String param2 = intent.getStringExtra(EXTRA_PARAM2);
                handleActionBaz(param1, param2);
            }
        }
    }

    /**
     * Handle action Foo in the provided background thread with the provided
     * parameters.
     */
    private void handleActionFoo(String param1, String param2) {
        // TODO: Handle action Foo
        throw new UnsupportedOperationException("Not yet implemented");
    }

    /**
     * Handle action Baz in the provided background thread with the provided
     * parameters.
     */
    private void handleActionBaz(String param1, String param2) {
        // TODO: Handle action Baz
        throw new UnsupportedOperationException("Not yet implemented");
    }
}
はぁ?ナニこれ?
ACTION_FOOだのACTION_BAZだの、この定数ナニ![]()
EXTRA_PARAM1だのEXTRA_PARAM2だの、この定数ナニ![]()
肝心なonHandleIntentメソッドをオーバーライドしてくれているのは、解せる。
だけど、「helper method」だと称するstaticメソッド2つ(startActionFooとstartActionBaz)ってナニ![]()
そして、結局いきつく先はprivateな2つのメソッド(handleActionFooとhandleActionBaz)なんだろうけど、これってナニ![]()
なんだこりゃ![]()
あーもう!onHandleIntentメソッドだけ残して丸っと消しちゃいたい!いらねえよ、こんなコード!
...でも、待てよ。何かこのコードには意味がある筈だ。
ロバート・ラングドン教授はコードの謎に迫って、驚くべき事実を解明した。さすれば私もまた、このAndroid Studioに作ってもらったIntentServiceのコードに立ち向かおうではないか!
...つまりは、憶測でこの記事を書いていますので、その辺は忖度してください。![]()
ActivityからこのIntentServiceを利用してみる
とかく、「アクティビティから、サービスに、処理を依頼する」というシーンは多々あると思います。そこで今回も、ActivityからこのIntentServiceに処理を依頼してみたいと思いますが、もう少し欲張って、「そのIntentServiceが処理した結果を、依頼主のActivityに返答したい」までやってみます。
Activity側
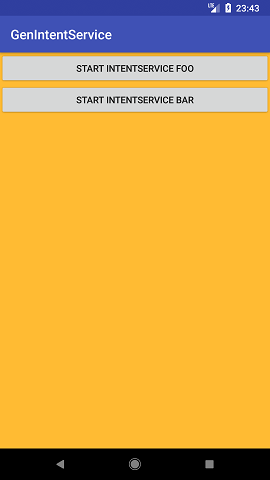
画面を以下のように作りました。
<LinearLayout xmlns:android="http://schemas.android.com/apk/res/android"
    android:layout_width="match_parent"
    android:layout_height="match_parent"
    android:background="@android:color/holo_orange_light"
    android:orientation="vertical">

    <Button
        android:id="@+id/start_intentservice_foo"
        android:layout_width="match_parent"
        android:layout_height="wrap_content"
        android:onClick="onClick"
        android:text="Start IntentService FOO" />

    <Button
        android:id="@+id/start_intentservice_bar"
        android:layout_width="match_parent"
        android:layout_height="wrap_content"
        android:onClick="onClick"
        android:text="Start IntentService BAR" />

    <TextView
        android:id="@+id/text_view"
        android:layout_width="wrap_content"
        android:layout_height="wrap_content"
        android:textColor="@android:color/black"
        android:textSize="24sp" />

</LinearLayout>
2つ全てのボタンにandroid:onClick属性でクリック・イベントに対応させることにしました。
ボタンの文字列をハードコードしていてお行儀が悪いのですが、ご容赦ください。
TextViewは、あとから文字列をsetTextするつもりで配置しておきました。
さて、Activityです。
package jp.co.casareal.genintentservice;
import android.content.BroadcastReceiver;
import android.content.Context;
import android.content.Intent;
import android.content.IntentFilter;
import android.os.Bundle;
import android.support.v7.app.AppCompatActivity;
import android.view.View;
import android.widget.TextView;
public class MainActivity extends AppCompatActivity {
private static final String TAG = "MainActivity";
private TextView textView;
public static final String BROADCAST_ACTION = " jp.co.casareal.genintentservice.broadcast";
public static final String SYSTEM_CURRENT_TIME_MILLIS = "counter";
public static final String GREETING = "greeting";
@Override
protected void onCreate(Bundle savedInstanceState) {
super.onCreate(savedInstanceState);
setContentView(R.layout.activity_main);
textView = (TextView) findViewById(R.id.text_view);
}
/**
* クリック・イベント対応コールバック・メソッド
*/
public void onClick(View view) {
switch (view.getId()) {
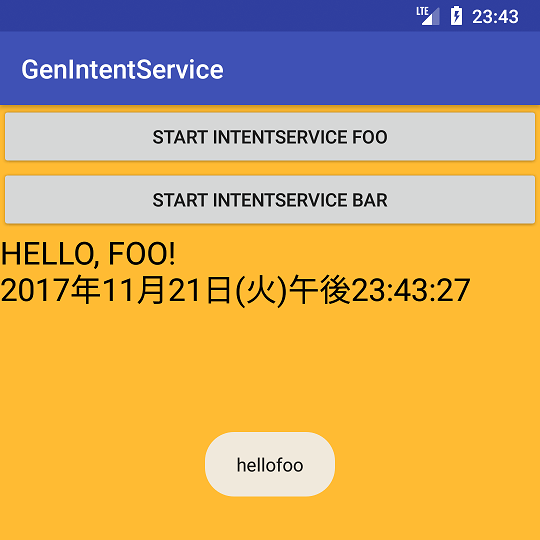
case R.id.start_intentservice_foo:
// 英語の「こんにちは」を小文字で
MyIntentService.startActionFoo(this, "hello", "foo");
break;
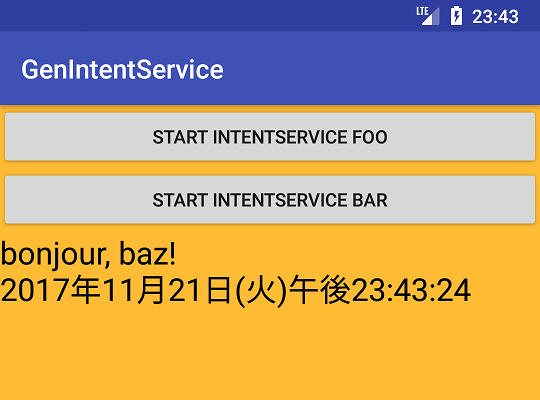
case R.id.start_intentservice_bar:
// 仏語の「こんにちは」を小文字で
MyIntentService.startActionBaz(this, "BONJOUR", "BAZ");
break;
}
}
/**
* ネストクラスで定義したBroadcastReceiverを、(マニフェスト上にではなく)ここで登録する
*/
@Override
protected void onResume() {
super.onResume();
registerReceiver(receiver, new IntentFilter(BROADCAST_ACTION));
}
@Override
protected void onPause() {
super.onPause();
unregisterReceiver(receiver);
}
/**
* BroadcastReceiverでMyIntentServiceからの返答を受け取ろうと思います
*/
private BroadcastReceiver receiver = new BroadcastReceiver() {
public void onReceive(Context context, Intent intent) {
long systemCurrentTimeMillis = intent.getExtras().getLong(SYSTEM_CURRENT_TIME_MILLIS);
Calendar cal = Calendar.getInstance();
cal.setTimeInMillis(systemCurrentTimeMillis);
String greeting = intent.getExtras().getString(GREETING);
// MyIntentServiceからの返答をTextViewに埋め込みます
textView.setText(greeting + "\n"
+ new SimpleDateFormat("yyyy年MM月dd日(E)aH:m:s").format(cal.getTime()));
}
};
}
こんなActivityを作った私の憶測は、以下の通りです。
- IntentServiceに、staticなメソッド(startActionFooとstartActionBaz)があるんだから、それを呼び出せってことでしょ。
- でも、Android Studioが作ってくれたIntentServiceの全メソッドの戻り値型はvoidなんだから、それらのメソッドから処理結果のリターンは望めないんでしょ。
- だから、明示的なIntentをブロードキャストして通知するなどの手段しかないのかな。
ということで、BroadcastReceiverをネストクラスで定義し、IntentServiceからの返答を受け取ろうと思います。
IntentService側
それでは、IntentServiceを実装しますが、Android Studioがお膳立てしたコードは極力そのまま残しつつ、以下のようにしました。あ、でも余計なコメントはもうウザいので除去しました。
package jp.co.casareal.genintentservice;

import android.app.IntentService;
import android.content.Intent;
import android.content.Context;
import android.os.Handler;
import android.view.Gravity;
import android.widget.Toast;

public class MyIntentService extends IntentService {
    private static final String ACTION_FOO = "jp.co.casareal.genintentservice.action.FOO";
    private static final String ACTION_BAZ = "jp.co.casareal.genintentservice.action.BAZ";

    private static final String EXTRA_PARAM1 = "jp.co.casareal.genintentservice.extra.PARAM1";
    private static final String EXTRA_PARAM2 = "jp.co.casareal.genintentservice.extra.PARAM2";

    public MyIntentService() {
        super("MyIntentService");
    }

    public static void startActionFoo(Context context, String param1, String param2) {
        Intent intent = new Intent(context, MyIntentService.class);
        intent.setAction(ACTION_FOO);
        intent.putExtra(EXTRA_PARAM1, param1);
        intent.putExtra(EXTRA_PARAM2, param2);
        context.startService(intent);
    }

    public static void startActionBaz(Context context, String param1, String param2) {
        Intent intent = new Intent(context, MyIntentService.class);
        intent.setAction(ACTION_BAZ);
        intent.putExtra(EXTRA_PARAM1, param1);
        intent.putExtra(EXTRA_PARAM2, param2);
        context.startService(intent);
    }

    @Override
    protected void onHandleIntent(Intent intent) {
        if (intent != null) {
            final String action = intent.getAction();
            if (ACTION_FOO.equals(action)) {
                final String param1 = intent.getStringExtra(EXTRA_PARAM1);
                final String param2 = intent.getStringExtra(EXTRA_PARAM2);
                handleActionFoo(param1, param2);
            } else if (ACTION_BAZ.equals(action)) {
                final String param1 = intent.getStringExtra(EXTRA_PARAM1);
                final String param2 = intent.getStringExtra(EXTRA_PARAM2);
                handleActionBaz(param1, param2);
            }
        }
    }

    private void handleActionFoo(String param1, String param2) {
        // 受け取った小文字を大文字にする
        String upperCase = param1.toUpperCase() + ", " + param2.toUpperCase() + "!";
        Intent intent = new Intent(MainActivity.BROADCAST_ACTION);
        intent.putExtra(MainActivity.SYSTEM_CURRENT_TIME_MILLIS, System.currentTimeMillis());
        intent.putExtra(MainActivity.GREETING, upperCase);
        intent.setPackage(getApplicationInfo().packageName);
        sendBroadcast(intent);
    }

    private void handleActionBaz(String param1, String param2) {
        // 受け取った大文字を小文字にする
        String lowerCase = param1.toLowerCase() + ", " + param2.toLowerCase() + "!";
        Intent intent = new Intent(MainActivity.BROADCAST_ACTION);
        intent.putExtra(MainActivity.SYSTEM_CURRENT_TIME_MILLIS, System.currentTimeMillis());
        intent.putExtra(MainActivity.GREETING, lowerCase);
        intent.setPackage(getApplicationInfo().packageName);
        sendBroadcast(intent);
    }
}
2つのprivateメソッド(handleActionFooとhandleActionBaz)の中を実装しました。やっている処理としては、引数の2つの文字列を大文字ないし小文字にして、long値とかもIntentに格納して、明示的Intentをブロードキャストする。
という、つまんないプログラムでごめんなさい。
ボタンを押してみる
上2つのボタンを押してみると、TextViewに文字列とlong値からの日付が出るようになりました。
ここまでにおける、考察(推理)
ここまで実装してみての考察(推理)をしてみます。
IntentServiceは、Serviceに比べて簡素に利用できる、って言うじゃない?
まず、そもそもIntentServiceの使い道を思い浮かべてみると、「IntentServiceは、Serviceに比べて簡素に利用できる」があげられると思います。その「簡素に」の意味としては、
- Serviceを起動(startService)したら、その起動主はちゃんとそのServiceを停止(stopService)しましょう。
- 一方、IntentServiceは、処理が終ったら自動的に停止してくれる(ので、いちいち起動主がstopServiceしなくてもよい)。
だと思います。
このように、『ServiceとIntentServiceの違い』ということに想いを馳せてしまうと、
- ServiceはUIスレッド(メインスレッド)上で処理を行う。
- IntentServiceは内部にHandlerThreadを持っているので、UIスレッドとは別のスレッド上で処理を行う。
などに行きつき、そうなると『別スレッドで処理をするとなったら!』とさらにさらに深みにはまると、Thread(とRunnable)だとかAsyncTaskだとかAsyncTaskLoaderだとも登場して、もうウジャウジャ話が尽きなくなってしまいます。
そこはグッと堪えて、Android Studioに作ってもらったIntentServiceの使い道の考察に立ち戻ります。
簡潔に使いたいけど、欲張っても使いたい
「アクティビティから、サービスに、処理を依頼する」際に、任意のメソッドをサービスに定義して、アクティビティはそのメソッドを簡素に呼び出して処理を依頼したい。というのが、このAndroid Studioに作ってもらったIntentServiceの狙いなのではないでしょうか。
ここで言う『任意のメソッド』というのが、2つのstaticメソッドであるstartActionFooとstartActionBazです。特にMyActivityからMyIntentServiceのstartActionFooメソッドを呼び出しているコードを今一度確認してください。
MyIntentService.startActionFoo(this, "hello", "foo");
フツーにサービスを起動するということを考えたら、あーIntent用意して、えーっとstartServiceメソッド一択だよなー。と思うわけですよ。
ところが、このMyIntentServiceだと、Intentをnewしなくていいし、メソッドも任意に用意できるし。
「簡潔に使えて、なおかつ柔軟にも使えるサービス、それがIntentServiceなのさ!」といったところでしょうか。
おまけ:IntentServiceはしょせん別スレッド+Toast出したい
私のToastに対する認識が甘かったのです。それは、「Toastはユーザが操作できないから、Viewではない」という屁理屈1から、「UIを持たないサービスでもToastはshowできる」と思い込んでいたのです。
「Toastは、Viewではない。けど、UIだ」と認識すべきなのでしょう。
MyIntentServiceのonHandleIntentメソッド内で、Toastをshowするコードを1行追記してみました。
    protected void onHandleIntent(Intent intent) {
        if (intent != null) {
            final String action = intent.getAction();
            if (ACTION_FOO.equals(action)) {
                final String param1 = intent.getStringExtra(EXTRA_PARAM1);
                final String param2 = intent.getStringExtra(EXTRA_PARAM2);
                handleActionFoo(param1, param2);
                // ↓この1行を追記しました
                Toast.makeText(getApplicationContext(), param1 + param2, Toast.LENGTH_SHORT).show();
            }
        }
    }
...Toast出ない![]() そりゃそうです、UIスレッドではない別スレッドですから。
そりゃそうです、UIスレッドではない別スレッドですから。
Logcat見ると、以下の例外が発生していました。
java.lang.IllegalStateException: Handler (android.widget.Toast$TN$1) {924eeb9} sending message to a Handler on a dead thread
例外は出ていても、画面(アプリ)は落ちません。その理由は、別スレッド上でこの例外が発生しているのであって、UIスレッド(メインスレッド)には影響を及ぼさないからです。
別スレッドで例外出たけどアプリ落ちずにすんだ![]() でも出したいToast出なかった
でも出したいToast出なかった![]() という救われたような、救われていないような、という複雑な気分です。
という救われたような、救われていないような、という複雑な気分です。
というわけで、以下のようにMyIntentServiceを改造しました。
// 略
public class MyIntentService extends IntentService {
// 略
    private Handler handler = null;

    public MyIntentService() {
        super("MyIntentService");
        handler = new Handler();
    }

// 略

    @Override
    protected void onHandleIntent(Intent intent) {
        if (intent != null) {
            final String action = intent.getAction();
            if (ACTION_FOO.equals(action)) {
                final String param1 = intent.getStringExtra(EXTRA_PARAM1);
                final String param2 = intent.getStringExtra(EXTRA_PARAM2);
                handleActionFoo(param1, param2);

                // トーストを出したい場合
                handler.post(new Runnable() {
                    @Override
                    public void run() {
                        Toast toast = Toast.makeText(getApplicationContext(), param1 + param2, Toast.LENGTH_SHORT);
                        toast.setGravity(Gravity.CENTER, 0, 0);
                        toast.show();
                    }
                });
            }
// 略
        }
    }

// 略
要は、Handlerにご協力いただきました。
以上です。