この記事は WebXR ( WebVR/WebAR ) Advent Calendar 2023 の3日目になります。
WebXRでMRをするためのAPI
WebXR Device API はブラウザでXRするためのさまざまなモジュールが含まれています。
その中でも、いわゆるMRに関係するものとして、リアルの部屋のメッシュをスタティックに取得するAPIが2種類用意されています。
- WebXR Plane Detection Module
- WebXR Mesh Detection Module
Plane Detectionは部屋の壁や床を平面ポリゴンとして取得できるもので、おおざっぱな部屋の状況がわかります。Mesh Detectionはさらに細かい部屋のメッシュが取得できるものです。用途によってPaneとMeshを使い分けることが想定されているようです。
HMDデバイスでの実装状況
Plane detectionについては、昨年のWebXR Advent Calenderで書いたように、Meta Quest2でもサポートされていました。
Plane detectionについては、去年の段階で仕様になかった semanticLabel 情報が追加され、壁や天井・床などの種別を取得できるようになっています。
Mesh detectionはQuest3の発表に合わせてQuestブラウザで実装されました。
Quest3の設定画面の「スペースの設定」であらかじめ部屋をスキャンして得られたメッシュを取得することができます。
Quest2やQuestProでは部屋のPlaneは設定できますが、Meshのスキャンはできないので、これはQuest3のみの機能ということになります。
2023年12月現在で、PICO4のブラウザではPlaneもまだ対応されていません。
Mesh Detection API
Mesh detection APIの仕様はこちら
APIを利用する準備として、VRSessionの初期化時にオプションとして機能要求をしておく必要があります。
具体的には requestSessionでrequiredFeaturesのフラグに"mesh-detection"を加えます。
const session = await navigator.xr.requestSession("immersive-ar", {
  requiredFeatures: ["mesh-detection"]
});
この状態でVRセッションが開始されると、描画ループの XRFrame
中に detectedMeshes という属性が取得できるようになります。detectedMeshes は XRMesh のcollectionになっているので、この中に部屋をスキャンしたメッシュが含まれることになります。
const meshes = frame.detectedMeshes
XRMeshには、メッシュの座標情報のvertices,indicesと、ワールド座標に変換するための meshSpace が含まれます。
さらに、更新時間であるlastChangedTimeと、メッシュが何を表しているかのsemanticLabel情報が含まれます。
 XRMesh {
    readonly attribute XRSpace meshSpace;
    readonly attribute FrozenArray<Float32Array> vertices;
    readonly attribute Uint32Array indices;
    readonly attribute DOMHighResTimeStamp lastChangedTime;
    readonly attribute DOMString? semanticLabel;
};
detectedMeshes は毎フレーム取れますが、更新時間lastChangedTimeが新しくなっていたら、メッシュが更新されたものと解釈する必要があるようです。
実際にQuest3の実装では、meshはリアルタイムに取得されたものではなく、予め部屋のスキャンで得られたものが帰ってくるのですが、この時間が結構頻繁に更新されています。
これはおそらく常時行っているトラッキングの更新によってメッシュの位置が微妙に更新されるためと思われます。また、Metaボタン長押しによるリセンターの操作をすると、ワールド座標上のメッシュの位置がかわります。
ということで、更新時間が新しくなったら、少なくともメッシュの位置は更新する必要があります。
XRMeshをワールド座標に変換するには、referenceSpaceを使ってXRPoseを取得します。この辺りはヘッドやコントローラの座標を取得する方法と同じです。
meshes.forEach(p=>{
    const pose = frame.getPose(p.meshSpace, xrReferenceSpace)
    // p.vertices p.indices のメッシュをposeのmatrixで変換して描画
    //
    ...
})
semanticLabel になにが入って来るか実装依存だと思いますが、Quest3では、部屋のスキャンで得られた全体のメッシュは"global mesh"というラベルがついています。その他、手動で設定した机や椅子などの家具類は、現状は直方体のメッシュとして、"table"のようなラベルが付いてくるようです。
実際のサンプル
以下がA-Frameのコンポーネントとして実装した実働サンプルです。
OculusQuest で開く
(このリンクをMataにログインした状態で開くと、Quest のデバイスのブラウザで自動的にリンクを開くことができます)
上のリンク先のサンプルは、ブラウザIDE Polybaasで作成されています。左のソースペインにはA-Frameのタグが表示されていますが、タブをcomponentに切り替えるとcomponentのソースを見ることができます。
componentは、メッシュを検出する roomdetect と、実際にメッシュを描画する roomdraw に分かれています。
roomdetectでは、毎フレームごとにframeからdetectedMeshesを取り出し、更新時間をチェックして、更新されたmeshを描画するために、roomdrawコンポーネントにメッセージを投げています。
roomdrawコンポーネントでは、meshの vertices と indices を利用して、メッシュとワイヤフレームの描画をしています。
上のサンプルでは、planeとmeshを両方取得するようになっていますが、以下はcomponentの定義部分からmeshのみを抜き出したものです。
// WebXR Mesh Detection Module sample component
AFRAME.registerComponent('roomdetect',{
	init:function() {
        // arモードに入ったところでmesh情報を初期化
		scene.addEventListener("enter-vr", ev=>{
			this.meshes = []
			this.tgtel = this.el.querySelectorAll("[roomdraw]")
		})
		const sc =  this.el.sceneEl
        // webxr の初期化にmesh-detectionを追加
		const of = sc.getAttribute("webxr")
		of.optionalFeatures = of.optionalFeatures.concat(["plane-detection","mesh-detection"])
		sc.setAttribute("webxr",of)
	},
	update:function(old) {
	},
	tick:function(time,dur) {
        // a-frameでは sceneEl.framでsession frameが取得できる
		const fr =  this.el.sceneEl.frame
		if(!fr) return
		const ref =  this.el.sceneEl.renderer.xr.getReferenceSpace()
		// 検知されたmesh
		const m = (fr.detectedMeshes)
		if(m && m.size>0) {
			let idx = 0
			let ctime = 0
			let uf = false
			m.forEach(o=>{
				if(!this.meshes[idx] || o.lastChangedTime>this.meshes[idx].time) {
					uf = true
					ctime = o.lastChangedTime
					this.meshes[idx] = {
						vertices:o.vertices,
						indices:o.indices,
						pose: fr.getPose(o.meshSpace, ref),
						label:o.semanticLabel,
						time:o.lastChangedTime,
						uf:true
					}
				} else this.meshes[idx].uf = false
				idx++
			})
            if(uf) { //更新があった場合にeventを送る
				this.tgtel.forEach(el=>{
					el.emit("updatemesh",this.meshes)
				})
			}
		}
	},
})

//meshの描画
AFRAME.registerComponent('roomdraw',{
	schema: {
    	meshes:{default:3},//描画パラメータ
		mesh_color:{default:"#4f4"},
		mesh_opacity:{default:0.5},
		mesh_pass:{default:false}
	},
	entervr:function() {// immersive-arに入ったところで初期化
		this.el.object3D.children = []
		this.meshes = []
		this.meshes_w = []
	},
	init:function() {
		this.material = null
		this.entervr = this.entervr.bind(this)
		scene.addEventListener("enter-vr",this.entervr)
		//roomdetect からのメッセージを受けてメッシュを描画する
		this.el.addEventListener("updatemesh",ev=>{
			if(this.data.meshes==0) return
			const meshes = ev.detail
			this.setmeshes(meshes)
		})
	},
	remove:function() {
		scene.remveEventListener("enter-vr",this.entervr)
	},
	setmeshes:function(meshes) {
		const to = this.el.object3D
		for(let i=0;i<meshes.length;i++) {
			const p = meshes[i]
			if(!p.uf) continue
			let mesh
			let geometry
			if(this.meshes[i]) {
                //すでにあるメッシュは使いまわし
				mesh = this.meshes[i]
				geometry = mesh.geometry
			} else {
                //bufferGeometryを作る
				geometry = new THREE.BufferGeometry();
				if(this.material != null) {
					mesh = new THREE.Mesh( geometry, this.material );
				} else {
					const material = new THREE.MeshStandardMaterial( {
						color: p.label=="global mesh"?this.data.mesh_color:this.data.mesh_color,
						transparent:this.data.mesh_opacity!=1,opacity:this.data.mesh_opacity,
						side:THREE.FrontSide,flatShading:true } );
					mesh = new THREE.Mesh( geometry, material );
				}
				this.meshes[i] = mesh
				if(this.data.meshes & 1) to.add(mesh)
			}
            //mesh座標のセット
			mesh.geometry.setIndex(  new THREE.BufferAttribute(p.indices,1) );
			mesh.geometry.setAttribute( 'position', new THREE.BufferAttribute( p.vertices, 3 ) );
			mesh.matrix.elements = p.pose.transform.matrix
    	    mesh.matrix.decompose(mesh.position, mesh.rotation, mesh.scale);

			if(this.data.meshes & 2) {//ワイヤフレームの描画
				let line
				if(this.meshes_w[i]) {
					line = this.meshes_w[i]
				} else {
					const wireframe = new THREE.WireframeGeometry( geometry )
					const wire_material = new THREE.LineBasicMaterial( {
							color: new THREE.Color( "#4f4") ,linewidth: 1} )
					line = new THREE.LineSegments( wireframe,wire_material )
					this.meshes_w[i] = line
					to.add(line)
				}
				line.matrix.elements = p.pose.transform.matrix
		    line.matrix.decompose(line.position, line.rotation, line.scale);
			}
		}
	},
	update:function(old) {
	},
	tick:function(time,dur) {
	}
})
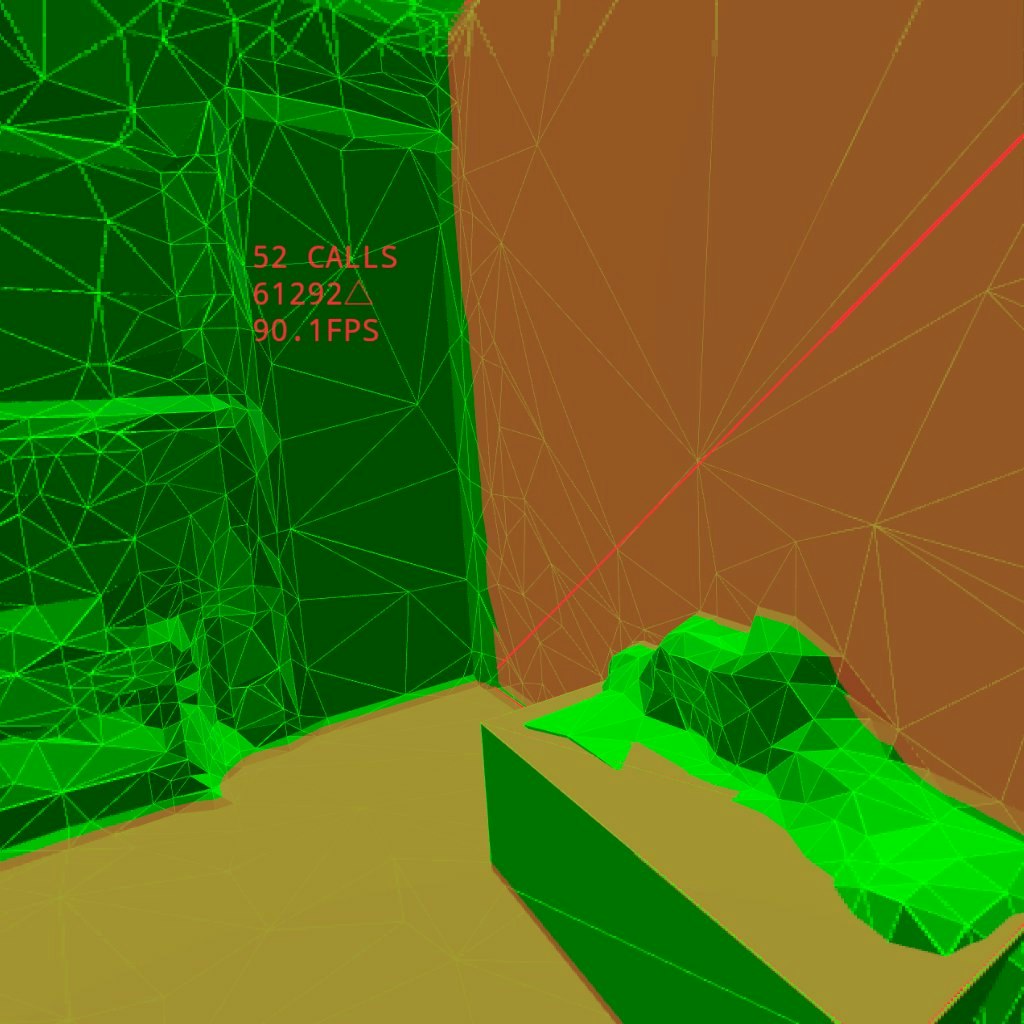
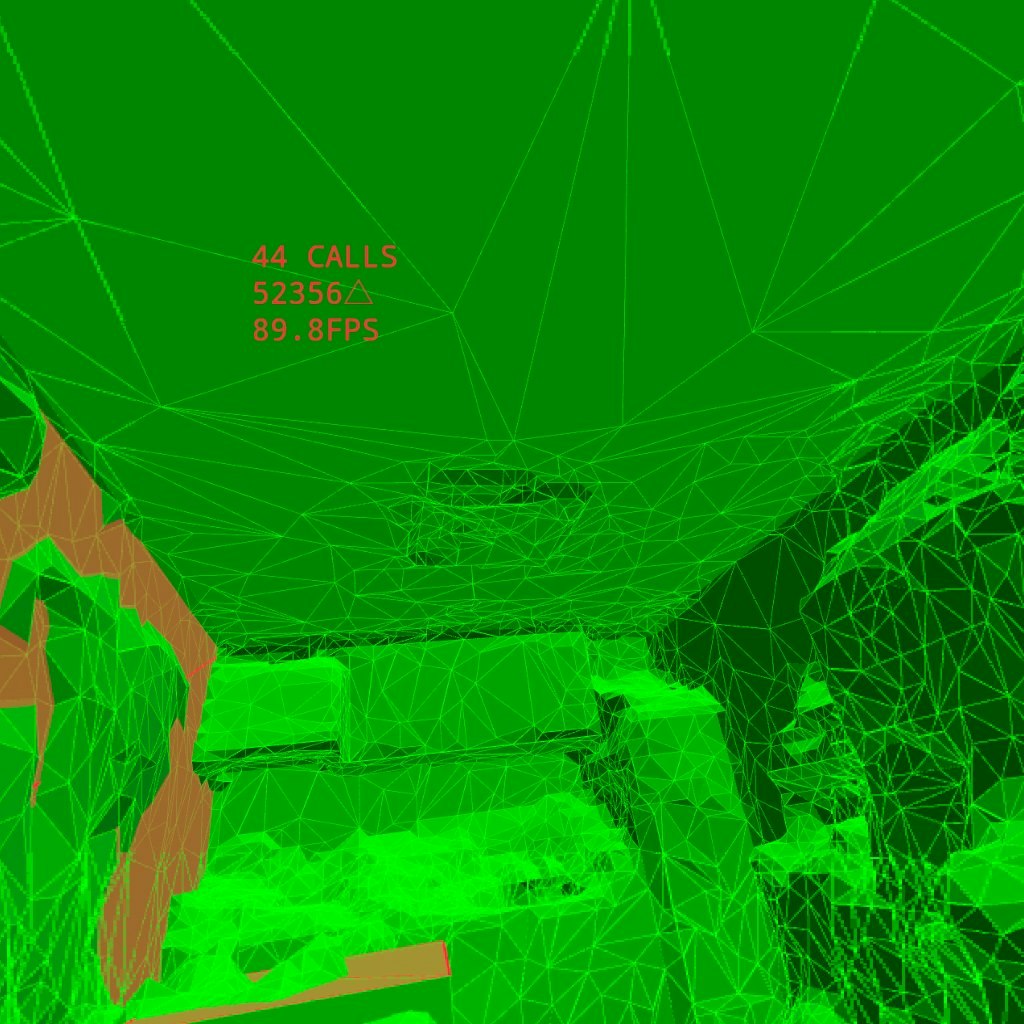
上のサンプルを実際にQuest3で動かしてメッシュを表示させた結果です。
赤い部分がplane 緑がmeshで取得されたmeshです。