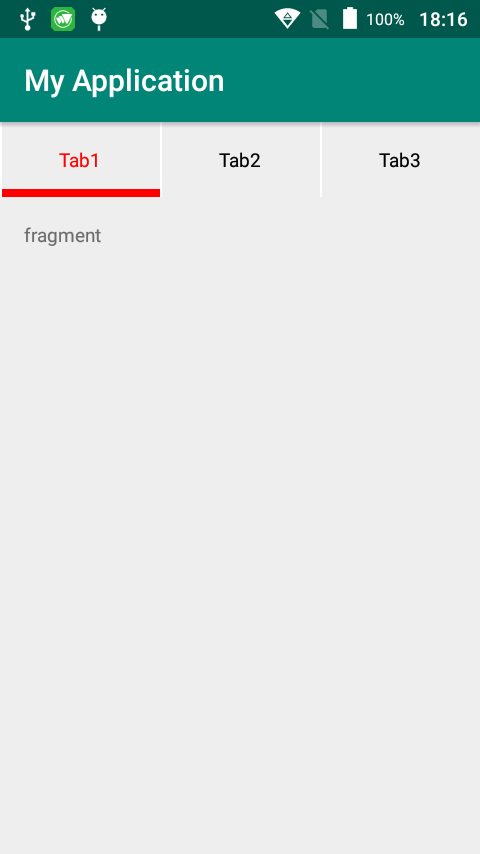
TabLayoutを使う機会があったのですが、
区切り線
を実装したい!
がしかし!
Androidのデフォルト機能で区切り線がない
ので実装してみた。
実装の手順・ActivityとFragment
区切り線とテキストを持つtabItemを個々にtabLayoutに配置
の流れです。
MainActivity.kt
import android.os.Bundle
import android.support.design.widget.TabLayout
import android.support.v4.view.ViewPager
import android.support.v7.app.AppCompatActivity
import android.view.LayoutInflater
import android.widget.RelativeLayout
import android.widget.TextView


class MainActivity : AppCompatActivity() {

    override fun onCreate(savedInstanceState: Bundle?) {
        super.onCreate(savedInstanceState)
        setContentView(R.layout.activity_main)

        val customViewPager = findViewById<ViewPager>(R.id.viewPager)
        val tabLayout = findViewById(R.id.tablayout) as TabLayout

        val customPagerAdapter = CustomViewPager(supportFragmentManager)

        customViewPager.setAdapter(customPagerAdapter)

        // 上部にタブをセットする
        tabLayout.setupWithViewPager(customViewPager)

        for (i in 0 until tabLayout.tabCount) {
            val tab = tabLayout.getTabAt(i)
            val relativeLayout = LayoutInflater.from(this).inflate(R.layout.tab_item, tabLayout, false) as RelativeLayout

            val tabTextView = relativeLayout.findViewById(R.id.tab_title) as TextView
            tabTextView.text = tab!!.text
            tab.customView = relativeLayout
        }
    }
}
CustomViewPager.kt
import android.support.v4.app.Fragment
import android.support.v4.app.FragmentManager
import android.support.v4.app.FragmentPagerAdapter


class CustomViewPager(fm: FragmentManager) : FragmentPagerAdapter(fm) {

    override fun getItem(position: Int): Fragment {
        when (position) {
            0 -> return SampleFragment()
            1 -> return SampleFragment()
            else -> return SampleFragment()
        }
    }

    override fun getCount(): Int {
        return 3
    }

    override fun getPageTitle(position: Int): CharSequence {
        return "Tab" + (position + 1)
    }
}
SampleFragment.kt
import android.os.Bundle
import android.support.v4.app.Fragment
import android.view.LayoutInflater
import android.view.View
import android.view.ViewGroup

class SampleFragment : Fragment() {

    override fun onCreateView(inflater: LayoutInflater, container: ViewGroup?, savedInstanceState: Bundle?): View? {
        return inflater.inflate(R.layout.fragment_sample, container, false)
    }
}
レイアウト周り
まずはメイン画面
基本的にTabLayoutとViewPagerですね。
activity_main.xml
<?xml version="1.0" encoding="utf-8"?>
<android.support.constraint.ConstraintLayout
        xmlns:android="http://schemas.android.com/apk/res/android"
        xmlns:tools="http://schemas.android.com/tools"
        xmlns:app="http://schemas.android.com/apk/res-auto"
        android:layout_width="match_parent"
        android:layout_height="match_parent"
        tools:context=".MainActivity">

    <android.support.design.widget.TabLayout
            android:id="@+id/tablayout"
            android:layout_width="match_parent"
            android:layout_height="50dp"
            app:tabIndicatorColor="@color/red"
            app:tabIndicatorHeight="5dp"
            app:tabPaddingStart="0dp"
            app:tabPaddingEnd="0dp"/>

    <LinearLayout
            android:layout_width="match_parent"
            android:layout_height="match_parent"
            android:orientation="vertical">

        <RelativeLayout
                android:id="@+id/recipe_swipe_layout"
                android:layout_width="wrap_content"
                android:layout_height="0dp"
                android:layout_weight="1">

            <ListView
                    android:id="@+id/listview"
                    android:layout_width="match_parent"
                    android:layout_height="match_parent"/>

            <android.support.v4.view.ViewPager
                    android:id="@+id/viewPager"
                    android:layout_marginTop="50dp"
                    android:layout_width="match_parent"
                    android:layout_height="match_parent"/>
        </RelativeLayout>
    </LinearLayout>

</android.support.constraint.ConstraintLayout>
・ViewPagerに格納するFragmentのレイアウト
fragment_sample.xml
<LinearLayout xmlns:android="http://schemas.android.com/apk/res/android"
              android:layout_width="match_parent"
              android:layout_height="match_parent"
              android:orientation="vertical"
              android:padding="16dp">

    <TextView
            android:layout_width="match_parent"
            android:layout_height="match_parent"
            android:text="fragment"/>

</LinearLayout>
・ここがメインのtab_item
区切り線とテキストを実装しています。
tab_item.xml
<?xml version="1.0" encoding="utf-8"?>
<RelativeLayout xmlns:android="http://schemas.android.com/apk/res/android"
                android:layout_width="match_parent"
                android:layout_height="match_parent" >
    <!-- Tab title -->
    <TextView
            android:id="@+id/tab_title"
            android:layout_width="match_parent"
            android:layout_height="match_parent"
            android:gravity="center"
            android:textColor="@drawable/tablayout_item_color_selector"/>
    <!-- Tab divider -->
    <View
            android:layout_width="1dp"
            android:layout_height="match_parent"
            android:layout_alignParentStart="true"
            android:background="@android:color/white" />
</RelativeLayout>
スクショ
でけたー!わーい!!
あんどろいどさん、ぐーぐるさん、初期で簡単に実装できる方法作って❤️
