はじめに
二年目になりました。
kotlinでAndroid開発を勉強中です。
とりあえずAPIでとってきたデータを表示するところまでできたので、メモ書き程度に残します。
やりたいこと
楽天ウェブサービスの楽天商品ランキングAPIで総合ランキングをとってきて、リストに表示する!
(本当は順位や画像、価格など表示したいのですが、一旦商品名だけ出します)

環境と使うもの
環境
- Mac OS Mojave v10.14.5
- Android Studio 3.4.1
使う物
- 楽天ウェブサービス(https://webservice.rakuten.co.jp/)
- Kotlin 1.3.31
- Retrofit 2.4.0
やってみよう
1.環境を整える
2.表示する場所をつくる
3.APIからの返り値を置く場所を作る
4.APIを呼ぶ
環境を整える
- 楽天ウェブサービスに登録する
楽天ウェブサービスに登録し、APIをコールする際に必要になるapplicationIdを取得します。
取得の仕方はこちらを参考にさせていただきました。
→楽天(Rakuten Developers)のアプリIDとアフィリエイトIDを取得する方法
- retrofitを使えるように
build.gradleに以下を追加する
def retrofitVersion = '2.4.0'
    implementation "com.squareup.retrofit2:retrofit:$retrofitVersion"
    implementation "com.squareup.retrofit2:adapter-rxjava:$retrofitVersion"
    implementation "com.squareup.retrofit2:converter-gson:$retrofitVersion"
- HTTP通信ができるように、
AndroidManifest.xmlに以下を追加する
<uses-permission android:name="android.permission.INTERNET"/>
manifestタグ内に入れましょう。
これがないとHTTP通信ができません!
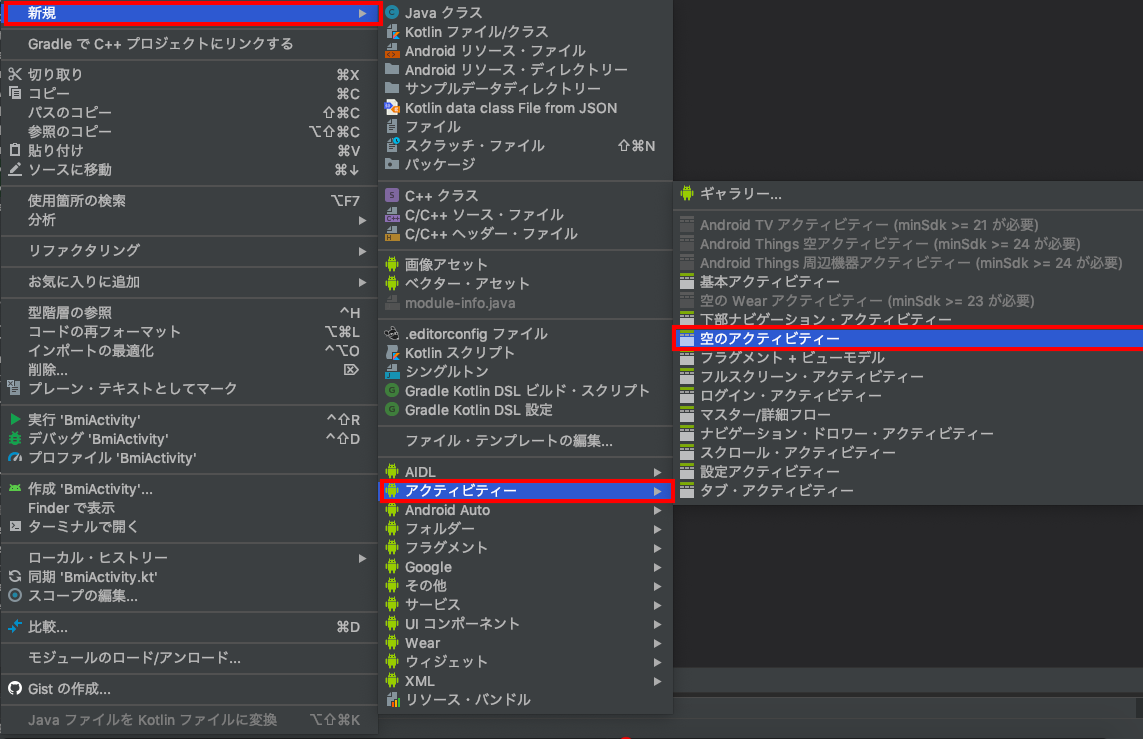
- Activityを作成する
プロジェクトビューで左クリックし、
新規 > アクティビティー > 空のアクティビティー
と選択します。
アクティビティー名を入力し、レイアウトファイルを生成するにチェックをいれます。
レイアウト名が自動で入ります。(好きなように変更できます)
パッケージ名はご自身の環境にあるものをお使いください。
完了を押すと、以下の2つのファイルが生成されます。
- RakutenActivity.kt
- activity_rakuten.xml

表示する場所を作る
先程作成したactivity_rakuten.xmlで、レイアウトを作成していきます。
GUIで作成することが可能ですが、今回は完成しているものをxmlで載せておきます。
<?xml version="1.0" encoding="utf-8"?>
<androidx.constraintlayout.widget.ConstraintLayout
        xmlns:android="http://schemas.android.com/apk/res/android"
        xmlns:tools="http://schemas.android.com/tools"
        xmlns:app="http://schemas.android.com/apk/res-auto"
        android:layout_width="match_parent"
        android:layout_height="match_parent"
        tools:context=".RakutenActivity">

    <Button
            android:text="ランキングを表示する"
            android:layout_width="wrap_content"
            android:layout_height="wrap_content"
            android:id="@+id/button"
            app:layout_constraintStart_toStartOf="parent"
            android:layout_marginLeft="8dp" android:layout_marginStart="8dp" app:layout_constraintEnd_toEndOf="parent"
            android:layout_marginEnd="8dp" android:layout_marginRight="8dp" app:layout_constraintHorizontal_bias="0.498"
            android:onClick="getRanking"
            android:layout_marginTop="16dp" app:layout_constraintTop_toTopOf="parent"/>
    <TextView
            android:layout_width="0dp"
            android:layout_height="36dp"
            android:id="@+id/titleRanking"
            android:textSize="18sp" android:gravity="center_horizontal|center_vertical" android:layout_marginStart="8dp"
            app:layout_constraintStart_toStartOf="parent" android:layout_marginLeft="8dp" android:layout_marginEnd="8dp"
            app:layout_constraintEnd_toEndOf="parent" android:layout_marginRight="8dp"
            app:layout_constraintHorizontal_bias="0.0" android:layout_marginTop="8dp"
            app:layout_constraintTop_toBottomOf="@+id/button"/>
    <ListView
            android:layout_width="395dp"
            android:layout_height="618dp"
            android:id="@+id/listRanking" app:layout_constraintEnd_toEndOf="parent"
            android:layout_marginEnd="8dp" android:layout_marginRight="8dp" android:layout_marginTop="8dp"
            app:layout_constraintTop_toBottomOf="@+id/titleRanking"/>

</androidx.constraintlayout.widget.ConstraintLayout>
Buttonを押すと、getRankingイベントが起こり、
TextView タグ内にランキングのタイトルを、
ListView タグ内にランキング上位から商品の名前を詰めていきます。
APIからの返り値を置く場所を作る
データクラスなるものを作ります。
JsonToKotlinClassというプラグインを使用しました。
以下の記事の通りに行いました。
kotlinでJSON扱うならJsonToKotlinClassが便利
記事のとおりに行うと以下のようなクラスが出来上がります。
data class RakutenRankingResult(
    val Items: List<Item>,
    val lastBuildDate: String,
    val title: String
)

data class Item(
    val affiliateRate: String,
    val affiliateUrl: String,
    val asurakuArea: String,
    val asurakuClosingTime: String,
    val asurakuFlag: Int,
    val availability: Int,
    val carrier: Int,
    val catchcopy: String,
    val creditCardFlag: Int,
    val endTime: String,
    val genreId: String,
    val imageFlag: Int,
    val itemCaption: String,
    val itemCode: String,
    val itemName: String,
    val itemPrice: String,
    val itemUrl: String,
    val mediumImageUrls: List<String>,
    val pointRate: Int,
    val pointRateEndTime: String,
    val pointRateStartTime: String,
    val postageFlag: Int,
    val rank: Int,
    val reviewAverage: String,
    val reviewCount: Int,
    val shipOverseasArea: String,
    val shipOverseasFlag: Int,
    val shopCode: String,
    val shopName: String,
    val shopOfTheYearFlag: Int,
    val shopUrl: String,
    val smallImageUrls: List<String>,
    val startTime: String,
    val taxFlag: Int
)
APIを呼ぶ
前半で作成したRakutenActivity.ktに書き足していきます。
interface
APIを表現、定義します。
@の後に基本のURLに続くURLを書きます。
本来であればクエリパラメータとして渡すのが正しい方法のような気はしますが、本記事ではできるだけシンプルに記述したいので、べた書きしてます。
applicationIdは、最初に取得したご自身のIDを書いてください。[]は不要です
private val itemInterface by lazy { createService() }

    interface ItemInterface {
        @GET("IchibaItem/Ranking/20170628?formatVersion=2&applicationId=[applicationId]")
        fun items(): retrofit2.Call<RakutenRankingResult>
}
HttpClient
基底URLの定義などを行います。
baseApiUrlが基本のURLです。
/まで入れるのが基本?と見たような気がします。ソースは不明です。申し訳ありません。
fun createService(): ItemInterface {
    val baseApiUrl = "https://app.rakuten.co.jp/services/api/"

    val httpLogging = HttpLoggingInterceptor().setLevel(HttpLoggingInterceptor.Level.BODY)
    val httpClientBuilder = OkHttpClient.Builder().addInterceptor(httpLogging)

    val retrofit = Retrofit.Builder()
        .addConverterFactory(GsonConverterFactory.create())
        .baseUrl(baseApiUrl)
        .client(httpClientBuilder.build())
        .build()

    return retrofit.create(ItemInterface::class.java)
}
Retrofit instance
このserviceは、APIを定義したinterfaceをインスタンス化したものであり、実際にAPIコールを行う際に利用されます。
メソッド名getRankingは、レイアウトで作成したボタンのonClick属性に入力します。
onFailureがAPIコール失敗時に呼ばれる処理、onResponseが成功時に呼ばれる処理です。
onFailureには何も書いていません。エラーハンドリングしたい方はここに書きましょう。
titleにランキングのタイトルをつめて、titleRankingというidのtextViewで表示しています。
for文でレスポンスのItemsを回し、itemNameをitemsにつめていきます。
ArrayAdapterを使用し、itemsにつめたitemNameを、listRankingに順番に表示します。
fun getRanking(v: View){
    itemInterface.items().enqueue(object : retrofit2.Callback<RakutenRankingResult> {
        override fun onFailure(call: retrofit2.Call<RakutenRankingResult>?, t: Throwable?) {
        }

        override fun onResponse(call: retrofit2.Call<RakutenRankingResult>?, response: retrofit2.Response<RakutenRankingResult>) {
            if (response.isSuccessful) {
                response.body()?.let {

                    var items = mutableListOf<String>()
                    var res = response.body()?.Items?.iterator()

                    var title = response.body()!!.title
                    titleRanking.text = "$title"

                    if (res != null) {
                        for (item in res) {
                            items.add(item.itemName)
                        }
                    }

                    val adapter = ArrayAdapter(this@RakutenActivity, android.R.layout.simple_list_item_1, items)
                    val list: ListView = findViewById(R.id.listRanking)
                    list.adapter = adapter
                }
            }
        }
    })
}
以上で完成です。ランキングは出てきましたか?
さいごに
はじめてandroid開発を行っています。
java経験もほぼ皆無なので苦戦中です。
なにか間違っていることや、もっとスマートな書き方等あればお教えいただきたいです。