2018/02/25
シャットダウン時の注意
2018/02/10
故障報告+現状報告
2016年の10月ぐらいに、1本だけUSBメモリが認識されなくなりました。
Windows等に指すと、数秒毎に抜き差しが行われているような、認識したり消えたりを繰り返す状態となり、トランセンドの復旧ツールでも治りませんでした。
永久保証のためトランセンドのRMAリクエストで、郵送してから5日ぐらいで届きましたが、それまでは片肺となるので、mdadm上に予備ディスクは用意しておいたほうがいいと思います。
ちなみにいまは10台構成で、内2台はスペアディスクとなっています。
今も元気にnextCloudとGitの共有フォルダとして働いてくれています。
2016/06/18
mdadmの自動起動について追記
概要
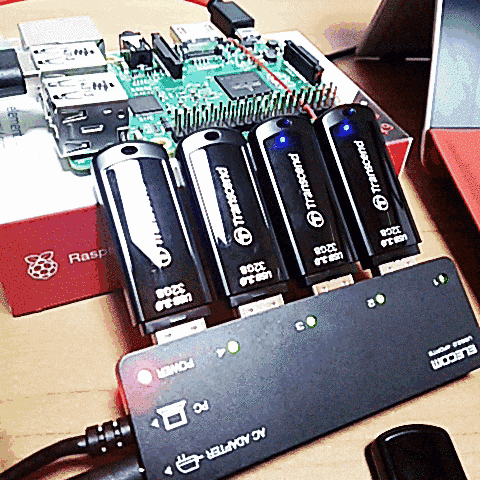
Raspberry Pi2にUSBメモリ4本を刺してRAID10を組みます。
タイトル通りですね・・・。
今日は体調不良で全休と取ってしまったので、あまり手を動かさず、処理をただひたすら待つだけの作業ってことでやってみました。
もともとバックアップ用のNASのようなこともしたくて材料は先週買っていたので、いい機会です。
必要な物はUSBメモリ4本とUSBハブなので、アマゾンで永久保証やタイムセールやっていたものを集めました。6000円ほどしましたが、HDDより静か(無音)でSATA <-> USBの変換や電源もいらないのでいいのではないでしょうか。
- Transcend USBメモリ 8GB USB 3.0 キャップ式 700シリーズ トランセンド・ジャパン (4本)
- ELECOM USBハブ USB2.0対応 ACアダプタ付 セルフ・バスパワー両対応 4ポート ブラック U2H-EG4SBK ELECOM(エレコム...
結論
作業も直感やネット上でなんとかなりますし、レスポンスなども期待以上です!
これをowncloud.jpで使用しても十分戦えると思います!
テスト結果(これしてほしいとかあればコメントに書いていただければ・・・多分)
root@raspberrypi:/media/test# dd if=/dev/zero of=file bs=100M count=500
500+0 records in
500+0 records out
52428800000 bytes (52 GB) copied, 3477.26 s, 15.1 MB/s
root@raspberrypi:/media/test# dd if=/dev/zero of=file bs=10M count=10
10+0 records in
10+0 records out
104857600 bytes (105 MB) copied, 6.03022 s, 17.4 MB/s
RAID構築手順
デバイス名固定について追記しました。デバイス名を固定した場合はsd*で記載している内容はシンボリックリンク名にして実行して下さい。
USBメモリ初期化
まずはUSBをすっからかんにする必要があるので、手っ取り早くUSBメモリのMBRを削除するコマンドsgdiskを使用して下さい。
インストールは次のとおりです。
apt-get install -y gdisk
ワイルドカード等は使えないため、a, b, c, dで削除していく必要があります。
root@raspberrypi:~# sgdisk -Z /dev/sda

***************************************************************
Found invalid GPT and valid MBR; converting MBR to GPT format
in memory.
***************************************************************


Warning! Secondary partition table overlaps the last partition by
33 blocks!
You will need to delete this partition or resize it in another utility.
GPT data structures destroyed! You may now partition the disk using fdisk or
other utilities.
USBパーティション作成
注意
同じ型番でもロットの違いによりセクタ数などが異なります。
パーティションのセクタ数は数百MB分を抑えて作ったほうがいいです!
ロットによるセクタ数の違い
fdiskもワイルドカードは使えないので、a, b, c, dすべてに同じ事をして下さい。
root@raspberrypi:~# fdisk /dev/sda

Welcome to fdisk (util-linux 2.25.2).
Changes will remain in memory only, until you decide to write them.
Be careful before using the write command.


Command (m for help): d
No partition is defined yet!
Could not delete partition 81229

Command (m for help): n
Partition type
   p   primary (0 primary, 0 extended, 4 free)
   e   extended (container for logical partitions)
Select (default p):

Using default response p.
Partition number (1-4, default 1):
First sector (2048-61702143, default 2048):
Last sector, +sectors or +size{K,M,G,T,P} (2048-61702143, default 61702143):

Created a new partition 1 of type 'Linux' and of size 29.4 GiB.

Command (m for help): l

 0  Empty           24  NEC DOS         81  Minix / old Lin bf  Solaris
 1  FAT12           27  Hidden NTFS Win 82  Linux swap / So c1  DRDOS/sec (FAT-
 2  XENIX root      39  Plan 9          83  Linux           c4  DRDOS/sec (FAT-
 3  XENIX usr       3c  PartitionMagic  84  OS/2 hidden C:  c6  DRDOS/sec (FAT-
 4  FAT16 <32M      40  Venix 80286     85  Linux extended  c7  Syrinx
 5  Extended        41  PPC PReP Boot   86  NTFS volume set da  Non-FS data
 6  FAT16           42  SFS             87  NTFS volume set db  CP/M / CTOS / .
 7  HPFS/NTFS/exFAT 4d  QNX4.x          88  Linux plaintext de  Dell Utility
 8  AIX             4e  QNX4.x 2nd part 8e  Linux LVM       df  BootIt
 9  AIX bootable    4f  QNX4.x 3rd part 93  Amoeba          e1  DOS access
 a  OS/2 Boot Manag 50  OnTrack DM      94  Amoeba BBT      e3  DOS R/O
 b  W95 FAT32       51  OnTrack DM6 Aux 9f  BSD/OS          e4  SpeedStor
 c  W95 FAT32 (LBA) 52  CP/M            a0  IBM Thinkpad hi eb  BeOS fs
 e  W95 FAT16 (LBA) 53  OnTrack DM6 Aux a5  FreeBSD         ee  GPT
 f  W95 Ext'd (LBA) 54  OnTrackDM6      a6  OpenBSD         ef  EFI (FAT-12/16/
10  OPUS            55  EZ-Drive        a7  NeXTSTEP        f0  Linux/PA-RISC b
11  Hidden FAT12    56  Golden Bow      a8  Darwin UFS      f1  SpeedStor
12  Compaq diagnost 5c  Priam Edisk     a9  NetBSD          f4  SpeedStor
14  Hidden FAT16 <3 61  SpeedStor       ab  Darwin boot     f2  DOS secondary
16  Hidden FAT16    63  GNU HURD or Sys af  HFS / HFS+      fb  VMware VMFS
17  Hidden HPFS/NTF 64  Novell Netware  b7  BSDI fs         fc  VMware VMKCORE
18  AST SmartSleep  65  Novell Netware  b8  BSDI swap       fd  Linux raid auto
1b  Hidden W95 FAT3 70  DiskSecure Mult bb  Boot Wizard hid fe  LANstep
1c  Hidden W95 FAT3 75  PC/IX           be  Solaris boot    ff  BBT
1e  Hidden W95 FAT1 80  Old Minix

Command (m for help): t
Selected partition 1
Hex code (type L to list all codes): fd
Changed type of partition 'Linux' to 'Linux raid autodetect'.

Command (m for help): w
The partition table has been altered.
Calling ioctl() to re-read partition table.
Syncing disks.
上記では何していいか直感でわかりにくいので、次のような感じでキー入力すれば(横着しすぎ・・・)
- d Enter
- n Enter * 4 ※USBメモリのロットによってセクタ数が異なります。ロットによるセクタ数の違い参照。
- t Enter
- fd Enter
- w Enter
ロットによるセクタ数の違い
最近どツボったのですが、、、同じ型番でも、ロットによって容量に若干差が出ます。
今回のトランセンドのUSBメモリも、同じ構成でもうセット作ろうと思い購入したところ、
4本中1本が100MBほど違いがありました。
root@raspberrypi:~# fdisk -l /dev/sda

Disk /dev/sda: 29.3 GiB, 31418613760 bytes, 61364480 sectors
Units: sectors of 1 * 512 = 512 bytes
Sector size (logical/physical): 512 bytes / 512 bytes
I/O size (minimum/optimal): 512 bytes / 512 bytes
Disklabel type: dos
Disk identifier: 0x00000000

Device     Boot Start     End Sectors   Size Id Type
/dev/sda1        2048 1952897 1950850 952.6M fd Linux raid autodetect

root@raspberrypi:~# fdisk -l /dev/sdb

Disk /dev/sdb: 29.4 GiB, 31591497728 bytes, 61702144 sectors
Units: sectors of 1 * 512 = 512 bytes
Sector size (logical/physical): 512 bytes / 512 bytes
I/O size (minimum/optimal): 512 bytes / 512 bytes
Disklabel type: dos
Disk identifier: 0xc3072e18

Device     Boot Start     End Sectors   Size Id Type
/dev/sdb1        2048 1952897 1950850 952.6M fd Linux raid autodetect
メーカーにも問い合わせましたが、これが普通です。
(HDDは聞いたことがあったのですが、USBメモリも当然という感じでした・・・)
RAID構築
デバイス名の固定を先にしてから行うべきかと、、、
固定すれば/dev/sd[abcd]1ではなく/dev/raid_01_00[1234]1と書けるようになります。
あとは下記魔法の呪文を唱えるだけでRAIDが構築されていきます。
mdadmはワイルドカードが使えるので、下記のようにa~dをまとめて渡せます。
root@raspberrypi:~# mdadm --create /dev/md0 -v --raid-devices=4 --level=raid10 --chunk=128 /dev/sd[abcd]1
mdadm: layout defaults to n2
mdadm: layout defaults to n2
mdadm: size set to 30833664K
mdadm: Defaulting to version 1.2 metadata
mdadm: array /dev/md0 started.
構築中は下記ファイルに出力されています。
root@raspberrypi:~# cat /proc/mdstat
Personalities : [raid10]
md0 : active raid10 sdd1[3] sdc1[2] sdb1[1] sda1[0]
      61667328 blocks super 1.2 128K chunks 2 near-copies [4/4] [UUUU]
      [====>................]  resync = 20.3% (12534272/61667328) finish=36.8min speed=22208K/sec

unused devices: <none>
watch -n 1 -d cat /proc/mdstatなどしてワクワクするのもよし、USBメモリのアクセスランプを眺めるのもよしです。
私の場合は1時間ほどかかりました。
(カメラ性能が良くないので点滅していないように見えますが、クリスマス並みです。ビカビカです。)
構築完了すると次の通りです。
root@raspberrypi:~# cat /proc/mdstat
Personalities : [raid10]
md0 : active raid10 sdd1[3] sdc1[2] sdb1[1] sda1[0]
      61667328 blocks super 1.2 128K chunks 2 near-copies [4/4] [UUUU]

unused devices: <none>
RAID構築情報の記録
RAIDアレイを作成した場合、その設定を残さないと再起動した場合にアレイの構築設定がなかったことになってしまいます。
そこで次の通り設定を記録します。
mdadm --detail --scan >> /etc/mdadm/mdadm.conf
RAIDマウント
やっとこさ使う準備がいろいろと終わってきました。
使うにはファイルシステムを作成する必要があります。
root@raspberrypi:~# mkfs -t ext4 /dev/md0
mke2fs 1.42.12 (29-Aug-2014)
Creating filesystem with 15416832 4k blocks and 3858432 inodes
Filesystem UUID: 448ad049-ad59-4aa8-adab-572a4dbdc491
Superblock backups stored on blocks:
        32768, 98304, 163840, 229376, 294912, 819200, 884736, 1605632, 2654208,
        4096000, 7962624, 11239424

Allocating group tables: done
Writing inode tables: done
Creating journal (32768 blocks): done
Writing superblocks and filesystem accounting information: done
あとはマウントの設定を記録します。
echo '/dev/md0 /media/usb_001 ext4 defaults 1 2' >> /etc/fstab
以上で再起動時にも/media/usb_001にマウントされるようになります。
(手動でマウントする場合は下記のmountコマンド)
root@raspberrypi:~# mount -a
root@raspberrypi:~# df -h
Filesystem      Size  Used Avail Use% Mounted on
/dev/root       7.3G  3.8G  3.2G  55% /
devtmpfs        459M     0  459M   0% /dev
tmpfs           463M     0  463M   0% /dev/shm
tmpfs           463M  6.4M  457M   2% /run
tmpfs           5.0M  4.0K  5.0M   1% /run/lock
tmpfs           463M     0  463M   0% /sys/fs/cgroup
/dev/mmcblk0p1   60M   20M   41M  34% /boot
tmpfs            93M     0   93M   0% /run/user/1000
tmpfs            93M     0   93M   0% /run/user/1001
/dev/md0         58G   52M   55G   1% /media/usb_001
デバイス名固定
また熱が上がってきたようなのでおとなしくKODI起動させて映画の撮り貯めみようと思い外部HDD挿したら、USBのデバイス名が変わってしまい、RAIDが崩れましたwww
ということでデバイス名の固定を行います。
デバイス名の固定にはルールファイルなるものが用意されているので、そのルールを自分で作成する必要があります。
(ルールの書き方はOracleがまとめています)
デバイス情報取得
まずはデバイスの情報がなければ何も書けないので、udevadm monitorコマンドを使い、デバイス情報を取得します。
(udevadm monitor実行後にUSBメモリを刺してみてください。すると下記の通りどのようなUSBメモリが追加されたのか確認できます)
root@raspberrypi:/dev# udevadm monitor
monitor will print the received events for:
UDEV - the event which udev sends out after rule processing
KERNEL - the kernel uevent

KERNEL[5638.986809] add      /devices/platform/soc/3f980000.usb/usb1/1-1/1-1.2/1-1.2.1 (usb)
KERNEL[5638.988134] add      /devices/platform/soc/3f980000.usb/usb1/1-1/1-1.2/1-1.2.1/1-1.2.1:1.0 (usb)
KERNEL[5638.989315] add      /devices/platform/soc/3f980000.usb/usb1/1-1/1-1.2/1-1.2.1/1-1.2.1:1.0/host22 (scsi)
KERNEL[5638.990356] add      /devices/platform/soc/3f980000.usb/usb1/1-1/1-1.2/1-1.2.1/1-1.2.1:1.0/host22/scsi_host/host22 (scsi_host)
UDEV  [5638.998288] add      /devices/platform/soc/3f980000.usb/usb1/1-1/1-1.2/1-1.2.1 (usb)
UDEV  [5639.003121] add      /devices/platform/soc/3f980000.usb/usb1/1-1/1-1.2/1-1.2.1/1-1.2.1:1.0 (usb)
UDEV  [5639.005669] add      /devices/platform/soc/3f980000.usb/usb1/1-1/1-1.2/1-1.2.1/1-1.2.1:1.0/host22 (scsi)
UDEV  [5639.008675] add      /devices/platform/soc/3f980000.usb/usb1/1-1/1-1.2/1-1.2.1/1-1.2.1:1.0/host22/scsi_host/host22 (scsi_host)
KERNEL[5640.354418] add      /devices/platform/soc/3f980000.usb/usb1/1-1/1-1.2/1-1.2.1/1-1.2.1:1.0/host22/target22:0:0 (scsi)
KERNEL[5640.355445] add      /devices/platform/soc/3f980000.usb/usb1/1-1/1-1.2/1-1.2.1/1-1.2.1:1.0/host22/target22:0:0/22:0:0:0 (scsi)
KERNEL[5640.356276] add      /devices/platform/soc/3f980000.usb/usb1/1-1/1-1.2/1-1.2.1/1-1.2.1:1.0/host22/target22:0:0/22:0:0:0/scsi_disk/22:0:0:0 (scsi_disk)
KERNEL[5640.357051] add      /devices/platform/soc/3f980000.usb/usb1/1-1/1-1.2/1-1.2.1/1-1.2.1:1.0/host22/target22:0:0/22:0:0:0/scsi_device/22:0:0:0 (scsi_device)
KERNEL[5640.357864] add      /devices/platform/soc/3f980000.usb/usb1/1-1/1-1.2/1-1.2.1/1-1.2.1:1.0/host22/target22:0:0/22:0:0:0/scsi_generic/sg0 (scsi_generic)
KERNEL[5640.358601] add      /devices/platform/soc/3f980000.usb/usb1/1-1/1-1.2/1-1.2.1/1-1.2.1:1.0/host22/target22:0:0/22:0:0:0/bsg/22:0:0:0 (bsg)
KERNEL[5640.359190] add      /devices/virtual/bdi/8:0 (bdi)
UDEV  [5640.363296] add      /devices/virtual/bdi/8:0 (bdi)
UDEV  [5640.364824] add      /devices/platform/soc/3f980000.usb/usb1/1-1/1-1.2/1-1.2.1/1-1.2.1:1.0/host22/target22:0:0 (scsi)
UDEV  [5640.367996] add      /devices/platform/soc/3f980000.usb/usb1/1-1/1-1.2/1-1.2.1/1-1.2.1:1.0/host22/target22:0:0/22:0:0:0 (scsi)
KERNEL[5640.370097] add      /devices/platform/soc/3f980000.usb/usb1/1-1/1-1.2/1-1.2.1/1-1.2.1:1.0/host22/target22:0:0/22:0:0:0/block/sda (block)
KERNEL[5640.371238] add      /devices/platform/soc/3f980000.usb/usb1/1-1/1-1.2/1-1.2.1/1-1.2.1:1.0/host22/target22:0:0/22:0:0:0/block/sda/sda1 (block)
UDEV  [5640.373708] add      /devices/platform/soc/3f980000.usb/usb1/1-1/1-1.2/1-1.2.1/1-1.2.1:1.0/host22/target22:0:0/22:0:0:0/scsi_device/22:0:0:0 (scsi_device)
UDEV  [5640.377649] add      /devices/platform/soc/3f980000.usb/usb1/1-1/1-1.2/1-1.2.1/1-1.2.1:1.0/host22/target22:0:0/22:0:0:0/scsi_generic/sg0 (scsi_generic)
UDEV  [5640.378162] add      /devices/platform/soc/3f980000.usb/usb1/1-1/1-1.2/1-1.2.1/1-1.2.1:1.0/host22/target22:0:0/22:0:0:0/scsi_disk/22:0:0:0 (scsi_disk)
UDEV  [5640.384401] add      /devices/platform/soc/3f980000.usb/usb1/1-1/1-1.2/1-1.2.1/1-1.2.1:1.0/host22/target22:0:0/22:0:0:0/bsg/22:0:0:0 (bsg)
UDEV  [5640.489974] add      /devices/platform/soc/3f980000.usb/usb1/1-1/1-1.2/1-1.2.1/1-1.2.1:1.0/host22/target22:0:0/22:0:0:0/block/sda (block)
UDEV  [5640.605602] add      /devices/platform/soc/3f980000.usb/usb1/1-1/1-1.2/1-1.2.1/1-1.2.1:1.0/host22/target22:0:0/22:0:0:0/block/sda/sda1 (block)
このように刺したUSBメモリがsdaというデバイス名だとわかります。
重要なのは一番上のKERNEL[5638.986809] add /devices/platform/soc/3f980000.usb/usb1/1-1/1-1.2/1-1.2.1 (usb)になります。
この行の/devices/platform/soc/3f980000.usb/usb1/1-1/1-1.2/1-1.2.1をメモって下さい。
次にこのデバイス(sda)の親子すべてのシリアルなどの情報を取得します。(SUBハブなどをかましているとその分数でてくるはず・・・)
root@raspberrypi:/dev# udevadm info -a -n /dev/sda

Udevadm info starts with the device specified by the devpath and then
walks up the chain of parent devices. It prints for every device
found, all possible attributes in the udev rules key format.
A rule to match, can be composed by the attributes of the device
and the attributes from one single parent device.

  looking at device '/devices/platform/soc/3f980000.usb/usb1/1-1/1-1.2/1-1.2.1/1-1.2.1:1.0/host22/target22:0:0/22:0:0:0/block/sda':
    KERNEL=="sda"
    SUBSYSTEM=="block"
    DRIVER==""
    ATTR{ro}=="0"
    ATTR{size}=="61702144"
    ATTR{stat}=="      90        0     1124      100        0        0        0        0        0       70      100"
    ATTR{range}=="16"
    ATTR{discard_alignment}=="0"
    ATTR{events}=="media_change"
    ATTR{ext_range}=="256"
    ATTR{events_poll_msecs}=="2000"
    ATTR{alignment_offset}=="0"
    ATTR{inflight}=="       0        0"
    ATTR{removable}=="1"
    ATTR{capability}=="51"
    ATTR{events_async}==""

  looking at parent device '/devices/platform/soc/3f980000.usb/usb1/1-1/1-1.2/1-1.2.1/1-1.2.1:1.0/host22/target22:0:0/22:0:0:0':
    KERNELS=="22:0:0:0"
    SUBSYSTEMS=="scsi"
    DRIVERS=="sd"
    ATTRS{rev}=="1100"
    ATTRS{type}=="0"
    ATTRS{scsi_level}=="7"
    ATTRS{model}=="Transcend 32GB  "
    ATTRS{state}=="running"
    ATTRS{queue_type}=="none"
    ATTRS{iodone_cnt}=="0x127"
    ATTRS{iorequest_cnt}=="0x127"
    ATTRS{device_busy}=="0"
    ATTRS{evt_capacity_change_reported}=="0"
    ATTRS{timeout}=="30"
    ATTRS{evt_media_change}=="0"
    ATTRS{max_sectors}=="240"
    ATTRS{ioerr_cnt}=="0x5"
    ATTRS{queue_depth}=="1"
    ATTRS{vendor}=="JetFlash"
    ATTRS{evt_soft_threshold_reached}=="0"
    ATTRS{device_blocked}=="0"
    ATTRS{evt_mode_parameter_change_reported}=="0"
    ATTRS{evt_lun_change_reported}=="0"
    ATTRS{evt_inquiry_change_reported}=="0"
    ATTRS{iocounterbits}=="32"
    ATTRS{eh_timeout}=="10"

  looking at parent device '/devices/platform/soc/3f980000.usb/usb1/1-1/1-1.2/1-1.2.1/1-1.2.1:1.0/host22/target22:0:0':
    KERNELS=="target22:0:0"
    SUBSYSTEMS=="scsi"
    DRIVERS==""

  looking at parent device '/devices/platform/soc/3f980000.usb/usb1/1-1/1-1.2/1-1.2.1/1-1.2.1:1.0/host22':
    KERNELS=="host22"
    SUBSYSTEMS=="scsi"
    DRIVERS==""

  looking at parent device '/devices/platform/soc/3f980000.usb/usb1/1-1/1-1.2/1-1.2.1/1-1.2.1:1.0':
    KERNELS=="1-1.2.1:1.0"
    SUBSYSTEMS=="usb"
    DRIVERS=="usb-storage"
    ATTRS{bInterfaceClass}=="08"
    ATTRS{bInterfaceSubClass}=="06"
    ATTRS{bInterfaceProtocol}=="50"
    ATTRS{bNumEndpoints}=="02"
    ATTRS{supports_autosuspend}=="1"
    ATTRS{bAlternateSetting}==" 0"
    ATTRS{bInterfaceNumber}=="00"

  looking at parent device '/devices/platform/soc/3f980000.usb/usb1/1-1/1-1.2/1-1.2.1':
    KERNELS=="1-1.2.1"
    SUBSYSTEMS=="usb"
    DRIVERS=="usb"
    ATTRS{bDeviceSubClass}=="00"
    ATTRS{bDeviceProtocol}=="00"
    ATTRS{devpath}=="1.2.1"
    ATTRS{idVendor}=="8564"
    ATTRS{speed}=="480"
    ATTRS{bNumInterfaces}==" 1"
    ATTRS{bConfigurationValue}=="1"
    ATTRS{bMaxPacketSize0}=="64"
    ATTRS{busnum}=="1"
    ATTRS{devnum}=="28"
    ATTRS{configuration}==""
    ATTRS{bMaxPower}=="300mA"
    ATTRS{authorized}=="1"
    ATTRS{bmAttributes}=="80"
    ATTRS{bNumConfigurations}=="1"
    ATTRS{maxchild}=="0"
    ATTRS{bcdDevice}=="1100"
    ATTRS{avoid_reset_quirk}=="0"
    ATTRS{quirks}=="0x0"
    ATTRS{serial}=="1234567890ABCDEFG"
    ATTRS{version}==" 2.10"
    ATTRS{urbnum}=="781"
    ATTRS{ltm_capable}=="no"
    ATTRS{manufacturer}=="JetFlash"
    ATTRS{removable}=="unknown"
    ATTRS{idProduct}=="1000"
    ATTRS{bDeviceClass}=="00"
    ATTRS{product}=="Mass Storage Device"

省略
ここでメモした*/devices/platform/soc/3f980000.usb/usb1/1-1/1-1.2/1-1.2.1が出てきます。
つまり、刺したUSBメモリの情報は上記のlooking at parent device '/devices/platform/soc/3f980000.usb/usb1/1-1/1-1.2/1-1.2.1':*となります。
このような情報が得られた時、
ATTRS{serial}=="1234567890ABCDEFG"、且つATTRS{manufacturer}=="JetFlash"であれば、このデバイスの名はraid_01_001です
みたいなルールを書けば固定されるということになります。
※ ただsd*はシステムが自動で割り当てるため先取りしたりすると他のシステムにも影響するようなので、USBが認識された場合には固定名のシンボリックリンクを作成しそれをRAIDで使ったほうがいいかもしれないです。
ルール作成
ということで、次のようなルールを書きます。
(10-local.rulesの先頭番号が大きいほど優先されます。またファイルは書き込んだ時点で有効です)
SUBSYSTEMS=="usb", ATTRS{manufacturer}=="JetFlash", ATTRS{serial}=="1234567890ABCDEFG", SYMLINK="raid_01_001%n"
SUBSYSTEMS=="usb", ATTRS{manufacturer}=="JetFlash", ATTRS{serial}=="1234567890ABCDEFG_", SYMLINK="raid_01_002%n"
SUBSYSTEMS=="usb", ATTRS{manufacturer}=="JetFlash", ATTRS{serial}=="1234567890ABCDEFG__", SYMLINK="raid_01_003%n"
SUBSYSTEMS=="usb", ATTRS{manufacturer}=="JetFlash", ATTRS{serial}=="1234567890ABCDEFG___", SYMLINK="raid_01_004%n"
このようなルールを記入した状態でUSBメモリを挿し直すと次の通りにシンボリックリンクが作成されます。
(もちろん抜くとシンボリックリンクもなくなります。)
root@raspberrypi:/dev# ls -l raid*
lrwxrwxrwx 1 root root  3 Feb 16 11:42 raid_01_001 -> sdd
lrwxrwxrwx 1 root root 12 Feb 16 11:41 raid_01_0010 -> bsg/24:0:0:0
lrwxrwxrwx 1 root root  4 Feb 16 11:42 raid_01_0011 -> sdd1
lrwxrwxrwx 1 root root  3 Feb 16 11:41 raid_01_0013 -> sg3
lrwxrwxrwx 1 root root 15 Feb 16 11:41 raid_01_0014 -> bus/usb/001/031
lrwxrwxrwx 1 root root  3 Feb 16 11:43 raid_01_002 -> sdc
lrwxrwxrwx 1 root root 12 Feb 16 11:41 raid_01_0020 -> bsg/23:0:0:0
lrwxrwxrwx 1 root root  4 Feb 16 11:43 raid_01_0021 -> sdc1
lrwxrwxrwx 1 root root  3 Feb 16 11:41 raid_01_0022 -> sg2
lrwxrwxrwx 1 root root 15 Feb 16 11:41 raid_01_0023 -> bus/usb/001/030
lrwxrwxrwx 1 root root  3 Feb 16 11:43 raid_01_003 -> sdb
lrwxrwxrwx 1 root root 12 Feb 16 11:41 raid_01_0030 -> bsg/22:0:0:0
lrwxrwxrwx 1 root root  4 Feb 16 11:43 raid_01_0031 -> sdb1
lrwxrwxrwx 1 root root 15 Feb 16 11:41 raid_01_0032 -> bus/usb/001/029
lrwxrwxrwx 1 root root  3 Feb 16 11:43 raid_01_004 -> sda
lrwxrwxrwx 1 root root 12 Feb 16 11:41 raid_01_0040 -> bsg/21:0:0:0
lrwxrwxrwx 1 root root  4 Feb 16 11:43 raid_01_0041 -> sda1
デバイス名固定ついでに自動でmdadmの実行
上記だけではOSを起動した際にUSBが認識される前にmdadmのチェックが走ってしまい、正しくマウントされないことが起きてました。
と、いうことで、udevがraidのデバイスをすべて認識した段階でmdadmを有効にする方法を検討したので残しておきます。
(USB認識時に用意したスクリプトを走らせて、mdadm用に用意しているUSBを認識(本数を引数で指定)すれば、mdadmの処理を開始する)
上記のルールに次のような感じで書き加えます。
ACTION=="add" SUBSYSTEMS=="usb", ATTRS{manufacturer}=="JetFlash", ATTRS{serial}=="1234567890ABCDEFG", SYMLINK="raid_01_001%n" RUN+="/etc/udev/rules.d/mdadmcheck.sh '/dev/raid_01_00[1234]1' 4"
ACTION=="add" SUBSYSTEMS=="usb", ATTRS{manufacturer}=="JetFlash", ATTRS{serial}=="1234567890ABCDEFG_", SYMLINK="raid_01_002%n" RUN+="/etc/udev/rules.d/mdadmcheck.sh '/dev/raid_01_00[1234]1' 4"
ACTION=="add" SUBSYSTEMS=="usb", ATTRS{manufacturer}=="JetFlash", ATTRS{serial}=="1234567890ABCDEFG__", SYMLINK="raid_01_003%n" RUN+="/etc/udev/rules.d/mdadmcheck.sh '/dev/raid_01_00[1234]1' 4"
ACTION=="add" SUBSYSTEMS=="usb", ATTRS{manufacturer}=="JetFlash", ATTRS{serial}=="1234567890ABCDEFG___", SYMLINK="raid_01_004%n" RUN+="/etc/udev/rules.d/mdadmcheck.sh '/dev/raid_01_00[1234]1' 4"
これでudevがUSBメモリを認識して、ATTRS{*}が一致した場合に**/etc/udev/rules.d/mdadmcheck.shを実行するようになります。
(最後の4**は、本環境がmdadm用USBメモリが4本だったのでこうなっています)
# !/bin/bash

if [ $# -ne 2 ]; then
        echo "Argument Error $#" 1&2

        exit 1
fi

DEVICE_COUNT=`ls $(echo $1) | wc -l`

echo $DEVICE_COUNT

if [[ ${DEVICE_COUNT} -eq $2 ]]; then
        echo 'OK'
        mdadm --assemble --scan
fi

exit 0
fstabの記述もちょっと変更。
ls -l /dev/disk/by-uuid/*
上記コマンドでmd0のUUIDが取得できるので、fstabを下記のように変更。
これでOS起動からマウントまで自動化できた!(はず、、、今のところ問題はない。)
UUID=********-****-****-****-************ /media/usb_001 ext4 nofail 0 2
nofailを追加しておくことで起動時にマウントできなかった場合でもOSが起動できるようになります。
これをしていないとEmergency ModeとかになってSSHできなくなります。
詳しくは下記参照
Qiita: CentOS7の/etc/fstabのnofailオプション(あるいはsystemd)
こんな感じにしておくとUSB認識時にmdadmを起動できます。
よくcronのrebootで対策する記事を見ていたのですが、まれに起動できないことがありました。
今のところ今回の方法でOS再起動時のmdadm起動は10/10成功しています。
シャットダウン時の処理
OSシャットダウン時にはmdadm側も何かしら終了処理をしてから落ちていくはずです。
ですが稀に、OS起動時にmdadm再構築が始まる事があり、おそらく正常にmdadm終了処理ができていないことがあるようです。
ググれば落とし方は出てきますが、何も考えずシャットダウンしたい場合は私はこうしています。
root@raspberrypi:/dev# umount /dev/md0
root@raspberrypi:/dev# mdadm --misc --stop /dev/md0
root@raspberrypi:/dev# cat /proc/mdstat
Personalities : [raid10]
unused devices: <none>
詳しくは下記参照
◇mdadmによるRAIDの解除◇初心者のためのLinuxサーバー構築講座(CentOS 自宅サーバー対応)☆お便利サーバー.com☆