はじめに
CutMixという新しいData Augumentation手法がシンプルな手法だったので試してみました。
今回はCifar10などを用いてこの手法の有効性を確認していません、あくまでCutMixという手法がどんなものなのかという点に重きをおいています。
検証についてはこの記事に追記、もしくは新しく記事をおこしたいと思います。
CutMix
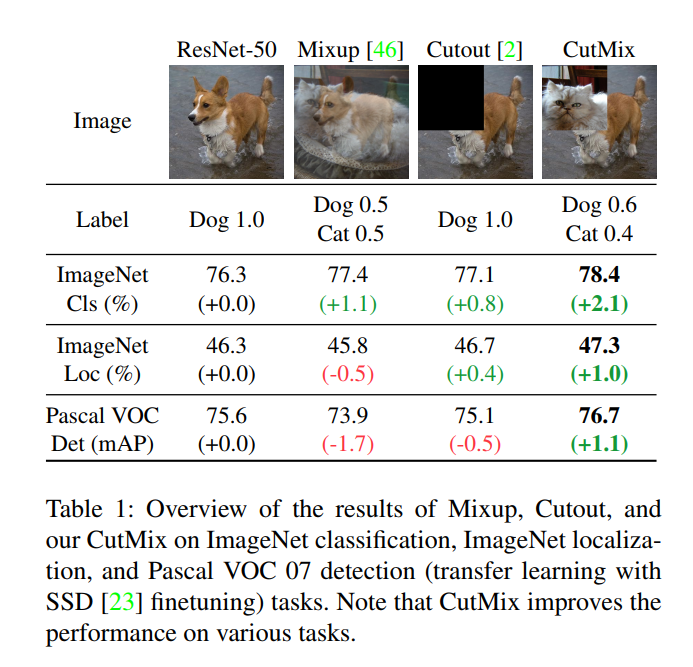
まずCutMixの名前の由来としてCutout + Mixupからきています。その由来通りCutoutとMixupの技術それぞれを合わせたような手法になっています。
以下CutOutとMixup、CutMixそれぞれの手法の違いが比較されている図が論文にのっていましたのでこちらにも掲載します。
具体的な処理の流れは画像とラベルのペア$(x_a, y_a)$, $(x_b, y_b)$から、$(x, y)$という新しいデータとラベルのペアを作ります。
ここで$\lambda \in [0, 1]$は、ベータ分布$Beta(\alpha, \alpha)$からのサンプリングにより取得し、$\alpha$はハイパーパラメータとなります。
また画像の幅と高さそれぞれの一様分布した乱数を取り出し、切り出す起点の座標$(r_x, r_y)$とします。切り出す際の幅と高さはさきほど計算した$\lambda$を使い、$\sqrt(1 - \lambda)$で計算しそれらを$(r_w, r_h)$とします。
その後切り出す起点$(r_x, r_y)$, $(r_w, r_h)$を使って片方の画像を切り出し、もう片方の画像に切り出した部分を貼り付けます、これで新しい画像は完成です。ラベルのほうはmixupの処理と同じで$\lambda$と$(1-\lambda)$をラベルそれぞれにかけ合わせそれらを足し合わせると処理は終わりになります。
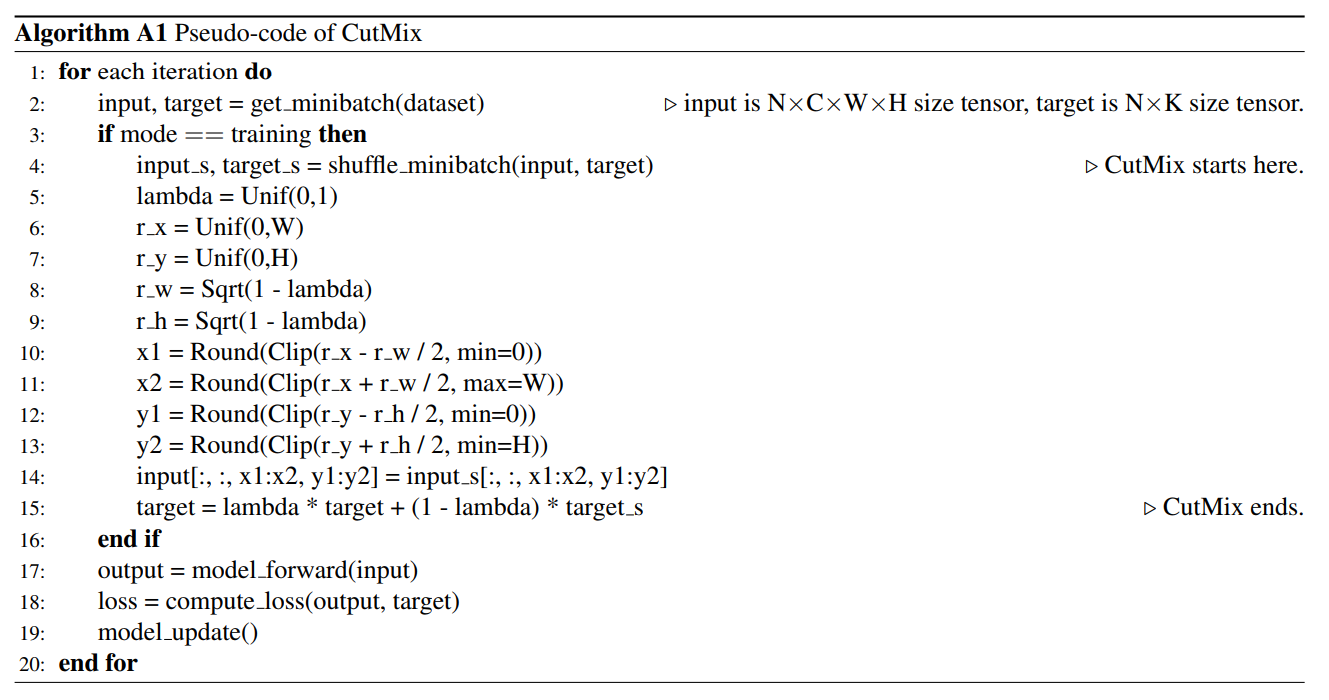
とグダグダと書きましたが論文にCutMixの擬似コードが書いてありましたので載せておきます。
実装
疑似コードを実装してみました。
import numpy as np


def get_rand_bbox(image, l):
    width = image.shape[0]
    height = image.shape[1]
    r_x = np.random.randint(width)
    r_y = np.random.randint(height)
    r_l = np.sqrt(1 - l)
    r_w = np.int(width * r_l)
    r_h = np.int(height * r_l)
    bb_x_1 = np.int(np.clip(r_x - r_w, 0, width))
    bb_y_1 = np.int(np.clip(r_y - r_h, 0, height))
    bb_x_2 = np.int(np.clip(r_x + r_w, 0, width))
    bb_y_2 = np.int(np.clip(r_y + r_h, 0, height))
    return bb_x_1, bb_y_1, bb_x_2, bb_y_2

def main():
    image_path_1 = "image_1.jpg"
    image_path_2 = "image_2.jpg"
    # 説明用にラベルを簡単化しています
    label_1 = np.array([1, 0])
    label_2 = np.array([0, 1])
    image_1 = Image.open(image_path_1).resize((224, 224))
    image_2 = Image.open(image_path_2).resize((224, 224))
    beta = 0.5
    l_param  = np.random.beta(beta, beta)
    img_1 = np.array(image_1)
    img_2 = np.array(image_2)
    bx1, by1, bx2, by2 = get_rand_bbox(img_1, l_param)
    img_2[bx1:bx2, by1:by2, :] = img_1[bx1:bx2, by1:by2, :]
    new_label = l_param * label_2 + (1 - l_param) * label_1
以上になります。


