天気予報アプリをよりパワーアップさせよう!
初めに
下記の続きとなります。
よりアプリケーションの機能を充実させてみよう。
目的
下記3つの改修を実施し、アプリケーションの機能を充実させよう。
- 表示する日付の切り替え
- 日本以外の気象情報表示
- Material-UIでよりスタイリッシュなデザインに
8. 日付を分けよう
openmeteo APIのデフォルト設定では、7日分の気象情報が取得されています。
現在のアプリケーションではこのように、7日分の情報が一気に表示されていて大変見づらいので、日付ごとに表示できるよう改修しましょう!
8-1. 日付選択ロジックの設定
日付はページ上でリアルタイム変更したいものです。
ブラウザ側で更新される変数の管理には何を使うんでしたっけ?
そうです、「現在選択されている日付」もuseStateで管理するように変更します。
まずは下記のようにいくつかの日付情報関連の値を定義しましょう。
...

const App = () => {
  const [location, setLocation] = useState(locationList[0]);
  const [weatherInfo, setWeatherInfo] = useState([]);
  /* 下記追加 */
  const dateFmt = 'yyyy-MM-dd';
  const gotDates = weatherInfo.map((info) => format(new Date(info.datetime), dateFmt));
  const dateList = Array.from(new Set(gotDates));
  const [selectedDate, setSelectedDate] = useState(format(new Date(), dateFmt));
  const weatherInfoOnCurrentDate = weatherInfo.filter((info) => {
    return format(new Date(info.datetime), dateFmt) === selectedDate
  });
  /* ここまで */
| 変数名 | 説明 |
|---|---|
| dateFmt | date-fnsで使用する、日時データのフォーマット形式 |
| gotDates | 気象データに含まれる日付の配列 |
| dateList | gotDatesについて重複排除したもの |
| selectedDate setSelectedDate |
現在選択されている日付を管理するstateと state更新用関数 |
| weatherInfoOnCurrentDate | 取得した7日分の気象データ(weatheInfo)のうち、現在選択されている日付のデータのみに絞ったもの |
8-2. 日付選択
日付を選択するための画面要素(ボタン)と、日付選択時のアクションを定義します。
...

  // 地点選択時のアクション
  const onChangeLocation = (event) => {
    const currentLocationData = locationList.find((lo) => event.target.value === lo.enName);
    setLocation(currentLocationData);
  }

  /* 下記追加 */
  // 日付選択時アクション
  const onClickDate = (event) => {
    if (event.target.value !== selectedDate) {  // 同じ日付を選択した場合は処理しない
      setSelectedDate(event.target.value);  // 選択した日付をstateにセットします
    }
  }
  /* ここまで */

  // 気象情報APIコールを実行
  useEffect(() => {

...

const App = () => {

...

  return (
    <div>
      <div className='center-item'>
        <select id='location-select' onChange={onChangeLocation}>
          {locationList.map((lo) => (
            <option key={lo.enName} value={lo.enName}>{lo.jpName}</option>
          ))}
        </select>
      </div>
      <h1 className='center-item'>{location.jpName} の天気</h1>
      {/* 下記追加 */}
      <div className='center-item'>
        {dateList.map((date) => (
          <button
            key={date}
            className='date-button'
            value={date}
            onClick={onClickDate}
          >
            {date.replace(/^\d{4}\-/, '').replace(/\-/g, '/')}
          </button>
        ))}
      </div>
      {/* ここまで */}
      <div className='center-item'>
        <table id='weather-table' border={1} >
          <tbody>
            {/* 下記でmap処理に渡していた定数を変更します。 weatherInfo => weatherInfoOnCurrentDate  */}
            {weatherInfoOnCurrentDate.map((info) => (
              <tr key={info.datetime}>
                <td style={{backgroundColor: format(new Date(info.datetime), 'MMddHH') === format(new Date(), 'MMddHH') ? 'lightpink' : null}}>{format(new Date(info.datetime), 'MM/dd - HH:mm')}</td>
                <td>{weatherNames[info.weatherCode]}</td>
              </tr>
            ))}
          </tbody>
        </table>
      </div>

...
デザイン設定のためにCSSも追加します。
...

.center-item {
  margin-bottom: 1em;
  display: flex;
  justify-content: center;
}

/* 下記追加 */
.date-button {
  margin: 0 5px;
  padding: 0.5em 1em;
  border-radius: 5px;
  border: 2px solid slategray;
}
/* ここまで */

...
8-3. 選択中の日付を強調
選択中の日付が分かりにくいので強調表示します。
現在選ばれている日付のボタンにだけ、selected-dateというクラス名が足されるように設定してみましょう。
...

  // 日付選択時アクション
  const onClickDate = (event) => {
    if (event.target.value !== selectedDate) {
      setSelectedDate(event.target.value);
    }
  }

  /* 下記追加 */
  // 選択されている日付にのみクラス"selected-date"を足す
  const checkDateButtonClassName = (date) => {
    return [
      'date-button',
      date === selectedDate ? 'selected-date' : null
    ].join(' ')
  }
  /* ここまで */

  // 気象情報APIコールを実行
  useEffect(() => {

...

const App = () => {

...

  return (

...

      <h1 className='center-item'>{location.jpName} の天気</h1>
      <div className='center-item'>
        {dateList.map((date) => (
          <button
            key={date}
            // 下記を変更: 'date-button' => checkDateButtonClassName(date)
            className={checkDateButtonClassName(date)}
            value={date}
            onClick={onClickDate}
          >
            {date.replace(/^\d{4}\-/, '').replace(/\-/g, '/')}
          </button>
        ))}
      </div>
      <div className='center-item'>
        <table id='weather-table' border={1} >

...
selected-date(現在選ばれている日付)に対して適用するデザインを追加します。
...

.date-button {
  margin: 0 5px;
  padding: 0.5em 1em;
  border-radius: 5px;
  border: 2px solid slategray;
}

/* 下記追加 */
.selected-date {
  background-color: palegreen;
  border: 2px solid green;
}
/* ここまで */

...
これで完成です。
9. 日本以外の天気を表示させよう
続いては日本以外の天気を表示してみます。
今回はアメリカのロサンゼルスにしましょう。
緯度・経度は気象庁のデータを参考にします。
https://www.data.jma.go.jp/gmd/cpd/monitor/nrmlist/NrmMonth.php?stn=72295
{ enName: 'losAngeles', jpName: 'ロサンゼルス', lat: 33.93, lon: -118.40 }
もし日本時間での表示で大丈夫でしたら、上記を地点情報に追加すればOKです。
今回は現地時間での表示としたいので、下記のようにタイムゾーンの変更ができるようにします。
...

/* tz(タイムゾーン)をデータに追加 */
const locationList = [
  { enName: 'tokyo', jpName: '東京', lat: 35.689, lon: 139.692, tz: 'Asia/Tokyo' },
  { enName: 'osaka', jpName: '大阪', lat: 34.686, lon: 135.520, tz: 'Asia/Tokyo' },
  { enName: 'saga', jpName: '佐賀', lat: 33.249, lon: 130.300, tz: 'Asia/Tokyo' },
  /* ロサンゼルスのデータを追加 */
  { enName: 'losAngeles', jpName: 'ロサンゼルス', lat: 33.93, lon: -118.40, tz: 'America/Los_Angeles' }
];

/* APIコールロジックを関数として分割 */
// 気象データ取得
const getWeatherData = async(location) => {
  return await weatherClient.get(openMeteoApiBase, {
    params: {
      timezone: location.tz,  // 新しく追加したタイムゾーンのデータを使う
      latitude: location.lat,
      longitude: location.lon,
      hourly: [
        'weather_code'
      ].join(',')
    }
  });
}

...

const App = () => {

...

  // 気象情報APIコールを実行
  useEffect(() => {
    (async() => {
      try {
        /* 下記削除 */
        const res = await weatherClient.get(
          `${openMeteoApiBase}?timezone=Asia/Tokyo&latitude=${location.lat}&longitude=${location.lon}&hourly=weather_code`
        );
        /* 下記追加 */
        const res = await getWeatherData(location);
        /* ここまで */
        const weatherData = res.data.hourly;

...
これで現地時間の表示ができます。
ちなみにですが「タイムゾーンに指定できる文字列(Asia/Tokyoなど)って何が使えるの?」などお思いの方がいるかもしれません。
こちらはOpenmeteo APIのリファレンスに答えがあります。
https://open-meteo.com/en/docs/
-> API Documentation -> timezone
どのサービスのAPIを使用する際も同じですが、使用方法や記述ルールはAPI提供元が定めています。なのでエンジニアとして記憶する必要もなく、実際我々も能動的に暗記しません。
APIの使い方で困ったら、どんな時でもAPIリファレンスを読みましょう。
そこで大抵の情報は得られます。
10. デザインをよりよく
Webアプリケーションのデザインについて、ここまではCSSファイル上にて簡単にCSSを記載し、色付けなどを行ってきました。
言ってしまえば原始的なスタイリング手法で、見てわかる通り簡単に書けるレベルのCSSでは見栄えもちょっと古臭いと思います。
それではどうすれば画面のデザインが良くなるでしょう?
極論言ってしまうと、CSSを極めていけばより高度なデザインが行えます。
…しかし、現代にはもっと手軽に画面のデザインをスタイリッシュにするための手法が存在します。
ここでは、Reactで使えるデザイン補助のライブラリのうち、高機能なMaterial UIというライブラリを使用してみましょう。
| Material UI |
|---|
| https://mui.com/material-ui/getting-started/ |
$ npm install @mui/material @mui/icons-material @emotion/react @emotion/styled
Material UI(以下MUI)は使い方に慣れるまでちょっと大変ですので、今回は細かい説明は省きます。使えると開発の幅がぐっと広がりますので、興味があれば調べてみてください。
本講義ではコピペでよいので以降の手順を実施し、スタイリングの体験だけしてみましょう。
10-1. コンポーネントの追加
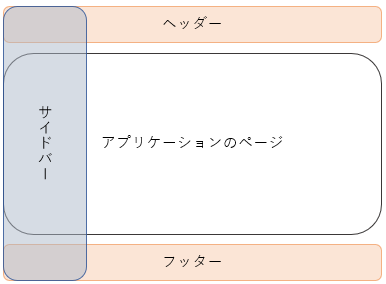
せっかくなのでWebアプリケーションらしい構成へと変更してみましょう。
下記のような画面構成を目指します。

要件定義
・ヘッダーとフッターはページコンテンツに関わらず常駐すること
・サイドバーは開閉可能であること
それでは構成変更&デザイン刷新を始めていきましょう。
いくつかコンポーネント(=アプリケーションのパーツ)を追加するため、新規ファイルを作成します。
10-1-1. 地点情報
コンポーネントの追加をする前に、src/App.js内で定義しているlocationList(地点情報)は複数のファイルで使いたいので個別ファイルに移します。
export const locationList = [
  { enName: 'tokyo', jpName: '東京', lat: 35.689, lon: 139.692, tz: 'Asia/Tokyo' },
  { enName: 'osaka', jpName: '大阪', lat: 34.686, lon: 135.520, tz: 'Asia/Tokyo' },
  { enName: 'saga', jpName: '佐賀', lat: 33.249, lon: 130.300, tz: 'Asia/Tokyo' },
  { enName: 'losAngeles', jpName: 'ロサンゼルス', lat: 33.93, lon: -118.40, tz: 'America/Los_Angeles' }
];
10-2-2. Webアプリケーションのサイドバー
まずはサイドバーを追加します。
ブラウザ左端に開閉可能なメニューを表示させます。
import { useState } from 'react';
import {
  Box, IconButton, Divider, SwipeableDrawer,
  List, ListItemButton, ListItemIcon, ListItemText, ListItem
} from '@mui/material';
import MenuIcon from '@mui/icons-material/Menu';
import PublicIcon from '@mui/icons-material/Public';
import LocationOnIcon from '@mui/icons-material/LocationOn';
import { locationList } from './location_list';

const Sidebar = ({ setLocation })=> {
  const [open, setOpen] = useState(false);

  // 地点選択時のアクション
  const onChangeLocation = (enName) => {
    const currentLocationData = locationList.find((lo) => enName === lo.enName);
    setLocation(currentLocationData);
  }

  // サイドバーの開閉
  const toggleDrawer = (open) => (event) => {
    if (
      event &&
      event.type === 'keydown' &&
      (event.key === 'Tab' || event.key === 'Shift')
    ) {
      return;
    }

    setOpen(open);
  };

  // 地点リスト
  const list = (
    <Box
      sx={{ width: 250 }}
      role='locations'
      onClick={toggleDrawer(false)}
      onKeyDown={toggleDrawer(false)}
    >
      <List>
        <ListItem>
          <ListItemIcon>
            <PublicIcon fontSize='large' sx={{ color: 'royalblue' }} />
          </ListItemIcon>
          <ListItemText primary='地点一覧' />
        </ListItem>
      </List>
      <Divider />
      <List>
        {locationList.map((location, index) => (
          <ListItem key={location.enName} disablePadding>
            <ListItemButton onClick={() => onChangeLocation(location.enName)}>
              <ListItemIcon>
                <LocationOnIcon sx={{ color: 'red' }} />
              </ListItemIcon>
              <ListItemText primary={location.jpName} />
            </ListItemButton>
          </ListItem>
        ))}
      </List>
    </Box>
  )

  return (
    <div>
      <IconButton edge='start' sx={{ mr: 2, color: 'white' }} onClick={toggleDrawer(true)}>
        <MenuIcon />
      </IconButton>
      <SwipeableDrawer
        anchor='left'
        open={open}
        onClose={toggleDrawer(false)}
        onOpen={toggleDrawer(true)}
      >
        {list}
      </SwipeableDrawer>
    </div>
  )
}

export default Sidebar
10-2-3. Webアプリケーションのヘッダー
続いてヘッダーです。アプリケーションの上部に常駐します。
先ほどのサイドバーも、このヘッダーから呼び出します。
(開閉ボタンをヘッダーに埋め込むため)
import { AppBar, Toolbar, Box, Typography } from '@mui/material';
import WbSunnyIcon from '@mui/icons-material/WbSunny';
import Sidebar from './sidebar';

const Header = (props) => {
  return (
    <Box sx={{ flexGrow: 1 }}>
      <AppBar position='static' sx={{ bgcolor: 'navy' }}>
        <Toolbar>
          <Sidebar {...props} />  {/* サイドバー配置 */}
          <Typography variant='h6' noWrap component='div' sx={{ flexGrow: 1, display: 'flex', alignItems: 'center' }}>
            天気予報アプリ
            <WbSunnyIcon sx={{ color: 'orange' }} />
          </Typography>
        </Toolbar>
      </AppBar>
    </Box>
  )
}

export default Header
10-2-4. Webアプリケーションのフッター
フッターはアプリケーションの下部に常駐します。
コピーライトや関連リンクが記載されていることが多いですね。
import { Grid, Box, Divider } from '@mui/material';

const Footer = () => {
  return (
    <footer>
      <Divider sx={{ mx: 5, bgcolor: 'lightgray' }} />  {/* 水平線 */}
      <Grid>
        <Box component='p' className='center-item' color='gray'>
          © {new Date().getFullYear()} 駆け出しむらぽん
        </Box>
      </Grid>
    </footer>
  )
}

export default Footer
10-3. Webアプリケーションのレイアウト管理コンポーネント
上記で作成した新しいコンポーネントと、メインのコンテンツであるApp.jsを含めたレイアウトの設定を行うコンポーネントを作成します。
import { useState } from 'react';
import { Grid } from '@mui/material';
import App from './App';
import Header from './header';
import Footer from './footer';
import { locationList } from './location_list';

const Layout = () => {
  const [location, setLocation] = useState(locationList[0]);

  return (
    <Grid container>
      <Grid item xs={12}>
        <Header setLocation={setLocation} />
      </Grid>
      <Grid item xs={12} m={2}>
        <App location={location} />
      </Grid>
      <Grid item xs={12}>
        <Footer />
      </Grid>
    </Grid>
  )
}

export default Layout
10-4. App(メインコンテンツ)の修正
アプリケーションの構成が変わりましたので、App.jsの内容も調整を行います。
親コンポーネントから子コンポーネントへは引数のように任意の値を渡すことができます。
「props」と呼ばれますが、イメージとしては関数の引数などと同じように考えていただいてOKです。
# src/layout.js
<App location={location} />

#   ↓
# { location: <value> } のようなオブジェクトの形式で渡されます
#   ↓

# src/App.js
const App = ({ location }) => {
...
...

/* 地点情報は外出ししたので削除 */
// const locationList = [
//   { enName: 'tokyo', jpName: '東京', lat: 35.689, lon: 139.692, tz: 'Asia/Tokyo' },
//   { enName: 'osaka', jpName: '大阪', lat: 34.686, lon: 135.520, tz: 'Asia/Tokyo' },
//   { enName: 'saga', jpName: '佐賀', lat: 33.249, lon: 130.300, tz: 'Asia/Tokyo' },
//   { enName: 'losAngeles', jpName: 'ロサンゼルス', lat: 33.93, lon: -118.40, tz: 'America/Los_Angeles' }
// ];

// 気象データ取得
const getWeatherData = async(location) => {
  return await weatherClient.get(openMeteoApiBase, {
    params: {
      timezone: 'Asia/Tokyo',
      latitude: location.lat,
      longitude: location.lon,
      hourly: [
        'weather_code'
      ].join(',')
    }
  });
}

const App = ({ location }) => { // 引数(props)からlocationを受け取る
  // const [location, setLocation] = useState(locationList[0]); // 削除
  const [weatherInfo, setWeatherInfo] = useState([]);
  const gotDates = weatherInfo.map((info) => format(new Date(info.datetime), 'yyyy-MM-dd'));
  const dateList = Array.from(new Set(gotDates));
  const [selectedDate, setSelectedDate] = useState(format(new Date(), 'yyyy-MM-dd'));
  const weatherInfoOnCurrentDate = weatherInfo.filter((info) => {
    return format(new Date(info.datetime), 'yyyy-MM-dd') === selectedDate
  });

  /* 下記削除 */
  // 地点選択時のアクション
  const onChangeLocation = (event) => {
    const currentLocationData = locationList.find((lo) => event.target.value === lo.enName);
    // setLocation(currentLocationData);
  }
  /* ここまで */

  // 日付選択時アクション
  const onClickDate = (event) => {
    if (event.target.value !== selectedDate) {
      setSelectedDate(event.target.value);
    }
  }

  // 選択されている日付にのみクラス"selected-date"を足す
  const checkDateButtonClassName = (date) => {
    return [
      'date-button',
      date === selectedDate ? 'selected-date' : null
    ].join(' ')
  }

  // 気象情報APIコールを実行
  useEffect(() => {
    (async() => {
      try {
        const res = await getWeatherData(location);
        const weatherData = res.data.hourly;
        const weatherDataByTime = weatherData.time.map((time, index) => {
          return {
            datetime: time,
            weatherCode: weatherData.weather_code[index]
          }
        }, {});
        setWeatherInfo(weatherDataByTime);
      } catch (error) {
        alert(error.message);
      }
    })();
  }, [location])

  return (
    <div>
      {/* 下記削除 */}
      {/* <div className='center-item'>
        <select id='location-select' onChange={onChangeLocation}>
          {locationList.map((lo) => (
            <option key={lo.enName} value={lo.enName}>{lo.jpName}</option>
          ))}
        </select>
      </div> */}
      {/* ここまで */}
      <h1 className='center-item'>{location.jpName} の天気</h1>
      <div className='center-item'>
        {dateList.map((date) => (
          <button
            key={date}
            className={checkDateButtonClassName(date)}
            value={date}
            onClick={onClickDate}
          >
            {date.replace(/^\d{4}\-/, '').replace(/\-/g, '/')}
          </button>
        ))}
      </div>
      <div className='center-item'>
        <table id='weather-table' border={1} >
          <tbody>
            {/* 取得した1時間おきの気象データを順番に表示します */}
            {weatherInfoOnCurrentDate.map((info) => (
              <tr key={info.datetime}>
                <td>{format(new Date(info.datetime), 'MM/dd - HH:mm')}</td>
                <td>{weatherNames[info.weatherCode]}</td>
              </tr>
            ))}
          </tbody>
        </table>
      </div>
    </div>
  );
}

export default App;
10-5. 新しい構成への移行
ここまでで新規ファイルの作成は完了です。
それではindex.jsを編集して、新しい構成でアプリケーションを表示します。
import React from 'react';
import ReactDOM from 'react-dom/client';
import './index.css';
/* 下記削除 */
import App from './App';
/* 下記追加 */
import Layout from './layout';
/* ここまで */
import reportWebVitals from './reportWebVitals';

const root = ReactDOM.createRoot(document.getElementById('root'));
root.render(
  <React.StrictMode>
    <Layout /> {/* Layout呼び出し */}
    {/* <App /> AppはLayout内から呼び出しているので削除する */}
  </React.StrictMode>
);

...
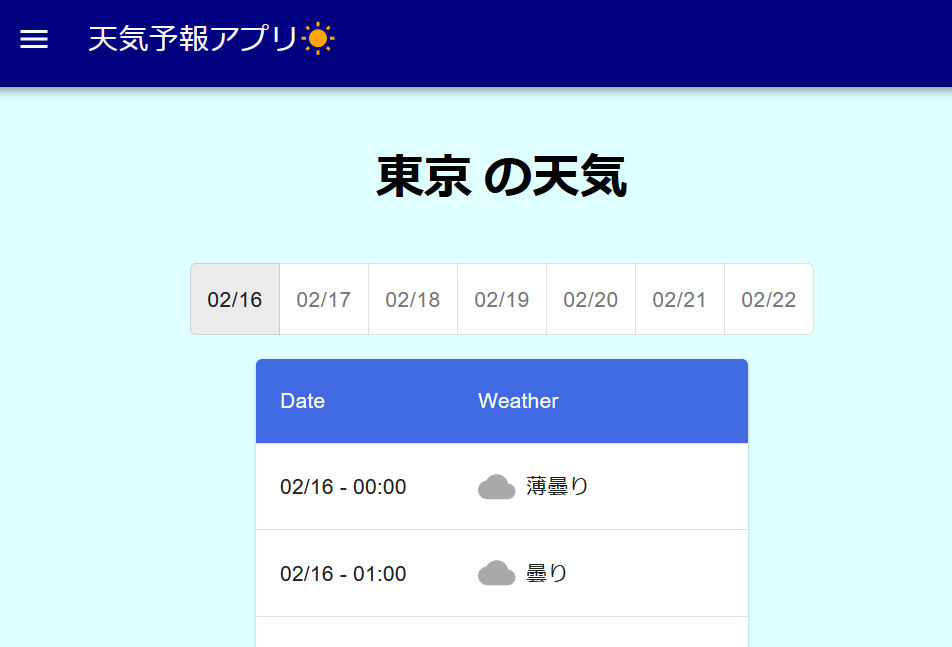
10-6. メインコンテンツのデザイン一新
最後にメインの天気予報表示部分のデザインを変更します。
import { useEffect, useState } from 'react';
/* 下記追加 */
import {
  Table, TableBody, TableCell, TableContainer, TableHead, TableRow,
  Paper, ToggleButton, ToggleButtonGroup, createTheme, ThemeProvider
} from '@mui/material';
/* ここまで */
import axios from 'axios';
import { format } from 'date-fns';
import { weatherNames } from './weather_names';

...

/* 下記追加 */
// 日付選択トグル
const DateToggle = ({ dateList, selectedDate, onClickDate }) => (
  <ToggleButtonGroup
    value={selectedDate}
    exclusive
    onChange={onClickDate}
    sx={{ bgcolor: 'white' }}
  >
    {dateList.map((date) => (
      <ToggleButton key={date} value={date}>
        {date.replace(/^\d{4}\-/, '').replace(/\-/g, '/')}
      </ToggleButton>
    ))}
  </ToggleButtonGroup>
)

// テーブルのスタイリング
const tableTheme = createTheme({
  components: {
    MuiTableCell: {
      styleOverrides: {
        head: {
          backgroundColor: 'royalblue',
          color: 'white'
        }
      }
    }
  }
});

// 気象テーブル
const WeatherTable = ({ weatherInfo }) => {
  return (
    <ThemeProvider theme={tableTheme}>
      <TableContainer component={Paper}>
        <Table>
          <TableHead>
            <TableRow>
              <TableCell width={100}>Date</TableCell>
              <TableCell>Weather</TableCell>
            </TableRow>
          </TableHead>
          <TableBody>
            {weatherInfo.map((info) => (
              <TableRow key={info.datetime}>
                <TableCell>{format(new Date(info.datetime), 'MM/dd - HH:mm')}</TableCell>
                <TableCell>{weatherNames[info.weatherCode]}</TableCell>
              </TableRow>
            ))}
          </TableBody>
        </Table>
      </TableContainer>
    </ThemeProvider>
  )
}
/* ここまで */

const App = ({ location }) => {

...

  /* クラス名判定の関数は使わなくなったので削除 */
  // 選択されている日付にのみクラス"selected-date"を足す
  // const checkDateButtonClassName = (date) => {
  //   return [
  //     'date-button',
  //     date === selectedDate ? 'selected-date' : null
  //   ].join(' ')
  // }
  /* ここまで */

...

  /* returnする内容をすべて置き換え */
  return (
    <Grid container>
      <Grid item sm={3} />  {/* ページの左側に余白を作ります */}
      <Grid item sm={6}>
        <h1 className='center-item'>{location.jpName} の天気</h1>
        <div className='center-item'>
          <DateToggle dateList={dateList} selectedDate={selectedDate} onClickDate={onClickDate} />
        </div>
        <div className='center-item'>
          <WeatherTable weatherInfo={weatherInfoOnCurrentDate} />
        </div>
      </Grid>
    </Grid>
  );
  /* ここまで */
}

export default App;
不要なCSSは削除します。
下記のみ残しましょう。
body {
  margin: 0;
  font-family: 'sans-serif';
  background-color: lightcyan;
}

.center-item {
  margin-bottom: 1em;
  display: flex;
  justify-content: center;
}
デザインについてほかの選択肢
Material-ui(MUI)は非常に便利で、慣れればできる幅がぐっと広がります。
ただしデザインの選択肢はこれ以外にも多彩に存在します。
| 名称 | 特徴・所感 |
|---|---|
| Material-ui(MUI) | 何よりもできることの多彩さ。 「こんなデザインがいい!」と「こんな機能が欲しい!」 を同時に実現できるので、覚えるほどに楽しいです。 Googleライクなデザインがコンセプトの様子。 |
| styled-components | 自由度が高く、これがあって助かる時がある。 ただし書き方はちょっと無骨で、 エディタの機能も活かせないのでちょっと古風な印象。 CSSとJSのハイブリッドができる感じ。 好きだけど、最適解ではない感じ。 |
| bootstrap | 知名度も高く、MUIのようなカジュアルなデザインを MUIより簡単に組めるのでとっつきやすいかも? 筆者はがっつり使ったことはないです |
| Tailwind-CSS | Reactのスタイリングライブラリとして主流な選択肢の様子。 使ったことないのですが、一番興味があります。 MUIと並んで多機能なイメージです。 |
and more ...
最後に
以上でアプリケーションの機能拡張は終了です。
まだまだ改良の余地はありますので、よかったらカスタマイズしてみてください。
- 降水確率の表示(openmeteo APIのさらなる理解)
- 地点の任意入力を可能にする(ユーザ入力用フォームの設置)
- 日付や地点ごとの固定URL発行(ページ分け、ダイナミックルーティング)
など…
また気が向いたら追加記事を出すかもしれません。
