はじめに
-
新型コロナ対策で、在宅時間が増えたため、何か自宅でできる新しいことに挑戦したいと考え、プログラミングの講座(ウェブアプリ制作コース)を受講しました。
-
職業は事務職で、プログラミングは初心者です。
本記事の概要
-
主に作成したウェブアプリの内容について書きます。
-
受講内容についてのブログ作成が修了要件にあるため、講座の一環として作成しています。ブログの作成がはじめてなので大変不慣れです。
学習振り返り
-
1ヶ月目
主に、PythonとライブラリNumPy(ナンパイ)、Pandas(パンダス)、Matplotlib(マットプロットリブ)について学習しました。 -
2ヶ月目
機械学習の流れを学習しました。
分類や予測の添削課題に取り組みました。 -
3ヶ月目
画像から犬の種類を識別するウェブアプリを作成しました。
作成したもの
画像から犬の種類を識別するウェブアプリを作成しました。
識別できる犬の種類は、ヨークシャーテリア、マルチーズ、ウェストハイランドホワイトテリア、ポメラニアン、パグの5種類です。
環境
GoogleColaboratory
目標
-
5種類の犬を分類できるようにする
-
これまでに学習したことのの理解を深め、学習内容の定着を図るため、添削課題で学習した内容を活かして作成する
-
極力少ないコード変更で、分類する犬の種類や数の変更に対応できるプログラムになるよう工夫する
作業手順
作業は、グーグルドライブのMyDriveに、あらかじめ作業用のフォルダ'dog_images'を作成し、そのフォルダ内で行いました。'dog_images'以外のフォルダはコードを実行しながら作成します。
MyDrive (/content/drive/MyDrive)
├── dog_images (←事前に作成)
│ ├── Mal
│ ├── Pom
│ ├── Pug
│ ├── Wes
│ └── Yor
└── dog_model
1. データ収集(スクレイピング)
Stanford Dogs Datasetのサイトから、識別したい種類の犬の画像を取得しました。
URLを指定してウェブサイトから使用したい画像を取得するコードを作成しました。
犬の種類ごとに、160~200枚程の画像が保存できました。
1.1. 犬種ごとのフォルダ名とURLを指定したリストを作成
犬種のURLは、共通するURL「http://vision.stanford.edu/aditya86/ImageNetDogs/」
と種類別のURL「n+数字8桁」(例:パグ犬はn02110958)の組み合わせだったので、
犬種ごとのフォルダ名とURLを指定したリストを作成しました。
import urllib.request
import zipfile
import os
import pathlib
import requests
from bs4 import BeautifulSoup


# Stanford Dogs DatasetのサイトのURLを指定
base_url= "http://vision.stanford.edu/aditya86/ImageNetDogs/"

# 5種類の犬種ごとのフォルダ名(犬種の英語3文字)とURLのリストを作成
# ☆識別する犬の種類や数を変更する場合はこの部分を変更する

# ヨークシャーテリア Yorkshire terrier "n02094433"
# マルチーズ Maltese dog "n02085936"
# ウェストハイランドホワイトテリア West Highland white terrier "n02098286"
# ポメラニアン Pomeranian "n02112018"
# パグ Pug "n02110958"

f_names = ['Yor','Mal','Wes','Pom','Pug']
d_urls = ['n02094433','n02085936','n02098286','n02112018','n02110958']
1.2. 画像データ保管フォルダ作成と画像の取得
作成したリストに対して、BeautifulSoup、for文などを使用して、
犬種ごとの画像データ保管フォルダを作成し、画像を取得、保存するコードを作成しました。
for fn, d in zip(f_names, d_urls):

  # 犬種ごとの画像を保管するフォルダが無ければ作成
  if not os.path.exists(fn):
    os.mkdir(fn)

  #犬種ごとのURLを作成
  bd_url = base_url + d + ".html"

  # 犬種ごとのURLを読み込み、BeautifulSoupでパースする
  response = requests.get(bd_url)
  soup = BeautifulSoup(response.text,"lxml")

  # ページ内のボタンのタグ要素から、画像が含まれる部分を取得
  urls = soup.find_all("a")

  #url_listにそれぞれの画像のURLを追加
  url_list = []
  for url in urls:

    url =  base_url + url.get("href")
    url_list.append(url)

  # 犬種ごとのフォルダに画像を格納
  for img in url_list:
    r = requests.get(img)
    with open(fn +"/"+ img.split('/')[-1], 'wb') as f:

      # .contentで画像データとして書き込む
      f.write(r.content)
2. データクレンジング(データ拡張・画像の水増し)
データ数を増やすため、取得できた画像データ一部のについて、データの水増しを行いました。
行った処理は、左右反転、閾値処理、ぼかし、モザイク、収縮の5種類です。
スクレイピングにより取得できた画像データのうち70枚に対して水増しを行い、犬の種類ごとに、2,200枚程の画像を作成することができました。
2.1. データ拡張の関数を作成
1枚の画像に対して、左右反転、閾値処理、ぼかし、モザイク、収縮の5種類の処理を行う関数を作成します。元の画像を含めて32枚の画像が作成されます。
import os
import numpy as np
import matplotlib.pyplot as plt
import cv2

# データ拡張の関数を作成
def scratch_image(img,flip=True,thr=True,filt=True,resize=True,erode=True):
    result_images = [img]#水増しした画像を保管するリスト

    #左右反転
    if flip:
        fliped_images = []
        for image in result_images:
            my_img_flip = cv2.flip(image,1)
            fliped_images.append(my_img_flip)
        result_images += fliped_images

    #閾値処理
    if thr:
        thr_applied_images = []
        for image in result_images:
            retval, my_img_thr = cv2.threshold(image,100,255,cv2.THRESH_TOZERO)
            thr_applied_images.append(my_img_thr)
        result_images += thr_applied_images

    #ぼかし
    if filt:
        filtted_images = []
        for image in result_images:
            my_img_blur = cv2.GaussianBlur(image,(5,5),0)
            filtted_images.append(my_img_blur)
        result_images += filtted_images

    #モザイク
    img_size = img.shape
    if resize:
        resized_images = []
        for image in result_images:
            my_img_resize = cv2.resize(cv2.resize(image, (img_size[1]//5, img_size[0]//5)), (img_size[1], img_size[0]))
            resized_images.append(my_img_resize)
        result_images += resized_images

    #収縮(「縮小」とは異なります)
    filt = np.array([[0,1,0],
                     [1,0,1],
                     [0,1,0]],np.uint8)
    if resize:
        eroded_images = []
        for image in result_images:
            my_img_erode = cv2.erode(image,filt)
            eroded_images.append(my_img_erode)
        result_images += eroded_images

    return result_images
2.2. フォルダごとに画像データの水増し
for文で、犬の種類別フォルダに保管されている画像データのうち、
70枚についてデータの水増しを行うコードを作成しました。
# 作業するディレクトリに移動
dir_work = '/content/drive/MyDrive/dog_images/'
os.chdir(dir_work)

# 作業用ディレクトリ内にあるフォルダの一覧を取得
path = os.listdir(dir_work)

for f in path:
  #フォルダ内にある画像の一覧を取得
  path_img = os.listdir(dir_work + f)

# 画像の読み込み ,最初の70枚分の画像の水増し
  for i in path_img[:70]:
    dog_img = cv2.imread(dir_work + f +'/'+ i)

    # 画像の水増しの関数を実行
    scratch_images = scratch_image(dog_img)

    #犬種ごとのフォルダ内に増加した画像を保存
    for num, im in enumerate(scratch_images):
        # 保存先のディレクトリを指定、番号を付けて保存
        cv2.imwrite(dir_work + f +'/'+ i+ str(num) + ".jpg" ,im)

    #元の画像を削除
    os.remove(dir_work + f +'/'+ i)
3. 機械学習手法でデータを学習
vgg16を転移学習したモデルを作成しました。
作成後、モデルの評価、テストを行いモデルを保存しました。
3.1. 準備
ライブラリのインポート、ディレクトリの情報の取得などを行いました。
import os
import cv2
import numpy as np
import matplotlib.pyplot as plt
from tensorflow.keras.utils import to_categorical
from tensorflow.keras.layers import Dense, Dropout, Flatten, Input
from tensorflow.keras.applications.vgg16 import VGG16
from tensorflow.keras.models import Model, Sequential
from tensorflow.keras import optimizers
from google.colab import files

# 作業したいディレクトリに移動
dir_work = '/content/drive/MyDrive/dog_images/'
os.chdir(dir_work)

# 作業用ディレクトリ内にあるフォルダの一覧を取得
path = os.listdir(dir_work)
3.2.モデルの作成
vgg16を転移学習したモデルを作成し、学習過程を取得しました。
for n,f in enumerate(path):

  #犬の種類ごとのフォルダ内にある画像の一覧を取得

  path_img = os.listdir(dir_work + f)
  print(n,f)

  #犬の種類ごとに、画像のサイズを変更して、リストに保存
  img_A = []

  for i in path_img:
      img = cv2.imread(dir_work + f +'/'+ i)
      img = cv2.resize(img, (50,50))
      img_A.append(img)

  #NumPy配列に変換、正解ラベルを作成する
  A = np.array(img_A)
  b = np.array([n]*len(img_A))

  #フォルダ別の配列をまとめた配列を作成する
  if n == 0:
    X = A
    y = b
  else:
    X = np.append(X, A, axis=0)
    y = np.append(y, b)

# フォルダのインデックス番号順に並んでいるデータをランダムに並べ替える
rand_index = np.random.permutation(np.arange(len(X)))
X = X[rand_index]
y = y[rand_index]

# データの分割
X_train = X[:int(len(X)*0.8)]
y_train = y[:int(len(y)*0.8)]
X_test = X[int(len(X)*0.8):]
y_test = y[int(len(y)*0.8):]

y_train = to_categorical(y_train)
y_test = to_categorical(y_test)

# vgg16のインスタンスの生成
input_tensor = Input(shape=(50, 50, 3))
vgg16 = VGG16(include_top=False, weights='imagenet', input_tensor=input_tensor)

top_model = Sequential()
top_model.add(Flatten(input_shape=vgg16.output_shape[1:]))
top_model.add(Dense(256, activation='relu'))

# ドロップアウト
top_model.add(Dropout(rate=0.5))

## 5種類の犬の種類を出力するのでDense(5
top_model.add(Dense(5, activation='softmax'))

# モデルの連結
model = Model(inputs=vgg16.input, outputs=top_model(vgg16.output))

# vgg16の重みの固定
for layer in model.layers[:19]:
    layer.trainable = False

model.compile(loss='categorical_crossentropy',
              optimizer=optimizers.SGD(lr=1e-4, momentum=0.9),
              metrics=['accuracy'])
model.summary()


print('Test loss:', scores[0])
print('Test accuracy:', scores[1])
3.3. モデルの評価
学習過程を取得し、精度を評価するコードを作成しました。
# 学習過程の取得
history = model.fit(X_train, y_train, batch_size=32, epochs=30, validation_data=(X_test, y_test))

# 精度の評価
scores = model.evaluate(X_test, y_test, verbose=1)

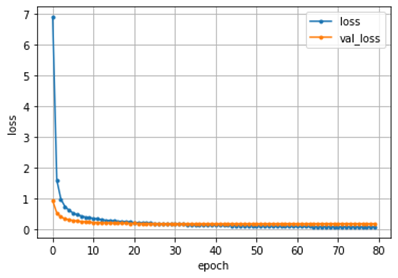
# epoch毎の予測値の正解データとの誤差を表すグラフを作成
loss=history.history['loss']
val_loss=history.history['val_loss']
epochs=len(loss)

plt.plot(range(epochs), loss, marker = '.', label = 'loss')
plt.plot(range(epochs), val_loss, marker = '.', label = 'val_loss')
plt.legend(loc = 'best')
plt.grid()
plt.xlabel('epoch')
plt.ylabel('loss')
plt.show()
当初、epoch数を80としていましたが、30を超えた辺りから val_lossが上昇していることが分かったので、30に変更しました。
- 変更前
Test loss: 0.1666262298822403
Test accuracy: 0.9713200926780701
- 変更後
Test loss: 0.1890518218278885
Test accuracy: 0.9687895178794861
3.4. 性能をテスト、モデルの保存
テストデータでモデルの性能をテストし、モデル保存用のフォルダを作成し、ファイルを保存するコードを作成しました。
# 画像を一枚受け取り、どの犬種かを判定して返す関数
def pred_dogs(img):

  img = cv2.resize(img, (50, 50))##サイズを同じにする
  pred = np.argmax(model.predict(np.array([img])))##argmaxは、確率が高い方を表示する
  if pred == 0:
    return 'Yor'
  elif pred == 1:
    return 'Mal'
  elif pred == 2:
    return 'Wes'
  elif pred == 3:
    return 'Pom'
  elif pred == 4:
    return 'Pug'


# pred_dogs関数に写真を渡して種類を予測します
for i in range(5):
    # pred_dogs関数に写真を渡して種類を予測します
    path_img = os.listdir(dir_work + path[i])
    img = cv2.imread(dir_work + path[i] +'/'+ path_img[i])
    b,g,r = cv2.split(img)
    img = cv2.merge([r,g,b])
    plt.imshow(img)
    plt.show()
    print(pred_dogs(img))


# resultsディレクトリを作成
os.chdir('/content/drive/MyDrive')
result_dir = 'dog_model'
if not os.path.exists(result_dir):
    os.mkdir(result_dir)

# 重みを保存
model.save(os.path.join(result_dir, 'model.h5'))

# ファイルをダウンロード
files.download( '/content/drive/MyDrive/dog_model/model.h5' )
4.機械学習モデルをWEBなどに実装
保存したモデルを使用し、犬種を識別するためのコードを作成しました。
作成したコードをherokにデプロイし、ウェブアプリを作成しました。
import os
from flask import Flask, request, redirect, url_for, render_template, flash
from werkzeug.utils import secure_filename
from tensorflow.keras.models import Sequential, load_model
from tensorflow.keras.preprocessing import image
import numpy as np
from tensorflow.keras.applications.vgg16 import VGG16

# ☆識別する犬の種類を変更する場合は、ここを変える
classes = ["ヨークシャーテリア","マルチーズ","ウェストハイランドホワイトテリア","ポメラニアン","パグ"]
num_classes = len(classes)
image_size = 50

UPLOAD_FOLDER = "uploads"
ALLOWED_EXTENSIONS = set(['png', 'jpg', 'jpeg', 'gif'])

app = Flask(__name__)

def allowed_file(filename):
    return '.' in filename and filename.rsplit('.', 1)[1].lower() in ALLOWED_EXTENSIONS

model = load_model('./model.h5')#学習済みモデルをロードする
@app.route('/', methods=['GET', 'POST'])
def upload_file():
    if request.method == 'POST':
        if 'file' not in request.files:
            flash('ファイルがありません')
            return redirect(request.url)
        file = request.files['file']
        if file.filename == '':
            flash('ファイルがありません')
            return redirect(request.url)
        if file and allowed_file(file.filename):
            filename = secure_filename(file.filename)
            file.save(os.path.join(UPLOAD_FOLDER, filename))
            filepath = os.path.join(UPLOAD_FOLDER, filename)

            #受け取った画像を読み込み、np形式に変換
            img = image.load_img(filepath, grayscale=False, target_size=(image_size,image_size))
            img = image.img_to_array(img)
            data = np.array([img])
            #変換したデータをモデルに渡して予測する
            result = model.predict(data)[0]
            predicted = result.argmax()
            pred_answer = "これは " + classes[predicted] + " です"

            return render_template("index.html",answer=pred_answer)

    return render_template("index.html",answer="")


if __name__ == "__main__":
    port = int(os.environ.get('PORT', 8080))
    app.run(host ='0.0.0.0',port = port)
今後の活用
違う犬種の識別や種類の変更に取り組みたいです。
おわりに
大変難しかったですが、なんとかアプリを作成することができてよかったです。
目標としていた1~3は達成できたと思いますが、まだ理解が不十分で、改善すべき点が多々あると思うので、今後も学習を継続し、改善していきたいとおもいます。

