はじめに
今回は、SwiftUIを使ってFirebaseAuthと連携するAppleIDログイン処理を実装します。
AppleIDログインとはよくみる「Sign in with Apple」です。
実装についてはFirebaseの公式サイトに載っているコードのコピペがほとんどですが、
SwiftUIで実装する記事があまりなかったため解説していきたいと思います。
実装の流れ
① Firebase導入(プロジェクト作成・SDK導入)
② UI実装
③ ログイン処理実装
① Firebase導入(プロジェクト作成・SDK導入)
まずはFirebaseの初期設定とアプリにSDKを導入します。
すでにご存知の方は読み飛ばしていただいて構いません。
Xcodeプロジェクト作成
Xcodeから新規SwiftUIプロジェクトを作成してください。
今回はサンプルプロジェクトとして「AppleVerify」としました。
Firebaseプロジェクト作成
Firebaseのコンソール上でプロジェクトを作成します。
SwiftのApp名と同様「AppleVerify」としました。
特に何も考えず次へを押していき作成を完了させます。
FirebaseAuthでAppleID認証を有効にする
Firebaseのメニュ画面にてAuthenticationを選択し、
Sign-in methodタブのAppleを有効化して保存する。
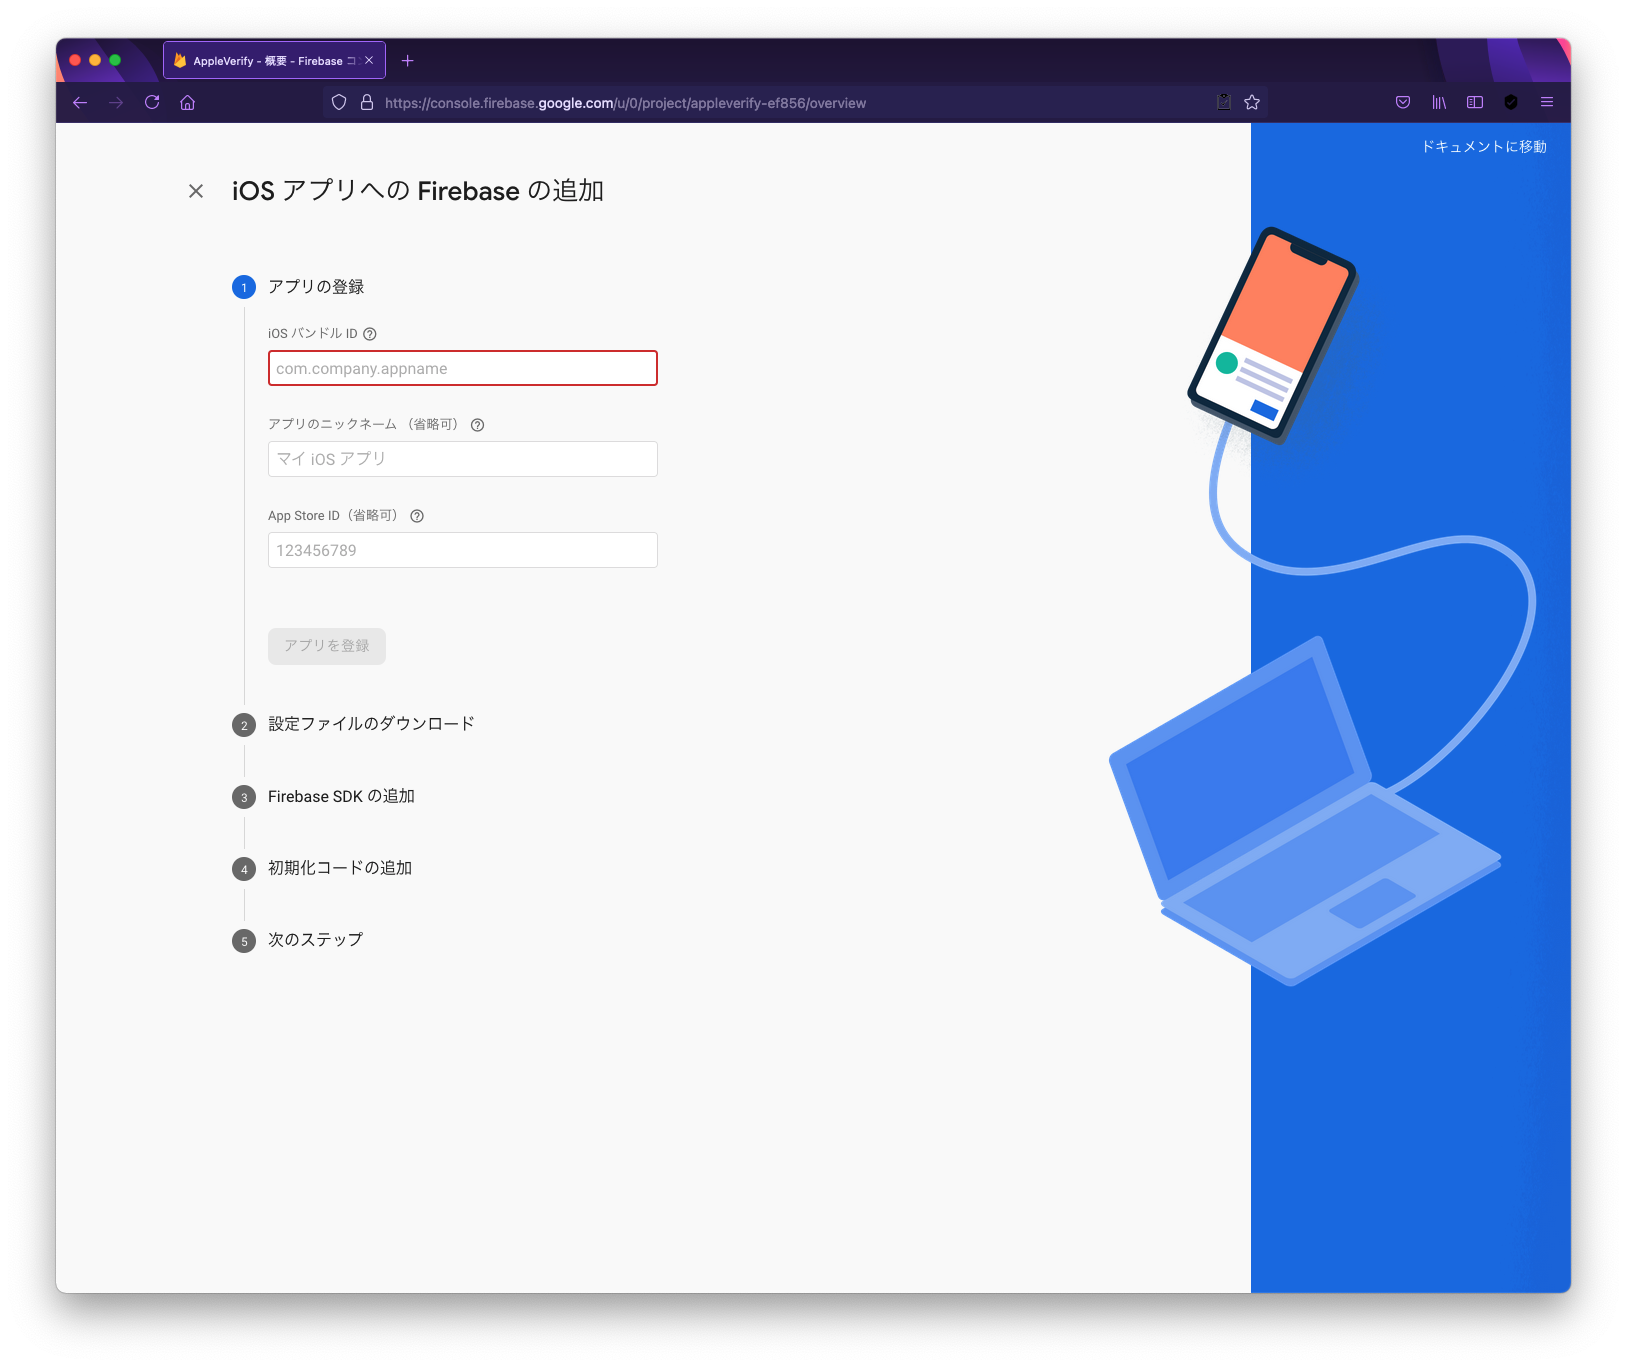
Firebaseにアプリを登録する
作成したプロジェクトのトップページからiosを選択しアプリを登録します。
アプリのバンドルIDのみ入力して次に進みます。
設定ファイルのインポート
その後設定ファイルをダウンロードしてXcodeプロジェクトにドラックアンドドロップで追加します。
SDKの追加
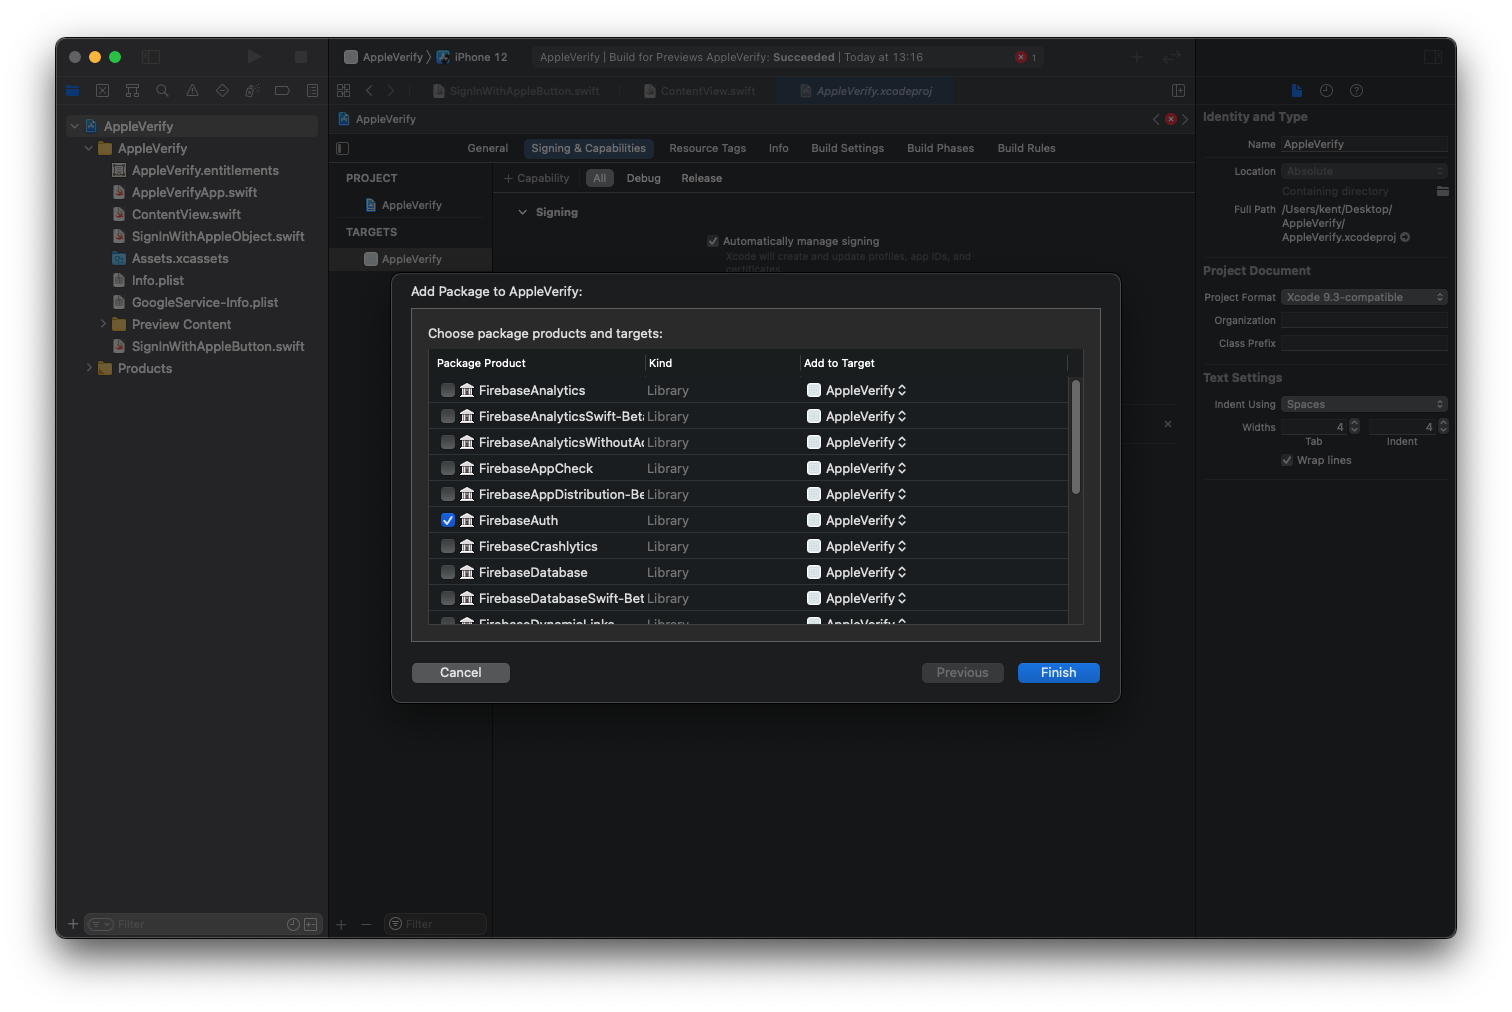
FirebaseSDKの追加はXcodeのpackageRepositoryを使って導入しました。
XcodeのFile>Swift Packages>Add Package Dependencyをクリックして下記のリポジトリを入力。
そのまま次へ進んでいき下記画面でFirebaseAuthを選択。
初期化コード追加
最後に初期化コードを実装します。AppleVerifyApp.swiftを下記のようにしてください。
※SwiftUIでの実装のため公式のコードと異なっています。
import SwiftUI
import Firebase

@main
struct AppleVerifyApp: App {
    @UIApplicationDelegateAdaptor(AppDelegate.self) var appDelegate
    var body: some Scene {
        WindowGroup {
            ContentView()
        }
    }
}

class AppDelegate: NSObject, UIApplicationDelegate {
    func application(_ application: UIApplication, didFinishLaunchingWithOptions launchOptions: [UIApplication.LaunchOptionsKey : Any]? = nil) -> Bool {
        FirebaseApp.configure()
        return true
    }
}
capabilityの設定
AppleIDでのサインインを許可する設定をXcode上で行います。
AppleVeryfy>TARGETS>Signing &Capabilitiesタブを選択。「+Capability」から「Sign in with Apple」を追加する

以上で事前準備は完了となります。
続いて実装に移っていきましょう。
② UI実装
ログインボタンを作成します。
ボタンのUIはAuthenticationServicesパッケージに含まれているASAuthorizationAppleIDButtonを使うことでよく見る共通のデザインで実装することが出来ます。
しかしこちらはUIKitのモジュールになりますのでSWiftUIで使用するためにはUIViewRepresentableでラップする必要があります。
新規SwiftファイルとしてSignInWithAppleButton.swiftを追加してください。
import SwiftUI
import AuthenticationServices

struct SignInWithAppleButton: UIViewRepresentable {
    typealias UIViewType = ASAuthorizationAppleIDButton

    func makeUIView(context: Context) -> ASAuthorizationAppleIDButton {
        return ASAuthorizationAppleIDButton(type: .signIn, style: .black)
    }

    func updateUIView(_ uiView: ASAuthorizationAppleIDButton, context: Context) {}
}
ContentView.swiftに反映して確認します。
struct ContentView: View {
    var body: some View {

        VStack {
            Button(action: {
                print("ここにログイン処理を書く")
            }, label: {
                SignInWithAppleButton()
                    .frame(height: 50)
                    .cornerRadius(16)
            })
            .padding()
        }
    }
}
ボタンが表示されました!UI実装はここまでです。
最後はいよいよログイン処理を実装していきます。
③ ログイン処理実装
認証の流れ
まずはどのような流れでログイン認証がなされるのかを図で見ていきます。

こちらの図の通り、まずユーザはAppleにcredentialをリクエストします。
その際、ノンス(nonce)を暗号化したものを付与しておき、検証時に改ざんされていないかを確認します。
ノンスとは暗号通信で用いられる、使い捨てのランダムな値のことです。
credentialを貰ったらそれを使ってFirebaseに認証をします。
実装
実装ですが、認証の部分についてはFirebaseのコードを参考。
ランダムなnonceの生成はAuth0のドキュメントを参考にして実装しました。
新規Swiftファイルを作成し、下記をコピペしてください。
sginInWithApple()でappleへのrequestを生成しています
randomNonceString()とsha256()はランダム文字列と暗号化関数です。
authorizationController()ではAppleから受信したcredentialを検証し、
問題がなければFirebaseへログイン認証リクエストを生成しています。
import AuthenticationServices
import CryptoKit
import FirebaseAuth

public class SignInWithAppleObject: NSObject {
    private var currentNonce: String?

    public func signInWithApple() {
        let request = ASAuthorizationAppleIDProvider().createRequest()
        request.requestedScopes = [.email, .fullName]
        let nonce = randomNonceString()
        currentNonce = nonce
        request.nonce = sha256(nonce)

        let authorizationController = ASAuthorizationController(authorizationRequests: [request])
        authorizationController.delegate = self
        authorizationController.performRequests()
    }

    //  https://auth0.com/docs/api-auth/tutorials/nonce#generate-a-cryptographically-random-nonce
    private func randomNonceString(length: Int = 32) -> String {
        precondition(length > 0)
        let charset: Array<Character> =
            Array("0123456789ABCDEFGHIJKLMNOPQRSTUVXYZabcdefghijklmnopqrstuvwxyz-._")
        var result = ""
        var remainingLength = length

        while remainingLength > 0 {
            let randoms: [UInt8] = (0 ..< 16).map { _ in
                var random: UInt8 = 0
                let errorCode = SecRandomCopyBytes(kSecRandomDefault, 1, &random)
                if errorCode != errSecSuccess {
                    fatalError("Unable to generate nonce. SecRandomCopyBytes failed with OSStatus \(errorCode)")
                }
                return random
            }

            randoms.forEach { random in
                if remainingLength == 0 {
                    return
                }

                if random < charset.count {
                    result.append(charset[Int(random)])
                    remainingLength -= 1
                }
            }
        }

        return result
    }

    private func sha256(_ input: String) -> String {
        let inputData = Data(input.utf8)
        let hashedData = SHA256.hash(data: inputData)
        let hashString = hashedData.compactMap {
            return String(format: "%02x", $0)
        }.joined()

        return hashString
    }

}

extension SignInWithAppleObject: ASAuthorizationControllerDelegate {

    public func authorizationController(controller: ASAuthorizationController, didCompleteWithAuthorization authorization: ASAuthorization) {
        // Sign in With Firebase app
        if let appleIDCredential = authorization.credential as? ASAuthorizationAppleIDCredential {
            guard let nonce = currentNonce else {
                print("Invalid state: A login callback was received, but no login request was sent.")
                return
            }

            guard let appleIDToken = appleIDCredential.identityToken else {
                print("Unable to fetch identity token")
                return
            }

            guard let idTokenString = String(data: appleIDToken, encoding: .utf8) else {
                print("Unable to serialize token string from data")
                return
            }

            let credential = OAuthProvider.credential(withProviderID: "apple.com", idToken: idTokenString, rawNonce: nonce)
            Auth.auth().signIn(with: credential) { result, error in
                guard error == nil else {
                    print(error!.localizedDescription)
                    return
                }
            }
        }
    }
}
ログイン処理を実装しましたのでそれをContentViewのボタンに組み込みます。
SignInWithAppleObjectのインスタンスを定義し、
ボタンのaction内でsignInWithApple()を呼び出しています
struct ContentView: View {
    @State private var email: String = ""
    @State private var password: String = ""

    @State private var signInWithAppleObject = SignInWithAppleObject()

    var body: some View {

        VStack {
            TextField("E-mail", text: self.$email)
            TextField("Password", text: self.$password)

            Button(action: {
                signInWithAppleObject.signInWithApple()
            }, label: {
                SignInWithAppleButton()
                    .frame(height: 50)
                    .cornerRadius(16)
            })
            .padding()
        }
    }
}
以上で実装は終了となります。
動作確認
最後に動作確認を行います。
動作確認はシミュレータではうまく動作しないことがありますので実機で確認を行ってください。
実行してボタンをタップすると下記のように認証がされるかと思います。

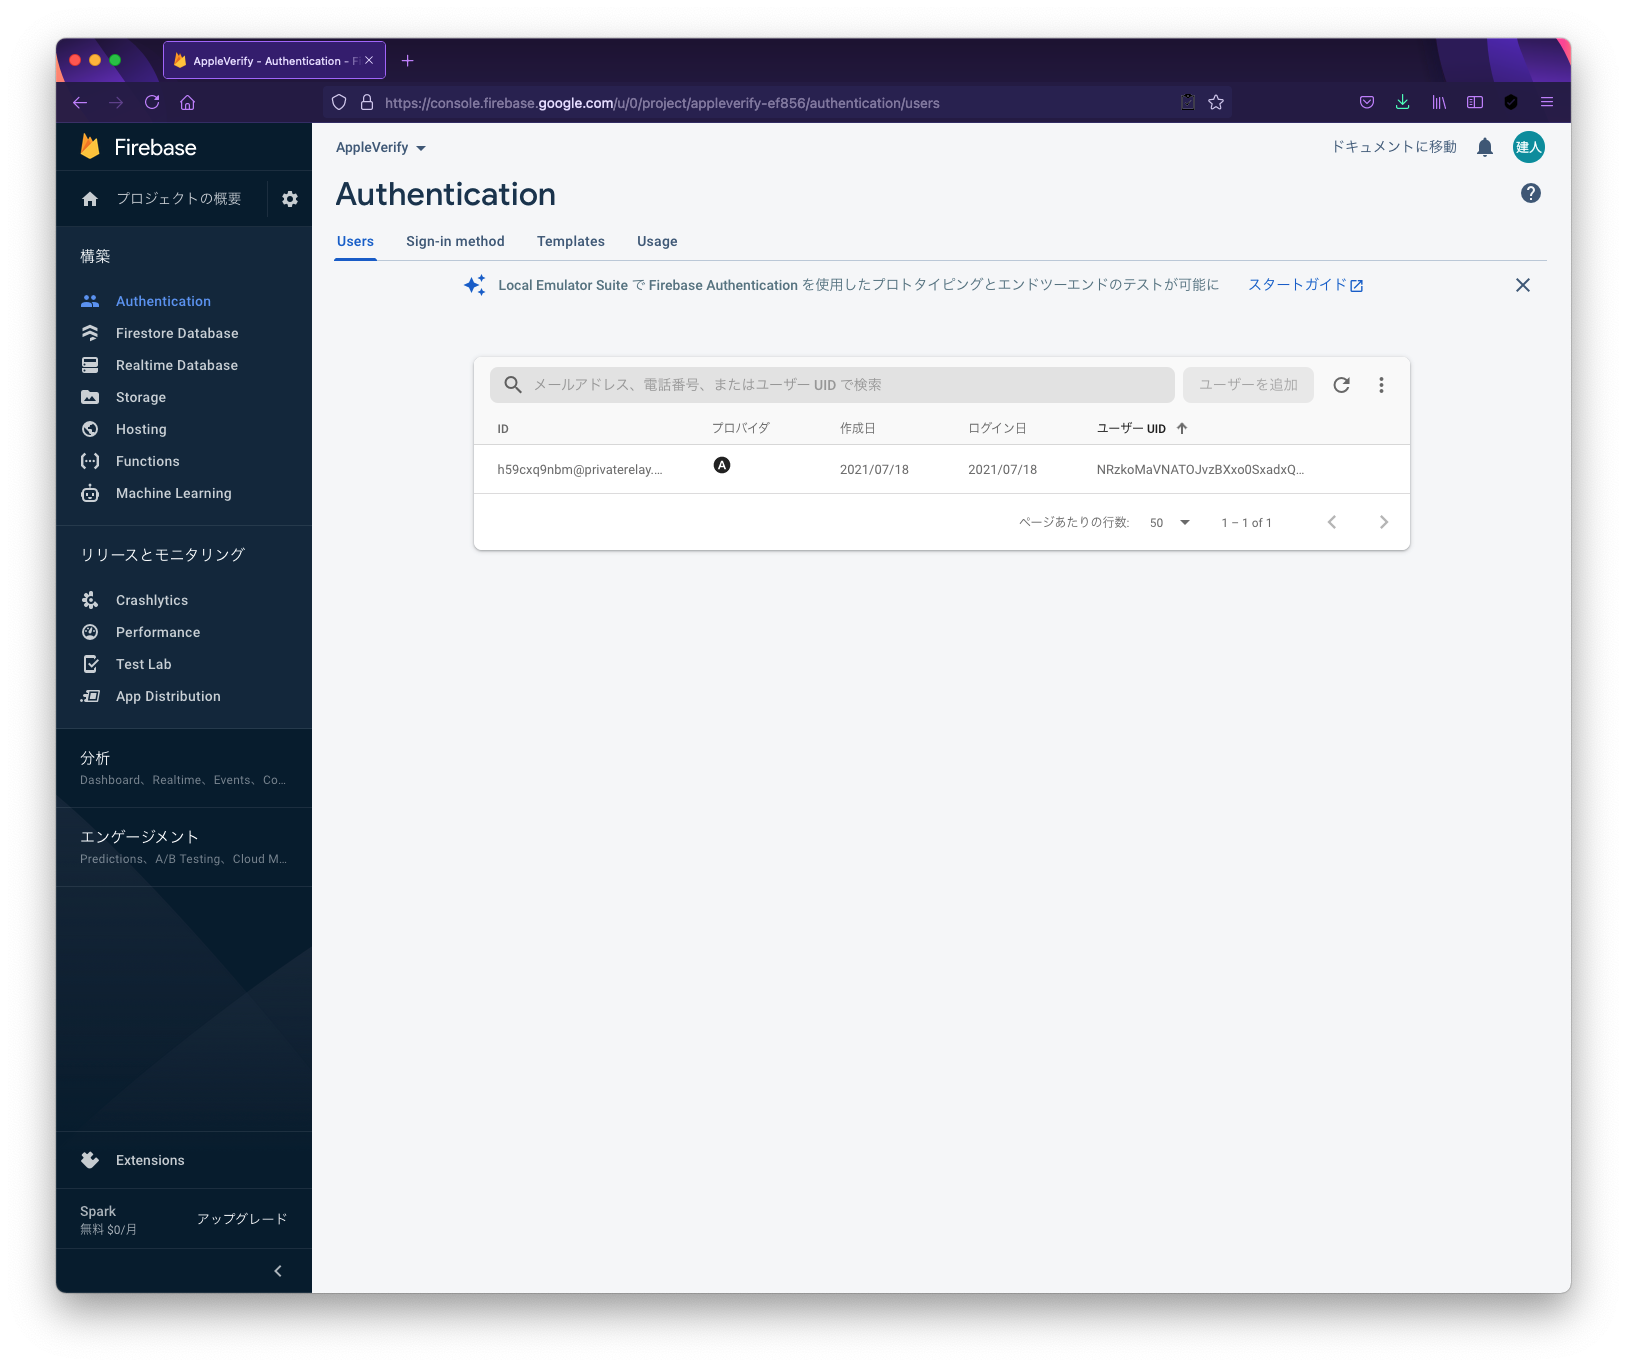
FirebaseのAuthenticationコンソールを確認するとユーザが追加されました!!
おわりに
本日はSwiftUIを用いてFirebaseのAppleID認証を実装しましたが、いかがでしたでしょうか。
私自身完全に理解しているわけではございませんので間違っている点がありましたらコメントいただけると嬉しいです。
以上です!


