はじめに
Androidアプリの開発のために、Android Studioの環境構築をします。
この記事で取り扱う環境は、Windows10です。
真新しい情報ではありません。体系立てて理解を整理するために、自分が理解しやすい枠組みでまとめるものです。
ひとつ前
ひとつ先
JavaでHello World
1.Javaプロジェクトの作成
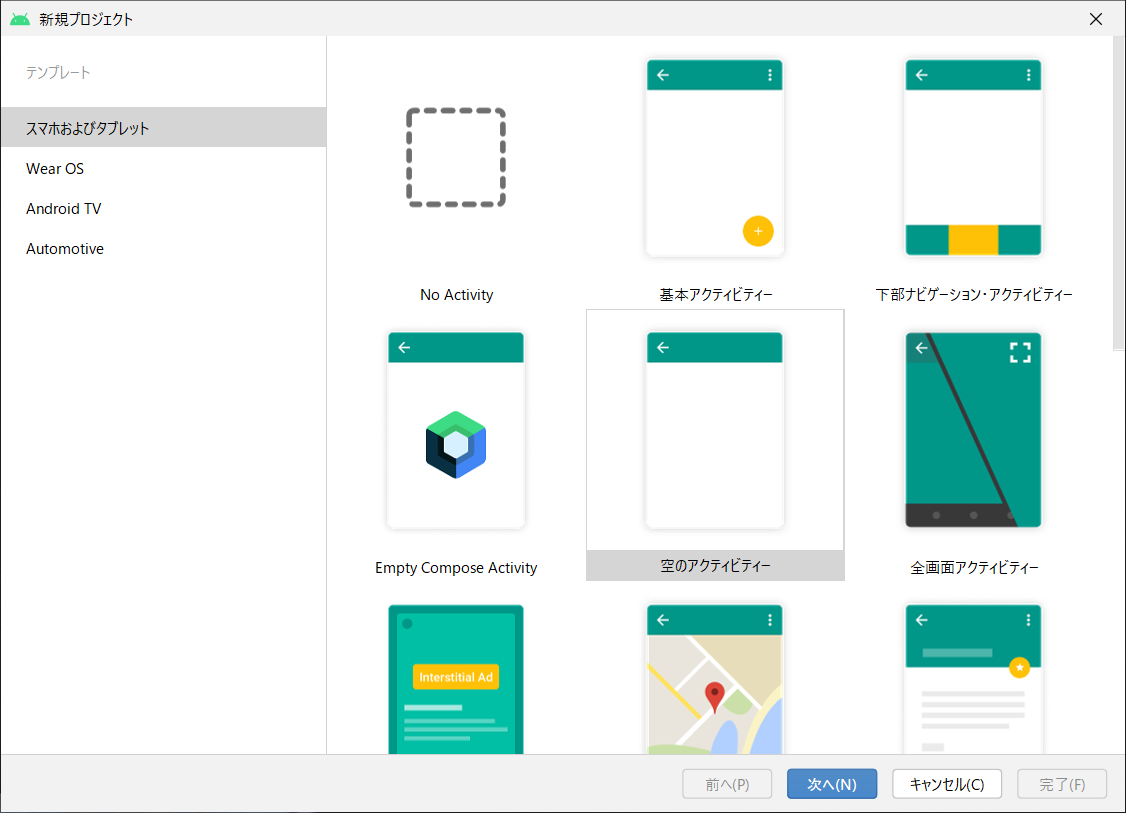
1.1.新規プロジェクト(テンプレート選択)
空のアクティビティを選択します。
1.2.新規プロジェクト(プロジェクトの構成)
プロジェクトの構成情報を入力して「完了(F)」を押下します。
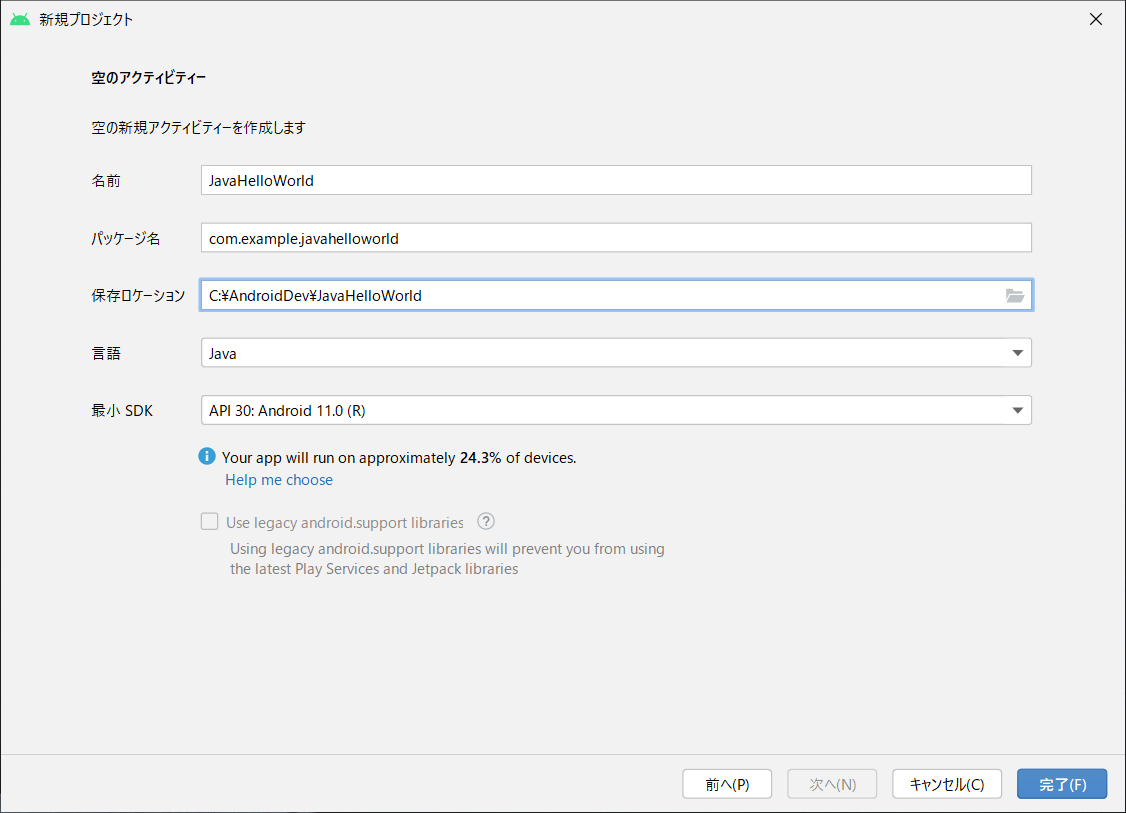
| 項目 | 値 |
|---|---|
| 名前 | JavaHelloWorld |
| パッケージ名 |
com.example.javahelloworld (ひとまず名前に対するデフォルト) |
| 保存ロケーション |
C:\AndroidDev\JavaHelloWorld (任意の場所) |
| 言語 | Java |
| 最小 SDK | API 30: Android 11.0(R) |
1.3.レイアウトファイルの確認
src/main/res/layout/activity_main.xmlの中身を確認します。
TextViewの中に"Hello World!"というテキストが定義されているのが分かります。
<?xml version="1.0" encoding="utf-8"?>
<androidx.constraintlayout.widget.ConstraintLayout xmlns:android="http://schemas.android.com/apk/res/android"
    xmlns:app="http://schemas.android.com/apk/res-auto"
    xmlns:tools="http://schemas.android.com/tools"
    android:layout_width="match_parent"
    android:layout_height="match_parent"
    tools:context=".MainActivity">

    <TextView
        android:layout_width="wrap_content"
        android:layout_height="wrap_content"
        android:text="Hello World!"
        app:layout_constraintBottom_toBottomOf="parent"
        app:layout_constraintLeft_toLeftOf="parent"
        app:layout_constraintRight_toRightOf="parent"
        app:layout_constraintTop_toTopOf="parent" />

</androidx.constraintlayout.widget.ConstraintLayout>
1.4.アクティビティクラスの確認
src/main/java/com/example/javahelloworld/MainActivity.javaの中身を確認します。
package com.example.javahelloworld;

import androidx.appcompat.app.AppCompatActivity;

import android.os.Bundle;

public class MainActivity extends AppCompatActivity {

    @Override
    protected void onCreate(Bundle savedInstanceState) {
        super.onCreate(savedInstanceState);
        setContentView(R.layout.activity_main);
    }
}
1.5.アプリ マニフェストの確認
src/main/AndroidManifest.xmlの中身を確認します。
<?xml version="1.0" encoding="utf-8"?>
<manifest xmlns:android="http://schemas.android.com/apk/res/android"
    package="com.example.javahelloworld">

    <application
        android:allowBackup="true"
        android:icon="@mipmap/ic_launcher"
        android:label="@string/app_name"
        android:roundIcon="@mipmap/ic_launcher_round"
        android:supportsRtl="true"
        android:theme="@style/Theme.JavaHelloWorld">
        <activity
            android:name=".MainActivity"
            android:exported="true">
            <intent-filter>
                <action android:name="android.intent.action.MAIN" />

                <category android:name="android.intent.category.LAUNCHER" />
            </intent-filter>
        </activity>
    </application>

</manifest>
1.6.仮想デバイスで確認

2.メッセージをJavaから書き換える
2.1.src/main/res/layout/activity_main.xmlの定義変更
Hello Worldが定義されているTextViewを選択します。
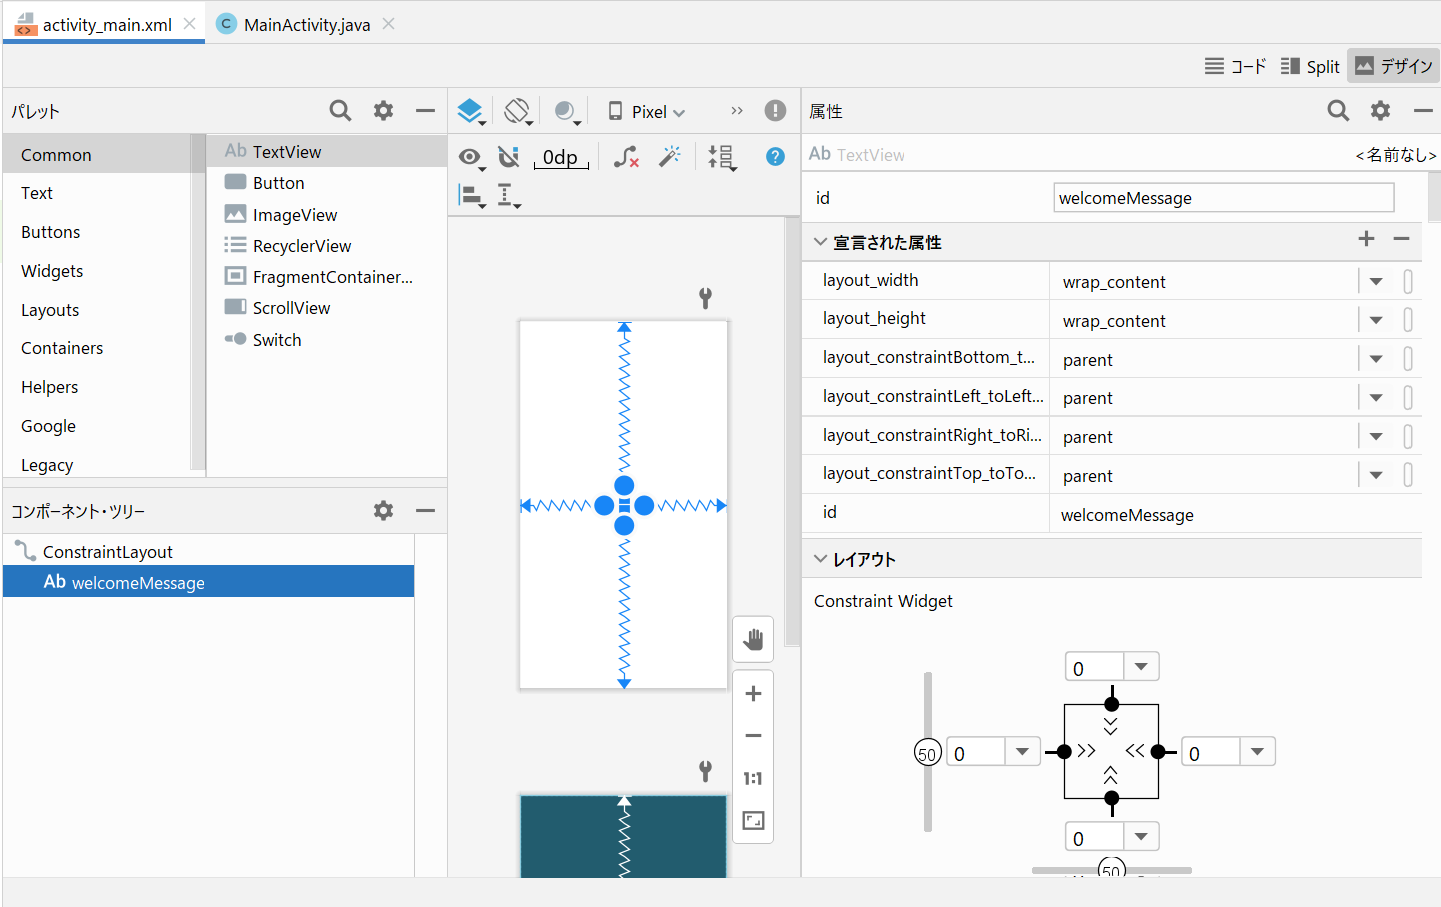
| 項目 | 変更内容 |
|---|---|
| ID | 空欄 → welcomeMessage
|
| Text |
Hello World → 空欄 |
書き換わっていることを確認します。
<?xml version="1.0" encoding="utf-8"?>
<androidx.constraintlayout.widget.ConstraintLayout xmlns:android="http://schemas.android.com/apk/res/android"
    xmlns:app="http://schemas.android.com/apk/res-auto"
    xmlns:tools="http://schemas.android.com/tools"
    android:layout_width="match_parent"
    android:layout_height="match_parent"
    tools:context=".MainActivity">

    <TextView
        android:id="@+id/welcomeMessage"
        android:layout_width="wrap_content"
        android:layout_height="wrap_content"
        app:layout_constraintBottom_toBottomOf="parent"
        app:layout_constraintLeft_toLeftOf="parent"
        app:layout_constraintRight_toRightOf="parent"
        app:layout_constraintTop_toTopOf="parent" />

</androidx.constraintlayout.widget.ConstraintLayout>
2.2.アクティビティクラスに出力処理を追加
src/main/java/com/example/javahelloworld/MainActivity.javaを編集します。
package com.example.javahelloworld;

import androidx.appcompat.app.AppCompatActivity;

import android.os.Bundle;
import android.widget.TextView;

public class MainActivity extends AppCompatActivity {

    @Override
    protected void onCreate(Bundle savedInstanceState) {
        super.onCreate(savedInstanceState);
        setContentView(R.layout.activity_main);
        TextView textView = findViewById(R.id.welcomeMessage);
        // さいしょは直書き
        textView.setText("ようこそいらっしゃいました!");
    }
}
2.3.仮想デバイスで確認
