やりたいこと
Bitbucketにコードをプッシュするだけで、Firebase Hostingに公開したい。
- Nuxt.jsを使って静的ページを生成
- Firebase Hostingで公開
- Bitbucket Pipelineを利用してCI連携
Nuxt.js プロジェクト作成
スターターテンプレートを利用してプロジェクト作成
自分の環境に合わせて読み替えてください。
$ vue init nuxt-community/starter-template`

? Project name my-project
? Project description Nuxt.js project
? Author w2-yamaguchi

   vue-cli · Generated "my-project".

   To get started:

     cd my-project
     npm install # Or yarn
     npm run dev

$ cd my-project/

my-project$ npm install
npm install は yarnでも大丈夫です。
動作確認
my-project$ npm run dev
http://localhost:3000へアクセスして動作確認をする。
静的ページのジェネレート
my-project$ npm run generate
distディレクトリに静的ページが生成される。
Bitbucketへプッシュする
自分の環境に合わせて読み替えてください。
リポジトリを作成していない方は、Bitbucketで作成してください。
my-project$ git init
my-project$ git add .
my-project$ git remote add origin [BitbucketリポジトリのURL]
my-project$ git commit -m "first commit"
my-project$ git push -u origin master
Firebase Hostingの設定
Firebase CLIの設定
Firebase CLIにログイン済みの方はスキップしてください。
$ sudo npm i -g firebase-tools
$ firebase -V
4.0.2
$ firebase login
プロジェクトにFirebaseを設定
自分の環境に合わせて読み替えてください。
Firebaseのプロジェクトを作成していない方は、Firebase Consoleで作成してください。
my-project$ firebase init

You're about to initialize a Firebase project in this directory:

  [ディレクトリ名]
Hostingを選択する。
? Which Firebase CLI features do you want to setup for this folder?
Press Space to select features, then Enter to confirm your choices.
Hosting: Configure and deploy Firebase Hosting sites

=== Project Setup

First, let's associate this project directory with a Firebase project.
You can create multiple project aliases by running firebase use --add,
but for now we'll just set up a default project.
Firebaseのプロジェクトを選択する。
? Select a default Firebase project for this directory: [プロジェクト名]

=== Hosting Setup

Your public directory is the folder (relative to your project directory)
that will contain Hosting assets to be uploaded with firebase deploy.
If you have a build process for your assets, use your build's output directory.

? What do you want to use as your public directory? dist
? Configure as a single-page app (rewrite all urls to /index.html)? No
✔  Wrote dist/404.html
? File dist/index.html already exists. Overwrite? No
i  Skipping write of dist/index.html

i  Writing configuration info to firebase.json...
i  Writing project information to .firebaserc...

✔  Firebase initialization complete!
デプロイしてみる
$ firebase deploy

=== Deploying to '[プロジェクト名]'...

i  deploying hosting
i  hosting: preparing dist directory for upload...
✔  hosting: 11 files uploaded successfully

✔  Deploy complete!

Project Console: https://console.firebase.google.com/project/[プロジェクト名]/overview
Hosting URL: [ここにデプロイ先のURLが発行されます]
上記のHosting URLへアクセスしてデプロイされたことを確認する。
これで世の中に公開されました!!
BitbucketPipelinesと連携
BitbucketPipelinesからFirebaseHostingへデプロイするために、Firebaseの認証トークンを取得します。
Firebase 認証トークンの取得
my-project$ firebase login:ci
Visit this URL on any device to log in:
https://accounts.google.com/o/oauth2/auth?client_id=*********

Waiting for authentication...

✔  Success! Use this token to login on a CI server:

[ここにトークンが発行されます]

Example: firebase deploy --token "$FIREBASE_TOKEN"
Bitbucket Pipelinesの設定
Bitbucket Pipelines有効化
設定 -> PIPELINES -> Settings から Enable Pipelines をオンに設定する。
Configure bitbucket-pipelines.ymlと出るが、先に環境変数を設定する。
環境変数の設定
設定 -> PIPELINES -> Environment variables から環境変数を設定する。
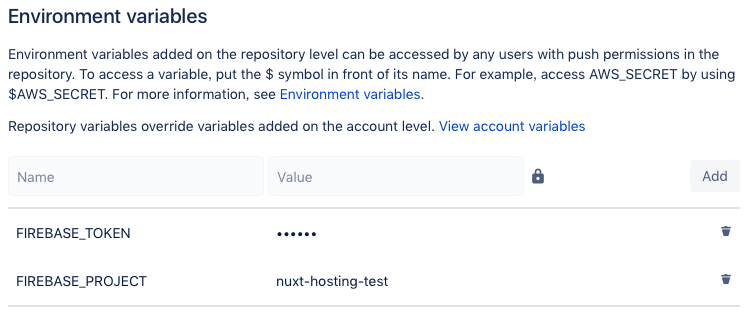
| 変数名[Name] | 設定値[Value] | 備考 |
|---|---|---|
| FIREBASE_TOKEN | 「Firebase 認証トークンの取得」で取得した認証トークン | 追加時に鍵マークを押して、マスク&暗号化する |
| FIREBASE_PROJECT | nuxt-hosting-test | Firebaseのプロジェクト名 |
bitbucket-pipelines.ymlの設定
Bitbucket Pipelineはbitbucket-pipelines.ymlの設定を元に実行されます。
ローカルで作成してBitbucketにプッシュしても構いませんが、今回はWeb上で作成してみます。
Pipelinesを選択すると、エディタが表示されます。
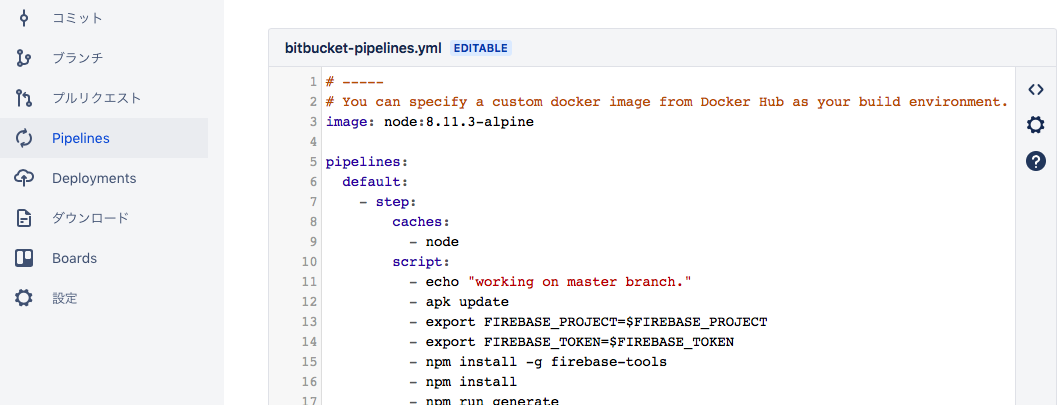
以下のソースを参考に修正してCommit fileを押してコミットしましょう。
$FIREBASE_PROJECT $FIREBASE_TOKENは上記で設定した環境変数を代入してくれます。
# -----
# You can specify a custom docker image from Docker Hub as your build environment.
image: node:8.11.3-alpine

pipelines:
  default:
    - step:
        caches:
          - node
        script:
          - echo "working on master branch."
          - apk update
          - export FIREBASE_PROJECT=$FIREBASE_PROJECT
          - export FIREBASE_TOKEN=$FIREBASE_TOKEN
          - npm install -g firebase-tools
          - npm install
          - npm run generate
          - firebase use ${FIREBASE_PROJECT} --token ${FIREBASE_TOKEN}
          - firebase deploy --token ${FIREBASE_TOKEN}
          - echo "Everything is awesome!"
なお、Your configuration is invalidと表示されてコミットできない場合は、ソースに誤りがあります。ソースを確認しましょう。
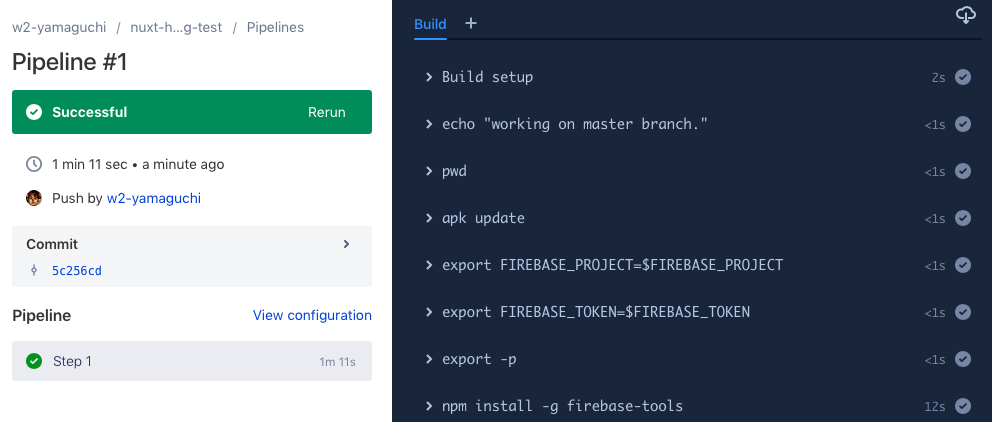
CI連携の確認
Pipelinesの実行結果の確認
Pipeline #1が自動的に始まり、StatusがSuccessfulになれば成功です。
FirebeaseHostingへのデプロイの確認
Firebase Consoleのデプロイの履歴でデプロイされたことを確認できます。

これで、Bitbucketにソースをプッシュするだけで、自動的にFirebase Hostingへデプロイされるようになりました!!幸せ!