AndroidStudioで可変リスト表示を作る(前編)
リスト表示を作ってみましょう
| Android | アンドロイド |
|---|---|
| Java | ジャバ |
| Kotlin | コトリン |
こういうリスト表示を作ってみます。
表示が固定ではなくボタンを押すと追加されるように作ります。
画面表示に使用する文字列を登録してしまいます。
<?xml version="1.0" encoding="utf-8" ?>
<resources>
    <string name="app_name">QiitaHelloSample</string>
    <string name="btAdd">追加</string>
    <string name="btDel">削除</string>
    <string name="etHint">追加する値</string>
</resources>
ListViewと追加ボタン、削除ボタンを並べたいのでレイアウトを工夫します。
activity_main.xmlに元からあるTextViewは消してしまいましょう。
スッキリしたところでデザインからLinearLayout(vertical)をドラッグして配置します。
ドラッグ先はレイアウトの画面では無く下のコンポーネントツリーにドラッグしていきます。
1.LinearLayout(vertical)
2.LinearLayout(horizontal)
3.ListView
4.Button を 2つ
5.EditText
LinerLayoutコンポーネントはvertical(縦)とhorizontal(横)がそれぞれ独立しているように見えますが実は同じでorientationの値が異なるだけです。
コンポーネントツリーのコンポーネントをドラッグして
置けたらidをそれぞれ lvMain、btAdd、btDelと付けます。
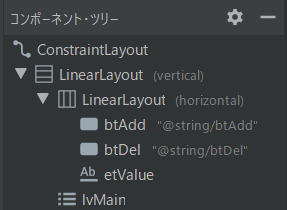
このようにします。
上下で位置の入れ替え、左右でツリーの階層が変わります。
1.LinearLayout(vertical)は
    <LinearLayout
        android:layout_width="wrap_content"
        android:layout_height="wrap_content"
        android:orientation="vertical"
        app:layout_constraintStart_toStartOf="parent"
        app:layout_constraintTop_toTopOf="parent">
2.LinearLayout(horizontal)は
        <LinearLayout
            android:layout_width="wrap_content"
            android:layout_height="wrap_content"
            android:orientation="horizontal">
3.ListViewは
        <ListView
            android:id="@+id/lvMain"
            android:layout_width="wrap_content"
            android:layout_height="match_parent">

        </ListView>
4.Buttonは
<Button
                android:id="@+id/btAdd"
                style="@style/Widget.AppCompat.Button"
                android:layout_width="0dp"
                android:layout_height="match_parent"
                android:layout_weight="1"
                android:text="@string/btAdd" />

            <Button
                android:id="@+id/btDel"
                style="@style/Widget.AppCompat.Button"
                android:layout_width="0dp"
                android:layout_height="match_parent"
                android:layout_weight="1"
                android:text="@string/btDel" />
5.EditTextは
            <EditText
                android:id="@+id/etValue"
                android:layout_width="0dp"
                android:layout_height="wrap_content"
                android:layout_weight="1"
                android:autofillHints="password"
                android:ems="10"
                android:hint="@string/etHint"
                android:inputType="text" />
ButtonやTextEditのlayout_weightは表示割合ですので追加ボタンと削除ボタンとテキスト入力の表示割合は1:1:1となります。値を色々変えてどのように変わるか試しましょう。
ListViewがデザイン時に配置しづらい
他のコンポーネントは置いた状態ですぐに表示されますが、ListViewは値が無いため配置がしづらく感じます。わざわざ値を用意するのも大変なのでそんな場合はListView選択状態でentriesの値を入力する所に「@」を入力すると最初から定義されている文字列リスト候補が表示されますので適当に採用します。
デザインが終わったら空白にすれば元に戻せます。
独自デザインのListViewを使う
ListViewには簡単に使える方法が用意していますがそれだとデザインが固定されます。1行に3つ以上の値を表示しようとすると用意されているものは使えませんので、ここでは独自にデザインすることが出来る方法を使います。
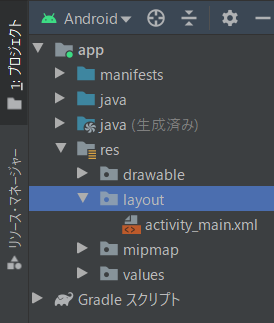
プロジェクト構成ツリーからres -> layoutの中にはメイン画面のレイアウトしかない状態ですがここにレイアウトを追加します。マウスの右クリックから新規 -> レイアウトリソースファイルを選択し
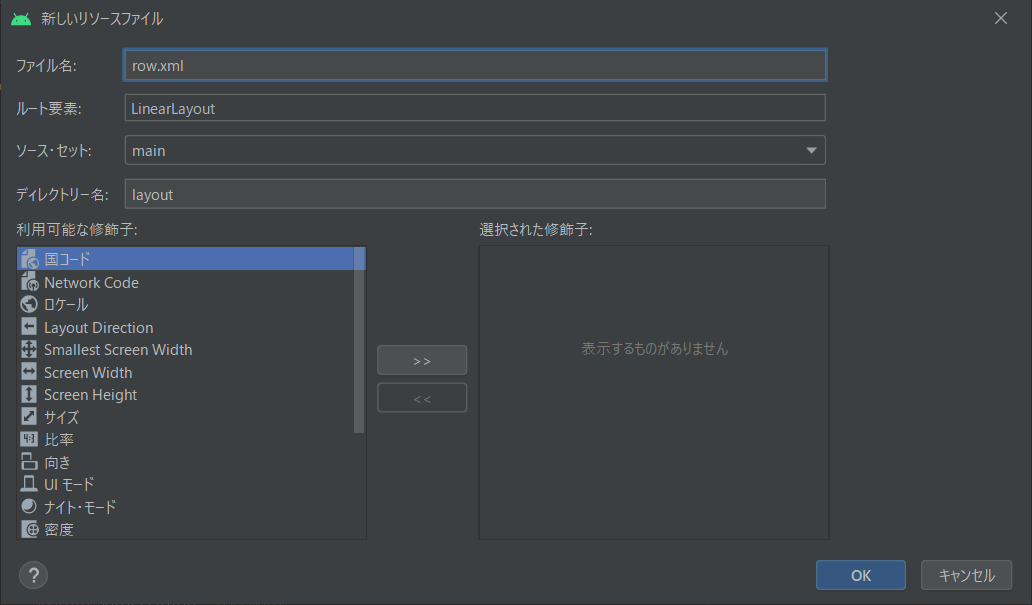
ファイル名を row.xml ※行をデザインしていますよという意味
ルート要素を LinearLayout
としてOKすると
<?xml version="1.0" encoding="utf-8"?>
<LinearLayout xmlns:android="http://schemas.android.com/apk/res/android"
    android:orientation="vertical" android:layout_width="match_parent"
    android:layout_height="match_parent">

</LinearLayout>
1行分のレイアウトのベースとなるxmlファイルが作られます。
これを
<?xml version="1.0" encoding="utf-8"?>
<LinearLayout xmlns:android="http://schemas.android.com/apk/res/android"
    android:orientation="vertical" android:layout_width="match_parent"
    android:layout_height="match_parent">
    <TextView
        android:id="@+id/tvDateTime"
        android:layout_width="match_parent"
        android:layout_height="wrap_content"
        android:layout_marginLeft="8dp"
        android:layout_marginTop="8dp"
        android:textSize="18sp"/>
    <LinearLayout
        android:layout_width="match_parent"
        android:layout_height="match_parent"
        android:layout_marginBottom="8dp"
        android:layout_marginLeft="8dp"
        android:orientation="horizontal">
        <TextView
            android:id="@+id/tvMsg"
            android:layout_width="wrap_content"
            android:layout_height="wrap_content"
            android:textSize="14sp"/>
    </LinearLayout>

</LinearLayout>
このように変更します。デザインの説明は割愛してTextViewの2箇所にidが割り当てられています。
ここのリストとして表示させる文字列を割り当ててリストにするわけです。
ListViewデザインを確認
row.xmlをデザイン表示しても値が無いので何も表示されません。
1行分がどんな表示になるのかを確認する場合はTextViewのtextに試験的に文字を入れてしまいましょう。
BaseAdapterを継承してListViewを作る
10行分表示する独自ListViewを作ってみましょう。
独自のListViewを作るためにBaseAdapterを継承したCustomListViewクラスを定義します。
BaseAdapterには継承しないといけないgetItem、getItemId、getItemId、getCountメソッドがあるので定義します。
今回は10行分のリストにするのでgetCountの返り値を10に、getItemId、getItemIdはまだ使いませんので適当な値を返します。
getView
getViewはリスト表示が必要になった時に発生するイベントです。
p0に表示する行数が渡されます。
class CustomListView(private val context: Activity): BaseAdapter() {
    override fun getView(p0: Int, p1: View?, p2: ViewGroup?): View {
        val inflater = context.layoutInflater
        val view1 = inflater.inflate(R.layout.row,null)
        var fMsg = view1.findViewById<TextView>(R.id.tvMsg)     // row.xmlレイアウトのtvMsgを参照
        fMsg.setText("Msg = $p0")   // tvMsgのtextに 引数 p0を返す
        return view1
    }
    override fun getItem(position: Int): Any {
        return "" // p0 にあるデータを返す※今回は未使用
    }
    override fun getItemId(position: Int): Long {
        return position.toLong() // 識別するためのidを返す
    }
    override fun getCount(): Int {
        return 10   // 一覧の件数
    }
}
作ったCustomListViewクラスを宣言してListViewが持つadapterに渡してあげると独自クラスが表示されます。
class MainActivity : AppCompatActivity() {

    val customAdaptor= CustomListView(this@MainActivity)

    override fun onCreate(savedInstanceState: Bundle?) {
        super.onCreate(savedInstanceState)
        setContentView(R.layout.activity_main)

        var listView = findViewById<ListView>(R.id.lvMain)
        listView.adapter = customAdaptor
    }
}
たったこれだけのことで簡単に独自クラスを作る事が出来ます。
可変リストを作る(後編)
ListView用に使用する可変コレクションリストを作ってみます。
mutableMapOfを使って見る
まずはコレクションを作ってみます。
private var map = mutableMapOf<String,Any>()
このように定義しているとキーを文字列、値の型は自由に決めることが出来ます。
定義したmapに値を与えます。
map = mutableMapOf("key" to "Jan","eng" to "January")
| キー String | 値 Any |
|---|---|
| key | jan |
| eng | January |
要素の数に制限はありません。
map = mutableMapOf("key" to "Jan","eng" to "January","jp" to "ジャニュアリー","id" to 1)
| キー String | 値 Any |
|---|---|
| key | jan |
| eng | January |
| jp | ジャニュアリー |
| id | 1 |
mutableMapOfを使うとキーと値の組み合わせでデータを管理することが出来ますが、表計算で言うところの横方向のデータだけの管理となります。
これを縦方向にも使おうとするとMutableListを使うことになります。
MutableListを使う
private var map = mutableMapOf<String,Any>()
private var mapList : MutableList<MutableMap<String,Any>> = mutableListOf()
**MutableList**は mutableMapOfを定義したものと同じものを定義します。
= mutableListOf()はMutableListの初期化をしています。
ではさっそく使って見ます。
map = mutableMapOf("key" to "Jan","eng" to "January","jp" to "ジャニュアリー","id" to 1)
mapList.add(map)
map = mutableMapOf("key" to "Feb","eng" to "February","jp" to "フェブラリー","id" to 2)
mapList.add(map)
mapListは
| index | key | eng | jp | id |
|---|---|---|---|---|
| 0 | jan | January | ジャニュアリー | 1 |
| 1 | Feb | February | フェブラリー | 2 |
このような中身になっています。
Januaryを取り出そうと思うと
mapList[0].get("eng")と書きます。
フェブラリーを取り出そうと思うと
mapList[1].get("jp")と書きます。
    private var mapList:MutableList<MutableMap<String,Any>> = mutableListOf()
    private var map = mutableMapOf<String,Any>()
定義したクラス内でAddメソッドとDelメソッドを作ります。
    fun Add(msg : String){
        map = mutableMapOf("msg" to msg)
        mapList.add(map)
    }
    fun Del(idx : Int){
        mapList.removeAt(idx)
    }
前編で作ったCustomListViewに組み込むと
class CustomListView(private val context: Activity): BaseAdapter() {

    private var mapList:MutableList<MutableMap<String,Any>> = mutableListOf()
    private var map = mutableMapOf<String,Any>()

    override fun getView(p0: Int, p1: View?, p2: ViewGroup?): View {
        val inflater = context.layoutInflater
        val view1 = inflater.inflate(R.layout.row,null)
        var fMsg = view1.findViewById<TextView>(R.id.tvMsg)     // row.xmlレイアウトのtvMsgを参照
        fMsg.setText(mapList[p0].get("msg").toString())   // tvMsgのtextに 引数 p0を返す
        return view1
    }
    override fun getItem(position: Int): Any {
        return "" // p0 にあるデータを返す※今回は未使用
    }
    override fun getItemId(position: Int): Long {
        return position.toLong() // 識別するためのidを返す
    }
    override fun getCount(): Int {
        return mapList.count()   // 一覧の件数
    }
    fun Add(msg : String){
        map = mutableMapOf("msg" to msg)
        mapList.add(map)
    }
    fun Del(idx : Int){
        mapList.removeAt(idx)
    }
}
これをメインアクティビティに実装してボタンを押されたときの処理も作ります。
class MainActivity : AppCompatActivity() {

    val customAdaptor= CustomListView(this@MainActivity)

    override fun onCreate(savedInstanceState: Bundle?) {
        super.onCreate(savedInstanceState)
        setContentView(R.layout.activity_main)
        Show()
    }
    fun onButtonAdd(view : View){
        val et = findViewById<EditText>(R.id.etValue)
        val msg = et.text.toString()
        customAdaptor.Add(msg)
        Show()
    }
    fun onButtonDel(view : View){
        customAdaptor.Del(0)
        Show()
    }
    fun Show(){
        var listView = findViewById<ListView>(R.id.lvMain)
        listView.adapter = customAdaptor
    }
}
CustomListViewでうまくカプセル化できたのでメインの方のコード量は非常に少なくなりました。
リストに日時を追加
追加ボタンを押されたときの日時を表示して見ましょう。
    fun Add(msg : String){
        val dt = LocalDateTime.now()
        map = mutableMapOf("msg" to msg,"dt" to dt)
        mapList.add(map)
    }
Addメソッドに処理を追加します。
変数 dtに現在日時を代入します。
コレクションとして キー dt にその値を代入します。
メインの方に日時を表示する処理を追加します。
    override fun getView(p0: Int, p1: View?, p2: ViewGroup?): View {
        val inflater = context.layoutInflater
        val view1 = inflater.inflate(R.layout.row,null)
        var fMsg = view1.findViewById<TextView>(R.id.tvMsg)     // row.xmlレイアウトのtvMsgを参照
        var fDt  = view1.findViewById<TextView>(R.id.tvDateTime)
        fMsg.setText(mapList[p0].get("msg").toString())   // tvMsgのtextに 引数 p0を返す
        fDt.setText(mapList[p0].get("dt").toString())
        return view1
    }
たったこれだけの追加ですが日時が表示されるようになりました。
でも日時の表示が日本風ではありません。
    override fun getView(p0: Int, p1: View?, p2: ViewGroup?): View {
        val inflater = context.layoutInflater
        val view1 = inflater.inflate(R.layout.row,null)
        var fMsg = view1.findViewById<TextView>(R.id.tvMsg)     // row.xmlレイアウトのtvMsgを参照
        var fDt  = view1.findViewById<TextView>(R.id.tvDateTime)

        val formatter = DateTimeFormatter.ofPattern("yyyy/MM/dd HH:mm:ss")
        val s = mapList[p0].get("dt").toString()
        val dt = LocalDateTime.parse(s)
        val dts = dt.format(formatter)
        fMsg.setText(mapList[p0].get("msg").toString())   // tvMsgのtextに 引数 p0を返す
        fDt.setText(dts)   // tvMsgのtextに 引数 p0を返す
        return view1
   }
文字列を日時型に変換したりさらにそれを日時の形式を指定した変換になっているので処理が複雑になりましたがこれで理想的な表示になりました。