はじめに
Googleカレンダーで予定を登録する際、弊社では社内のルールとして、予定のタイトルに接頭辞(例:【作業】【Inner】【テレカン】など)をつける習慣があります。これにより、予定の種類がひと目で分かりやすくなり、チーム内での情報共有もスムーズになります。
これ以降「接頭辞」や「プロジェクト名」のことをタグと呼びます。
しかし、毎回これらのタグを手入力するのは地味に面倒で、表記ゆれの原因にもなりがちです。さらに、現在社内で工数管理の強化が求められており、Googleカレンダーでの予定入力をできるだけ簡潔かつ正確に行える仕組みが必要になってきました。
そこで今回、Chrome拡張機能を開発し、予定登録時にあらかじめスプレッドシートで定義したタグをプルダウンで選択できるようにしました。これにより、予定登録の手間を減らしつつ、記載ルールの統一やカレンダーと他ツールとの連携もスムーズに行えるようになります。
このChrome拡張機能は、社内利用を前提としており、タグの候補はスプレッドシートで管理しています。将来的にはチームや個人ごとのカスタマイズにも対応できるようにする予定ですが、今回はまず最小構成で運用を始めています。
完成イメージ

概要
この記事では、Google Apps Script(以降GAS)で簡易的なAPIを作成し、スプレッドシートのデータをChrome拡張機能に渡すことで、Googleカレンダーの予定追加画面にタグ選択用のドロップダウンを追加する方法を紹介します。
システムイメージ

Chrome拡張機能とは
Google Chrome拡張機能(Chrome Extension)では、Google Chromeの機能を拡張・カスタマイズできます。これらの拡張機能を活用することで、ブラウジングや日常業務の効率を大幅に向上させることが可能です。
例としては以下のようなものがあります
- 英単語の意味をすぐに確認できる辞書機能(例:Google Dictionary)
- Webページのスクリーンショットを撮る機能(例:GoFullPage)
- パスワード管理やフォームの自動入力(例:LastPass)
拡張機能は主に HTML / CSS / JavaScript といったWeb技術で構成されており、manifest.json ファイルで機能や権限を定義します。ファイル構成については後ほど解説します。
多くの拡張機能はChromeウェブストアからインストール可能で、基本的には無料で利用できます。
全体構造
本記事で作成したGASと拡張機能のフォルダ構成は以下の通りになっています。
Google Apps Script //GASの実装
    ├── const.gs
    └── main.gs

Chrome Extension //拡張機能の実装
    ├── background.js
    ├── const.js
    ├── content_script.js
    ├── icons
    │   ├── icon-128.png
    │   ├── icon-16.png
    │   ├── icon-32.png
    │   └── icon-64.png
    └── manifest.json
GAS(Google Apps Script)の実装
拡張機能で使用するタグ情報は、Googleスプレッドシートに保存しています。このデータをGASでWeb APIとして公開し、拡張機能側がJSONとして取得できるようにします。
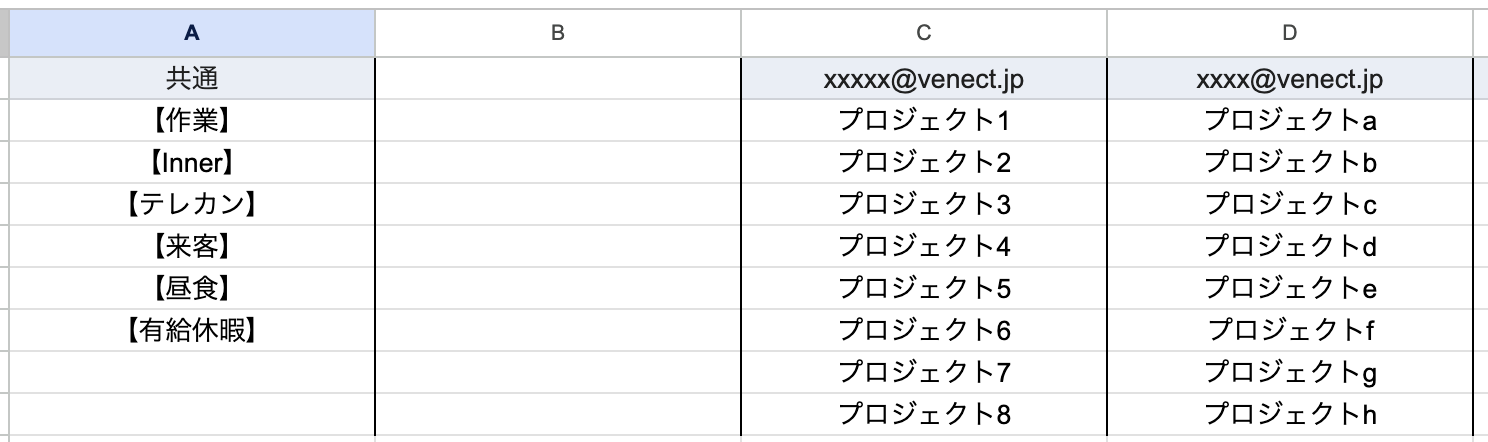
スプレッドシートの中身
A列には共通の項目を、C~は各社員の個別のタグを書くようにしています。
シート名は info にしています。
GASの中身
スプレッドシートの 拡張機能 => Apps Script => エディタ から以下のファイルを追加してください。
const.gs
このファイルでは、GASで使用するスプレッドシートに関する設定情報を定数として定義しています。
SHEET_IDに入れる値はスプレッドシートのURLから確認可能です。
https://docs.google.com/spreadsheets/d/**ここがID部分**/edit
const SHEET_ID = "xxxxxxxxxxxxxxxxxxxxx"
const INFO_SHEET = "info";
const RANGE = "A:Z";
main.gs
function doGet() {
  const sheet = SpreadsheetApp.openById(SHEET_ID).getSheetByName(INFO_SHEET);
  const data = sheet.getRange(RANGE).getValues();
  let results = [];
  let categories = [];

  const categoriesCounts = sheet.getRange('A1:A').getValues().filter(String).length;
  for (let row = 1; row < categoriesCounts; row++) {
    if (data[row][0] === "" || data[row][0] === undefined) break;
    categories.push(String(data[row][0]));
  }

  for (let i = 0; i < data[0].length; i += 1) {
    if (!data[0][i + 2]) continue;
    let email = data[0][i + 2];
    let options = [];
    for (let row = 1; row < data.length; row++) {
      if (data[row][i + 2] === "" || data[row][i + 2] === undefined) break;
      options.push(String(data[row][i + 2]));
    }
    results.push({
      email: email,
      categories: categories,
      options: options
    });
  }
  let jsonOutput = ContentService.createTextOutput(JSON.stringify(results));
  jsonOutput.setMimeType(ContentService.MimeType.JSON);
  return jsonOutput;
}
-
doGet関数
この関数は doGet() によって Web APIとして動作します。指定のURLにアクセスすると、スプレッドシートから取得したユーザーごとのデータをJSON形式で返却します。
処理の流れは以下の通りです:
- A列の共通タグを読み取り、categories 配列として保存します。
- 各ユーザーに対応する列(C列以降)を順に処理していきます。各列の先頭セルを email 変数に代入し、その列の2行目以降を options 配列に追加します。
- email, categories, options を組み合わせて、ユーザーごとの情報オブジェクトを作成し、それを results 配列に追加します。
- 最後に results を JSON 形式に変換して、HTTP レスポンスとして返します。
先ほどのスプレッドシートの例で返されるレスポンスは以下のようになります
[
  {
    "email": "xxxxx@venect.jp",
    "categories": ["【作業】", "【テレカン】", "【Inner】", "【テレカン】", "..."],
    "options": ["プロジェクト1", "プロジェクト2", "プロジェクト3", "..."]
  },
  {
    "email": "xxxx@venect.jp",
    "categories": ["【作業】", "【テレカン】", "【Inner】", "【テレカン】", "..."],
    "options": ["プロジェクトa", "プロジェクトb", "プロジェクトc", "..."]
  }
]
デプロイ
スプレッドシートに必要な情報を記入し、GASを用意できたら、最後に「デプロイ」操作を行って Web API を公開します。これにより、拡張機能側からHTTPリクエストを送ってスプレッドシートのデータを取得できるようになります。
手順
- GASのエディタを開く
- 上部メニューから 「デプロイ」→「新しいデプロイ」 を選択

- 「種類の選択」で 「ウェブアプリ」 を選ぶ
- 各項目を以下のように設定:
説明:任意の名前(例:API公開用 など)
次のユーザーとして実行:自分
アクセスできるユーザー:全員

- デプロイ をクリック
- 発行された URL(https://script.google.com/macros/s/~/exec)をコピー

- 拡張機能のconst.gsに貼り付ける
拡張機能の実装
拡張機能のフォルダは以下の通りです。
Chrome Extension //拡張機能の実装
    ├── background.js
    ├── const.js
    ├── content_script.js
    ├── icons
    │   ├── icon-128.png
    │   ├── icon-16.png
    │   ├── icon-32.png
    │   └── icon-64.png
    └── manifest.json
拡張機能では主に3つのカスタマイズができます。
1. Content Scripts
特定のWebページ上で実行されるJavaScriptです。対象ページのDOMにアクセスできるため、画面にボタンを追加したり、要素を取得・変更したりといった操作が可能です。
今回は、スプレッドシートからのデータ受け渡しとGoogleカレンダーの予定追加画面にドロップダウンメニュー(タグ選択)を挿入するために使用しています。
2. Background
拡張機能の裏側で常に動作しているスクリプトです。イベントリスナーの役割を持ち、他のスクリプトとのメッセージ通信などが可能です。今回は使用者のメールアドレス取得に使用しました。
3. Browser Action
拡張機能のアイコンをクリックしたときに表示されるUI部分です。通常は、ポップアップ画面(popup.html)を表示して、簡単な操作パネルを提供します。今回は使用していません。
以下のようにそれぞれ行えることが決まっているので目的にあったアプローチ方法を探しましょう。
| 機能 | content.js(Webページ内) |
background.js(拡張機能) |
|---|---|---|
| DOM操作 | ✅ 可能(WebページのHTML変更) | ❌ 不可 |
| Webページのイベント監視 | ✅ 可能(クリック・入力など) | ❌ 不可 |
拡張機能 API (chrome.runtime など) |
❌ 一部のみ可 | ✅ 完全に使用可能 |
それでは、実際に作成したファイルの中身とその役割を個々に解説していきます。
manifest.json
拡張機能の設定ファイルです。拡張機能の「名前」「バージョン」「使うファイル」「権限」などをブラウザに伝える構成情報のすべてを記述します。
このファイルがないと、拡張機能として認識されません。
{
    "manifest_version": 3,
    "name": "Google Calendar Tag Helper",
    "description": "Googleカレンダーの予定作成時にカスタムタグを追加できる拡張機能",
    "version": "1.0",
    "permissions": [
        "tabs",
        "storage",
        "activeTab",
        "scripting",
        "identity",
        "identity.email"
    ],
    "host_permissions": [
        "https://calendar.google.com/*"
    ],
    "icons": {
        "16": "icons/icon-16.png",
        "32": "icons/icon-32.png",
        "64": "icons/icon-64.png",
        "128": "icons/icon-128.png"
    },
    "content_scripts": [
        {
            "js": [
                "const.js",
                "content_script.js"
            ],
            "matches": [
                "https://calendar.google.com/calendar/*"
            ]
        }
    ],
    "background": {
        "service_worker": "background.js",
        "type": "module"
    }
}
-
manifest_version
2025年時点ではバージョン3が推奨・標準です。(公式ドキュメント参照) -
name
拡張機能の名前です。 -
description
拡張機能の説明です。 -
version
拡張機能のバージョン番号。更新のたびに数値を上げていく必要があり、ユーザー側にもアップデート通知が届くトリガーとなります。 -
icons
拡張機能のアイコン画像を定義します。サイズごとに用意し、Chromeが適切なものを表示します。 -
permission
拡張機能が使用するChrome APIの権限を定義する項目です。
ここで指定されたAPIに対してのみ、拡張機能はアクセスできるようになります。 -
host_permissions
拡張機能がアクセスできる 特定のドメイン(URLパターン) を指定します。
今回の場合、Googleカレンダーのページでのみ拡張機能が動作するように設定してます。 -
content_scripts
指定されたWebページ上で実行される スクリプト(JavaScript) を定義します。
DOMにアクセスできるため、UIの追加やページ操作が可能です。また、matchesに設定したURLパターンのみスクリプトを適応できるようすることも可能です。 -
background
拡張機能の裏で動き続ける サービスワーカー(バックグラウンドスクリプト) を定義します。
拡張機能の状態管理や、メッセージ通信、データ取得処理などを担当します。typeにはV3で推奨されているES Modulesを使用するための設定をしています。
以下は実際にデプロイしたときの拡張機能の選択画面

icons
各ピクセルサイズの正方形のアイコンファイルを入れてください。
| サイズ | 用途 |
|---|---|
| 16x16 | ツールバー、アドレスバーなどに表示される小アイコン |
| 32x32 | 中アイコン。状況によって利用されることがある |
| 48x48 | 拡張機能の詳細ページなどで使用 |
| 128x128 | Chromeウェブストアでのアイコン表示など |
background.js
拡張機能を使用しているユーザーの Googleアカウントのメールアドレスを取得 するための JavaScript ファイルです。
ここで取得したメールアドレスをもとに、スプレッドシート上の各ユーザー用データと照合し、一致するユーザーのタグ情報のみを取得・反映する仕組みです。
chrome.runtime.onMessage.addListener((request, sender, sendResponse) => {
    if (request.action === "getEmail") {
        chrome.identity.getProfileUserInfo({ accountStatus: "ANY" }, function (userInfo) {
            if (userInfo.email) {
                console.log("【バックグラウンド】取得したGoogleアカウント:", userInfo.email);
                sendResponse({ email: userInfo.email });
            } else {
                console.log("【バックグラウンド】メールアドレスを取得できませんでした。");
                sendResponse({ error: "メールアドレスを取得できませんでした。" });
            }
        });
        return true;
    }
});
const.js
GASでWeb APIとしてデプロイした際に発行されるURLを定数として保持しておくファイルです。
このURLを通じてスプレッドシートからタグデータを取得します。
const URL = "https://script.google.com/macros/s/xxxxxxxxxxxxxxxxxxxxxxxxxx/exec";
content_script.js
Googleカレンダーの予定作成画面にタグ選択用のドロップダウンUIを動的に追加する処理を行うためのファイルです。ユーザーのGoogleアカウントのメールアドレスをもとに、スプレッドシートから該当するタグ情報だけを取得し、予定タイトルに簡単に追加できるようにしています。
コード全体
//メールアドレスとスプレッドシート情報を入れるグローバル変数
let email, info;

//使用者のメールアドレスとスプレッドシートの情報を取得
function fetchOptionsFromSheet() {
    try {
        let response = await fetch(URL);
        info = await response.json();
    } catch (error) {
        console.error("エラー:", error);
    }
}

function fetchGoogleAccountEmail() {
    chrome.runtime.sendMessage({ action: "getEmail" }, response => {
        email = response.email;
    });
}

fetchOptionsFromSheet();
fetchGoogleAccountEmail();

//ボタンを作成
function createDropdownButton(id, menuName) {
    let button = document.createElement("button");
    Object.assign(button.style, {
        border: "1px solid", borderRadius: "5px", cursor: "pointer", fontSize: "15px", width: "65px", height: "25px"
    });
    button.id = id;
    button.textContent = menuName;

    return button;
}

//リストを作成
function createDropdownList(id) {
    let list = document.createElement("ul");
    Object.assign(list.style, {
        position: "absolute", listStyle: "none", padding: "8px",
        margin: "0", background: "white", border: "1px solid",
        borderRadius: "5px",
        display: "none", zIndex: "9999"
    });
    list.id = id;
    return list;
}

//リストに選択肢を追加 & 押したらタイトル欄に挿入されるように設定
function populateDropdown(list, items, titleInput) {
    items.forEach(option => {
        let listItem = document.createElement("li");
        listItem.style.color = "#444746";
        Object.assign(listItem.style, { padding: "5px 10px", cursor: "pointer" });
        listItem.innerText = option;

        listItem.addEventListener("click", () => {
            titleInput.focus();
            titleInput.value = titleInput.value.trim() === "" ? option : titleInput.value + option;
            const inputEvent = new Event('input', { bubbles: true });
            titleInput.dispatchEvent(inputEvent);
            list.style.display = "none";
        });

        listItem.addEventListener("mouseover", () => listItem.style.background = "#ddd");
        listItem.addEventListener("mouseout", () => listItem.style.background = "white");

        list.appendChild(listItem);
    });
}

//ボタンを押したらリストが出てくる仕組みを作成
function setupDropdownToggle(button, list, otherList) {
    button.addEventListener("click", event => {
        event.stopPropagation();
        if (otherList.style.display === "block") {
            otherList.style.display = "none";
        }
        list.style.display = list.style.display === "none" ? "block" : "none";
    });

    document.addEventListener("click", event => {
        if (!button.contains(event.target) && !list.contains(event.target)) {
            list.style.display = "none";
        }
    });
}

//予定追加のモーダル画面に余白を追加してボタンを設置してリスト表示できるようにする。
function addCustomDropdown(screen) {

    //もう既にボタンが作成されていたら操作を中止
    if (document.getElementById("custom-menu-button")) return;

    let titleWrapper = document.querySelector(screen.target);

    //ボタンとリストを作成
    let menuButton = createDropdownButton("custom-menu-button", "タグ1");
    let menuButton2 = createDropdownButton("custom-menu-button2", "タグ2");
    let dropdownList = createDropdownList("custom-dropdown-list");
    let dropdownList2 = createDropdownList("custom-dropdown-list2");

    let titleInput = document.querySelector(screen.title);

    //使用者のユーザーメールとスプレッドシートのメール欄を照らし合わせ、該当のタグをリストに追加
    let userInfo = info.find(user => user.email === email);
    if (userInfo) {
        populateDropdown(dropdownList, userInfo.categories, titleInput);
        populateDropdown(dropdownList2, userInfo.options, titleInput);
    }

    //ボタンを押すとリストが出てくるように設定
    setupDropdownToggle(menuButton, dropdownList, dropdownList2);
    setupDropdownToggle(menuButton2, dropdownList2, dropdownList);

    //ボタンとリストを挿入
    titleWrapper.parentNode.insertBefore(menuButton, titleWrapper);
    titleWrapper.parentNode.insertBefore(dropdownList, titleWrapper);
    titleWrapper.parentNode.insertBefore(menuButton2, titleWrapper);
    titleWrapper.parentNode.insertBefore(dropdownList2, titleWrapper);
}

// モーダルのIDとその関連情報を格納する辞書
let modalIdMap = {
    defaultScreen: {
        target: '.Fgl6fe-fmcmS-yrriRe-OWXEXe-H9tDt.shdZ7e',
        title: 'input[aria-label="タイトルを追加"]'
    },
    detailScreen: {
        target: '.UXzdrb',
        title: 'input[aria-label="タイトル"]'
    }
};

//モーダルが出てきたら一連の操作を開始する
const observer = new MutationObserver(() => {
    if (document.querySelector(modalIdMap.defaultScreen.target)) {
        addCustomDropdown(modalIdMap.defaultScreen);
        document.getElementById("custom-menu-button2").style.marginLeft = "10px";
        document.querySelector(".mvRfff").style.padding = "0 0 0 20px";
    }

    if (document.querySelector(modalIdMap.detailScreen.target)) {
        addCustomDropdown(modalIdMap.detailScreen)
        document.getElementById("custom-menu-button").style.margin = "5px 0 0 64px";
        document.getElementById("custom-menu-button2").style.margin = "5px 0 0 10px";
        document.getElementById("custom-dropdown-list").style.margin = "0 0 0 64px";
        document.getElementById("custom-dropdown-list2").style.margin = "0 0 0 64px";
        document.querySelector(".RfMZ0c").style.padding = "0 0 16px 0";
        document.querySelector(".UywwFc-LgbsSe.UywwFc-StrnGf-YYd4I-VtOx3e.guz9kb").style.margin = "0 0 0 16px";
    }
});

//予定追加のモーダルが出てこないか常時監視
observer.observe(document.body, { childList: true, subtree: true });
以下はコードの詳細
function setupDropdownToggle(button, list, otherList) {
    button.addEventListener("click", event => {
        event.stopPropagation();
        if (otherList.style.display === "block") {
            otherList.style.display = "none";
        }
        list.style.display = list.style.display === "none" ? "block" : "none";
    });

    document.addEventListener("click", event => {
        if (!button.contains(event.target) && !list.contains(event.target)) {
            list.style.display = "none";
        }
    });
}
-
setupDropdownToggle関数
ボタンを押したときに、対応するリストの表示・非表示を切り替える仕組みを作ります。他のリストが開いていた場合は閉じ、また、画面のどこかをクリックした場合にもリストを閉じるようにしています。
function addCustomDropdown(screen) {

    if (document.getElementById("custom-menu-button")) return;

    let titleWrapper = document.querySelector(screen.target);

    let menuButton = createDropdownButton("custom-menu-button", "タグ1");
    let menuButton2 = createDropdownButton("custom-menu-button2", "タグ2");
    let dropdownList = createDropdownList("custom-dropdown-list");
    let dropdownList2 = createDropdownList("custom-dropdown-list2");

    let titleInput = document.querySelector(screen.title);

    let userInfo = info.find(user => user.email === email);
    if (userInfo) {
        populateDropdown(dropdownList, userInfo.categories, titleInput);
        populateDropdown(dropdownList2, userInfo.options, titleInput);
    }

    setupDropdownToggle(menuButton, dropdownList, dropdownList2);
    setupDropdownToggle(menuButton2, dropdownList2, dropdownList);

    titleWrapper.parentNode.insertBefore(menuButton, titleWrapper);
    titleWrapper.parentNode.insertBefore(dropdownList, titleWrapper);
    titleWrapper.parentNode.insertBefore(menuButton2, titleWrapper);
    titleWrapper.parentNode.insertBefore(dropdownList2, titleWrapper);
}
-
addCustomDropdown関数
予定追加モーダルが表示されたタイミングで、カスタムドロップダウンを挿入します。email変数 と info変数 を照らし合わせて該当ユーザーを探し、見つかった場合は categories配列 と options配列 をリストに追加します。最後に各種ボタンとリストを DOM に追加します。
const observer = new MutationObserver(() => {
    if (document.querySelector(modalIdMap.defaultScreen.target)) {
        addCustomDropdown(modalIdMap.defaultScreen);
        document.getElementById("custom-menu-button2").style.marginLeft = "10px";
        document.querySelector(".mvRfff").style.padding = "0 0 0 20px";
    }

    if (document.querySelector(modalIdMap.detailScreen.target)) {
        addCustomDropdown(modalIdMap.detailScreen)
        document.getElementById("custom-menu-button").style.margin = "5px 0 0 64px";
        document.getElementById("custom-menu-button2").style.margin = "5px 0 0 10px";
        document.getElementById("custom-dropdown-list").style.margin = "0 0 0 64px";
        document.getElementById("custom-dropdown-list2").style.margin = "0 0 0 64px";
        document.querySelector(".RfMZ0c").style.padding = "0 0 16px 0";
        document.querySelector(".UywwFc-LgbsSe.UywwFc-StrnGf-YYd4I-VtOx3e.guz9kb").style.margin = "0 0 0 16px";
    }
});

observer.observe(document.body, { childList: true, subtree: true });
-
observerによる監視処理
Googleカレンダーの「予定追加モーダル」が表示されたら、自動的に addCustomDropdown を実行します。MutationObserver を使って body 要素の変化(DOM追加)を監視し、対象モーダルのセレクタに一致する要素があれば処理を開始します。
動作確認と利用方法
拡張機能が完成したら、実際にChromeに読み込んで動作確認をしてみましょう。
この拡張機能は、ローカルフォルダから手動で追加することができます。
拡張機能の読み込み
-
Chromeブラウザで chrome://extensions/ にアクセス
-
右上の「デベロッパーモード」をオンにする
-
「パッケージ化されていない拡張機能を読み込む」をクリック

-
作成した拡張機能のフォルダ(Chrome Extension)を選択
拡張機能のテスト
- Googleカレンダー にアクセス
- 「予定を作成」をクリックして、モーダルを表示

- タイトル欄の上に 「タグ1」「タグ2」 というボタンが表示されていることを確認
- ボタンをクリックし、ドロップダウンメニューからタグを選択して、タイトル欄に正しく入力されるかを確認
おわりに
本記事では、Googleカレンダーで予定を登録する際に、スプレッドシートで管理されたタグを簡単に選べる拡張機能の作成方法を紹介しました。
この仕組みによって、予定入力の手間を減らしつつ、チーム内でのルール統一や工数管理の精度向上が期待できます。
実際に社内で使ってみたところ、想像以上に入力がスムーズになり、メンバーからも好評でした。 同じような課題を感じている方は、ぜひ試してみてください!