はじめに
社内勉強用のコンテンツをそのまま公開しました
Azure Functionsで処理を書きたいんだけど何から勉強すればいいんだろう・・・という方向けに、AzureFunctionsのTimerTriggerを使ってURL監視するサービスを一緒に作っていきたいと思います。
こんなことを勉強していきます
- 必要なソフトウェアのインストール
- nodejsの超基本中のキホン
- AzureFunctionsへのデプロイ
- AzureFunctionsをローカルで動かしてみよう
- モジュールの活用
- AzureFunctionsにおける環境変数の活用
- 学んだことを使ってURL監視サービス(証明書チェック機能付き)を作ってみる
じゃあ早速やっていきましょう
必要なもの
- Azureアカウント
必要なもののインストール
nodejs(LTS)のインストール
yarn(パッケージマネージャ)のインストール
Azure cliのインストール
Azure Functions Core Toolsのインストール
- v2とv3がありますが、今回はv2を使います。
- https://docs.microsoft.com/ja-jp/azure/azure-functions/functions-run-local#v2
必要に応じてインストール
お好みのエディタ
私のお好みはIntelliJですが、VisualStudioCodeは割ととっつきやすいので使ってみてください。
まずはnodejsの基本中のキホンから
azure-functions-samplesというディレクトリを作ってその中にindex.jsを作って実行してみましょう
function hello() {
    console.log("test");
}
hello();
実行してみる
node index.js
yarnで実行してみよう
yarn initコマンドを実行することでpackage.jsonのひな型を作ります。とりあえずは何も入力しなくても大丈夫です。
azure-functions-samples> yarn init
yarn init v1.21.1
question name (fetch-timer):
question version (1.0.0):
question description:
question entry point (index.js):
question repository url:
question author:
question license (MIT):
question private:
success Saved package.json
Done in 13.50s.
- package.jsonではライブラリの依存関係を記述したりするのですが、それは後で説明するとして、package.jsonのscriptsの部分に書けば好きなコマンドを実行できます。
{
  "name": "simple-timer-function",
  "version": "1.0.0",
  "description": "",
  "scripts": {
    "start": "node index.js"
  },
  "author": "",
  "main": "index.js",
  "license": "MIT"
}
package.jsonのscriptsの部分を書いておくことでyarn startすると実行することができる。
まぁここまでは大丈夫ですよね。
AzureFunctionsについて
AzureFunctionsにはいろいろな機能があります。
- HTTPアクセスを受け取って処理を実行する
- CosmosDBにデータが入ったらTriggerとして起動する
- BlobStorageにデータが格納されたら処理を実行する
- 定期的に実行する
また、AWSLambdaのように必要に応じて随時動かしておくこともできますし、常時動かしておくこともできます。
AWS Lambdaでは随時動かした場合、初回起動に時間がかかったりしますが、これはAzureFunctionsでも同様です。許容できない場合は定期的にポーリングしておくことや常時起動にしておくことで回避します。
今回は、定期的にURLを監視したいのでTimerTrigger(定期的に実行する)を使っていきます。
シンプルなTimerTrigger
simple-timerディレクトリを作ります。
$ mkdir simple-timer
timerディレクトリの下でfunctionのひな型を作ります。
- 言語はJavaScriptを選択してください
azure-functions-samples\simple-timer> func new
Select a language: Starting from 2.0.1-beta.26 it's required to set a language for your project in your settings
'node' has been set in your local.settings.json
Select a template: Timer trigger
Function name: [TimerTrigger] simple-timer
Writing C:\Users\uzres\git\azure-functions-samples\simple-timer\simple-timer\index.js
Writing C:\Users\uzres\git\azure-functions-samples\simple-timer\simple-timer\readme.md
Writing C:\Users\uzres\git\azure-functions-samples\simple-timer\simple-timer\function.json
The function "simple-timer" was created successfully from the "Timer trigger" template.
せっかちなので10秒に1回起動するようにしましょう
{
  "bindings": [
    {
      "name": "myTimer",
      "type": "timerTrigger",
      "direction": "in",
      "schedule": "*/10 * * * * *"
    }
  ]
}
デプロイ
CloudShellを起動します。
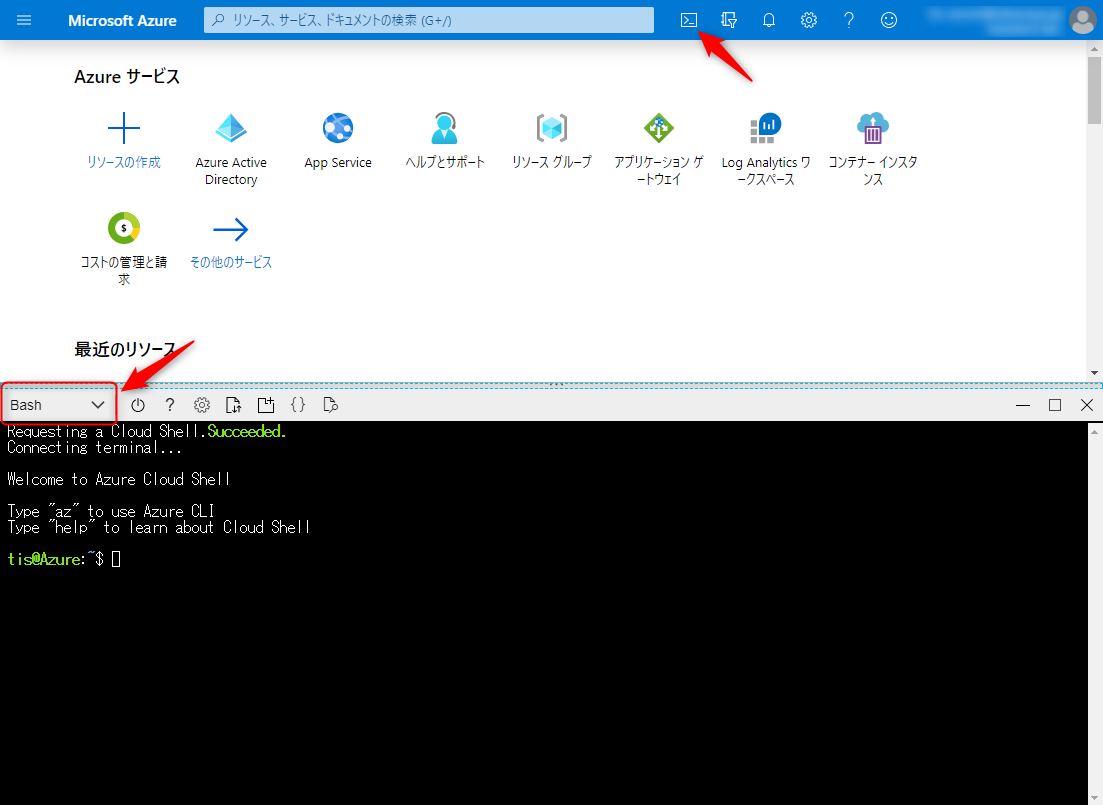
CloudShellが起動出来たらFunctionsを作っていきます。
<適当な文字列>にはuzreskなど自身のものとわかるような名前にしておきましょう。
export RESOURCE_SUFFIX=<適当な文字列>

export RG_NAME=rg-$RESOURCE_SUFFIX
export STORAGE_NAME=azfunsamples$RESOURCE_SUFFIX
export FUNCTION_NAME=azfun-samples-$RESOURCE_SUFFIX
export LOCATION=japaneast

az group create --name $RG_NAME --location $LOCATION

az storage account create \
  --name $STORAGE_NAME \
  --location $LOCATION \
  --resource-group $RG_NAME \
  --sku Standard_LRS

az functionapp create \
  --name $FUNCTION_NAME \
  --storage-account $STORAGE_NAME \
  --consumption-plan-location $LOCATION \
  --resource-group $RG_NAME
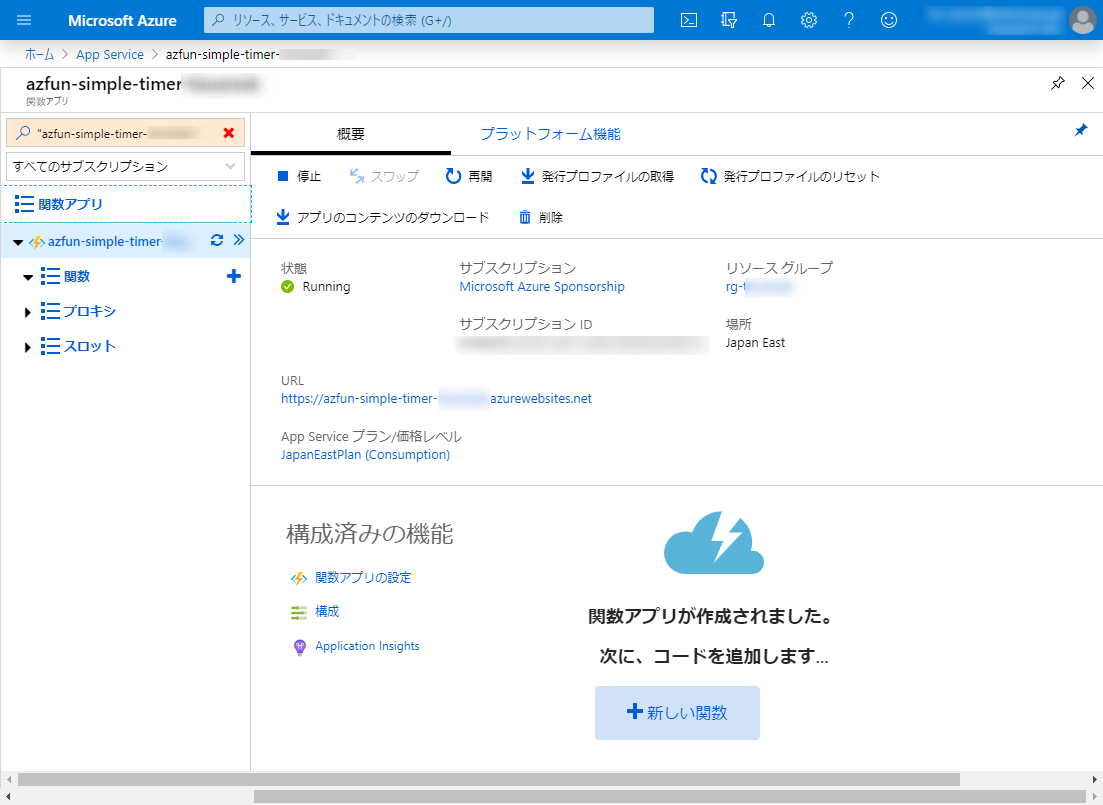
FunctionsができたらAzureの画面で確認しておきます。
今度はローカルに戻ってデプロイしていきます。
azure-functions-samples\simple-timer> func azure functionapp publish azfun-samples-xxxxxxx
Getting site publishing info...
Creating archive for current directory...
Uploading 1.49 KB [###############################################################################]
Upload completed successfully.
Deployment completed successfully.
Syncing triggers...
Syncing triggers...
Functions in azfun-samples-xxxxxxx:
    simple-timer - [timerTrigger]
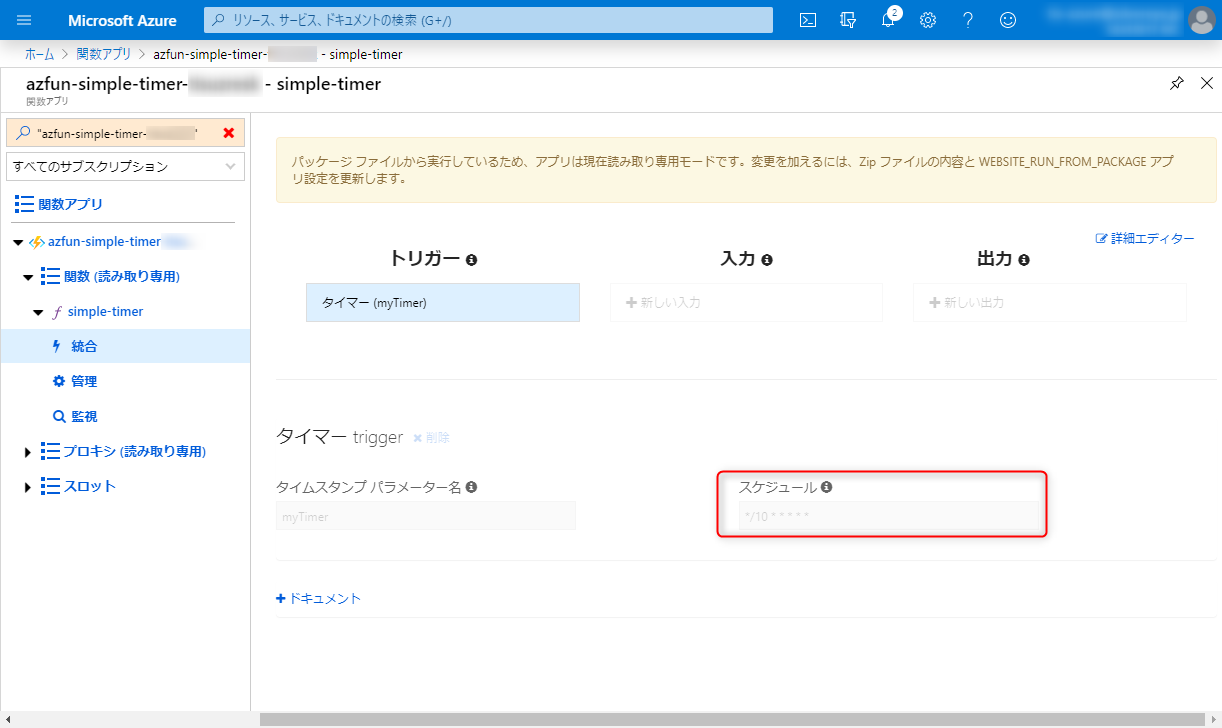
Azureのポータルに戻り、関数を選択して「統合」というところを見ると変更したスケジュールが反映されているのがわかると思います。(少し薄いです)
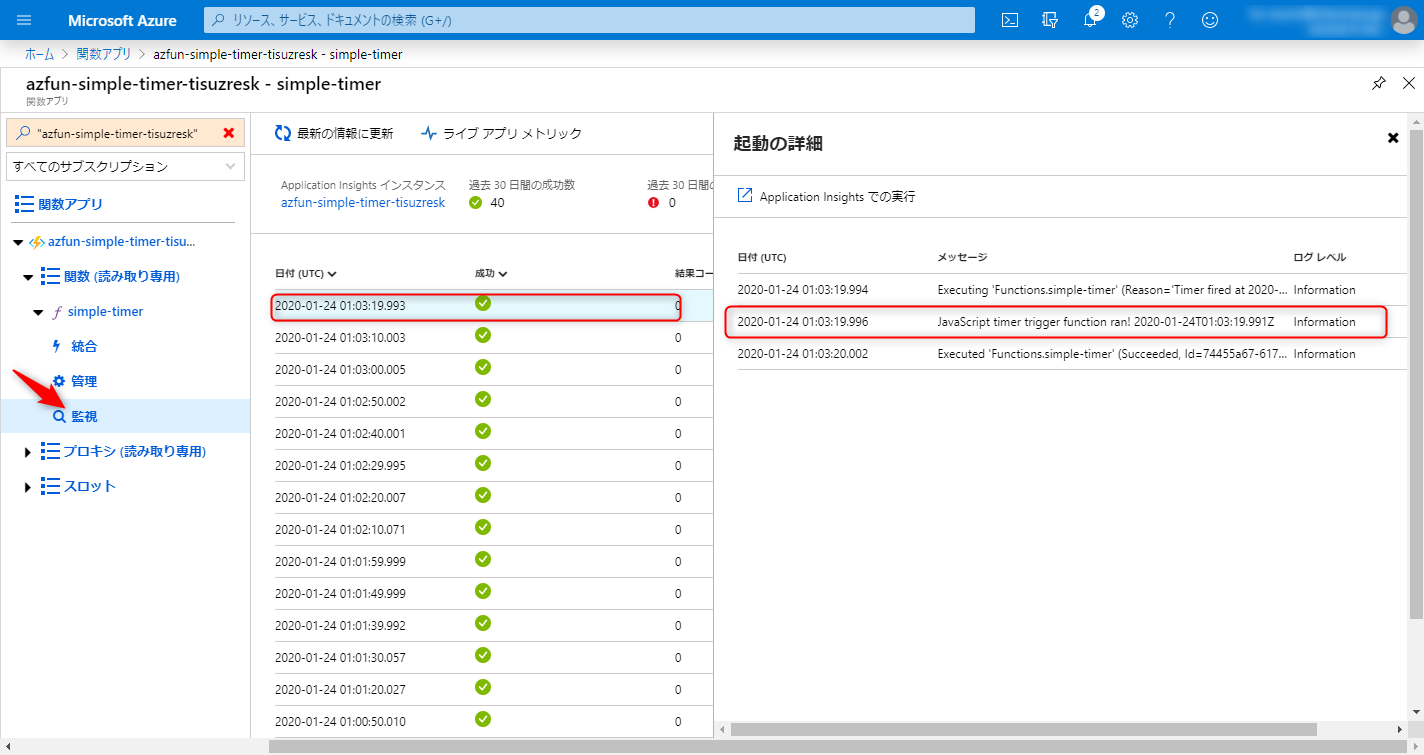
「監視」を見ると10秒おきに起動していることと、さらに進むと出力したログが出ていることを確認できます。
ローカルで実行する
毎回デプロイしているのは時間の無駄なのでローカルでAzureFunctionsを実行してみましょう。
ローカルで動かすための設定はlocal.settings.jsonに記載します
{
  "IsEncrypted": true,
  "Values": {
    "FUNCTIONS_WORKER_RUNTIME": "xxxxxxxxxxxxxxxxxxxxxxxxxxxxxxxxxx"
  },
  "ConnectionStrings": {}
}
local.settings.jsonに何を書けばいいのかは実は考える必要はありません。
コマンドを一発実行するだけでサーバから設定を取得することができるのです。
func azure functionapp fetch-app-settings <functionAppName>
実行するとlocal.settings.jsonが以下のように変更されるはずです。
{
  "IsEncrypted": true,
  "Values": {
    "FUNCTIONS_WORKER_RUNTIME": "xxxxxxxxxxxxxxxxxxxxxxxxxxx",
    "FUNCTIONS_EXTENSION_VERSION": "xxxxxxxxxxxxxxxxxxxxxxxxxxx",
    "AzureWebJobsStorage": "xxxxxxxxxxxxxxxxxxxxxxxxxxx",
    "AzureWebJobsDashboard": "xxxxxxxxxxxxxxxxxxxxxxxxxxx",
    "WEBSITE_NODE_DEFAULT_VERSION": "xxxxxxxxxxxxxxxxxxxxxxxxxxx",
    "WEBSITE_CONTENTAZUREFILECONNECTIONSTRING": "xxxxxxxxxxxxxxxxxxxxxxxxxxx",
    "WEBSITE_CONTENTSHARE": "",
    "APPINSIGHTS_INSTRUMENTATIONKEY": "xxxxxxxxxxxxxxxxxxxxxxxxxxx",
    "WEBSITE_RUN_FROM_PACKAGE": "xxxxxxxxxxxxxxxxxxxxxxxxxxx"
  },
  "ConnectionStrings": {}
}
それではローカル環境で実行してみましょう。
VSCodeのターミナルを開いて以下のコマンドを実行します。
func start
10秒間隔で実行にしていた場合には下記のようにいつ動くのかが書かれたメッセージの後に、時間が来たら実行結果が表示されているはずです。
[2020/01/24 4:27:44] The next 5 occurrences of the 'simple-timer' schedule (Cron: '0,10,20,30,40,50 * * * * *') will be:
[2020/01/24 4:27:44] 01/24/2020 13:27:50+09:00 (01/24/2020 04:27:50Z)
[2020/01/24 4:27:44] 01/24/2020 13:28:00+09:00 (01/24/2020 04:28:00Z)
[2020/01/24 4:27:44] 01/24/2020 13:28:10+09:00 (01/24/2020 04:28:10Z)
[2020/01/24 4:27:44] 01/24/2020 13:28:20+09:00 (01/24/2020 04:28:20Z)
[2020/01/24 4:27:44] 01/24/2020 13:28:30+09:00 (01/24/2020 04:28:30Z)
モジュールを追加する
先ほどはひな型をそのまま動かしてみましたが今度は外部のリソースにHTTPSアクセスし、それをログに出力してみます。
外部のリソースにHTTPSアクセスするコードを一から頑張って自分で書く必要はありません。ライブラリをローカルにインストールして、そのライブラリを使ってHTTPSアクセスしてみましょう。
azure-functions-samplesにfetch-timerというディレクトリを作成します。
先ほどと同じようにfunctionのひな型を作りましょう
PS C:\Users\uzres\git\azure-functions-samples\fetch-timer> func new
'node' has been set in your local.settings.json
Select a template: Timer trigger
Function name: [TimerTrigger] fetch-timer
Writing C:\Users\uzres\git\azure-functions-samples\fetch-timer\fetch-timer\index.js
Writing C:\Users\uzres\git\azure-functions-samples\fetch-timer\fetch-timer\readme.md
Writing C:\Users\uzres\git\azure-functions-samples\fetch-timer\fetch-timer\function.json
The function "fetch-timer" was created successfully from the "Timer trigger" template.
yarn initしてpackage.jsonのひな型を作ってみましょう
package.jsonを確認してみましょう。
{
  "name": "fetch-timer",
  "version": "1.0.0",
  "main": "index.js",
  "license": "MIT",
}
http/httpsアクセスするモジュールaxiosをインストールします。
PS C:\Users\uzres\git\azure-functions-samples\fetch-timer> yarn add axios
・・・
Done in 0.58s.
再度package.jsonを確認するとaxiosが追加されていることがわかります。
{
  "name": "fetch-timer",
  "version": "1.0.0",
  "main": "index.js",
  "license": "MIT",
  "dependencies": {
    "axios": "^0.19.2"
  }
}
また、node_modulesというディレクトリができていて、その中にライブラリが入っていることが確認できると思います。
package.jsonにはライブラリの依存関係が書かれており、package.jsonがある状態でyarn initすると必要なライブラリが自動でインストールされるようになっています。
yarn add xxxxとすることでpackage.jsonに自動で書き込まれますが、パッケージのバージョンを固めたりするために手で編集することもあります。
とりあえずpackage.jsonのパッケージで気をつけておきたいバージョン記法のキャレット(^)とチルダ(~)的なお話を読んでふーん。くらいで覚えておきましょう。
HTTPSアクセスしてみよう
Google Books APIにアクセスして「Azure」がタイトルにつくデータを取得してみます。
こちらにアクセスしてみましょう。
qの後ろに検索する文字列を入れることで書籍のデータをjson形式で取得することができます。
データにアクセスして、ステータスコードとjsonデータを取得するコードを書いてみます。
(コピペしないで確認しながら写経しましょう)
const axios = require('axios');
module.exports = async function (context, myTimer) {
    const result = await axios(`https://www.googleapis.com/books/v1/volumes?q=Azure`)
        .then(response => {
            context.log('status code: ', response.status);
            context.log('data', response.data);
        })
};
ローカルで実行して問題なければAzureにデプロイして実行してみましょう。
問題①
レスポンスのデータの中にはitemsという書籍のデータが入っている配列があります。
その数を出力してみてください。
答えは次の章にありますが、まずは見ないでやってみましょう。
タイトルだけ抽出してみる
JSONを解析してタイトルだけ表示してみましょう。for文を使ってくるくる回して表示してみます
const axios = require('axios');
module.exports = async function (context, myTimer) {
    const searchValue = "Azure";
    const result = await axios(`https://www.googleapis.com/books/v1/volumes?q=${searchValue}`)
        .then(response => {
            const items = response.data.items;
            for (i=0; i<items.length; i++) {
                context.log(items[i].volumeInfo.title);
            }
        }).catch(error => {
            context.log('error: ' + error);
        });
};
for文でもよいのですが、forEachを使う書き方もあります。
const axios = require('axios');
module.exports = async function (context, myTimer) {
    const searchValue = "Azure";
    const result = await axios(`https://www.googleapis.com/books/v1/volumes?q=${searchValue}`)
        .then(response => {
            response.data.items.forEach( item => {
                context.log(item.volumeInfo.title)
            })
        }).catch(error => {
            context.log('error: ' + error);
        });
};
こんな感じで実行結果が出るはずです。
[2020/01/24 4:27:49] Host lock lease acquired by instance ID '0000000000000000000000009E8328FA'.
[2020/01/24 4:27:50] Executing 'Functions.fetch-timer' (Reason='Timer fired at 2020-01-24T13:27:50.0705362+09:00', Id=a5682498-bb5a-46b3-b3fd-78bea46c3de8)
[2020/01/24 4:27:51] status code:  200
[2020/01/24 4:27:51] Azureテクノロジ入門 2019
[2020/01/24 4:27:51] PowerShell for Azure
[2020/01/24 4:27:51] Azureテクノロジ入門 2018
[2020/01/24 4:27:51] ひと目でわかるAzure Active Directory 第2版
[2020/01/24 4:27:51] Microsoft Azure導入ガイドブック
[2020/01/24 4:27:51] Windows Azure実践クラウド・プログラミングfor C#/Visual Basic/PHP
[2020/01/24 4:27:51] Microsoft Azureへの招待
[2020/01/24 4:27:51] Azure定番システム設計・実装・運用ガイド
[2020/01/24 4:27:51] ひと目でわかるAzure 基本から学ぶサーバー&ネットワーク構築
[2020/01/24 4:27:51] Windows Azure APIリファレンス
Azure上にもデプロイして出力されることを確認しておきましょう。
ちなみにAzure上だとロケールの関係で日本語のタイトルの本が出てこないかもしれません。
エラーの時にログを出力する
接続先が間違っていた時には正常にデータがとれずエラーになるはずです。
エラーの場合にログが出力されるように記述してみましょう。
(接続先をわざとlocalhostに変更しています)
const axios = require('axios');
module.exports = async function (context, myTimer) {
    const result = await axios(`https://localhost/books/v1/volumes?q=Azure`)
        .then(response => {
            context.log('status code: ', response.status);
            context.log('data', response.data);
        }).catch(error => {
            context.log('error: ' + error);
        });
};
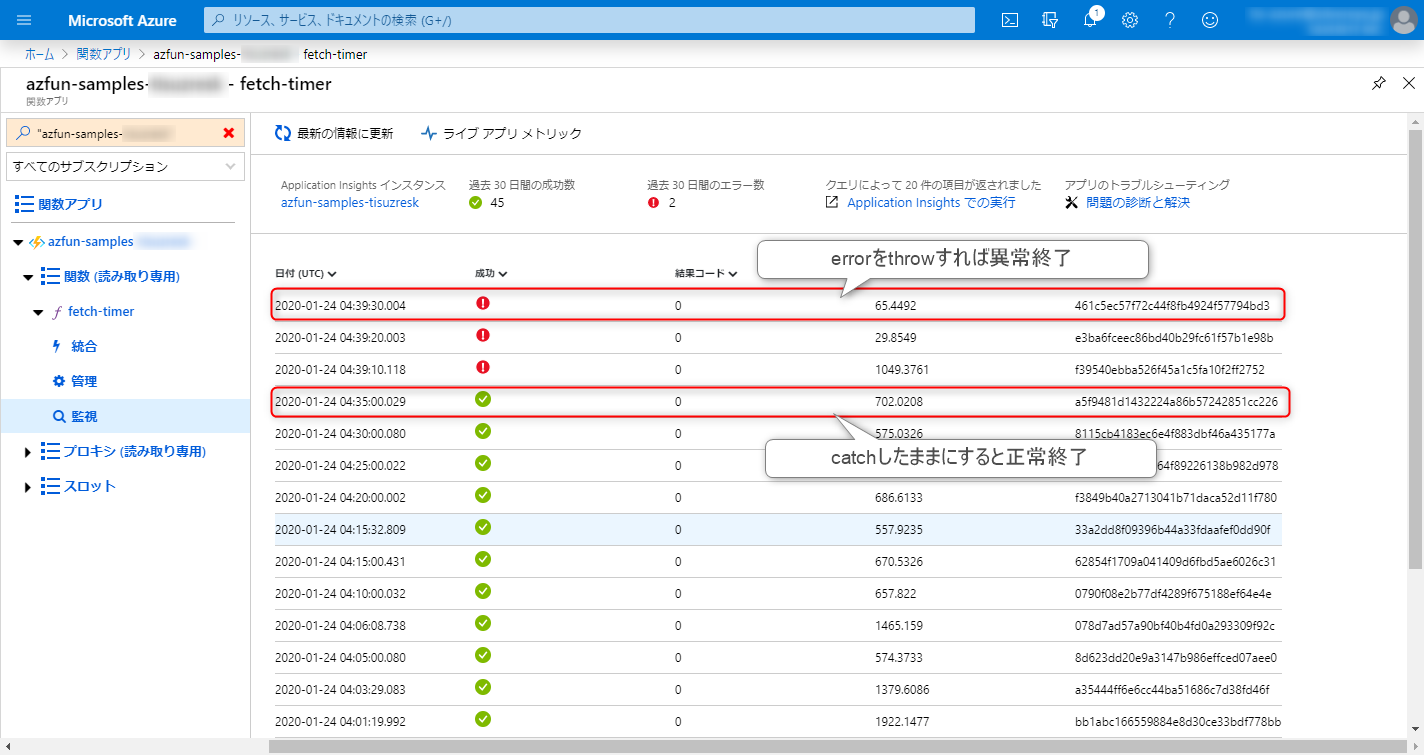
Azureポータル上でログを見るとエラーが出たときにcatchできていることが確認できていると思います。
2020-01-24T02:00:39.107 [Information] error: Error: connect EACCES 127.0.0.1:443
監視タブの一覧上ではグリーンのランプがついていたと思いますが、これはcatchだけして正常終了してしまっているからです。
異常終了させるにはcatchしたあとにthrowします。
const axios = require('axios');
module.exports = async function (context, myTimer) {
    const searchValue = "Azure";
    // const result = await axios(`https://www.googleapis.com/books/v1/volumes?q=${searchValue}`)
    const result = await axios(`https://localhost/books/v1/volumes?q=${searchValue}`)
        .then(response => {
            response.data.items.forEach( item => {
                context.log(item.volumeInfo.title)
            })
        }).catch(error => {
            context.log('error: ' + error);
            throw error;
        });
};
環境変数に切り出す
接続先のURLなどは環境変数に切り出すことで1つの関数で色々な役割をこなすことができますよね。
たとえばHTTPアクセスしてエラーにならないことを確認する関数を作った場合、URLの部分だけ差し替えることができれば再利用性が増しますよね。
const axios = require('axios');
module.exports = async function (context, myTimer) {
    const result = await axios(`https://www.googleapis.com/books/v1/volume?q=Azure`)
        .then(response => {
            response.data.items.forEach(item => {
                context.log(item.volumeInfo.title)
            })
        }).catch(error => {
            context.log('[ERROR]: ' + error);
            throw error;
        });
};
https://www.googleapis.com/books/v1/volume?q=Azureの部分を環境変数に切り出してみましょう。
環境変数はAzureポータル上で設定し、ソース上から環境変数を利用します。
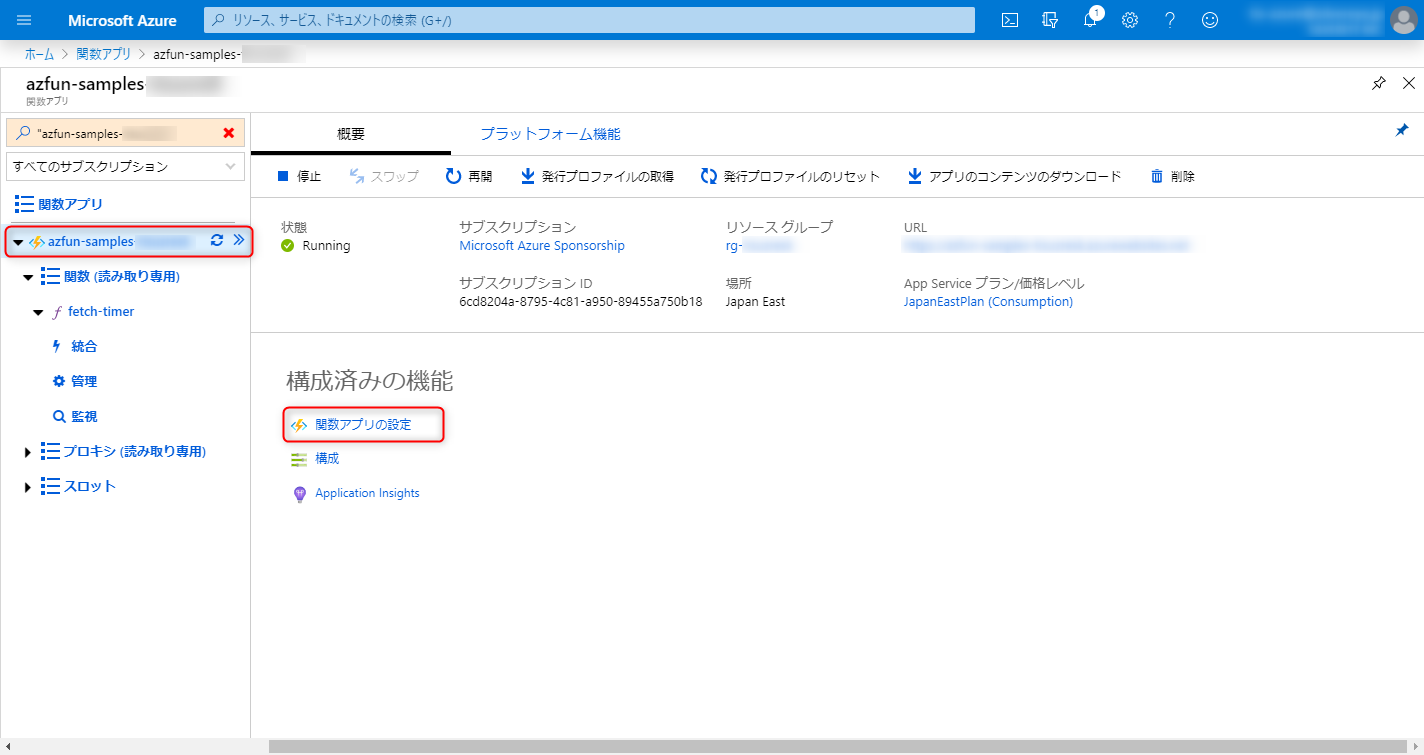
関数アプリの設定をクリックします。
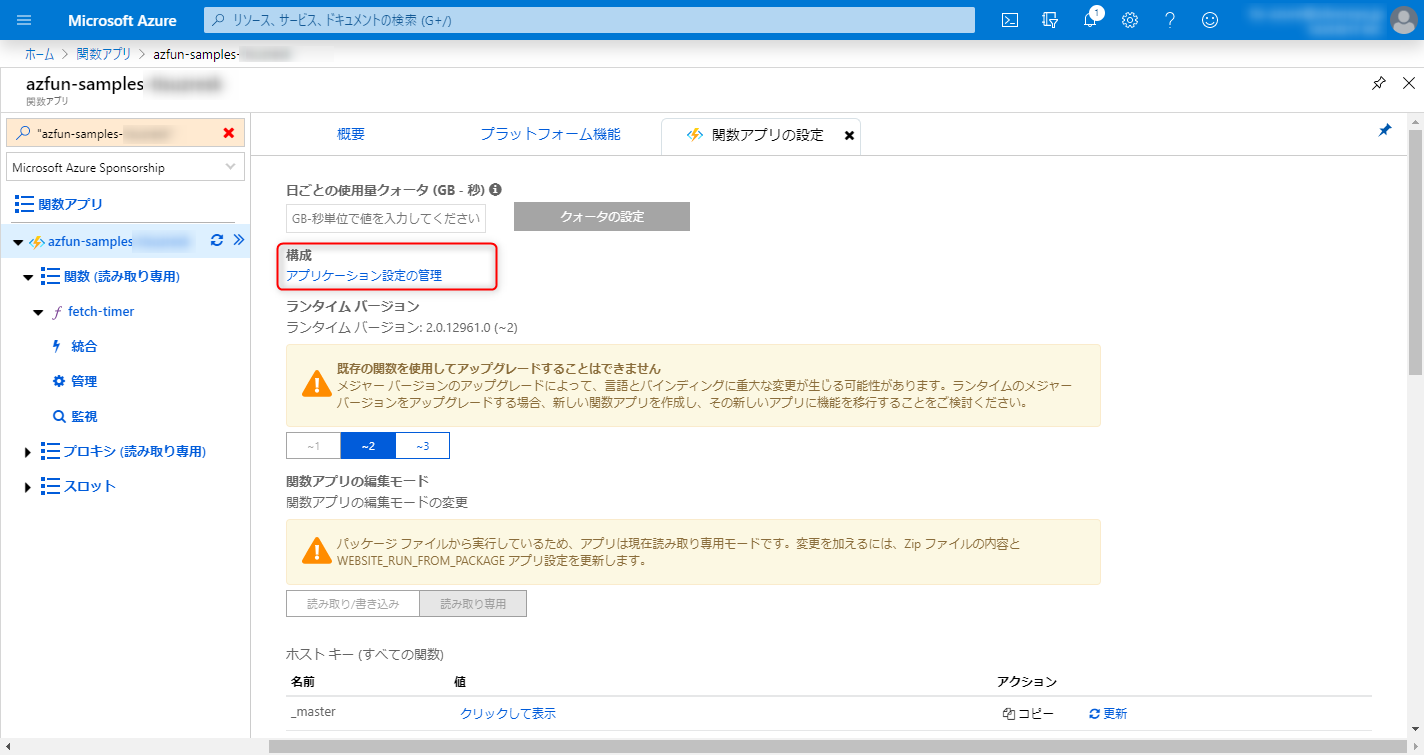
アプリケーション設定の管理をクリックします。
環境変数を設定します。ここではURLにhttps://www.googleapis.com/books/v1/volume?q=Azureを入力します。
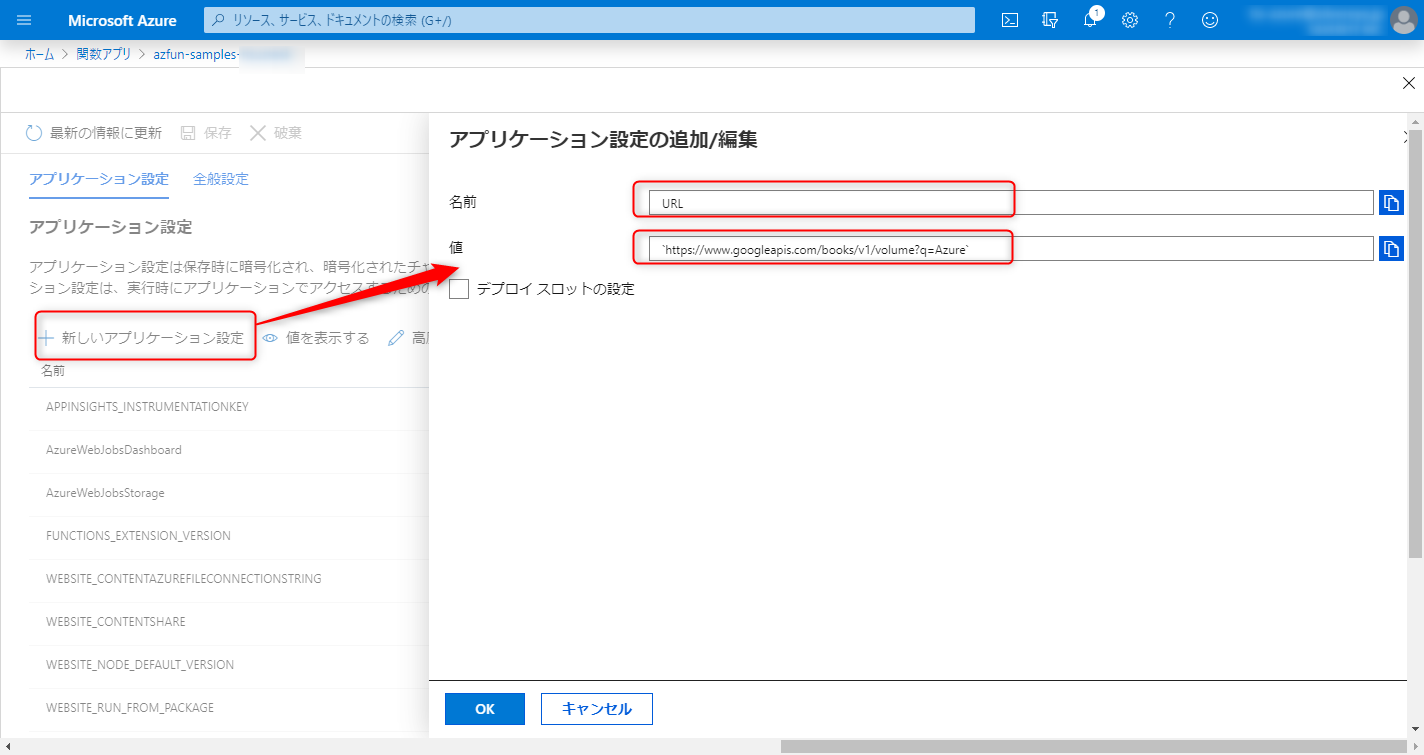
最後に保存ボタンを押すのを忘れないようにしましょう
ソースを修正していきます。
- 環境変数から値を取得するにはprocess.env.[環境変数]を使います。
- 環境変数URLが設定されていない場合はエラーログを出力します。
const axios = require('axios');
module.exports = async function (context, myTimer) {
    const URL = process.env.URL;
    if (typeof process.env.URL === 'undefined') {
        context.log("[ERROR]URL is undefined.");
    }
    const result = await axios.get(URL)
        .then(response => {
            response.data.items.forEach(item => {
                context.log(item.volumeInfo.title)
            })
        }).catch(error => {
            context.log('[ERROR]: ' + error);
            throw error;
        });
};
ソースを修正したらそのまま実行しましょう(func start)
このようなエラーが出るはずです。
[2020/01/24 5:42:50] [ERROR]URL is undefined.
[2020/01/24 5:42:50] URL: undefined
環境変数がされていないので出ているエラーですね。
ローカル環境で動かす手順で紹介しましたが、fetch-app-settingsは環境変数の情報を取得するコマンドなので、このコマンドを再度実行してみましょう
func azure functionapp fetch-app-settings azfun-samples-xxxxxxx
実行した結果、local.settings.jsonは以下のようにURLが追加されているはずです。
{
  "IsEncrypted": true,
  "Values": {
    "FUNCTIONS_WORKER_RUNTIME": "xxxxxxxxxxxxxxxxxxxxxxxxxxx",
    "FUNCTIONS_EXTENSION_VERSION": "xxxxxxxxxxxxxxxxxxxxxxxxxxx",
    "AzureWebJobsStorage": "xxxxxxxxxxxxxxxxxxxxxxxxxxx",
    "AzureWebJobsDashboard": "xxxxxxxxxxxxxxxxxxxxxxxxxxx",
    "WEBSITE_NODE_DEFAULT_VERSION": "xxxxxxxxxxxxxxxxxxxxxxxxxxx",
    "WEBSITE_CONTENTAZUREFILECONNECTIONSTRING": "xxxxxxxxxxxxxxxxxxxxxxxxxxx",
    "WEBSITE_CONTENTSHARE": "",
    "APPINSIGHTS_INSTRUMENTATIONKEY": "xxxxxxxxxxxxxxxxxxxxxxxxxxx",
    "WEBSITE_RUN_FROM_PACKAGE": "xxxxxxxxxxxxxxxxxxxxxxxxxxx"
    "URL": "xxxxxxxxxxxxxxxxxxxxxxx"
  },
  "ConnectionStrings": {}
}
再度実行してローカル環境でうまく動くことを確認しましょう。
問題なければAzure上にデプロイして実行してみましょう。
問題②
証明書の有効期限が残り何日かを取得してみましょう
ヒント:ssl-checkerを使ってみよう
ログには以下が出力されるようにしてください
[INFO]SSL daysRemaining <証明書有効期限の残り日数>
問題③
ここまで学んだことを使ってURL監視を実装してみよう
- 対象URLにとある間隔でアクセスし以下を確認してください。
- HTTP Responseのステータスコードが200であること
- ResponseBodyに特定の文字列があること
- BooksAPIを使うのであればtotalItemsという文字列があるかを確認してみてください。
- 証明書の有効期限内であること
- 対象URL、証明書の有効期限残り日数は環境変数で指定できるようにしましょう
- エラーの場合は文字列の先頭に[ERROR]という文字を付与しましょう。
後片付け
リソースグループごとガツンと消しておきましょう。取り返しがつかないので間違えないように!!
az group delete --name <リソースグループ名>
おわりに
TimerFunctionsを使うことで指定された期間に不要なサービスを自動停止・開始することなども実装できるはずなので是非ともチャレンジしてみてください。