目的
タスクスケジューラで動かしているスクリプトの通知メールを個人Googleアカウントから会社公式メールアカウントに切り替えたい。
真の目的 Redmine用メールサーバを立てることは社内規定上禁止。 そのためチケット変更等をポーリングするスクリプトからメールを送信する。利用サービス・言語
-
Python
REST APIを使用するためrequestsモジュールを使用します。 -
MicrosoftGraph
弊社共用ツールであるOffice365(Outlook)を扱うためのインターフェースです。
今回はOutlookのメール送信を目的としますがカレンダの予定やOneDriveへのアクセスも可能なようです。 -
MicroSoft Edge
トークンの取得に使用します。
ブラウザであれば何でもよいと思います。
流れ
1.Application Registration Portalでアプリの作成
2.認証コードの取得
3.アクセストークンの取得
4.アクセストークンを使用してGraphAPIを実行
解説
こちらを参考にさせていただきました。
Microsoft Outlook API で遊ぶ
アプリの作成
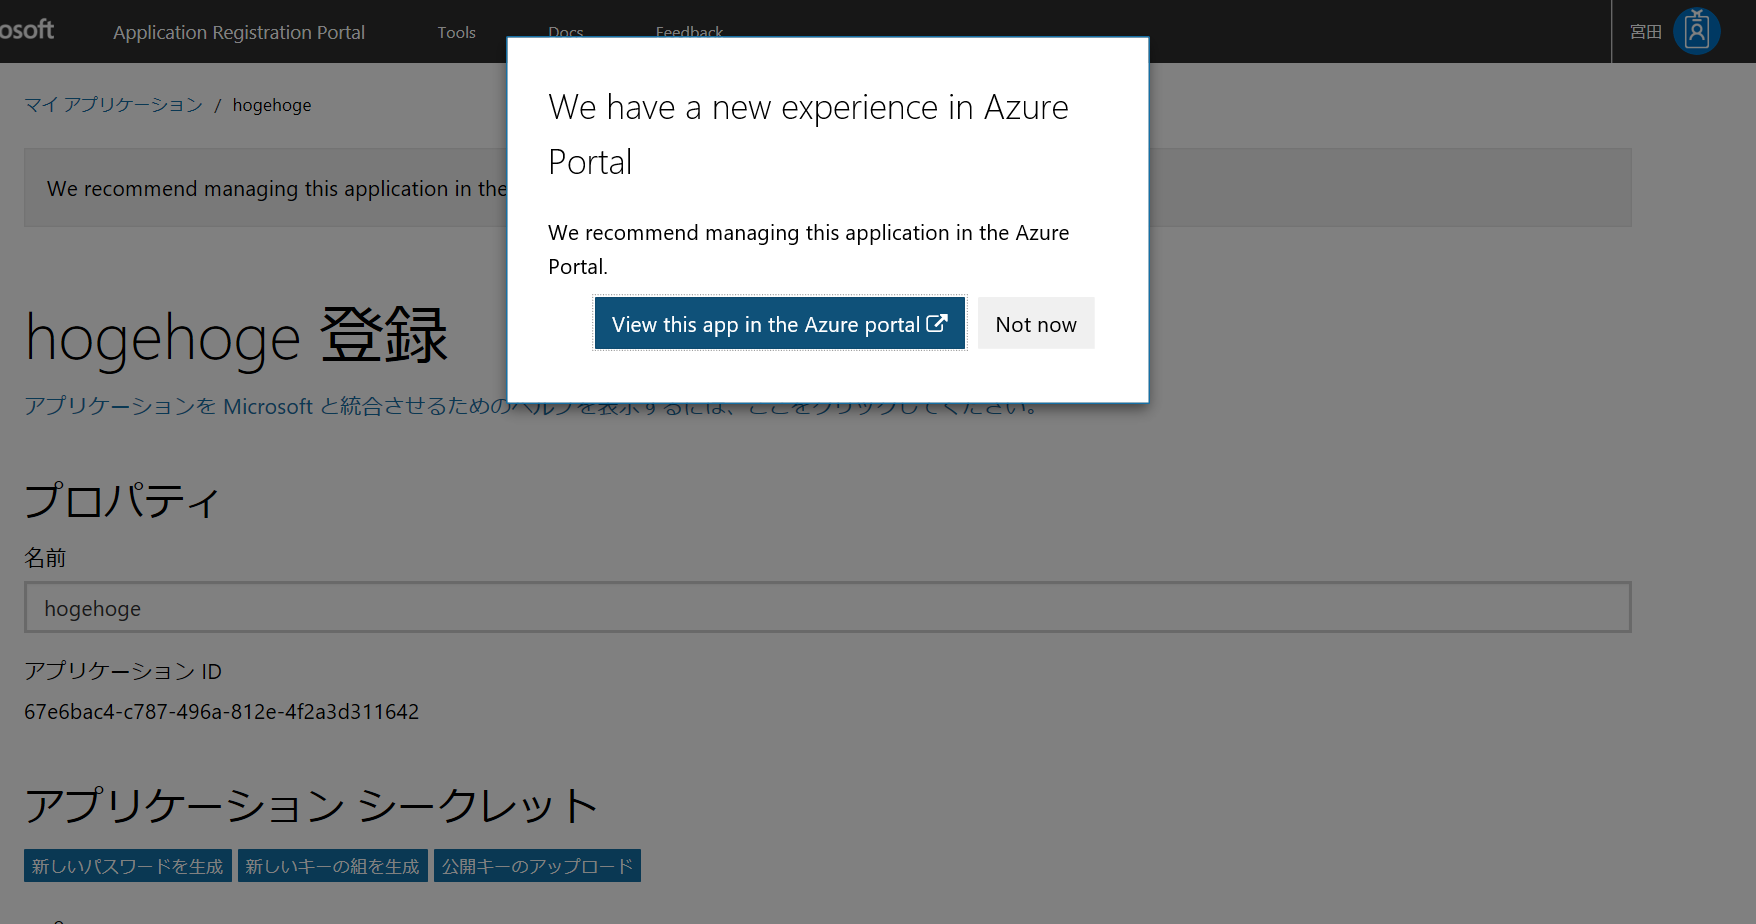
https://apps.dev.microsoft.com/#/appListへ行き
アプリの追加→名前の入力(任意)→アプリケーションの作成

作成が終わると管理画面に進みます。
ここでAzurePortalの画面で管理できるよ!みたいなメッセージが出ますが今回は断っておきます。

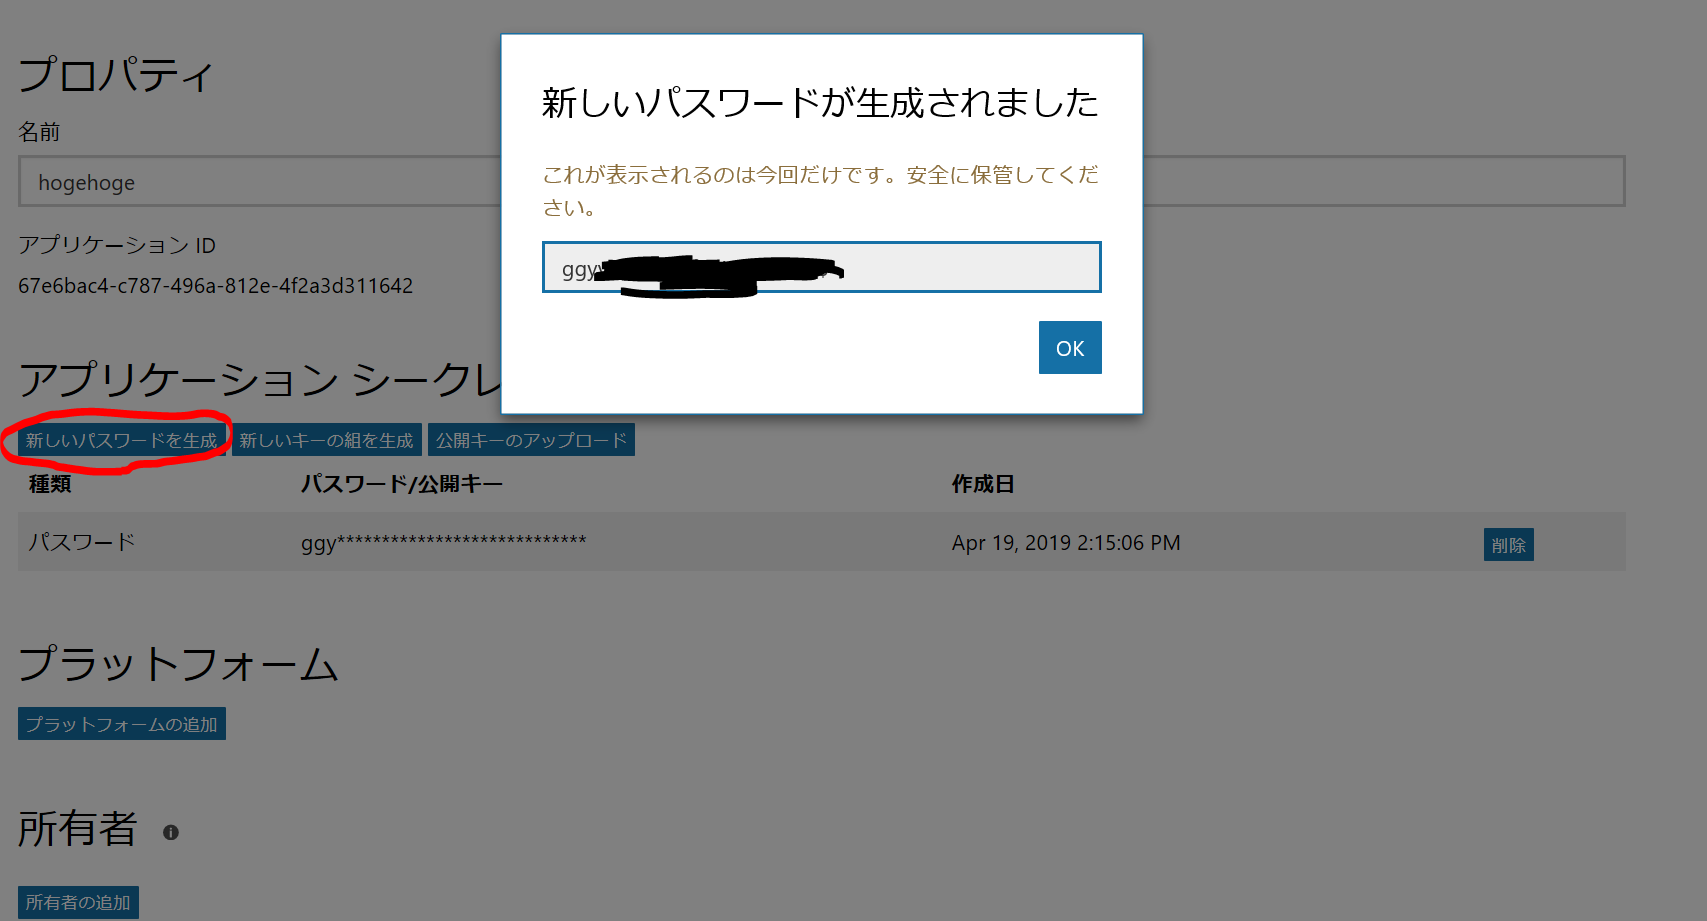
新しいパスワードの作成ボタンを押し、シークレットキーを発行します。
アプリケーションIDとシークレットキーはアクセストークンの取得に必要なので控えておいてください。(client_id, client_secretという名前で再登場します)

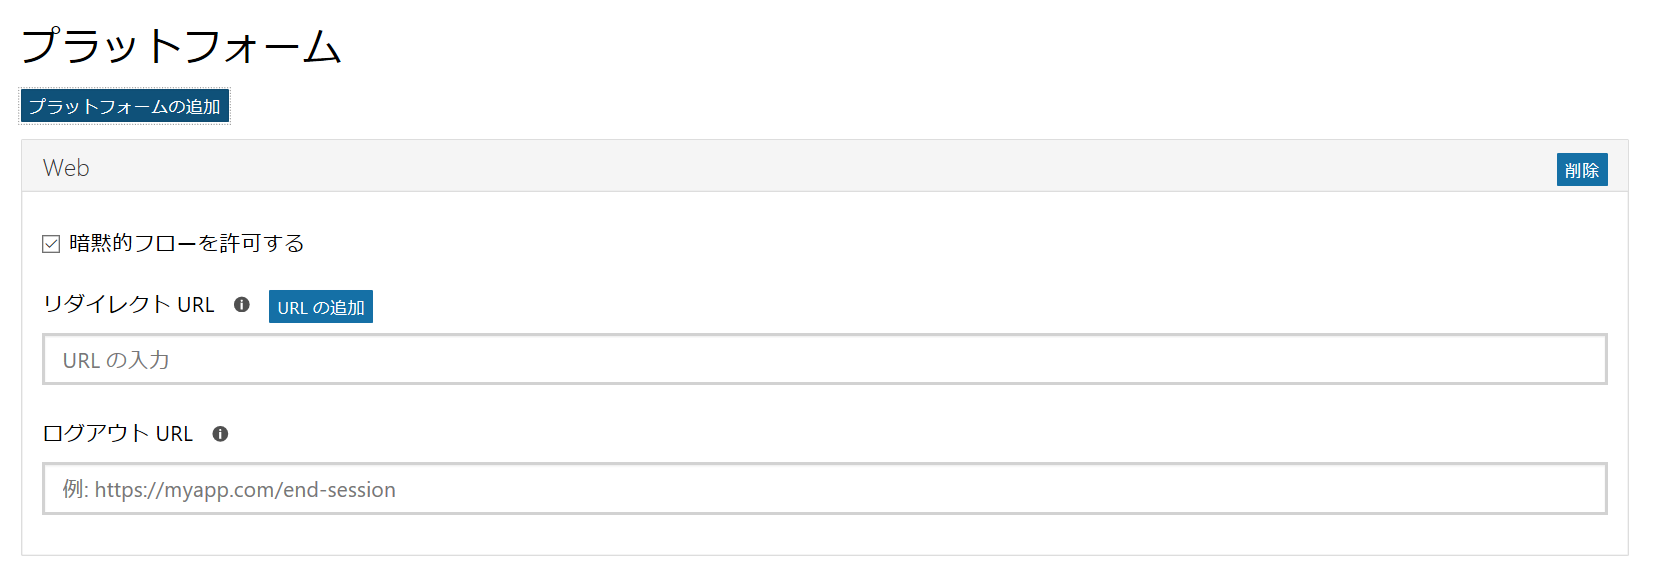
プラットフォームの追加ボタンを押し、Webを選択します。
(プラットフォームの追加のところは必須かどうかわかっていません。。。。)

暗黙的フローを許可する、にチェックを入れ、リダイレクトURIにhttp://localhost:10101/authorizedを入力します。
http://localhost:10101/authorizedは参考元のページに合わせていますがwebアプリを指定する場合は適宜書き換えてください。

ここまで設定が出来たら保存を押してアプリケーションの作成は終わりです。
認証コードの取得
login.microsoftonline.com/common/oauth2/v2.0/authorizeエンドポイントへ認証コードの要求を行います。
| パラメータ | 説明 | |
|---|---|---|
| tenant | 必須 | |
| client_id | 必須 | アプリ作成時に出てきたアプリケーションID |
| response_type | 必須 |
code固定です |
| redirect_uri | 推奨 | アプリ作成時に登録したURL、今回の場合はhttp://localhost:10101/authorized
|
| スコープ | 必須 | 使用するAPIのスコープを指定、今回はhttps://graph.microsoft.com/Mail.Send
|
| response_mode | 推奨 | query または form_post を指定可能 |
| state | 推奨 | 任意の文字列、内部での乱数の生成にも使われるようです。 |
ブラウザのアドレスバーに
https://login.microsoftonline.com/common/oauth2/v2.0/authorize?client_id=[client_id]&response_type=code&redirect_uri=http%3A%2F%2Flocalhost%3A10101%2Fauthorized&response_mode=query&scope=https%3A%2F%2Fgraph.microsoft.com%2FMail.Send+offline_access&state=[任意]
と入力します。
ログインに成功すると指定したredirect_uriにリダイレクトされます。
HTTP404エラーですが問題はありません。
赤枠をみてもらうとわかるようにcodeが返ってきていますね、アホみたいに長い(889文字)ですが問題ありません。
これを次のアクセストークンの取得に使用します。stateとsession_stateは不要です。

http://localhost:10101/authorized? code=XXX...XXXX(省略) &state=1234 &session_state=XXXXXXXX-XX-XX-XX-XXXXXXXX
アクセストークンの取得
参考元からまんまパクってきましたが、client_id, client_secret, auth_codeを入力し
下記pythonを実行します。
# -*- coding:utf-8 -*-
import requests
import json
import sys

APP = {
    'client_id': 'XXXXXXXXXXXXXXXXXXXXXXXXXXXX',
    'redirect_uri': 'http://localhost:10101/authorized',
    'client_secret': 'XXXXXXXXXXXXXXXXXXXXXXXXXXXX'
}

auth_code = 'XXXX...XXXX(省略)'


def get_refresh_token(code, app):
    data = {
        'grant_type': 'authorization_code',
        'client_id': app['client_id'],
        'code': code,
        'redirect_uri': app['redirect_uri'],
        'scope': 'https://graph.microsoft.com/Mail.Send',
        'client_secret': app['client_secret'],
    }

    global response
    response = requests.post(
        'https://login.microsoftonline.com/common/oauth2/v2.0/token',
        data=data,
    )
    if response.status_code == 200:
        token = response.json()['refresh_token']
        return response, token
    return response, None

refresh_token = get_refresh_token(auth_code, APP)

if refresh_token[1] is None:
    print('-**--**--**--**--**--**--**--**--**--**--**--**--**-')
    print('refresh_token failed')
    print(refresh_token[0].json())
    print('-**--**--**--**--**--**--**--**--**--**--**--**--**-')
else:
    print('-**--**--**--**--**--**--**--**--**--**--**--**--**-')
    print('refresh_token done')
    print(refresh_token[0].json())
    print('-**--**--**--**--**--**--**--**--**--**--**--**--**-')
実行し、refresh_token doneが表示されれば成功です。
refresh_token doneのあとにjson文字列がついてくるので次項目でaccess_tokenを使用します。
{
  "token_type": "Bearer",
  "scope": "profile openid email https://graph.microsoft.com/Mail.Send",
  "expires_in": 3599,
  "ext_expires_in": 3599,
  "access_token": "XXX...XXX(省略)",
  "refresh_token": "XXX...XXX(省略)"
}
GraphAPI実行
アクセストークンと送信先を指定して下記Pythonファイルを実行してください。
print(result.status_code)が4XXでなければメールが宛先に届きます。
# -*- coding:utf-8 -*-
import requests
import json

HTTP_POST_URL = 'https://graph.microsoft.com/v1.0/me/sendMail'

token = 'XXX...XXX'

headers = {'Content-Type': 'application/json',
           'Authorization': 'Bearer %s' % token,
           }

datas = {
  "message": {
    "subject": "Title",
    "body": {
      "contentType": "Text",
      "content": "TextBody"
    },
    "toRecipients": [
      {
        "emailAddress": {
          "address": "xxxxxxxx@xxxxxxxx.com"
        }
      }
    ],
    "ccRecipients": [
      {
        "emailAddress": {
          "address": "xxxxxxxx@xxxxxxxx.com"
        }
      }
    ],
    "bccRecipients": [
      {
        "emailAddress": {
          "address": "xxxxxxxx@xxxxxxxx.com"
        }
      }
    ]

  },
  "saveToSentItems": "true"
}

# 社内プロキシを介するとエラーになるためプロキシ設定しない
proxies = {
  'http': '',
  'https': '',
}


def send_mail(msg):
    datas['message']['body']['content'] = msg
    try:
        # proxiesオプションでプロキシを無効にする
        result = requests.post(HTTP_POST_URL,
                               json.dumps(datas),
                               headers=headers,
                               proxies=proxies)
        print(result.status_code)
    except requests.exceptions.ConnectionError:
        print('エラーが発生しました')
        print('プロキシを外してください')
    except Exception as err:
        print('ConnectionError以外の例外')
        print(err)

send_main('aaaaaaaaaaa')
結果
できました^^
つぎ
これで社外を通らずに会社指定ツールのみでメールを送信できました。
機密情報とかもスクリプトでやり取りできるようになりますね!
トークンの有効期限が1時間という問題があります。
今回手動でブラウザを使って認証コードをとってきましたが毎時間ブラウザ開くのも・・・・
スクレイピングかwebアプリを作るしかなさそうです。
何かいい方法があれば教えてください。


