はじめに
前回はFlashAirを使ってSwitchのスクリーンショットをAzure Blob Storageにアップロードしました。
今回はBlob Storageにアップロードされた画像に対し、Azure Cognitive Servicesを使ってOCR処理を行います。(下図赤枠部が本記事の解説範囲です)

Blob Storageへの書き込みでFunctionsを起動する二種のトリガー
Blob Storageへのファイル書き込みをトリガーにFunctionsを起動するには、
- Blob Storage トリガー
- Event Grid トリガー
のどちらかを使うのが一般的でしょう。では、どちらを使うのがいいでしょうか?
Azure公式のドキュメントによると、以下に当てはまる際にはEvent Grid トリガーを利用することが推奨されています。
- BLOB専用ストレージアカウントを利用している場合(Blobトリガーがサポートされない)
- 100,000以上のBlobを含むコンテナー、または1 秒あたり100を超えるBlobの更新が発生する場合
- 既存のBlobが多数含まれ、新しいBlobに対してのみトリガーしたい場合(Blobトリガーでは既存のBlobを含めて全て処理されてしまう)
- 待ち時間を最小化したい場合
今回はアップロード用のコンテナーを先に作成しておりテストデータも含めてBlobが多数存在してる状況なので、Event Grid トリガーを利用することとします。
Functionsの作成
方針が決まったのでリソースを作成していきます。まずはFunctionsから作成します。
Functions用のストレージアカウントを作成し、
$ az storage account create -g RingFitRecorder -n rffnstorage --sku Standard_LRS
作成したストレージアカウントを指定してFunctionsを作成します。言語はPythonにしました。
FunctiosでマネージドIDを利用するので、「--assign-identity」を付けています。
$ az functionapp create -g RingFitRecorder -n RingFitRecorder -s rffnstorage --runtime python --runtime-version 3.9 --functions-version 3 --consumption-plan-location japaneast --os-type Linux --assign-identity
Azure Cognitive Servicesの作成
続いてCognitive Servicesを作成します。
OCRに利用するのでkindは「ComputerVision」、後ほどマネージドIDを利用してストレージへの権限設定を行うので「--assign-identity」を付与しシステム割り当てマネージドIDを有効にしておきます。
また今回の構成では、FunctionsからCognitive Servicesを呼び出す際の認証にFunctionsのマネージドIDを利用します。マネージドIDを含めたAzure ADで認証を行う際はカスタムサブドメインが必須です。「--custom-domain」でサブドメイン名を指定しましょう。
$ az cognitiveservices account create -n RingFitRecorder -g RingFitRecorder --custom-domain RingFitRecorder --kind ComputerVision --sku F0 --location japaneast --assign-identity --yes
リソースが作成できたら、Cognitive ServicesのIAMの設定で、FunctionsのマネージドIDを「Cognitive Services ユーザー」として割り当てます。

Functionsで関数の作成
Cognitive Servicesの作成が完了したらFunctionsの設定に戻ります。
まずはアプリケーション設定を作成します。「COGNITIVE_ENDPOINT」という名前で、値にCognitive ServicesのURLを以下のように指定します。

続けて関数を作成します。
手元の端末で以下のようにファイルを作成します。(私はWindows11上のWSLで作成してます)
$ tree
.
├── EventGridTrigger
│   ├── __init__.py
│   └── function.json
├── host.json
└── requirements.txt
import json
import os
import time
import logging
import azure.functions as func
from azure.cognitiveservices.vision.computervision import ComputerVisionClient
from azure.cognitiveservices.vision.computervision.models import OperationStatusCodes
from azure.identity import DefaultAzureCredential
from msrest.authentication import BasicTokenAuthentication

def main(event: func.EventGridEvent):

    result = json.dumps({
        'id': event.id,
        'data': event.get_json(),
        'topic': event.topic,
        'subject': event.subject,
        'event_type': event.event_type,
    })

    endpoint = os.environ['COGNITIVE_ENDPOINT']
    event_data = event.get_json()
    blob_url = event_data['url']

    credentials = DefaultAzureCredential()
    access_token = credentials.get_token('https://cognitiveservices.azure.com')
    dict_token = {'access_token': access_token.token}

    computervision_client = ComputerVisionClient(endpoint, BasicTokenAuthentication(dict_token))
    read_response = computervision_client.read(blob_url, raw=True)

    read_operation_location = read_response.headers['Operation-Location']
    operation_id = read_operation_location.split('/')[-1]

    while True:
        read_result = computervision_client.get_read_result(operation_id)
        if read_result.status not in ['notStarted', 'running']:
            break
        time.sleep(1)

    active_time_flag = False
    active_time_text = ''
    burned_calories_flag = False
    burned_calories_text = ''

    if read_result.status == OperationStatusCodes.succeeded:
        for text_result in read_result.analyze_result.read_results:
            for line in text_result.lines:
                logging.info('text: %s', line.text)

                if line.text == '合計活動時間':
                    active_time_flag = True
                    burned_calories_flag = False
                elif line.text == '合計消費カロリー':
                    active_time_flag = False
                    burned_calories_flag = True
                elif line.text == '合計走行距離':
                    active_time_flag = False
                    burned_calories_flag = False
                else:
                    if active_time_flag == True:
                        active_time_text += line.text
                    elif burned_calories_flag == True:
                        burned_calories_text += line.text

    if active_time_text != '' and burned_calories_text != '':
        logging.info('リングフィットアドベンチャーのリザルト画面のようです')
        logging.info('合計活動時間: %s', active_time_text)
        logging.info('合計消費カロリー: %s', burned_calories_text)
{
  "scriptFile": "__init__.py",
  "disabled": false,
  "bindings": [
    {
      "type": "eventGridTrigger",
      "name": "event",
      "direction": "in"
    }
  ]
}
{
  "version": "2.0",
  "logging": {
    "applicationInsights": {
      "samplingSettings": {
        "isEnabled": true,
        "excludedTypes": "Request"
      }
    }
  },
  "extensionBundle": {
    "id": "Microsoft.Azure.Functions.ExtensionBundle",
    "version": "[2.*, 3.0.0)"
  }
}
azure-cognitiveservices-vision-computervision==0.9.0
azure-identity==1.9.0
これらのファイルをZIPファイルにまとめ、
$ zip -r function.zip ./requirements.txt ./host.json EventGridTrigger/
  adding: requirements.txt (deflated 13%)
  adding: host.json (deflated 37%)
  adding: EventGridTrigger/ (stored 0%)
  adding: EventGridTrigger/function.json (deflated 29%)
  adding: EventGridTrigger/__init__.py (deflated 66%)
Functionsにデプロイします。
$ az functionapp deployment source config-zip -g RingFitRecorder -n RingFitRecorder --src function.zip --build-remote
画像アップロード用Blobコンテナーの設定
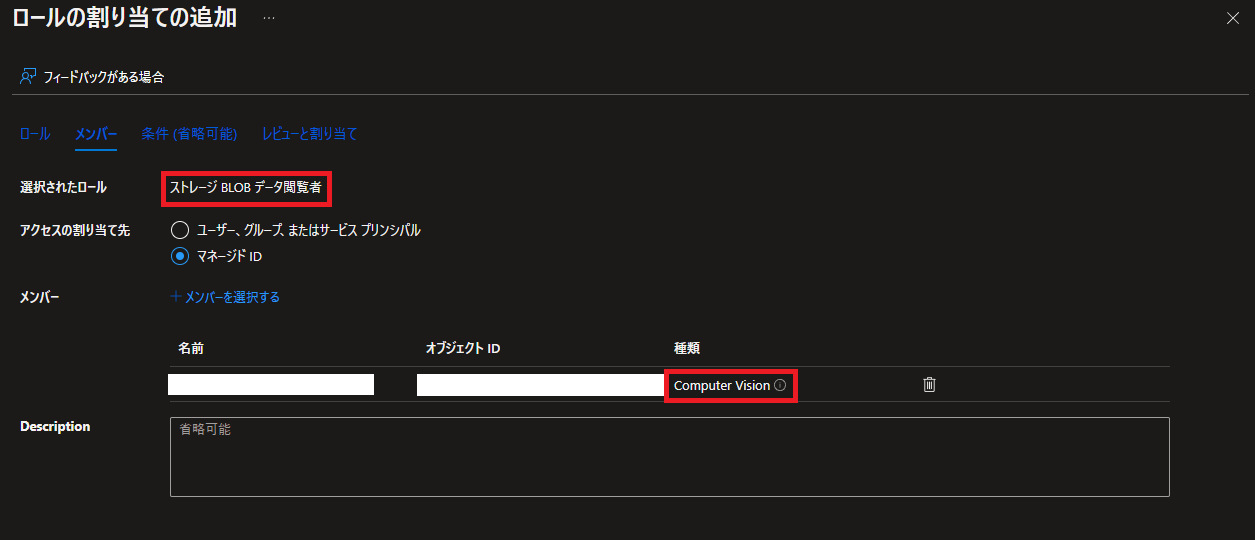
前回作成したFlashAirからの画像アップロード先のBlobコンテナーに対し、Cognitive Servicesが画像を読み取りできるよう権限設定します。
BlobコンテナーのIAM画面から、Cognitive ServicesのマネージドIDに「ストレージ BLOB データ閲覧者」を割り当てましょう。
次にEvent Grid トリガーの設定をします。
ストレージアカウントの「イベント」メニューからイベントサブスクリプションの追加を行います。

イベントサブスクリプションとトピックの名前を適当に付けます。イベントの種類を「Blob Created」のみ選択、エンドポイントの詳細で先ほど作ったFunctionsの「EventGridTrigger」を選択します。
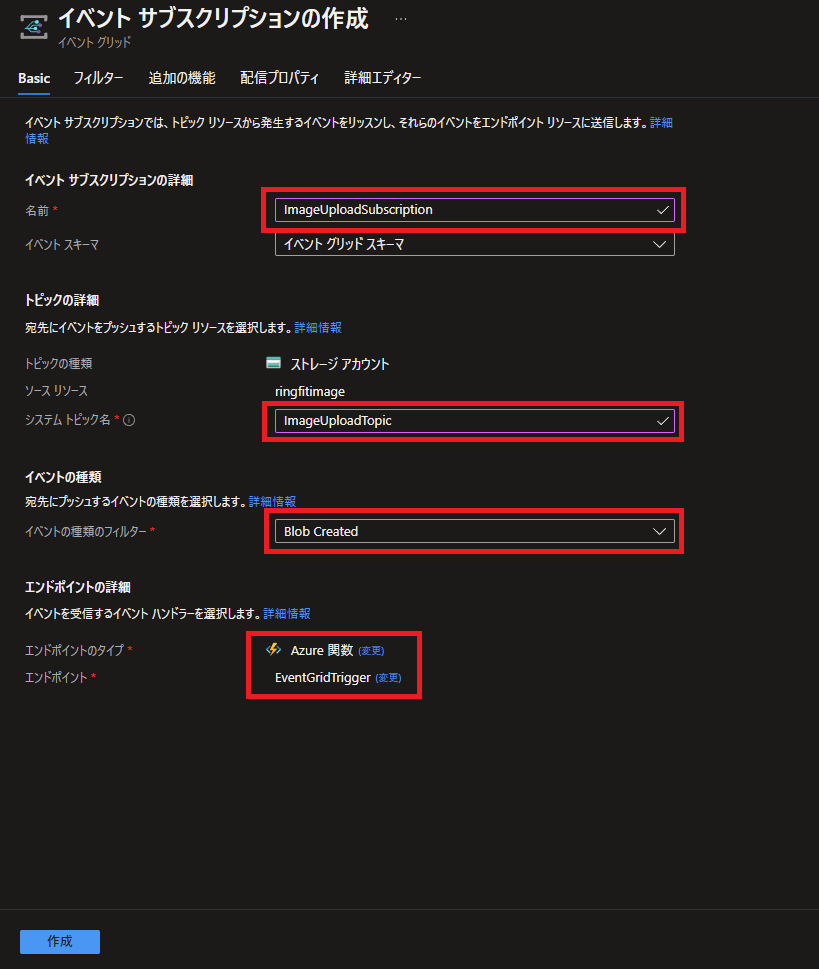
次に上部の「フィルター」タブをクリックし、サブジェクトフィルタリングを有効にチェック、「次で終わるサブジェクト」に「.jpg」を入力します。
これにより、ストレージに.jpgの拡張子が付いたファイルが書き込まれたときのみイベントを発行するようになります。
入力が終わったら「作成」ボタンをクリックし、Event Gridの設定は完了です。

動作テスト
ここまでで設定は完了しました。
実際にBlob Storageにファイルをアップロードして、処理を確認してみましょう。
以下のリングフィットアドベンチャーのリザルト画面のスクリーンショットをテストに使ってみます。

FunctionsのEventGridTrigger関数の画面から、モニター→ログを選択し、リアルタイムでログが見えるようにしておきます。

この状態で画像をアップロードすると…

うまくOCR処理ができているようです!
おわりに
これで画像アップロード処理を受けて起動するOCR処理が完成しました。
次回はOCRで得た結果を基に、Google Fitに記録する処理を作成します。
(まだ未完成のため、次回の投稿予定は未定です)