この記事について
ドライバを書いたことのない自分が、調べながらドライバを書くまでの記録を行う。
最終的に実装したのはユーザーアプリケーションなので、OSとハードウェアを橋渡しするという意味でのドライバにはマッチしないかもしれない。
ただしドキュメントには "application-level drivers" なる言い回しがあったため、広義な意味でのドライバにはマッチすると考えている。
やりたいこと
ゲームパッドをOS X上で動作させたい。
動作の定義は「押したボタンに対応するキーイベントが発生すること」とする。
今回利用したゲームパッドはRumblepad™ 2。
ちなみにすでに似たようなソリューションはあるものの、相性の問題なのか斜めキーがうまく動作しなかったため今に至る。
ドライバの区分について
いきなり実装に入る前に、概要だけは把握した方がいいと思った。
公式ドキュメントは親切な印象。
以下、特に重要だと感じた部分を抜粋する。
カーネル or ユーザー空間
Introductionに詳しい。
- 多くのドライバはユーザー空間で動作させることができる
- ネットワークカーネルエクステンションとファイルシステムに関するものは原則としてカーネルで動作する必要がある
今回はユーザー空間での動作を想定する。
I/O Kit or not
I/O Kitという、I/Oをラップしたフレームワークが提供されている。
多くのドライバはこのフレームワークを利用して実装できる。
作業ログ
自分の書きたいものの立ち位置を調べる
今回の立ち位置は I/O Kit HID family だということがI/O Kit Family Device-Access Supportから判断できる。
また_Carbon Event Manager_ なるものと NSEvent を利用して入力を制御できることが先ほどのリストから分かる。
それら2つの技術についてはHardware-Access Optionsで概要を把握することができる。
手元のUSBデバイスのベンダーIDとプロダクトIDを調べる
以下のコマンドを実行しデバイスの情報を取得する。
system_profiler SPUSBDataType
以下の出力が得られた。
        Logitech RumblePad 2 USB:

          Product ID: 0xc218
          Vendor ID: 0x046d  (Logitech Inc.)
          Version: 1.00
          Speed: Up to 1.5 Mb/sec
          Manufacturer: Logitech
          Location ID: 0x14100000 / 11
          Current Available (mA): 1000
          Current Required (mA): 500
          Extra Operating Current (mA): 0
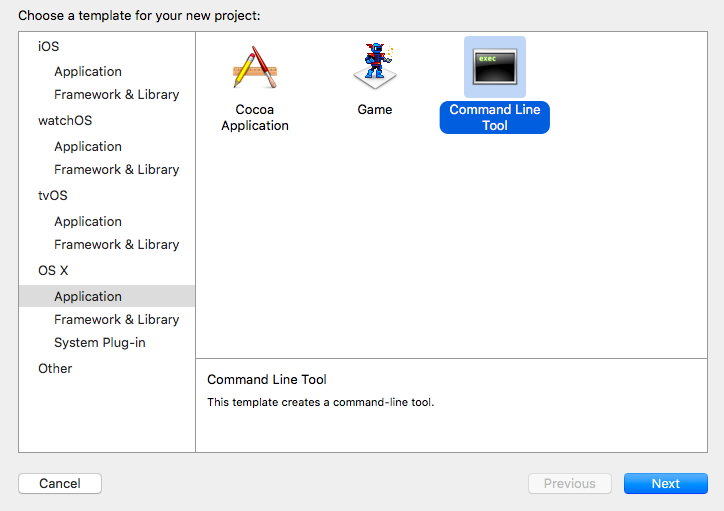
Command Line Toolとして新しいプロジェクトを作成する
体裁は何でも良さそうだが、今回は手軽にCommand Line Toolとして実装する。

作成した時点でのファイルは以下のようになる。
# import <Foundation/Foundation.h>

int main(int argc, const char * argv[]) {
    @autoreleasepool {
        // insert code here...
        NSLog(@"Hello, World!");
    }
    return 0;
}
IOHIDManager を利用し入力を受け取る
IOHIDManager を利用すると手軽にHIDからの入力を扱うことができる。
マッチングするデバイスのIDに先ほどの情報を設定する。
実装についてはMacOSXでUSBデバイスからの入力を取得するを参考にした。
// 以下のimport文を追加する。
# import <IOKit/hid/IOHIDManager.h>

IOHIDManagerRef manager;

void cleanUp() {
    CFRelease(manager);
}

int main(int argc, const char * argv[]) {
    // IOHIDManagerをデフォルトの設定で作成する。
    manager = IOHIDManagerCreate(kCFAllocatorDefault, kIOHIDManagerOptionNone);
    // マッチングするデバイスの条件を定義する。
    NSDictionary* criteria = @{
                           @kIOHIDDeviceUsagePageKey: @(kHIDPage_GenericDesktop),
                            @kIOHIDDeviceUsageKey: @(kHIDUsage_GD_Joystick),
                            @kIOHIDVendorIDKey: @(0x046d),
                            @kIOHIDProductIDKey: @(0xc218),
                            };
    // 上記の条件を設定する。
    IOHIDManagerSetDeviceMatching(manager, (__bridge CFDictionaryRef)criteria);
    // 作成したIOHIDManagerを現在のループに紐付ける。
    IOHIDManagerScheduleWithRunLoop(manager, CFRunLoopGetCurrent(), kCFRunLoopDefaultMode);
    // デバイスを作成したIOHIDManagerで扱うように設定する。
    // 第二引数にkIOHIDOptionsTypeSeizeDeviceを渡すことで、排他的に扱うように設定している。
    IOReturn ret = IOHIDManagerOpen(manager, kIOHIDOptionsTypeSeizeDevice);
    if (ret != kIOReturnSuccess) {
        fprintf(stderr, "Failed to open\n");
    } else {
        // 入力ハンドラを設定する。
        IOHIDManagerRegisterInputValueCallback(manager, &handleInput, NULL);
    }

    // ループに入り入力を待ち受ける。
    CFRunLoopRun();

    // リソースを解放する。
    cleanUp();
}
値をキーボードイベントに再マッピングする
上記 IOHIDManagerRegisterInputValueCallback で参照している handleInput 関数を実装する。
// 以下のinclude文を追加する。
# include <Carbon/Carbon.h>

// 押下中の方向キーを記憶する。
NSSet *currentDirections = [NSSet set];

void handleInput(void *context, IOReturn result, void *sender, IOHIDValueRef valueRef) {
    if (result == kIOReturnSuccess) {
        // イベントの情報を取得する。
        IOHIDElementRef elementRef = IOHIDValueGetElement(valueRef);
        uint32_t usage = IOHIDElementGetUsage(elementRef);
        long value = IOHIDValueGetIntegerValue(valueRef);

        // 対応するキーを設定する。
        NSMutableArray *events = [NSMutableArray array];

        if (usage <= 10) {
            // ボタンが押されたか離された。
            CGEventRef eventRef = CGEventCreateKeyboardEvent(NULL, keyCodeForButton(usage), value == 0 ? NO : YES);
            [events addObject:[NSValue valueWithPointer:eventRef]];
        } else if (usage == kHIDUsage_GD_Hatswitch) {
            // 方向キーが押されたか離された。
            NSSet *keyCodes = keyCodesForDirection(value);
            for (NSValue *keyCode in [currentDirections allObjects]) {
                if (![keyCodes containsObject:keyCode]) {
                    // 解放するべきキー。
                    int code = 0;
                    [keyCode getValue:&code];
                    CGEventRef eventRef = CGEventCreateKeyboardEvent(NULL, code, NO);
                    [events addObject:[NSValue valueWithPointer:eventRef]];
                }
            }
            for (NSValue *keyCode in [keyCodes allObjects]) {
                if (![currentDirections containsObject:keyCode]) {
                    // 新たに設定すべきキー。
                    int code = 0;
                    [keyCode getValue:&code];
                    CGEventRef eventRef = CGEventCreateKeyboardEvent(NULL, code, YES);
                    [events addObject:[NSValue valueWithPointer:eventRef]];
                }
            }
            // 押されている方向を記憶する。
            currentDirections = keyCodes;
        }

        // キーボードイベントを発火する。
        for (NSValue *event in events) {
            CGEventRef eventRef = (CGEventRef)[event pointerValue];
            CGEventPost(kCGHIDEventTap, eventRef);
            CFRelease(eventRef);
        }
    }
}
また上記のメソッドを実装する上でのヘルパとして以下を定義している。
/** 値に応じたキーコードを返す **/
int keyCodeForButton(long usage) {
    switch (usage) {
        case 1:
            return kVK_ANSI_1;
        case 2:
            return kVK_ANSI_2;
        case 3:
            return kVK_ANSI_3;
        case 4:
            return kVK_ANSI_4;
        case 5:
            return kVK_ANSI_5;
        case 6:
            return kVK_ANSI_6;
        case 7:
            return kVK_ANSI_7;
        case 8:
            return kVK_ANSI_8;
        case 9:
            return kVK_ANSI_9;
        default:
            return kVK_ANSI_0;
    }
}

/** 値に応じたキーコードを返す **/
NSSet* keyCodesForDirection(long value) {
    switch (value) {
        case 0:
            return [NSSet setWithObjects:@(kVK_UpArrow), nil];
        case 1:
            return [NSSet setWithObjects:@(kVK_UpArrow), @(kVK_RightArrow), nil];
        case 2:
            return [NSSet setWithObjects:@(kVK_RightArrow), nil];
        case 3:
            return [NSSet setWithObjects:@(kVK_RightArrow), @(kVK_DownArrow), nil];
        case 4:
            return [NSSet setWithObjects:@(kVK_DownArrow), nil];
        case 5:
            return [NSSet setWithObjects:@(kVK_DownArrow), @(kVK_LeftArrow), nil];
        case 6:
            return [NSSet setWithObjects:@(kVK_LeftArrow), nil];
        case 7:
            return [NSSet setWithObjects:@(kVK_LeftArrow), @(kVK_UpArrow), nil];
        default:
            return [NSSet set];
    }
}
シグナルハンドラを定義する
Ctrl+Cで中断することを想定し、シグナルハンドラを定義する。
ハンドラ内で使用しているリソースを解放している。
以下のようなハンドラを定義し:
void SignalHandler(int sigraised)
{
    cleanUp();
    fprintf(stderr, "Bye\n");
    exit(0);
}
main関数内で以下のように記述し、ハンドラとして設定する。
signal(SIGINT, SignalHandler);
設定後はCtrl+Cで中断した際も、正常系のような挙動となる。
所感
I/O Kitに素直に乗れたため、思っていたより随分簡単に実装できてしまった。
気軽に色々と作ってみたい。
おまけ
マウスとして利用するドライバも実装してみた。
最終的なファイルの内容
//
//  main.m
//  gamepad
//
//  Created by usp on 7/19/16.
//  Copyright © 2016 usp. All rights reserved.
//

# import <Foundation/Foundation.h>
# import <IOKit/hid/IOHIDManager.h>
# include <Carbon/Carbon.h>

// 押下中の方向キーを記憶する。
NSSet *currentDirections = [NSSet set];

// HID Manager
IOHIDManagerRef manager;

/** 値に応じたキーコードを返す **/
int keyCodeForButton(long usage) {
    switch (usage) {
        case 1:
            return kVK_ANSI_1;
        case 2:
            return kVK_ANSI_2;
        case 3:
            return kVK_ANSI_3;
        case 4:
            return kVK_ANSI_4;
        case 5:
            return kVK_ANSI_5;
        case 6:
            return kVK_ANSI_6;
        case 7:
            return kVK_ANSI_7;
        case 8:
            return kVK_ANSI_8;
        case 9:
            return kVK_ANSI_9;
        default:
            return kVK_ANSI_0;
    }
}

/** 値に応じたキーコードを返す **/
NSSet* keyCodesForDirection(long value) {
    switch (value) {
        case 0:
            return [NSSet setWithObjects:@(kVK_UpArrow), nil];
        case 1:
            return [NSSet setWithObjects:@(kVK_UpArrow), @(kVK_RightArrow), nil];
        case 2:
            return [NSSet setWithObjects:@(kVK_RightArrow), nil];
        case 3:
            return [NSSet setWithObjects:@(kVK_RightArrow), @(kVK_DownArrow), nil];
        case 4:
            return [NSSet setWithObjects:@(kVK_DownArrow), nil];
        case 5:
            return [NSSet setWithObjects:@(kVK_DownArrow), @(kVK_LeftArrow), nil];
        case 6:
            return [NSSet setWithObjects:@(kVK_LeftArrow), nil];
        case 7:
            return [NSSet setWithObjects:@(kVK_LeftArrow), @(kVK_UpArrow), nil];
        default:
            return [NSSet set];
    }
}

void handleInput(void *context, IOReturn result, void *sender, IOHIDValueRef valueRef) {
    if (result == kIOReturnSuccess) {
        // イベントの情報を取得する。
        IOHIDElementRef elementRef = IOHIDValueGetElement(valueRef);
        uint32_t usage = IOHIDElementGetUsage(elementRef);
        long value = IOHIDValueGetIntegerValue(valueRef);

        // 対応するキーを設定する。
        NSMutableArray *events = [NSMutableArray array];

        if (usage <= 10) {
            // ボタンが押されたか離された。
            CGEventRef eventRef = CGEventCreateKeyboardEvent(NULL, keyCodeForButton(usage), value == 0 ? NO : YES);
            [events addObject:[NSValue valueWithPointer:eventRef]];
        } else if (usage == kHIDUsage_GD_Hatswitch) {
            // 方向キーが押されたか離された。
            NSSet *keyCodes = keyCodesForDirection(value);
            for (NSValue *keyCode in [currentDirections allObjects]) {
                if (![keyCodes containsObject:keyCode]) {
                    // 解放するべきキー。
                    int code = 0;
                    [keyCode getValue:&code];
                    CGEventRef eventRef = CGEventCreateKeyboardEvent(NULL, code, NO);
                    [events addObject:[NSValue valueWithPointer:eventRef]];
                }
            }
            for (NSValue *keyCode in [keyCodes allObjects]) {
                if (![currentDirections containsObject:keyCode]) {
                    // 新たに設定すべきキー。
                    int code = 0;
                    [keyCode getValue:&code];
                    CGEventRef eventRef = CGEventCreateKeyboardEvent(NULL, code, YES);
                    [events addObject:[NSValue valueWithPointer:eventRef]];
                }
            }
            // 押されている方向を記憶する。
            currentDirections = keyCodes;
        }

        // キーボードイベントを発火する。
        for (NSValue *event in events) {
            CGEventRef eventRef = (CGEventRef)[event pointerValue];
            CGEventPost(kCGHIDEventTap, eventRef);
            CFRelease(eventRef);
        }
    }
}

void cleanUp() {
    CFRelease(manager);
}

void SignalHandler(int sigraised) {
    cleanUp();
    fprintf(stderr, "Bye\n");
    exit(0);
}

int main(int argc, const char * argv[]) {
    signal(SIGINT, SignalHandler);

    // IOHIDManagerをデフォルトの設定で作成する。
    manager = IOHIDManagerCreate(kCFAllocatorDefault, kIOHIDManagerOptionNone);
    // マッチングするデバイスの条件を定義する。
    NSDictionary* criteria = @{
                           @kIOHIDDeviceUsagePageKey: @(kHIDPage_GenericDesktop),
                            @kIOHIDDeviceUsageKey: @(kHIDUsage_GD_Joystick),
                            @kIOHIDVendorIDKey: @(0x046d),
                            @kIOHIDProductIDKey: @(0xc218),
                            };
    // 上記の条件を設定する。
    IOHIDManagerSetDeviceMatching(manager, (__bridge CFDictionaryRef)criteria);
    // 作成したIOHIDManagerを現在のループに紐付ける。
    IOHIDManagerScheduleWithRunLoop(manager, CFRunLoopGetCurrent(), kCFRunLoopDefaultMode);
    // デバイスを作成したIOHIDManagerで扱うように設定する。
    // 第二引数にkIOHIDOptionsTypeSeizeDeviceを渡すことで、排他的に扱うように設定している。
    IOReturn ret = IOHIDManagerOpen(manager, kIOHIDOptionsTypeSeizeDevice);
    if (ret != kIOReturnSuccess) {
        fprintf(stderr, "Failed to open\n");
    } else {
        // 入力ハンドラを設定する。
        IOHIDManagerRegisterInputValueCallback(manager, &handleInput, NULL);
    }

    // ループに入り入力を待ち受ける。
    CFRunLoopRun();

    // リソースを解放する。
    cleanUp();
}