TouchGFXを使おう~I2C編~の続きとして今回はServoモータを動かします。
STM32CubeIDEを使ってみよう How To STM32CubeIDE 日本語版 (13) PWMでサーボモーター(SERVO)を動かしてみようを元にプログラム作成をします。
画面の作成
新規プロジェクトを作成し、画面上にサーボモーターの角度を表示するテキストエリアを作成します。
Transtation を Servo ° にし + を クリック します。

wildcardの設定
Wildcard1 を クリック します。
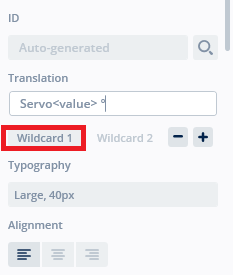
+ を クリック します。

Initial Value を 000 とします。
Buffer size は 12 にしました。

左の Texts を クリック し、文字設定を行います。
Typographies を選択し、Large の Wildcard Ranges を 0-9 にします。

pin設定
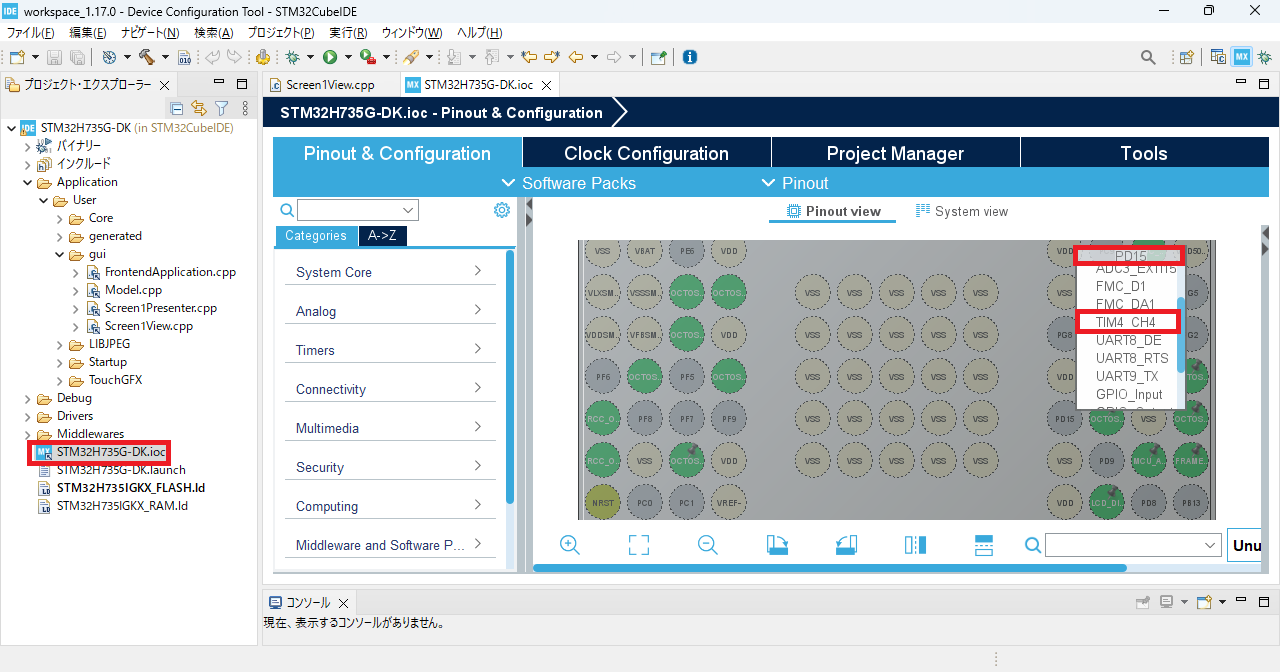
今回、Timerを使用出来るピンとしてPD15を使用しますが、PWMが使用出来るピンであればほかのピンでも問題ありません。

コード生成後、STM32CubeIDE で プロジェクト を開き
PD15 を クリック し TIM4_CH4 を選択します。
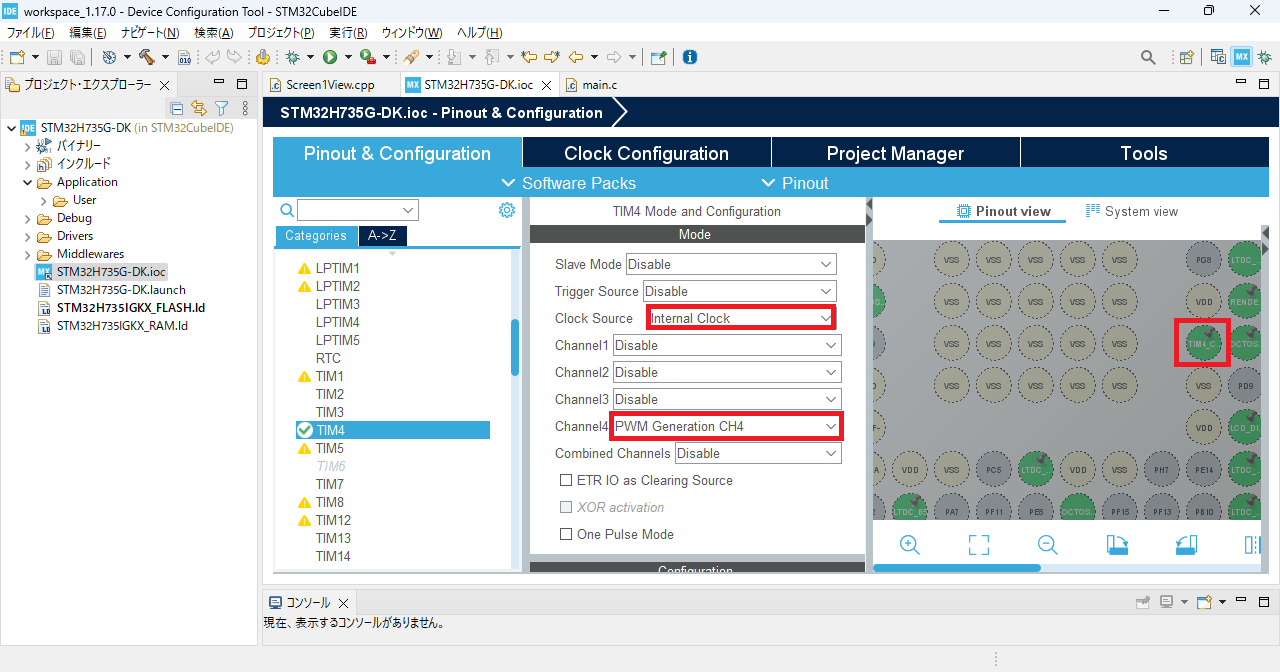
TIM4を開き、Mode を Internal Clock,Channel4 を PWM Generation CH4 にします。
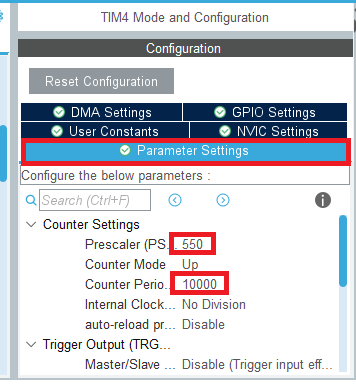
Configuration の Prescaler を 550、Counter period を 10000 とします。
275MHz を 50Hz にします。
275MHz/550/10000=50Hz
Yes で進みます。
プログラム
Duty設定
__ HAL_TIM_SET_COMPARE で PWM を生成します。
__ HAL_TIM_SET_COMPARE(&htim4,TIM_CHANNEL_4,duty);
275MHz/550=500000Hz⇒2us
1us は 500カウント になります。
dutyの計算式
250+角度*(1000/180)
0.5ms 0度
500us/2=2500 counts
2.5ms 180度
2500us/2=1250 counts
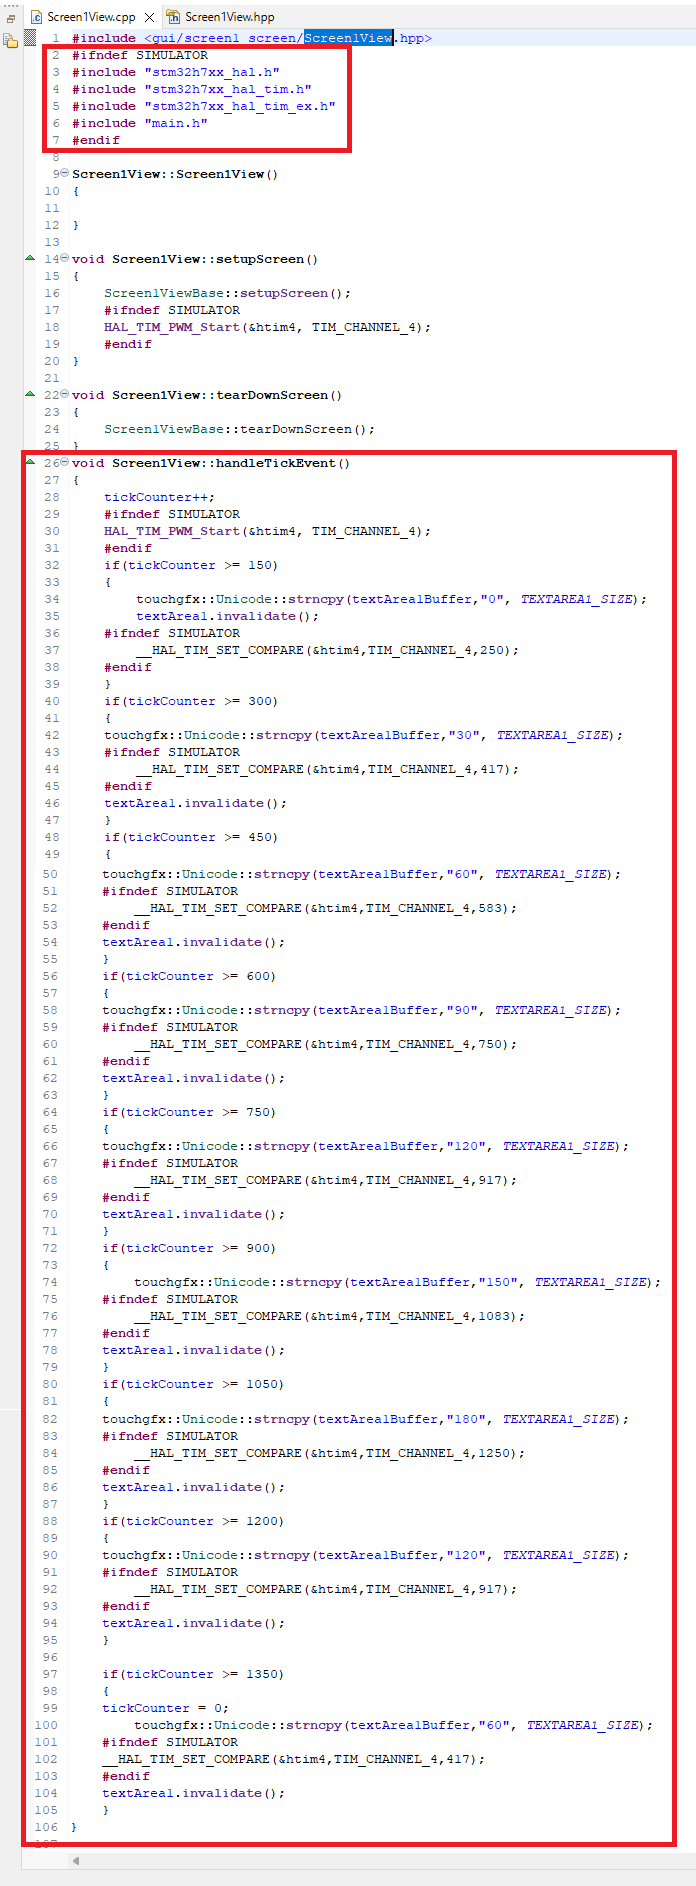
Screen1View.cpp
\TouchGFX\gui\src\screen1_screen\Screen1View.cpp
#include <gui/screen1_screen/Screen1View.hpp>
#ifndef SIMULATOR
#include "stm32h7xx_hal.h"
#include "stm32h7xx_hal_tim.h"
#include "stm32h7xx_hal_tim_ex.h"
#include "main.h"
#endif
setupScreen内にHAL_TIM_PWM_Startを追加していますが、handleTickEvent内でも宣言しています。
void Screen1View::setupScreen()
{
    Screen1ViewBase::setupScreen();
	#ifndef SIMULATOR
    HAL_TIM_PWM_Start(&htim4, TIM_CHANNEL_4);
	#endif
}
void Screen1View::tearDownScreen()
{
    Screen1ViewBase::tearDownScreen();
}
void Screen1View::handleTickEvent()
{
    tickCounter++;
    #ifndef SIMULATOR
    HAL_TIM_PWM_Start(&htim4, TIM_CHANNEL_4);
	#endif

	if(tickCounter >= 150)
	{
		touchgfx::Unicode::strncpy(textArea1Buffer,"0", TEXTAREA1_SIZE);
		textArea1.invalidate();
	#ifndef SIMULATOR
		__HAL_TIM_SET_COMPARE(&htim4,TIM_CHANNEL_4,250);
	#endif
	}
	if(tickCounter >= 300)
	{
	touchgfx::Unicode::strncpy(textArea1Buffer,"30", TEXTAREA1_SIZE);
	#ifndef SIMULATOR
		__HAL_TIM_SET_COMPARE(&htim4,TIM_CHANNEL_4,417);
	#endif
	textArea1.invalidate();
	}
	if(tickCounter >= 450)
	{
	touchgfx::Unicode::strncpy(textArea1Buffer,"60", TEXTAREA1_SIZE);
	#ifndef SIMULATOR
		__HAL_TIM_SET_COMPARE(&htim4,TIM_CHANNEL_4,583);
	#endif
	textArea1.invalidate();
	}
	if(tickCounter >= 600)
	{
	touchgfx::Unicode::strncpy(textArea1Buffer,"90", TEXTAREA1_SIZE);
	#ifndef SIMULATOR
		__HAL_TIM_SET_COMPARE(&htim4,TIM_CHANNEL_4,750);
	#endif
	textArea1.invalidate();
	}
	if(tickCounter >= 750)
	{
	touchgfx::Unicode::strncpy(textArea1Buffer,"120", TEXTAREA1_SIZE);
	#ifndef SIMULATOR
		__HAL_TIM_SET_COMPARE(&htim4,TIM_CHANNEL_4,917);
	#endif
	textArea1.invalidate();
	}
	if(tickCounter >= 900)
	{
		touchgfx::Unicode::strncpy(textArea1Buffer,"150", TEXTAREA1_SIZE);
	#ifndef SIMULATOR
		__HAL_TIM_SET_COMPARE(&htim4,TIM_CHANNEL_4,1083);
	#endif
	textArea1.invalidate();
	}
	if(tickCounter >= 1050)
	{
	touchgfx::Unicode::strncpy(textArea1Buffer,"180", TEXTAREA1_SIZE);
	#ifndef SIMULATOR
		__HAL_TIM_SET_COMPARE(&htim4,TIM_CHANNEL_4,1250);
	#endif
	textArea1.invalidate();
	}
	if(tickCounter >= 1200)
	{
	touchgfx::Unicode::strncpy(textArea1Buffer,"120", TEXTAREA1_SIZE);
	#ifndef SIMULATOR
		__HAL_TIM_SET_COMPARE(&htim4,TIM_CHANNEL_4,917);
	#endif
	textArea1.invalidate();
	}

	if(tickCounter >= 1350)
	{
	tickCounter = 0;
		touchgfx::Unicode::strncpy(textArea1Buffer,"60", TEXTAREA1_SIZE);
	#ifndef SIMULATOR
	__HAL_TIM_SET_COMPARE(&htim4,TIM_CHANNEL_4,417);
	#endif
	textArea1.invalidate();
	}
}
Screen1View.hpp
\TouchGFXgui\screen1_screen\Screen1View.hpp
public:
virtual void handleTickEvent();
protected:
uint16_t tickCounter;

main.h
main.hにexternを追加します。

以上でコンパイル&書込みすることでサーボモーターが回ります。