はじめに
この記事は,OpenCVとGoogle Colaboratory (以下Colab) を使って,PCに接続されているWebカメラで画像を一枚キャプチャし,顔を検出するPythonプログラムを作成した備忘録です.
Colabの詳細は他の情報源が多数存在するので譲りますが,ColabではPython+OpenCVが動作する上に,PCに接続されているWebカメラからの画像ストリームをキャプチャするコードスニペットを利用できます.OpenCV3.3以降のdnnモジュールでは学習済みモデルを提供しているため,学習に時間を費やすことなく手軽に物体検出などのプログラムを実行できます.
本記事のコードが書かれているColabノートブック
本記事のコードは下記のノートブックの形でも公開されています.
参考文献
本記事中のコードは,Colabにより提供されているコードスニペットと下記のFace detectionコードを改変しつつ利用しています.
動作環境
2021.08.27時点の最新版です.
- Google Colaboratory https://colab.research.google.com/
- MacBook Air (M1, 2020)
- Chrome 92.0.4515.159 (Official Build) (arm64)
解説付きのコード
前処理
まず,ヘッダとして様々なパッケージをインポートします.
# Google Driveをマウント
from google.colab import drive
drive.mount('/content/gdrive')

# imshowサポートパッチのインポート
from google.colab.patches import cv2_imshow

# dnn用
from IPython.display import display, Javascript
from google.colab.output import eval_js
from base64 import b64decode

# その他パッケージ
import imutils
import numpy as np
import matplotlib.pyplot as plt
import cv2
次に, Webカメラからストリームをキャプチャするコードスニペットです.この部分はGoogle Colabにより提供されています.
def take_photo(filename='photo.jpg', quality=0.8):
  js = Javascript('''
    async function takePhoto(quality) {
      const div = document.createElement('div');
      const capture = document.createElement('button');
      capture.textContent = 'Capture';
      div.appendChild(capture);

      const video = document.createElement('video');
      video.style.display = 'block';
      const stream = await navigator.mediaDevices.getUserMedia({video: true});

      document.body.appendChild(div);
      div.appendChild(video);
      video.srcObject = stream;
      await video.play();

      // Resize the output to fit the video element.
      google.colab.output.setIframeHeight(document.documentElement.scrollHeight, true);

      // Wait for Capture to be clicked.
      await new Promise((resolve) => capture.onclick = resolve);

      const canvas = document.createElement('canvas');
      canvas.width = video.videoWidth;
      canvas.height = video.videoHeight;
      canvas.getContext('2d').drawImage(video, 0, 0);
      stream.getVideoTracks()[0].stop();
      div.remove();
      return canvas.toDataURL('image/jpeg', quality);
    }
    ''')
  display(js)
  data = eval_js('takePhoto({})'.format(quality))
  binary = b64decode(data.split(',')[1])
  with open(filename, 'wb') as f:
    f.write(binary)
  return filename
ネットワークと学習済みのモデルをダウンロードします.今回はCaffeのモデルを利用します.
以下の2行はColab,もしくはJupyter Notebook環境特有の記述です.
!wget -N https://raw.githubusercontent.com/opencv/opencv/master/samples/dnn/face_detector/deploy.prototxt
!wget -N https://raw.githubusercontent.com/opencv/opencv_3rdparty/dnn_samples_face_detector_20170830/res10_300x300_ssd_iter_140000.caffemodel
メインプログラム
まず,ストリームから画像を一枚撮影します.下記はColabにより提供されているカメラキャプチャのコードスニペットの改変です.
try:
  filename = take_photo()
  img = cv2.imread(filename)
  print('Saved to {}'.format(filename))

  # Show the image which was just taken.
  #display(Image(filename))
except Exception as err:
  # Errors will be thrown if the user does not have a webcam or if they do not
  # grant the page permission to access it.
  print(str(err))
次に,画像からblobを作成し,検出器にblobを適用します.
# ネットワークと学習済みモデルをロードする
print("[INFO] loading model...")
prototxt = 'deploy.prototxt'
model = 'res10_300x300_ssd_iter_140000.caffemodel'
net = cv2.dnn.readNetFromCaffe(prototxt, model)

# 幅400画素になるようにリサイズする
img = imutils.resize(img, width=400)
(h, w) = img.shape[:2]
blob = cv2.dnn.blobFromImage(cv2.resize(img, (300, 300)), 1.0, (300, 300), (104.0, 177.0, 123.0))

# 物体検出器にblobを適用する
print("[INFO] computing object detections...")
net.setInput(blob)
detections = net.forward()
最後にネットワークの出力を描画し,出力結果を表示して保存します.
for i in range(0, detections.shape[2]):

	# ネットワークが出力したconfidenceの値を抽出する
	confidence = detections[0, 0, i, 2]

	# confidenceの値が0.5以上の領域のみを検出結果として描画する
	if confidence > 0.5:
		# 対象領域のバウンディングボックスの座標を計算する
		box = detections[0, 0, i, 3:7] * np.array([w, h, w, h])
		(startX, startY, endX, endY) = box.astype("int")
		# バウンディングボックスとconfidenceの値を描画する
		text = "{:.2f}%".format(confidence * 100)
		y = startY - 10 if startY - 10 > 10 else startY + 10
		cv2.rectangle(img, (startX, startY), (endX, endY), (0, 0, 255), 2)
		cv2.putText(img, text, (startX, y),
			cv2.FONT_HERSHEY_SIMPLEX, 0.45, (0, 0, 255), 2)

# 出力結果を表示して保存
cv2_imshow(img)
cv2.imwrite("/content/gdrive/My Drive/Works_OpenCV/OpenCV_Colaboratory/dnn_face_out.jpg", img)
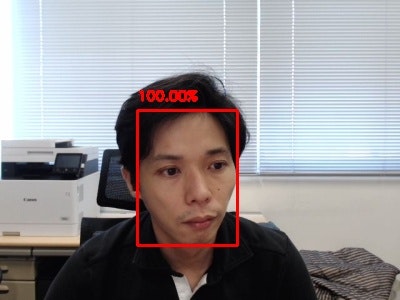
動作結果
confidenceが高すぎて逆に怪しい結果ですが.
今後の改善予定
- 動画への対応
- 他のモデルの利用