はじめに
今回は、Oracle Cloud InfrastructureのComputeインスタンスにコマンド・ライン・インターフェース(CLI)をインストールし、また、下記のURLを参考に"Dynamic Groups"、"Policies"の設定で「Instance Principal」の構成をすることで鍵認証無しでCLIを実行可能 にしてみた。
Calling Services from an Instance
1. CLIのインストール
Install方法は以下のマニュアルに記載有。
CLI Install方法
1-1. Python確認
OCIのComputeインスタンスは必要なPythonが導入されているため確認をする。
(2.7.5 or 3.5以上)
[opc@hostname ~]$ python -V
Python 2.7.5
1-2. Installの実施
今回はopcユーザーでInstallする。
[opc@hostname ~]$ bash -c "$(curl -L https://raw.githubusercontent.com/oracle/oci-cli/master/scripts/install/install.sh)"
          ~省略~
===> In what directory would you like to place the install? (leave blank to use '/home/opc/lib/oracle-cli'):     ←そのままEnter
          ~省略~
===> In what directory would you like to place the 'oci' executable? (leave blank to use '/home/opc/bin'):     ←そのままEnter
          ~省略~
===> In what directory would you like to place the OCI scripts? (leave blank to use '/home/opc/bin/oci-cli-scripts'):     ←そのままEnter
          ~省略~
===> Modify profile to update your $PATH and enable shell/tab completion now? (Y/n): Y     ←Yを入力してEnter
          ~省略~
===> Enter a path to an rc file to update (leave blank to use '/home/opc/.bashrc'):      ←そのままEnter
 -- ** Run `exec -l $SHELL` to restart your shell. **
 --
 -- Installation successful.
 -- Run the CLI with /home/opc/bin/oci --help

### 上記の出力の通り下記を最後に実行
[opc@hostname ~]$ exec -l $SHELL
1-3. CLIの設定
[opc@hostname ~]$ oci setup config
          ~省略~
Enter a location for your config [/home/opc/.oci/config]:       ←そのままEnter
Enter a user OCID:       ←ユーザーのOCIDを入力
Enter a tenancy OCID:       ←TenancyのOCIDを入力
Enter a region (e.g. ca-toronto-1, eu-frankfurt-1, uk-london-1, us-ashburn-1, us-phoenix-1):       ←Regionを入力
Do you want to generate a new RSA key pair? (If you decline you will be asked to supply the path to an existing key.) [Y/n]: Y     ←Yを入力してEnter
Enter a directory for your keys to be created [/home/opc/.oci]: ←そのままEnter
Enter a name for your key [oci_api_key]: ←そのままEnter
Public key written to: /home/opc/.oci/oci_api_key_public.pem
Enter a passphrase for your private key (empty for no passphrase): ←そのままEnter
Private key written to: /home/opc/.oci/oci_api_key.pem
Fingerprint: 29:05:32:08:81:20:04:ae:d9:f9:c1:0b:61:bd:49:64
Config written to /home/opc/.oci/config
     ~省略~

[opc@hostname ~]$ ls -la
dr-xr-x---.  9 opc opc 4096 Jan 30 05:45 .
dr-xr-xr-x. 17 opc opc 4096 Jan 15 23:22 ..
-rw-------.  1 opc opc  208 Jan 30 04:51 .bash_history
-rw-r--r--.  1 opc opc   18 Apr 30  2014 .bash_logout
-rw-r--r--.  1 opc opc  176 Apr 30  2014 .bash_profile
-rw-r--r--.  1 opc opc  391 Jan 30 04:51 .bashrc
-rw-r--r--.  1 opc opc  176 Jan 30 04:51 .bashrc.backup
drwxr-xr-x.  3 opc opc   52 Jan 30 04:50 bin
drwxr-xr-x.  4 opc opc   29 Jan 30 04:50 .cache
drwxr-xr-x.  3 opc opc   18 Jan 30 04:47 .config
-rw-r--r--.  1 opc opc  100 Apr 30  2014 .cshrc
drwxr-xr-x.  3 opc opc   24 Jan 30 04:50 lib
drwx------.  2 opc opc   73 Jan 30 05:46 .oci
drwxr-----.  3 opc opc   19 Jan 30 04:49 .pki
drwx------.  2 opc opc   29 Jan 30 04:42 .ssh
-rw-r--r--.  1 opc opc  129 Apr 30  2014 .tcshrc
### Installでbin、lib、.ociディレクトリ等が作成されている
2. Instance Principalの構成
構成は以下のマニュアルに記載。
Calling Services from an Instance
2-1. Dynamic Groupsの作成
まずは、Dynamic Groupsを作成する。
Identity > Dynamic Groupsと遷移し、Create Dynamic Groupを押す。
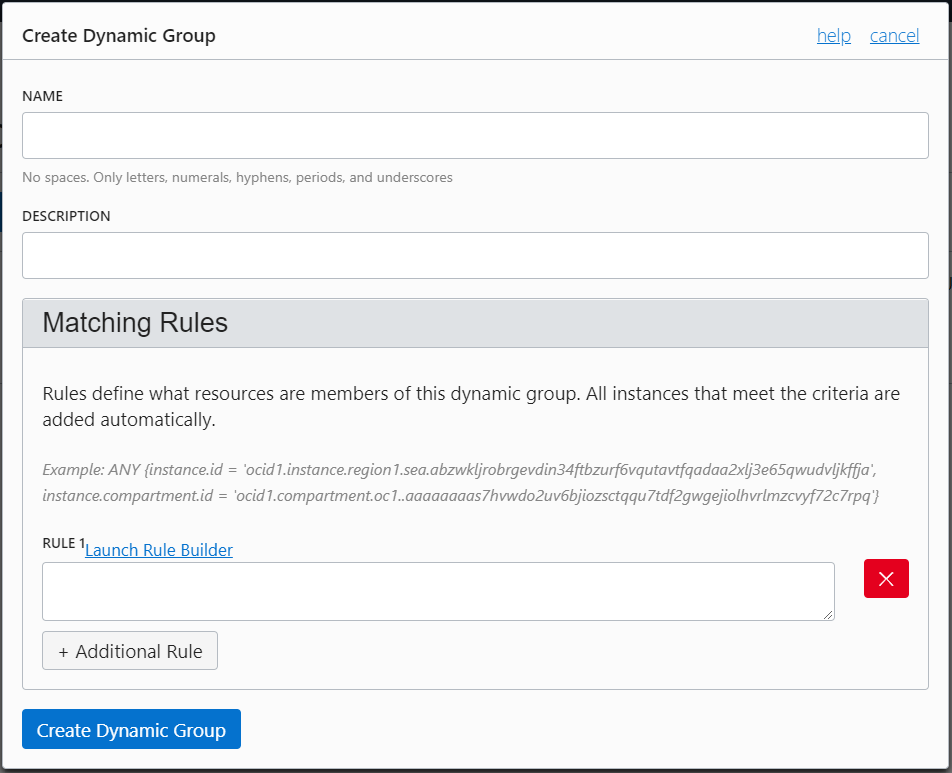
【Create Dynamic Groupの画面】

NAME,DESCRIPTIONを入力してLaunch Rule Builderを押す
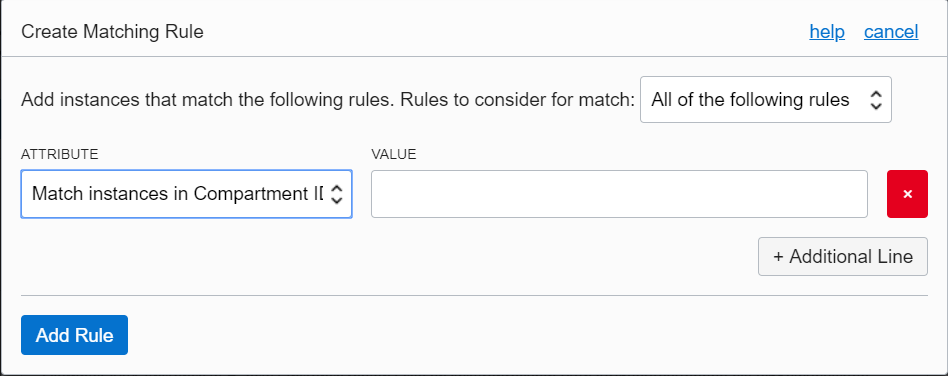
【Create Matching Ruleの画面】

ATTRIBUTEにMatch instances in Compartment IDを選択してComputeインスタンスが所属するコンパートメントのOCIDを入力しAdd Ruleを押す。
そうするとRULEに値が入力されるので、Create Dynamic Groupを押す
2-2. Policyの作成
Identity > Policiesと遷移し、Create Policyを押す。
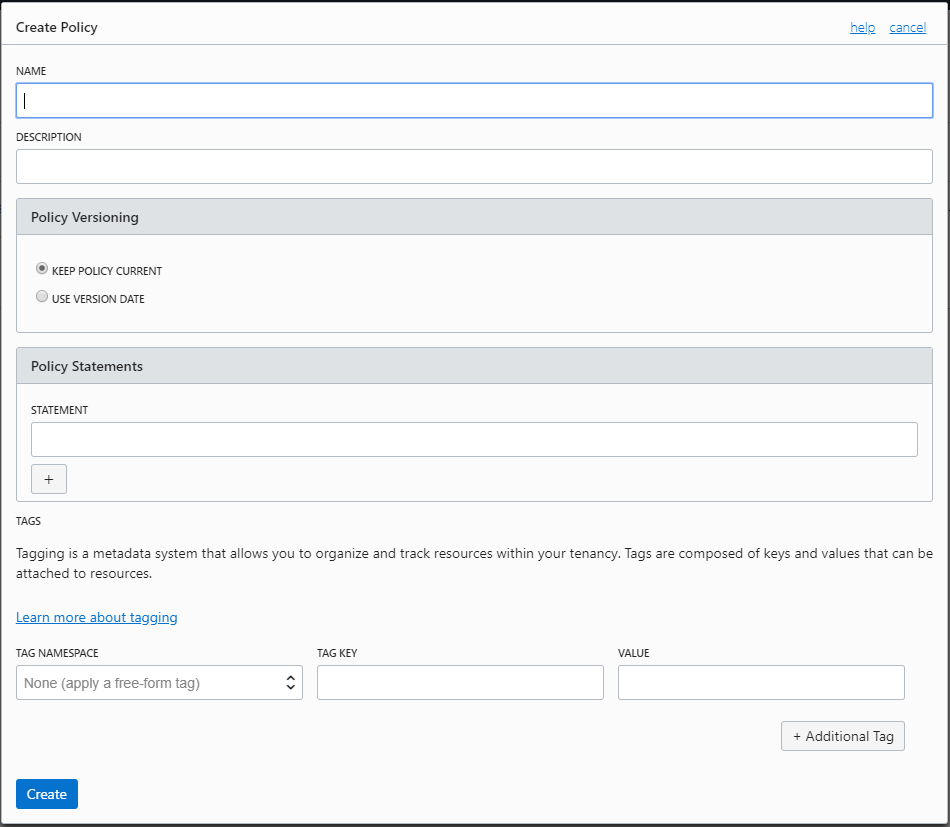
【Create Policyの画面】

NAME、DESCRIPTIONを入力、KEEP POLICY CURRENTを選択し、STATEMENTに以下の記載をする。
Allow dynamic-group <作成したDynamic Group名> to manage all-resources in compartment <Instanceに使用させたいコンパートメント名>
上記の内容は、実際にInstance Principalで有効にさせたい項目によって変更をする必要がある。Policyの参考などについては以下を参照。
Common Policies
実はここまでで、最低限の構成は完了している。
3. 最終設定と確認
3-1. 最終設定
CLIは現在、鍵を使用する前提で構成されているため、その箇所を削除する。(念の為)
[opc@hostname ~]$ vi /home/opc/.oci/config
### 以下の部分をコメントアウト ###
# user=XXX
# fingerprint=XXX
# key_file=XXX
# 他は特に変更しない
3-2. 確認
コマンドで確認をする。(マニュアルのコマンドを実行することにする)
確認方法(実行方法)は以下の2パターンとなる。
- --auth instance_principal のオプションを付与する
or - OCI_CLI_AUTH=instance_principal を環境変数に入れてから実行する
[opc@hostname ~]$ oci os ns get --auth instance_principal
 {
   "data": "XXX"
 }
# 成功

[opc@hostname ~]$ export OCI_CLI_AUTH=instance_principal
[opc@hostname ~]$ oci os ns get
 {
   "data": "XXX"
 }
# こちらも成功
これで、鍵がなくてもCLIが実行可能になった。