はじめに
データベースと連携するJavaアプリケーションの開発において、MyBatisは有用なフレームワークとして使われています。しかし、SQLマッピングを手動で行うのは少々手間がかかってしまうことがあります。そんな時に便利なのがMyBatis Generatorです。
MyBatis Generatorはデータベースのテーブルをもとに、自動的にMapperなどを生成してくれます。
本記事では、生成されたコード内の基本的なメソッドの使い方を解説していきます。
MyBatis Generatorのセットアップ
今回はEclipse、ビルドツールとしてMavenを使っている前提で記載します。
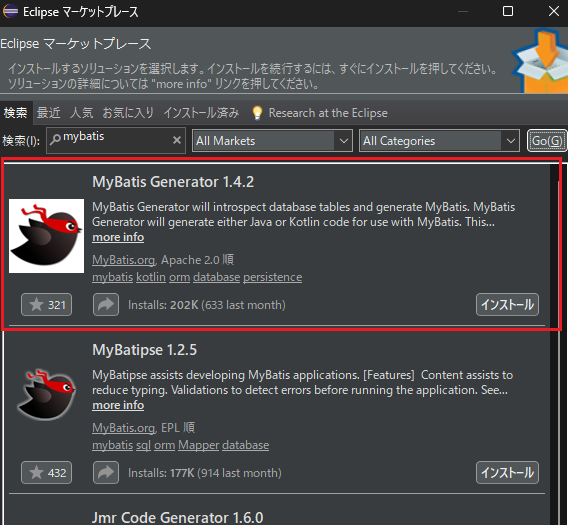
EclipseマーケットプレイスでMyBatis Generator x.x.xをインストールします。
インストール後はEclipseを再起動しておきます。

- generatorConfig.xml
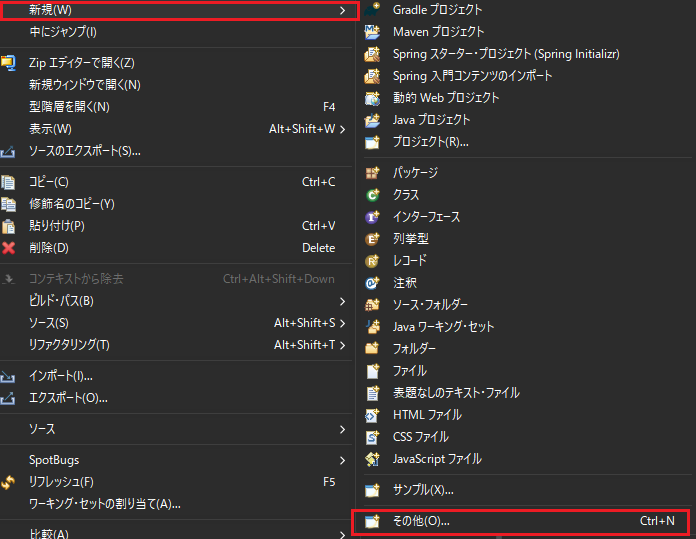
generatorConfig.xmlを作成します。src/main/resourcesで右クリックしMyBatis Generator構成ファイルを新規追加します。


作成したxmlファイルでDBの接続設定、自動生成ファイルの出力設定、対象テーブルの設定をしていきます。
<?xml version="1.0" encoding="UTF-8"?>
<!DOCTYPE generatorConfiguration PUBLIC "-//mybatis.org//DTD MyBatis Generator Configuration 1.0//EN" "http://mybatis.org/dtd/mybatis-generator-config_1_0.dtd">
<generatorConfiguration>
  <context id="context1">
    <!-- JDBC接続設定 -->
    <jdbcConnection
        connectionURL="jdbc:postgresql://localhost:5432/testdb"
        driverClass="org.postgresql.Driver"
        userId="ユーザーのID"
        password="パスワード" />

    <!-- Javaモデル設定 -->
    <javaModelGenerator targetPackage="作成先パス" targetProject="プロジェクト名" />

    <!-- XML設定 -->
    <sqlMapGenerator targetPackage="作成先パス" targetProject="プロジェクト名"/>

    <!-- Mapperインターフェース設定 -->
    <javaClientGenerator targetPackage="作成先パス" targetProject="プロジェクト名" type="XMLMAPPER" />

    <!-- 生成対象テーブルの設定 -->
    <!-- 適宜変更して利用する -->
    <table tableName="対象のテーブル名"></table>
  </context>
</generatorConfiguration>
設定ファイルの更新ができたらxmlファイル上で右クリック→実行→Run MyBatis Generatorで実行します。
コンソールに成功と表示され、いくつかのファイルが新規追加されていたらOKです。

自動生成されるファイル
testというテーブルを自動生成した場合を例に簡単に説明します。
1. TestMapper.java
自動生成されるMapperインターフェース には、データベース操作を行うためのメソッド(例:selectByPrimaryKey、insert、updateByPrimaryKey)が定義されています。
public interface TestMapper {

    long countByExample(TestExample example);

    int deleteByExample(TestExample example);

    int deleteByPrimaryKey(Integer id);

    int insert(Test record);

    // 以下省略
}
2. Test.java
データを格納するクラスでgetter/setterメソッドを持っています。
public class Test {

    private Integer id;
    private String name;
    private String comment;

    public Integer getId() {
        return id;
    }

    public void setId(Integer id) {
        this.id = id;
    }

    public String getName() {
        return name;
    }

    public void setName(String name) {
        this.name = name;
    }

    // 以下省略
3. TestExample.java
Exampleクラスは、主に検索条件を指定する時に使用されます。使い方については後半で解説しています。
public class TestExample {

    protected String orderByClause;
    protected boolean distinct;
    protected List<Criteria> oredCriteria;

    public TestExample() {
        oredCriteria = new ArrayList<>();
    }

    public void setOrderByClause(String orderByClause) {
        this.orderByClause = orderByClause;
    }

    // 以下省略
4. TestMapper.xml
TestMapper.javaで定義したメソッドに対応しているSQLクエリが記述されています。
主要なメソッドとその使い方
selectByPrimaryKey
selectByPrimaryKeyメソッドは、主キーを使ってレコードを1件取得するためのメソッドです。例えば、idカラムが主キーとして定義されたテーブルにおいては、特定のidを持つレコードを取得します。主キーが複数設定されている場合は全て指定する必要があります。
Test test = testMapper.selectByPrimaryKey(1);
updateByPrimaryKey
主キーを指定し、条件に一致するデータを更新します。
Test test = new Test();
test.setId(1);
test.setName("UpdateUser");
test.setComment("更新しました");

int rowsAffected = testMapper.updateByPrimaryKey(test);
deleteByPrimaryKey
使い方はselectByPrimaryKeyメソッドと同じです。主キーであるidを条件に特定のレコードを削除します。
主キーを条件とするメソッドはメソッド名にByPrimaryKeyと付いているのでまとめて覚えられるかと思います。
int rows = testMapper.deleteByPrimaryKey(1);
insert
追加したいデータを設定してinsertメソッドを呼び出しテーブルに1件レコードを挿入します。
Test test = new Test();
test.setId(2);
test.setName("Insert");
test.setDescription("追加しました");

int rows = testMapper.insert(test);
insertメソッドでは、すべてのカラムに値を設定する必要があります。insertSelectiveメソッドを使用すると、nullでないカラムのみが挿入されます。
Test test = new Test();
test.setId(2);
test.setName("Insert");
// 設定しない
// test.setDescription("追加しました");

int rows = testMapper.insertSelective(test);
selectByExample
selectByExampleメソッドは、Exampleクラスを使い任意の条件を指定してレコードを取得するためのメソッドです。selectByPrimaryKeyとは異なり戻り値の型はListになっています。
// nameが"User"と一致
TestExample example = new TestExample();
example.createCriteria().andNameEqualTo("User");

List<Test> testList = testMapper.selectByExample(example);
このほかにも様々な条件の指定方法があるため一部紹介します。
// 複数条件
TestExample example2 = new TestExample();
example2.createCriteria().andNameEqualTo("User").andCommentEqualTo("更新しました");

List<Test> testList2 = testMapper.selectByExample(example2);

// より大きい(より小さい)
TestExample example3 = new TestExample();
example3.createCriteria().andIdGreaterThan(10);

List<Test> testList3 = testMapper.selectByExample(example3);

// より大きいか等しい(より小さいか等しい)
TestExample example4 = new TestExample();
example4.createCriteria().andIdGreaterThanOrEqualTo(10);

List<Test> testList4 = testMapper.selectByExample(example4);

// Like検索
TestExample example5 = new TestExample();
example5.createCriteria().andCommentLike("%Test%");

List<Test> testList5 = testMapper.selectByExample(example5);
ソート順の指定なども可能です
TestExample example = new TestExample();
example.createCriteria().andCommentIsNull(); // commentがnull

// idの昇順
example.setOrderByClause("id ASC");

List<Test> testList = testMapper.selectByExample(example);
countByExample
selectByExampleと使い方はほぼ同じです。実際にデータを取得する前に件数チェックする用途で使われていたりします。
// nameが"User"と一致
TestExample example = new TestExample();
example.createCriteria().andNameEqualTo("User");

long count = testMapper.selectByExample(example);
あとがき
複数のテーブルを結合してselectした結果を取得したい場合は自動生成したファイルとは別に自分でMapperなどを作成する必要がありますが、単一テーブルのデータを操作する場合は非常に便利かと思います。
少しでも参考になれば幸いです。
最後まで読んでいただきありがとうございます。