Qiitaに記事を初投稿
見ている皆さんにはあまり関係ないと思いますが、Qiitaに初めて記事を書くのでそのことについて少し触れようと思います。
Qiitaに記事を投稿する意味として、自分は4つ意味を持っています。
1つ目として、自分の頭の整理ができ、他人にも詳細に説明できるようになると思っている点。
2つ目として、自分が過去を振り返った時にやってきたことを思い出し、自信に繋がると思っている点。
3つ目として、後々やってきたことを忘れてしまうことがあると思うので、その時に簡単に思い出すことが出来る点。
4つ目として、Qiitaにて自分は大変お世話になったので、次は逆に自分が得た知見を記事として投稿して、皆さんと共有できたらなと思っている点。
初めてなのでQiitaに記事を投稿する意味について書きました。皆さんよろしくお願いします。
開発環境
Xcode9.1, Swift4, iOS10.0
上記の開発環境で実装しました。
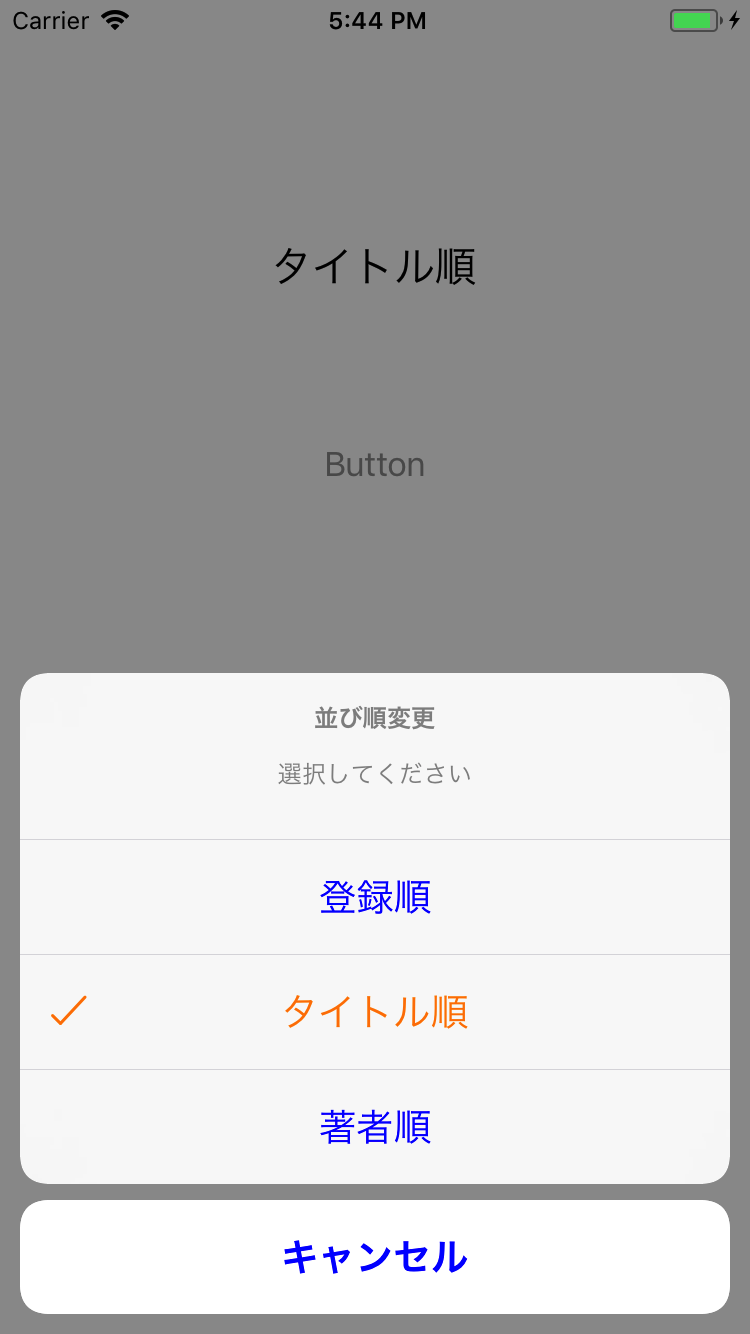
完成図
UIAlertControllerで下記のようにImageを表示させることができます。

UIAlertControllerの左端にImageを表示させる方法
まず、画像をAssets.xcassetsに追加します。
自分の場合は、下記のようにチェックマークの画像を追加しました。

次に実装です。
AlertControllerを表示させる仕組みは、皆さん既に分かっていると思います。
AlertControllerにImageを表示させる仕組みは、下記のプログラムのselectAlertController関数が行なっています。そこの関数部分を見てもらえたら、仕組みが分かると思います。
import UIKit

class ViewController: UIViewController {

    @IBOutlet weak var label: UILabel!

    var selectNumber:Int = 0 //タップしたalertControllerの位置を記録する変数

    override func viewDidLoad() {
        super.viewDidLoad()
    }

    override func didReceiveMemoryWarning() {
        super.didReceiveMemoryWarning()
    }

    @IBAction func tapButton(_ sender: UIButton) {
        let alert: UIAlertController = UIAlertController(title: "並び順変更", message: "選択してください", preferredStyle:  UIAlertControllerStyle.actionSheet)

        var defaultAction: UIAlertAction = UIAlertAction(title: "登録順", style: .default, handler:{
            (action: UIAlertAction!) -> Void in
            self.selectNumber = 0
            self.label.text = "登録順"

        })
        var defaultAction1: UIAlertAction = UIAlertAction(title: "タイトル順", style: .default, handler:{
            (action: UIAlertAction!) -> Void in
            self.selectNumber = 1
            self.label.text = "タイトル順"

        })
        var defaultAction2: UIAlertAction = UIAlertAction(title: "著者順", style: .default, handler:{
            (action: UIAlertAction!) -> Void in
            self.selectNumber = 2
            self.label.text = "著者順"

        })
        let cancelAction: UIAlertAction = UIAlertAction(title: "キャンセル", style: .cancel, handler: nil)

        if(selectNumber == 0){
            defaultAction = selectAlertController(action: defaultAction)
        }else if(selectNumber == 1){
            defaultAction1 = selectAlertController(action: defaultAction1)
        }else{
            defaultAction2 = selectAlertController(action: defaultAction2)
        }

        alert.addAction(defaultAction)
        alert.addAction(defaultAction1)
        alert.addAction(defaultAction2)
        alert.addAction(cancelAction)
        //下記のtintColorをいじるとalertControllerのボタン部分が全て色変更される。
//        alert.view.tintColor = UIColor.blue
        present(alert, animated: true, completion: nil)
    }

    //選択されているAlertActionの色を変える関数
    func selectAlertController(action: UIAlertAction) -> UIAlertAction {
        action.setValue(UIImage(named: "todo.png"), forKey: "image")//左にImageを挿入
        action.setValue(UIColor.orange, forKey: "imageTintColor")//Imageの色を変更
        action.setValue(UIColor.orange, forKey: "titleTextColor")//Textの色を変更

        return action
    }
}
UIAlertActionの.setValueを設定することにより、Imageを追加したり、色を変更したりすることが出来ます。
UIAlertControllerのボタン全体の色変更
alert.view.tintColorに色を設定することにより、UIAlertControllerのボタン全体の色変更をすることが出来ます。下記の場合は、全体を青に変更しています。
疑問点
UIAlertActionの.setValueのforKeyで設定できるプロパティには何があるのか気になりました。
"image","imageTintColor","titleTextColor"以外にも設定できるプロパティがありましたら、
教えて欲しいです。