C++ で作ったWindows Runtime (WinRT) Component を、C# WinUI3 (.Net 6 以降) で使う方法をまとめました。
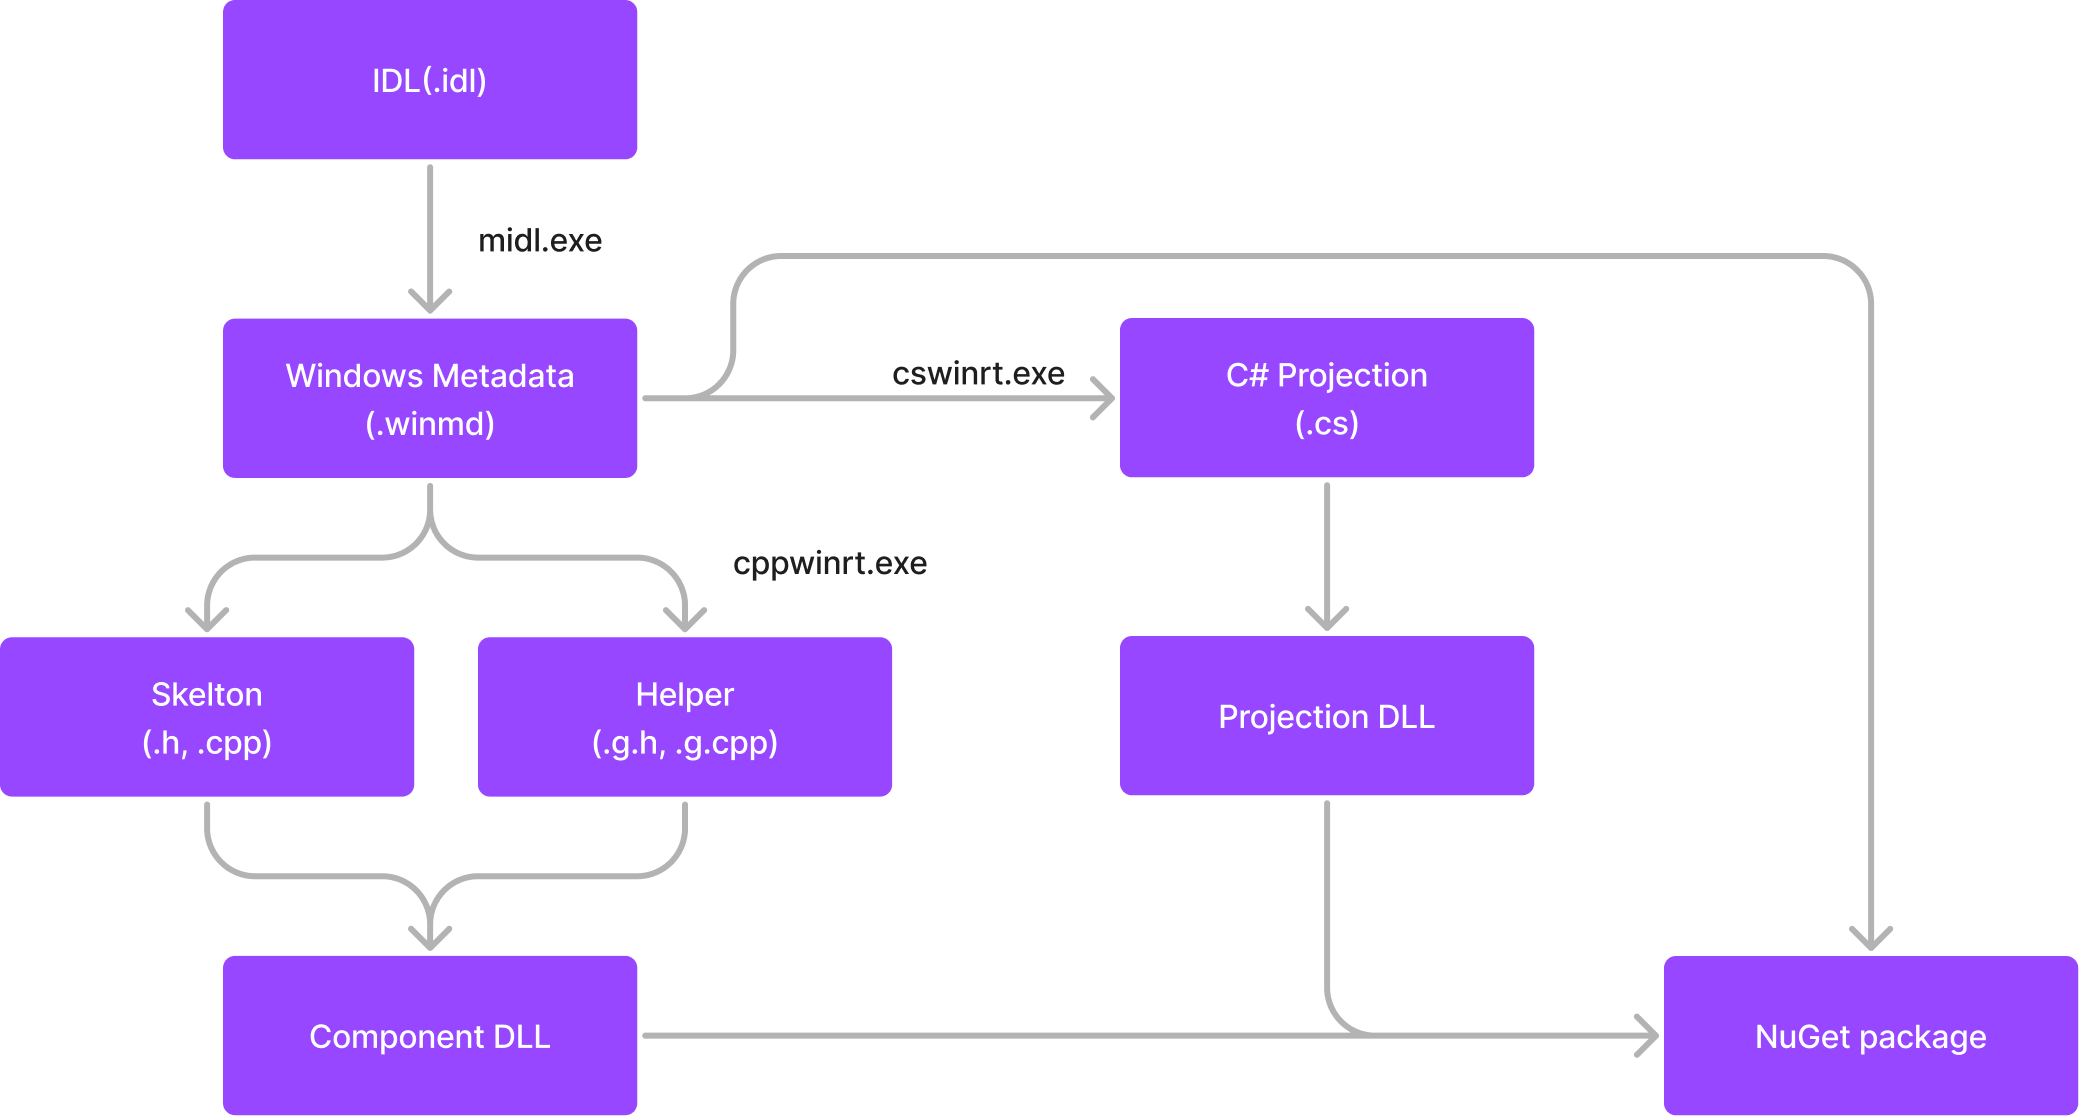
前編ではWinRT Component の IDLから Windows Metadata (.winmd)を生成し、さらにその.winmdからC++コードを生成してDLLを作りました。.Net 5.0 以前ではこの.winmdとDLLを直接使うことができましたが、.Net 6 以降では WinRT Component の情報が書かれた Windows metadata (.winmd) を直接参照することができなくなりました。
直接参照するのではなく、
- C# projection のC#コードを .winmd から生成し、DLLを作る
- C# projection DLL を .winmd と WinRT component DLL とともにnuget package 化する
といった手順が必要になります。
前後編合わせた全体の流れは以下の図のようになっています。
本記事では以下記事をベースにこのやり方をなぞっていきます。
https://docs.microsoft.com/en-us/windows/apps/develop/platform/csharp-winrt/net-projection-from-cppwinrt-component
C# Projection コードのプロジェクトを作る
前編ではCMakeを使ってWinRT component のDLLを作りましたが、今回は Visual Studio を使って作ります。
無印の C#クラスライブラリプロジェクトテンプレートを使って新規プロジェクトを作ります。
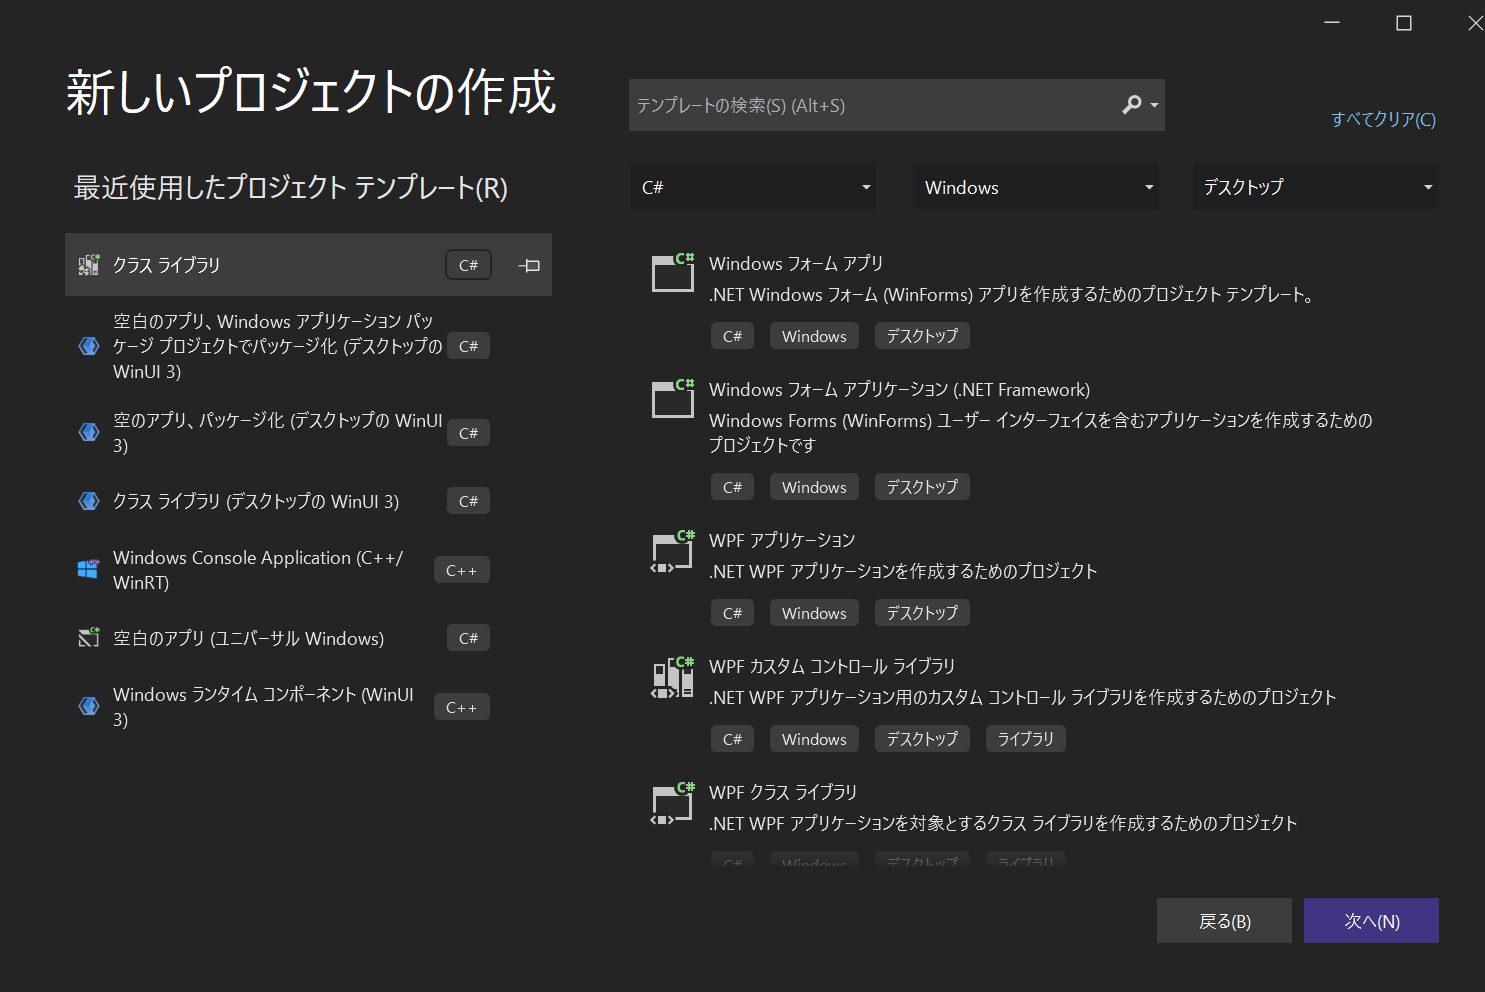
プロジェクト名はCsWinRTProjection にしておきます。フレームワークは .Net 6.0 を選びます。
デフォルトでClass.c1 が生成されていますが、使わないので削除します。cswinrt が生成するコードのみがビルドされることになります。
また、ターゲットフレームワークを設定します。
ソリューションエクスプローラからCsWinRTProjectionプロジェクトをダブルクリックすると、CsWinRTProjection.csprojのXMLが開かれるので、TargetFrameworkを以下のようにnet6.0からnet6.0-windows10.0.22000.0に設定します。
	<PropertyGroup>
		<TargetFramework>net6.0-windows10.0.22000.0</TargetFramework>
		<ImplicitUsings>enable</ImplicitUsings>
		<Nullable>enable</Nullable>
	</PropertyGroup>
Sample.winmd への参照追加
前編で作成した Sample.winmd への参照を追加します。
CsWinRT 設定
csswinrt.exe を使って .winmd ファイルからC# projection コードを生成します。
csswinrt.exe は NuGetで配布されているので、プロジェクトに追加します。Microsoft.Windows.CsWinRTを追加してください。
csswinrt 用の以下設定をCsWinRTProjection.csprojに追加します。
	<PropertyGroup>
		<CsWinRTIncludes>Sample</CsWinRTIncludes>
		<CsWinRTGeneratedFilesDir>$(OutDir)</CsWinRTGeneratedFilesDir>
	</PropertyGroup>
CsWinRTIncludesにはSample.idlのnamespaceを指定します。
ここまででビルドを実行すると、 $(OutDir)以下にC# projection の C#コードが生成され、それを使ってprojection DLLがビルドされます。
NuGet 設定
つぎにNuGetまわりの設定をします。以下のようなファイルを nuget/Sample.nuspec として保存します。
<?xml version="1.0" encoding="utf-8"?>
<package xmlns="http://schemas.microsoft.com/packaging/2012/06/nuspec.xsd">
	<metadata>
		<id>Sample</id>
		<version>0.1.0-prerelease</version>
		<authors>Me</authors>
		<description>A simple component</description>
		<dependencies>
			<group targetFramework="net6.0-windows10.0.22000.0" />
			<group targetFramework=".NETCoreApp3.0" />
			<group targetFramework="UAP10.0" />
			<group targetFramework=".NETFramework4.6" />
		</dependencies>
	</metadata>
	<files>
		<!--Support .NET 6, .NET Core 3, UAP, .NET Framework 4.6, C++ -->
		<!--Architecture-netural assemblies-->
		<file src="..\bin\Release\net6.0-windows10.0.22000.0\CsWinRTProjection.dll" target="lib\net6.0-windows10.0.22000.0\CsWinRTProjection.dll" />
		<file src="..\..\..\dist\bin\Sample.winmd" target="lib\netcoreapp3.0\Sample.winmd" />
		<file src="..\..\..\dist\bin\Sample.winmd" target="lib\uap10.0\Sample.winmd" />
		<file src="..\..\..\dist\bin\Sample.winmd" target="lib\net46\Sample.winmd" />
		<!--Architecture-specific implementation DLLs should be copied into RID-relative folders-->
		<file src="..\..\..\dist\bin\Sample.dll" target="runtimes\win10-x64\native\Sample.dll" />
	</files>
</package>
Sample.dll,Sample.winmdの場所は適宜修正します。
NuGet用に以下設定をCsWinRTProjection.csprojに追加します。
	<PropertyGroup>
		<GeneratedNugetDir>.\nuget\</GeneratedNugetDir>
		<NuspecFile>$(GeneratedNugetDir)Sample.nuspec</NuspecFile>
		<OutputPath>$(GeneratedNugetDir)</OutputPath>
		<GeneratePackageOnBuild>true</GeneratePackageOnBuild>
	</PropertyGroup>
ここまででビルドすると、nuget/Sample.0.1.0-prerelease.nupkgが生成されます。
C# WinUI3アプリからの参照
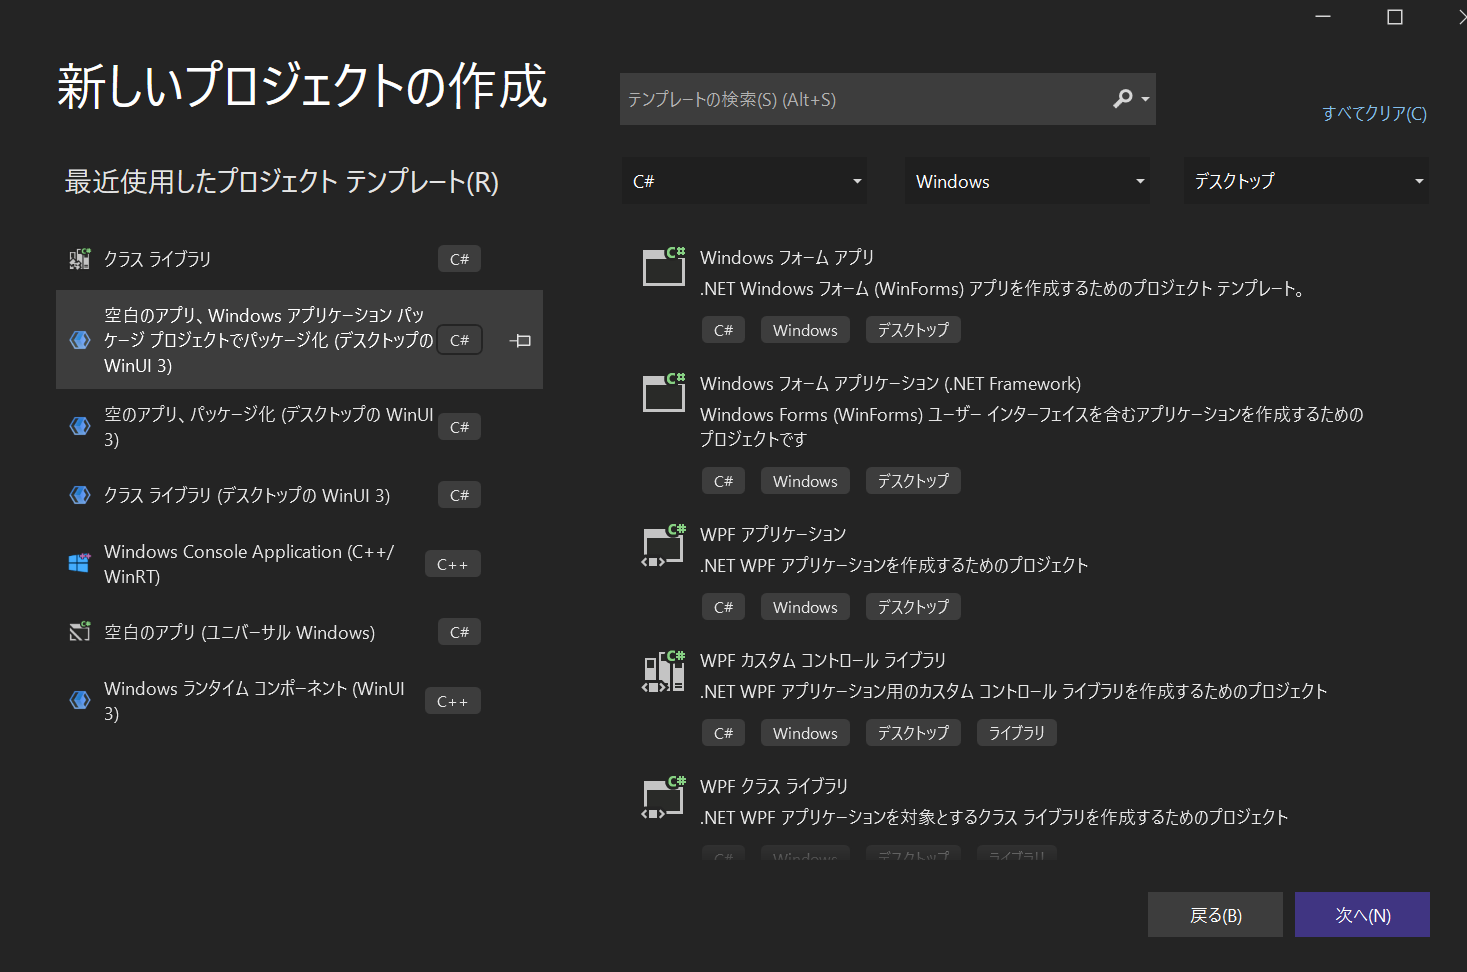
C# WinUI3 アプリから参照します。WinUI3アプリケーションプロジェクトを新規作成します。名前はCsWinUI3Appにしてみます。
CsWinRTProjection で作ったnupkg を参照するため、CsWinUI3App.csprojに以下を追加します。
	<PropertyGroup>
		<RestoreSources>
			https://api.nuget.org/v3/index.json;
			../../../CsWinRTProjection/CsWinRTProjection/nuget
		</RestoreSources>
	</PropertyGroup>

	<ItemGroup>
		<PackageReference Include="Sample" Version="0.1.0-prerelease" />
	</ItemGroup>
パスやバージョンは適宜修正します。
これでC# WinUI3 App からC++ WinRT Componentが使えるようになりました。
試しにコードを追加してみましょう。
WinUI3アプリのスケルトンにもともとあるボタンのClickハンドラに以下のコードを追加します。
        private void myButton_Click(object sender, RoutedEventArgs e)
        {
            var sc = new Sample.SampleClass();
            myButton.Content = sc.sqrt(100).ToString();
        }
アプリを起動してボタンをクリックすると

から

と変化することで、実際にC++ WinRT Component が使われていることが確認できます。
まとめ
前回と合わせて、CMake + C++ で作成したWinRT Component を C# WinUI3 アプリから使用する方法を説明しました。
C# projection の生成もCMake で出来るようにしたかったのですが、将来の課題として残しておきます。
関連コードは https://github.com/unicodon/cmake-winui3/tree/sample-v1 に置いてあります。